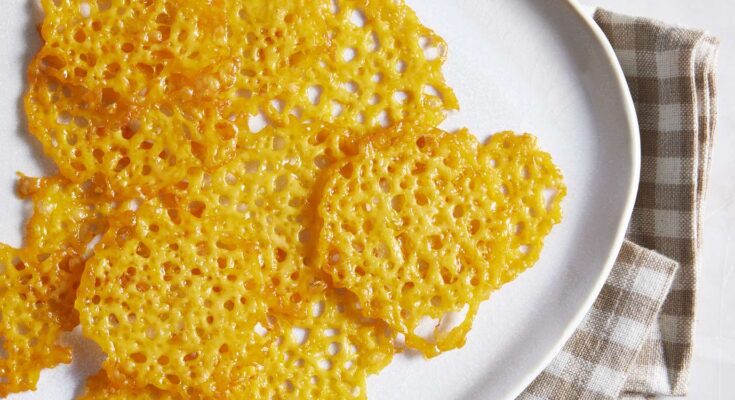
Cheese Crisps Recipe: If you’ve ever craved a crunchy, cheesy, guilt-free snack, then cheese crisps are the answer. They’re light, full of flavor, and ridiculously easy to make at home.
Forget about those pricey store-bought bags—you can whip up your own fresh batch in minutes. Whether you want them as a low-carb alternative to chips, a keto-friendly snack, or just something crispy to munch on, cheese crisps are the way to go.
In this guide, we’ll walk you through the exact ingredients, step-by-step instructions, and tips to make the perfect cheese crisps every single time.
Why Cheese Crisps Are So Popular
Cheese crisps have taken the snacking world by storm, and it’s no surprise why. They deliver everything we love in a snack: crunch, flavor, and versatility. Unlike regular chips, they’re not packed with carbs, oils, or preservatives. Instead, they’re made from one simple, star ingredient—cheese. This makes them a great choice for those following a keto, low-carb, or gluten-free diet. They’re also naturally high in protein and calcium, which makes them not only delicious but also nutritious.
Imagine this: you’re watching a movie or working late, and suddenly the cravings hit. Instead of reaching for greasy chips, you can have a batch of homemade cheese crisps ready in under 15 minutes. That’s what makes them unbeatable.
The Perfect Snack for Any Occasion
The beauty of cheese crisps lies in their versatility. You can serve them at parties as a crunchy appetizer, use them as a topping for soups and salads, or simply enjoy them straight from the baking tray. Want a healthier alternative to crackers with your dip? Cheese crisps are the answer. They’re portable, customizable, and downright addictive.
Ingredients You’ll Need
Choosing the Right Cheese
The type of cheese you use determines everything—flavor, texture, and crispiness. Hard cheeses work best because they release less moisture during baking, allowing them to crisp up perfectly. Some great options include:
- Parmesan – Sharp, nutty, and super crunchy.
- Cheddar – Classic, bold flavor with a golden finish.
- Mozzarella – Mild taste but adds a stretchy crunch.
- Gouda – Slightly sweet with a smoky edge.
Pro tip: Try mixing two cheeses for a layered flavor that keeps your taste buds guessing.
Optional Seasonings and Add-ons
While plain cheese crisps are already heavenly, you can easily jazz them up with a sprinkle of seasoning. Here are some favorites:
- Garlic powder or onion powder for a savory kick.
- Smoked paprika for a hint of spice.
- Chili flakes if you love it hot.
- Italian herbs like oregano, thyme, or basil for a Mediterranean touch.
- Sesame seeds or black pepper for added crunch.
Think of cheese crisps as a blank canvas—you can get as creative as you like.
Tools and Equipment Needed
Making cheese crisps doesn’t require fancy kitchen gadgets. All you need is:
- A baking sheet
- Parchment paper or a silicone baking mat (to prevent sticking)
- Cheese grater or pre-shredded cheese
- A cooling rack for crispier results
That’s it—simple tools for a simple, yet satisfying snack.
Step-by-Step Guide to Making Cheese Crisps
Step 1 – Prepping Your Baking Sheet
First things first, preheat your oven to 375°F (190°C). While that’s heating up, line your baking sheet with parchment paper or a silicone baking mat. This step is crucial—cheese tends to stick, and you don’t want to wrestle with the pan later. Make sure the surface is smooth so the crisps bake evenly.
Think of this step as setting the stage—once the sheet is ready, the cheese will take care of the rest.
Step 2 – Grating or Slicing Cheese Properly
Next, grate your cheese finely. Smaller, uniform shreds melt and crisp more evenly compared to large chunks. If you’re using sliced cheese, cut it into small squares or circles for individual crisps. Place small mounds of cheese (about 1 tablespoon each) on the baking sheet, spacing them at least 2 inches apart to prevent them from merging.
Consistency is key here—if your cheese pieces are uneven, you’ll end up with crisps that are half burnt and half chewy.
Step 3 – Adding Seasonings for Extra Flavor
Before sliding the tray into the oven, sprinkle your favorite seasonings on top of each cheese mound. Don’t go overboard—a little goes a long way. For example, a pinch of garlic powder adds depth without overpowering the cheese. This step is where you make the recipe your own.
Imagine customizing each batch—Parmesan crisps with rosemary for a wine night, or cheddar crisps with chili flakes for game day.
Step 4 – Baking to Crispy Perfection
Now, place the tray in the oven and bake for 6–8 minutes. Keep a close eye on them—cheese goes from golden to burnt in a flash. You’ll know they’re ready when the edges turn golden brown and the centers are bubbling. Remove them immediately, as they continue to crisp up while cooling.
Think of baking cheese crisps like sunbathing—they need just the right amount of heat for that perfect golden glow. Too much, and they burn; too little, and they stay floppy.
Step 5 – Cooling and Serving
Once baked, let the crisps cool on the tray for 2–3 minutes, then transfer them to a cooling rack. This step is crucial for maximum crunch. Serve them fresh or store them in an airtight container for up to 3 days.
That’s it—you’ve got yourself a batch of crispy, golden cheese crisps ready to devour.
Variations of Cheese Crisps
Low-Carb and Keto-Friendly Options
Cheese crisps are already a dream come true for anyone following a low-carb or keto diet. Since they’re made almost entirely of cheese, they’re naturally free of refined carbs and gluten. But you can take them a step further by experimenting with different keto-approved cheeses. Parmesan and cheddar are the most popular, but don’t stop there—Asiago, Gruyère, and Manchego are also fantastic low-carb choices.
You can also use cheese crisps as a replacement for chips, crackers, or even taco shells. That’s right—you can make larger rounds and fold them into crunchy taco shells, giving you a 100% keto-friendly taco night. Pair them with guacamole, sour cream, or even a meat filling, and you’ll never miss tortillas again.
For those who are trying to cut carbs but still crave that “snack crunch,” cheese crisps are a total lifesaver. They fit perfectly into meal prep plans and keep you satisfied without derailing your progress.
Adding Herbs and Spices
One of the best things about cheese crisps is their ability to take on different flavors. By adding herbs and spices, you can turn a simple snack into something gourmet. A few great combinations include:
- Parmesan + rosemary + sea salt = A refined, earthy flavor.
- Cheddar + chili powder + cumin = A Tex-Mex inspired snack.
- Mozzarella + Italian seasoning = Pizza-flavored crisps.
- Gouda + smoked paprika = A smoky, savory bite.
The secret is balance—you don’t want the spices to overpower the cheese, but instead, complement it. Try small batches with different blends and discover your favorites. These little twists make your crisps unique and add variety to your snack rotation.
Using Different Types of Cheese
Not all cheeses behave the same way in the oven. While hard cheeses crisp up beautifully, softer cheeses can be a bit tricky. That doesn’t mean you should avoid them—it just means you need to experiment.
- Parmesan & Asiago: Ultra-crispy and nutty.
- Cheddar & Colby Jack: Bold flavor with a slightly chewy finish.
- Mozzarella & Provolone: Mild, stretchy, and softer crisps.
- Pepper Jack: Adds a built-in spicy kick.
If you want to mix things up, try combining two cheeses. For example, Parmesan adds crunch, while cheddar brings rich flavor. Together, they create the perfect bite.
Tips for Perfect Cheese Crisps Every Time
Common Mistakes to Avoid
Even though cheese crisps are simple to make, a few small mistakes can ruin the batch. Here’s what to watch out for:
- Using too much cheese – If you pile it too high, you’ll end up with gooey blobs instead of crisps. Stick to small mounds.
- Skipping parchment paper – Without a non-stick surface, the cheese will glue itself to your pan. Don’t risk it.
- Overbaking – Cheese crisps can burn in seconds. Keep a close eye on them and pull them out once they’re golden.
- Not letting them cool – Crisps need a couple of minutes to firm up. If you move them too soon, they’ll break apart.
Think of cheese crisps like cookies—they need the right size, spacing, and timing for the best results.
How to Store Cheese Crisps for Freshness
Cheese crisps are best enjoyed fresh, but you can store them for later if you follow a few rules. Once they’re fully cooled, transfer them to an airtight container. Keep them at room temperature—never in the fridge—since moisture can make them soggy.
For maximum crunch, place a paper towel at the bottom of the container to absorb excess oil. Properly stored, they’ll stay fresh for up to 3 days. If you want to revive slightly soft crisps, pop them back in the oven at 300°F (150°C) for 3–4 minutes.
Pro tip: Make smaller batches and enjoy them right away—it’s hard to resist them anyway!
Creative Ways to Enjoy Cheese Crisps
As a Snack on Their Own
The most obvious (and honestly, the most satisfying) way to enjoy cheese crisps is straight out of the oven. Their salty crunch and cheesy flavor are enough to make them addictive all by themselves. Perfect for movie nights, road trips, or a quick mid-day bite, they’re a healthier alternative to traditional potato chips. The best part? You won’t feel the same guilt afterward because they’re naturally low-carb and packed with protein.
You can also portion them into small snack bags for on-the-go convenience. This way, instead of reaching for packaged snacks loaded with preservatives, you’ll have a homemade treat that’s fresh and satisfying.
As a Soup or Salad Topper
Cheese crisps make an excellent garnish for soups and salads. Forget boring croutons—these crunchy bites bring texture and flavor to every spoonful. For example, crumble Parmesan crisps over tomato soup, or toss cheddar crisps into a Caesar salad for an extra cheesy punch.
Since they’re naturally gluten-free, they’re also a great alternative for anyone who can’t have bread-based toppings. They add crunch without the carbs, making your dishes both healthier and more delicious.
Paired with Dips
Cheese crisps are sturdy enough to handle dips, unlike some chips that break under pressure. You can use them with guacamole, salsa, spinach dip, or even hummus. Their salty, cheesy profile pairs beautifully with creamy or tangy dips.
If you’re hosting a party, serve them on a platter with an assortment of dips—it’s guaranteed to impress your guests. The best part? They’ll disappear faster than you can say “pass the dip.”
As a Low-Carb Cracker Substitute
Missing crackers on a low-carb or keto diet? Cheese crisps fill that gap perfectly. Use them with sliced meats, pepperoni, or even smoked salmon for a quick appetizer. They also pair wonderfully with wine, making them a chic addition to any charcuterie board.
Instead of buying expensive keto crackers, you can make these at home with minimal effort. They’re elegant, budget-friendly, and downright tasty.
Health Benefits of Cheese Crisps
High in Protein and Calcium
One of the biggest perks of cheese crisps is their nutritional profile. Since they’re made entirely of cheese, they’re naturally high in protein, which keeps you fuller for longer. Protein is also essential for muscle repair, making these crisps a smart post-workout snack.
They’re also loaded with calcium, which supports strong bones and teeth. Unlike many packaged snacks that contribute empty calories, cheese crisps offer real nutritional value with every bite.
Low-Carb and Gluten-Free
For anyone cutting carbs, these crisps are a dream come true. They fit seamlessly into keto and low-carb diets, providing that crunchy texture most people miss. Plus, they’re gluten-free, making them safe for anyone with gluten intolerance or celiac disease.
Instead of sabotaging your progress with chips or crackers, cheese crisps give you the same satisfaction without the carb overload.
Better Than Store-Bought Snacks
Most packaged chips are fried in oils, loaded with preservatives, and often contain hidden sugars. Cheese crisps, on the other hand, are baked and made from a single, natural ingredient—cheese. You control the seasonings, the portion size, and the freshness. That means no hidden additives, no artificial colors, and no questionable ingredients.
When it comes to snacking smart, homemade cheese crisps are easily one of the healthiest options around.
FAQs about Cheese Crisps Recipe
1. Can I make cheese crisps in the microwave instead of the oven?
Yes! Simply place small piles of shredded cheese on a microwave-safe plate lined with parchment paper. Microwave for 1–2 minutes until crispy. Keep a close eye to avoid burning.
2. Why did my cheese crisps turn out chewy instead of crunchy?
This usually happens if the cheese wasn’t baked long enough or if the pieces were too thick. Make sure to spread the cheese evenly and bake until golden around the edges.
3. What’s the best cheese for making crisps?
Hard cheeses like Parmesan, Cheddar, and Asiago work best because they crisp up easily. Softer cheeses like mozzarella may turn out chewy unless combined with a harder cheese.
4. How long do cheese crisps last?
When stored in an airtight container at room temperature, they can last up to 3 days. For maximum crunch, enjoy them fresh.
5. Can I freeze cheese crisps?
Freezing isn’t recommended, as it alters the texture. However, you can refrigerate them and re-crisp in the oven for a few minutes before serving.
Conclusion
Cheese crisps are one of the easiest, tastiest, and most versatile snacks you can make at home. With just one ingredient—cheese—you can create a crunchy, flavorful treat that fits into any lifestyle, whether you’re keto, low-carb, or just a lover of good food. From seasoning variations to creative serving ideas, the possibilities are endless.
So next time you’re craving a snack, skip the chips and bake a quick batch of cheese crisps instead. They’re healthier, fresher, and oh-so satisfying.


