Canned Green Beans Recipe: Canned green beans are one of those ingredients that quietly sit in your pantry, waiting for the moment when you need a quick, comforting, and reliable side dish. They may not get as much attention as fresh produce, but they’re a lifesaver when you want something hearty without spending too much time prepping. Whether it’s a busy weeknight dinner or a holiday feast where you need extra sides on the table, canned green beans always deliver.
This recipe is not just about heating up beans from a can—it’s about transforming them into something flavorful, tender, and downright delicious. With just a few pantry staples and simple steps, you can turn an ordinary can of beans into a dish that tastes like it came from scratch. In this guide, I’ll walk you through everything: the ingredients, the tools, and a detailed step-by-step method to make sure your beans are far from boring.
If you’ve ever wondered how to make canned green beans taste amazing, this guide has you covered. By the end, you’ll have a go-to recipe that works for everyday meals as well as special occasions.
Why Choose Canned Green Beans?
You might be wondering: why should I use canned green beans when I can just grab fresh or frozen? The truth is, canned green beans hold their own for several reasons, and once you see the benefits, you’ll appreciate them even more.
First off, convenience is key. Canned green beans are pre-cooked during the canning process, which means you don’t need to boil or steam them for ages. They’re ready to heat, season, and serve—perfect for when time isn’t on your side.
Next, there’s accessibility. Fresh green beans aren’t always in season, and when they are, prices can vary. Frozen beans are an option, but not everyone has the freezer space. Canned green beans, on the other hand, are available year-round, affordable, and shelf-stable for months.
Nutritionally speaking, they’re still a solid choice. While fresh beans may retain slightly more vitamins, canned green beans provide plenty of fiber, antioxidants, and minerals. Plus, since you’re adding seasonings and cooking them with flavorful ingredients, the taste easily rivals fresh versions when done right.
Lastly, they’re versatile. You can make them buttery and simple, cook them southern-style with bacon, or add garlic and herbs for a Mediterranean twist. With canned beans, you have a blank canvas that works for nearly any cuisine.
So, don’t underestimate that little can—it’s a shortcut to comfort food that doesn’t compromise on taste.
Ingredients You’ll Need
One of the best things about this canned green beans recipe is how flexible it is. You don’t need a long grocery list to make them taste incredible, but a few carefully chosen ingredients can make a world of difference.
Core Ingredients
- 1–2 cans of green beans (14.5 oz each) – The star of the recipe. You can choose regular, no-salt-added, or French-style depending on your preference.
- 2 tablespoons butter or olive oil – Adds richness and helps carry the seasonings.
- 1 medium onion (chopped) – Brings sweetness and depth of flavor.
- 2 cloves garlic (minced) – Infuses the beans with a savory kick.
- Salt and black pepper to taste – Essential for balancing flavors.
Optional Seasonings and Add-ons
- Bacon or ham pieces – For a smoky, southern-style twist.
- Chicken broth (instead of water) – Enhances flavor while simmering.
- Red pepper flakes – A touch of heat for spice lovers.
- Fresh or dried herbs (thyme, rosemary, or parsley) – Brightens up the dish.
- Soy sauce or Worcestershire sauce – Adds umami depth.
Substitutions for Dietary Preferences
- For a vegan option, stick with olive oil instead of butter.
- If you’re low-sodium, opt for no-salt-added canned beans and control the seasoning yourself.
- Want it healthier? Use olive oil and skip processed meats like bacon.
These ingredients are just the starting point—you can adjust them to fit your taste and pantry.
Kitchen Tools Required
Cooking canned green beans doesn’t require a fancy setup, but having the right tools makes the process easier and more enjoyable.
- Medium-sized saucepan or skillet – This is where all the magic happens. A skillet is great if you want more caramelization, while a saucepan helps retain moisture.
- Wooden spoon or silicone spatula – For stirring without damaging your cookware.
- Cutting board and sharp knife – To prep onions, garlic, or any add-ons.
- Measuring spoons – Helpful for seasonings if you like precision.
- Serving dish – A nice bowl or platter to present your final creation.
Optional but nice to have:
- Colander – For draining the beans if you prefer not to use the liquid from the can.
- Lid for your pan – To trap steam and help infuse flavors while simmering.
With these tools in hand, you’re all set to move on to the fun part—cooking.
Step-by-Step Guide to Cooking Canned Green Beans
This is where we take ordinary canned beans and make them taste like they simmered all day. Follow these steps carefully, and you’ll have beans that are savory, tender, and downright crave-worthy.
Step 1: Preparing the Beans
Open your cans of green beans and decide if you’ll keep or drain the liquid. Keeping it adds flavor, while draining helps reduce sodium. If you’re replacing the liquid, swap in chicken broth, vegetable broth, or even water with a pinch of bouillon.
Step 2: Seasoning the Base
Melt butter or heat olive oil in your skillet over medium heat. Add the chopped onion and cook until it’s soft and slightly golden. Next, add the garlic and sauté for about 30 seconds—just until fragrant. This step builds the flavor foundation for your beans.
Step 3: Simmering and Flavor Development
Add your green beans to the skillet along with your chosen liquid (bean juice, broth, or water). Stir well, then season with salt, pepper, and any extras like herbs or red pepper flakes. Cover and let them simmer on low heat for 10–15 minutes, stirring occasionally. This allows the beans to soak up all the delicious flavors.
Step 4: Taste Testing and Adjustments
After simmering, give them a taste. Need more salt? A splash of soy sauce or Worcestershire can fix that. Too bland? Add an extra knob of butter or squeeze of lemon juice for brightness. This step ensures the beans match your personal flavor preference.
Step 5: Serving the Dish
Once your beans are tender and flavorful, transfer them to a serving dish. Garnish with fresh parsley, crispy bacon bits, or even toasted almonds for crunch. Serve hot as a side dish with roasted chicken, steak, or holiday turkey.
Flavor Variations for Canned Green Beans
Canned green beans are like a blank canvas—you can take them in countless directions depending on your taste and the occasion. Instead of sticking to the basic butter-and-salt approach, why not experiment a little? Below are some of the most popular and delicious variations you can try.
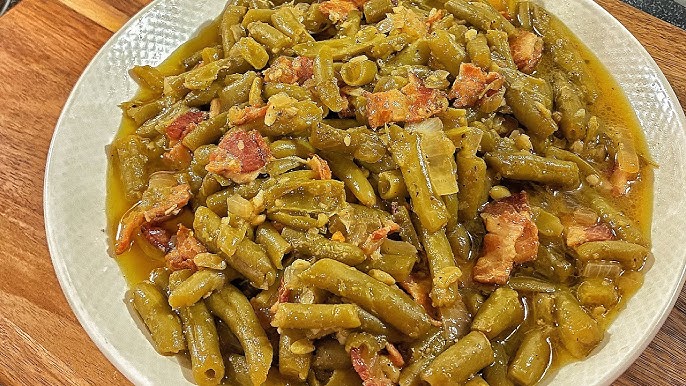
Southern-Style Green Beans
For a dish packed with comfort and nostalgia, cook your green beans with bacon, ham hock, or smoked turkey. Simmer them slowly in chicken broth with onions and garlic until tender. The smoky flavor seeps into every bite, making it taste like something Grandma used to serve on Sundays.
Garlic and Herb Green Beans
This variation is light yet flavorful. Add extra garlic along with fresh herbs such as thyme, rosemary, or parsley. Finish with a drizzle of olive oil and a squeeze of lemon juice for brightness. This style pairs beautifully with roasted chicken or fish.
Spicy Kick Green Beans
If you like a bit of heat, sprinkle in red pepper flakes or add a few dashes of hot sauce. You can even sauté a chopped jalapeño with your onions and garlic before adding the beans. It’s a bold and fiery twist perfect for spice lovers.
Asian-Inspired Green Beans
Switch things up with soy sauce, sesame oil, and a touch of ginger. Garnish with sesame seeds and chopped scallions. These beans pair well with rice and stir-fried dishes.
Holiday-Style Green Beans
Make them festive by adding slivered almonds or crispy fried onions on top. This version works beautifully for Thanksgiving or Christmas dinners, giving your table a polished look without much extra effort.
Experiment with these styles, or combine elements from each to create your signature canned green bean recipe.
Tips for Perfectly Cooked Canned Green Beans
Cooking canned green beans might seem foolproof, but a few simple tips can help you avoid a bland or mushy outcome.
- Don’t overcook them.
Canned beans are already cooked during processing, so simmering them too long can make them fall apart. Stick to about 10–15 minutes on low heat. - Drain wisely.
If you want a richer flavor, keep some of the liquid from the can. If you’re watching sodium, drain and rinse the beans before cooking. - Build layers of flavor.
Start with aromatics like onion, garlic, or shallots. Add herbs, spices, or broth to make the beans taste like they’ve been cooked from scratch. - Use butter or olive oil generously.
Fat helps carry flavors and keeps the beans from tasting flat. - Finish with freshness.
A sprinkle of fresh herbs or a squeeze of lemon juice at the end can transform canned beans from average to restaurant-worthy.
With these tricks, you’ll never look at canned beans as a boring side dish again.
Serving Suggestions
Canned green beans may be a side dish, but that doesn’t mean they have to be an afterthought. Here are some ways to pair and serve them:
- With classic proteins: They go hand-in-hand with roasted chicken, pork chops, or steak.
- Holiday feasts: They balance out rich dishes like turkey, ham, and stuffing.
- Healthy bowls: Add them to grain bowls with quinoa, brown rice, or couscous.
- Casseroles: Mix them into creamy casseroles topped with breadcrumbs or cheese.
- Lunch sides: Pair them with sandwiches, wraps, or even grilled cheese for a quick meal.
Presentation also matters—serve them in a shallow bowl and top with herbs, nuts, or crispy onions for a touch of elegance.
Storage and Reheating Tips
Sometimes you make a little too much, and that’s okay—leftover canned green beans can taste even better the next day when the flavors have had time to mingle.
- Refrigeration: Store cooked beans in an airtight container in the fridge for up to 4 days.
- Freezing: For longer storage, freeze them in a freezer-safe bag or container for up to 2 months. Thaw overnight in the fridge before reheating.
- Reheating: Warm them in a saucepan over medium-low heat with a splash of broth or water to keep them from drying out. You can also reheat them in the microwave, but be sure to stir halfway through for even heating.
Pro tip: If the beans feel a little flat when reheating, add a fresh squeeze of lemon juice, a knob of butter, or a sprinkle of herbs to bring them back to life.
Common Mistakes to Avoid
Even simple recipes can go wrong if you’re not careful. Here are some common pitfalls when cooking canned green beans and how to avoid them:
- Skipping aromatics: Just heating beans straight from the can often leaves them bland. Always add onions, garlic, or herbs.
- Over-salting: Remember, canned beans often contain sodium. Taste first before adding more salt.
- Overcooking: Too much simmering can leave beans mushy. Keep an eye on the clock.
- Forgetting acid: Without a splash of vinegar or lemon juice, the flavor can feel heavy. A touch of acid balances everything.
- Serving plain: Presentation matters. A garnish of parsley, almonds, or crispy onions elevates the dish instantly.
Avoid these mistakes, and your canned green beans will always be a hit at the table.
Nutritional Benefits of Canned Green Beans
Canned green beans may not always get the credit they deserve, but they’re a surprisingly healthy option that can fit into almost any diet. While some people assume canned vegetables are less nutritious than fresh, the truth is that green beans hold on to a good amount of their vitamins and minerals through the canning process.
Rich in Fiber
Green beans are naturally high in dietary fiber, which plays a vital role in digestion and keeping you full longer. Fiber also helps regulate blood sugar levels and supports heart health by lowering cholesterol.
Vitamins and Minerals
Even in canned form, green beans provide essential nutrients such as vitamin C, vitamin K, folate, and manganese. These vitamins support immunity, bone health, and overall energy levels.
Low in Calories
One of the biggest perks is that canned green beans are low in calories—making them perfect for weight management or for balancing heavier meals. A full cup only has around 30–40 calories, depending on the brand.
Antioxidants
Green beans contain plant compounds such as carotenoids and flavonoids, which act as antioxidants. These help fight inflammation and protect your body from free radical damage.
When paired with healthy cooking methods—like using olive oil instead of bacon grease—you can enjoy canned green beans as both a tasty and nutritious dish.
Canned vs. Fresh vs. Frozen Green Beans
When it comes to choosing green beans, you have three main options: canned, fresh, or frozen. Each has its pros and cons, and the right choice often depends on your needs.
Canned Green Beans
- Pros: Convenient, affordable, long shelf life, and quick to prepare.
- Cons: May contain added sodium; texture is softer than fresh or frozen.
Fresh Green Beans
- Pros: Crisp texture, vibrant flavor, and often higher in certain vitamins.
- Cons: Short shelf life, seasonal availability, and require trimming and longer cooking.
Frozen Green Beans
- Pros: Retain nutrients well, easy to store, and cook quickly.
- Cons: Can become soggy if overcooked, flavor not as bold as fresh.
If you’re short on time and want something reliable, canned is the way to go. If you’re making a fancy dinner, fresh may be your best bet. Frozen beans strike a balance between the two.
Budget-Friendly Meal Ideas with Canned Green Beans
Canned green beans aren’t just a side dish—they can be part of full meals that are affordable and filling. Here are some creative ways to stretch your dollar:
1. Green Bean Stir-Fry
Sauté beans with garlic, soy sauce, and rice for a quick one-pan meal. Add tofu, chicken, or beef for protein.
2. Green Bean Soup
Simmer beans with broth, potatoes, carrots, and onions for a hearty soup. Throw in some herbs for flavor.
3. Tuna and Green Bean Salad
Mix beans with canned tuna, olive oil, lemon juice, and a sprinkle of black pepper. It’s a protein-packed, no-cook meal.
4. Pasta with Green Beans
Toss beans with pasta, garlic, olive oil, and parmesan cheese for a simple but satisfying dish.
5. Green Bean and Potato Skillet
Cook beans with diced potatoes and onions in butter for a budget-friendly comfort meal.
These meals prove that a single can of beans can be transformed into something filling, delicious, and wallet-friendly.
FAQs about Canned Green Beans Recipe
Here are some common questions people have when working with canned green beans:
1. Do I need to rinse canned green beans before cooking?
Not necessarily. You can cook them straight from the can, but rinsing helps lower the sodium content.
2. How do I make canned green beans taste fresh?
Add aromatics like garlic and onion, fresh herbs, or a splash of lemon juice to brighten the flavor.
3. Can I bake canned green beans instead of simmering them?
Yes! You can toss them in olive oil, seasonings, and roast them in the oven for a slightly crispy texture.
4. How long should I cook canned green beans?
Since they’re already cooked, 10–15 minutes of simmering is plenty to absorb flavors without turning mushy.
5. Are canned green beans good for weight loss?
Yes, they’re low in calories and high in fiber, making them a great addition to a weight-loss-friendly diet.
Conclusion
By following the step-by-step guide, experimenting with flavor variations, and keeping the tips in mind, you’ll never have to settle for bland beans again. They can be rich and buttery, spicy and bold, or light and refreshing—whatever suits your mood and meal.
So next time you see a can of green beans sitting in your pantry, don’t overlook it. With a little creativity, it can turn into something truly delicious.


