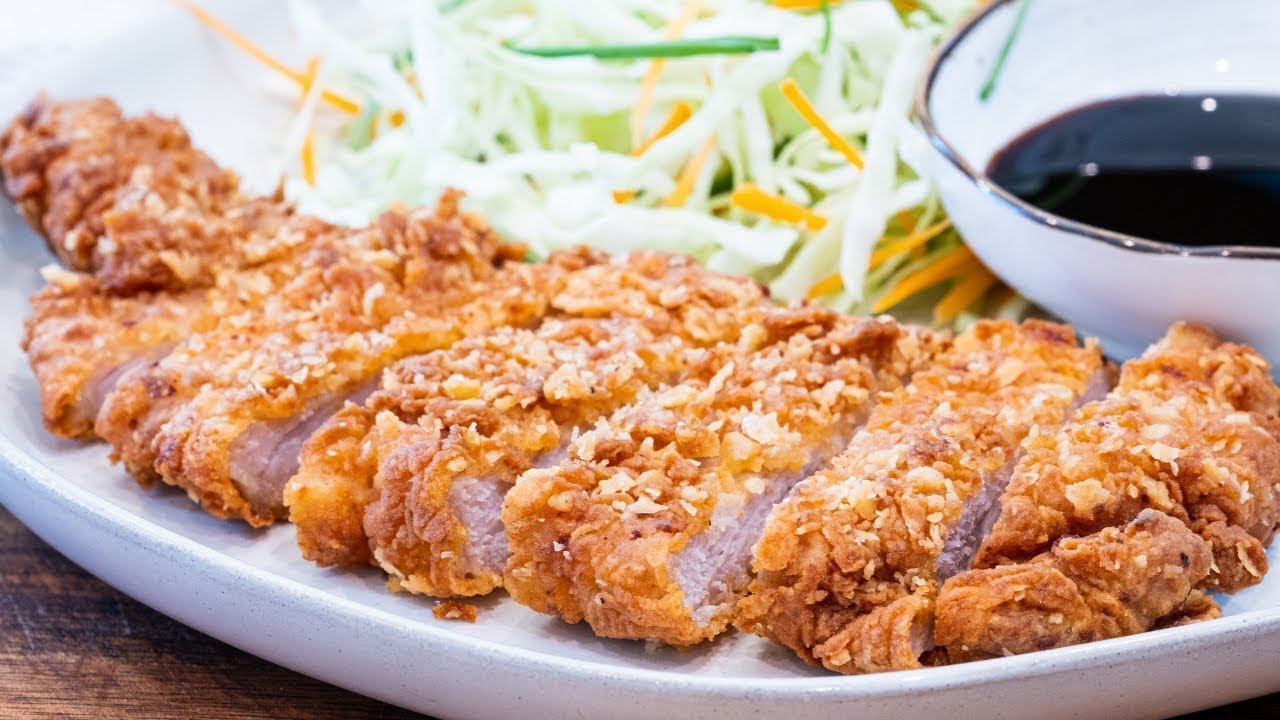
Breaded Pork Chop Recipe: There’s just something undeniably comforting about biting into a crispy, golden-brown breaded pork chop. The combination of a crunchy outer crust and juicy, tender meat inside makes it a go-to dish in households around the world. Whether you grew up with pork chops as a staple weeknight dinner or you’re trying them for the first time, you’re in for a treat.
Breaded pork chops are the epitome of home-cooked goodness. They’re versatile, budget-friendly, and easy to make, even for beginners. From the aroma that fills the kitchen while they cook to the satisfying crunch of the first bite, every part of the experience is nostalgic and delicious. Plus, you can dress them up or down depending on the occasion.
What Makes Breaded Pork Chops So Special?
What sets breaded pork chops apart from other pork dishes is the crispy exterior that gives way to juicy meat. The breading locks in moisture, so the meat stays tender during cooking. And because the coating is typically seasoned, you get an extra punch of flavor in every bite.
Unlike grilled or roasted pork, breaded pork chops are all about texture. That contrast between crispy and tender? Absolute perfection. And they work great with a variety of dips, gravies, and sauces—each one bringing a unique twist to the dish.
Ideal Occasions to Serve Breaded Pork Chops
Breaded pork chops are incredibly versatile. Need a quick weeknight dinner? They cook fast. Hosting a Sunday dinner? They pair beautifully with mashed potatoes and gravy. Want something indulgent but homemade? This dish checks every box. You can even slice them and serve over salads or stuff them into sandwiches the next day.
Whether you’re cooking for kids, impressing dinner guests, or just treating yourself, breaded pork chops always feel like a win. And once you master this recipe, you’ll be making them on repeat.
Ingredients You’ll Need
Getting the ingredients right is the foundation of a great pork chop. The good news? You don’t need anything fancy. In fact, you probably already have most of these items in your pantry or fridge. Let’s break it down so you’re fully prepared.
Basic Ingredients for Breaded Pork Chops
Here’s a list of the essentials you’ll need to make a classic breaded pork chop:
- Pork Chops (4 pieces, about ¾ inch thick) – Boneless or bone-in, depending on your preference.
- Salt & Pepper – For basic seasoning.
- Garlic Powder & Onion Powder – Adds depth to the flavor.
- All-Purpose Flour (½ cup) – First layer of the breading process.
- Eggs (2 large, beaten) – Acts as a binder between the flour and breadcrumbs.
- Breadcrumbs (1 cup) – Panko or regular, for the crispy crust.
- Vegetable or Canola Oil (for frying) – Neutral oil works best for even browning.
These simple ingredients create a flavor-packed crust that’s crispy on the outside, juicy on the inside.
Optional Ingredients for Extra Flavor
Want to kick your pork chops up a notch? Here are some bonus ingredients that can elevate your recipe:
- Parmesan Cheese (¼ cup, grated) – Adds a salty, umami flavor to the breading.
- Paprika or Smoked Paprika – Gives color and a hint of smoky heat.
- Dijon Mustard (1 tsp mixed into the eggs) – Enhances the tanginess and complexity.
- Fresh Herbs (like parsley or thyme) – For garnish and extra aroma.
Ingredient Substitutions
Don’t have all the ingredients on hand? No worries:
- No breadcrumbs? Use crushed cornflakes, crackers, or even potato chips.
- Avoiding gluten? Swap flour and breadcrumbs for gluten-free alternatives.
- No eggs? Use a slurry of water and cornstarch as a binder instead.
This recipe is incredibly forgiving, so don’t be afraid to experiment or adjust based on what you have.
Tools and Equipment Needed
Before diving into cooking, let’s talk gear. Having the right tools can make your cooking experience smoother and help ensure perfect results.
Must-Have Kitchen Tools
- Cutting Board & Knife – For trimming and prepping the pork chops.
- Meat Mallet or Tenderizer – Optional, but useful for even thickness and tenderness.
- Three Shallow Bowls – For the flour, egg, and breadcrumb stations.
- Tongs or Forks – To handle the chops without getting your hands messy.
- Non-Stick Skillet or Cast-Iron Pan – Essential for frying.
- Paper Towels – To absorb excess oil after frying.
Having these items on hand helps streamline the cooking process and keeps everything neat and efficient.
Recommended Optional Equipment
- Digital Meat Thermometer – Ensures your pork is cooked to the safe internal temperature (145°F).
- Oven (for finishing or baking) – You can bake instead of fry or finish the chops in the oven for even cooking.
- Wire Rack on a Baking Sheet – Helps drain excess oil and keeps the coating crispy after frying.
With just a few simple tools, you’re fully equipped to make restaurant-quality breaded pork chops at home.
Choosing the Right Pork Chops
Believe it or not, the type of pork chop you use can make or break the dish. Different cuts bring different flavors, textures, and cooking times.
Best Cuts for Breaded Pork Chops
When it comes to breading and frying, go for:
- Center-Cut Chops – These are lean, tender, and uniform in shape.
- Rib Chops – They have a bit more fat, which adds flavor.
- Boneless Chops – Easier to eat and quicker to cook.
Try to choose chops that are at least ¾ inch thick. Anything thinner might dry out quickly, and anything too thick could take longer to cook through.
Bone-In vs. Boneless: Which is Better?
Both have their merits:
- Bone-In – Adds more flavor and helps keep the meat juicy. Ideal for slower cooking.
- Boneless – More convenient, easier to bread and eat. Cooks faster.
If you’re aiming for quick and easy, go boneless. If you want richer flavor and don’t mind a bit more effort, bone-in is the way to go.
Tips for Buying Quality Pork
- Look for Light Pink Meat – Fresh pork should be pink, not gray or dull.
- Check for Marbling – A little fat within the meat enhances flavor and tenderness.
- Avoid Too Much Liquid in Packaging – Excess liquid could mean lower-quality or thawed-and-refrozen meat.
Always buy from a reputable butcher or supermarket, and if you can, go for organic or pasture-raised pork for the best taste and quality.
Prepping Your Pork Chops
Now that you’ve got your pork chops and gear ready, it’s time to prep. Prepping is more than just seasoning—it’s about getting the chops ready to soak up all that flavor and cook evenly.
Trimming and Tenderizing the Pork
Start by trimming any excess fat or silver skin. Too much fat on the edge can cause curling during cooking. If your chops are uneven in thickness, gently pound them with a meat mallet to ensure they cook evenly.
Tenderizing also helps break down muscle fibers, which can lead to more tender meat. Don’t go overboard—just a few light taps will do.
Seasoning Tips for Maximum Flavor
Season both sides of the pork chops generously with salt, pepper, garlic powder, and onion powder. Let the seasoning sit for 10–15 minutes so it can penetrate the meat. For added flavor, you can also rub in a little mustard or Worcestershire sauce.
Marination Options for Juicier Chops
Want even more juiciness? Try a quick marinade:
- Buttermilk and Spices – Tenderizes and adds flavor.
- Soy Sauce, Garlic, and Ginger – For an Asian-inspired twist.
- Lemon Juice and Olive Oil – Light and zesty.
Marinate for 30 minutes to a few hours, depending on how much time you have. Just don’t overdo it, or the texture might get mushy.
Step-by-Step Guide to Making Breaded Pork Chops
Once your ingredients and tools are ready, it’s time to get cooking. The key to the perfect breaded pork chop lies in the breading technique, cooking method, and attention to timing. Here’s a step-by-step guide that breaks it all down so you can make this dish like a pro.
Step 1: Set Up Your Breading Station
Start by creating a simple assembly line. This keeps everything organized and helps you avoid messy, clumpy breading.
Here’s how to set up your station:
- First Bowl – Flour: Add seasoned all-purpose flour (salt, pepper, garlic powder).
- Second Bowl – Eggs: Beat two large eggs with a splash of water or milk for a smooth coating.
- Third Bowl – Breadcrumbs: Use panko for extra crunch or traditional breadcrumbs for a softer texture. Add optional seasonings or grated parmesan here.
Keep a plate or tray nearby to place your breaded pork chops before cooking.
Tip: Use one hand for dry ingredients and the other for wet ingredients to prevent breading buildup on your fingers.
Step 2: Properly Coat Each Pork Chop
Follow this process to get a well-adhered, crispy coating:
- Dredge in Flour: Coat each pork chop evenly, tapping off excess.
- Dip in Egg Mixture: Fully submerge to ensure an even bind.
- Press into Breadcrumbs: Firmly press both sides into the crumbs to get a solid crust.
After breading, let the chops rest on a wire rack or plate for 5–10 minutes. This helps the breading stick during cooking.
Step 3: Cooking Methods – Pan Frying vs. Baking
You have two main options for cooking your breaded pork chops: frying or baking. Both methods work, but each delivers a different texture.
Pan-Frying (For a Classic Crunch):
- Heat about ½ inch of vegetable or canola oil in a skillet over medium heat.
- Once the oil shimmers, add the pork chops gently.
- Cook for 4–5 minutes per side or until golden brown and cooked through.
- Transfer to a paper towel-lined plate to drain excess oil.
Tip: Don’t overcrowd the pan—cook in batches if needed.
Baking (For a Healthier Option):
- Preheat oven to 400°F (200°C).
- Place breaded pork chops on a wire rack over a baking sheet.
- Lightly spray with cooking oil.
- Bake for 20–25 minutes, flipping halfway through.
Baking delivers a slightly lighter crust but still offers great flavor and crunch, especially with panko breadcrumbs.
Step 4: How to Know When They’re Perfectly Cooked
Use a digital meat thermometer to check doneness. Pork should be cooked to an internal temperature of 145°F (63°C) and rested for 3 minutes after cooking.
Other signs it’s done:
- Juices run clear when sliced.
- The crust is golden and firm to the touch.
- The meat has a slight blush in the center but is not raw.
Avoid overcooking—pork can dry out quickly if left on heat too long.
Step 5: Resting the Pork Chops
After cooking, rest the pork chops for 5–10 minutes on a plate or rack. This allows the juices to redistribute throughout the meat, keeping them moist and flavorful.
Don’t skip this step. Cutting too early can lead to dry, tough meat as the juices escape onto the plate instead of staying in the chop.
Pro Tips for Crispy, Golden Crust
Want that magazine-worthy crust? These insider tips will help you achieve maximum crunch and flavor every time.
Temperature Control Tips
- Oil Temperature: Keep the frying oil around 350°F (175°C). Too low = soggy crust. Too high = burnt outside, raw inside.
- Use a thermometer or test by dropping a breadcrumb in—if it sizzles immediately, the oil is ready.
Best Breading Techniques
- Double Dredge for Extra Crunch: Flour → egg → breadcrumbs → quick dip in egg → breadcrumbs again.
- Use Panko Breadcrumbs: These Japanese-style breadcrumbs are airier and crisp up better than regular ones.
- Add Parmesan or Herbs to Breadcrumbs: This boosts flavor without adding extra work.
Mistakes to Avoid
- Skipping the Rest Time: Let the breaded pork chops sit before and after cooking.
- Overcrowding the Pan: Reduces oil temperature, resulting in soggy chops.
- Too Much Moisture on the Meat: Pat dry before breading for better adhesion.
- Not Seasoning Each Layer: Every layer—flour, egg, and crumbs—should have seasoning.
Master these techniques, and your pork chops will rival any restaurant’s.
Delicious Side Dishes to Pair With
Breaded pork chops are the star, but the right sides can turn them into a complete, unforgettable meal. Whether you’re going for comfort food or something lighter, there’s a perfect pairing for every vibe.
Classic Comfort Food Pairings
- Mashed Potatoes & Gravy: Creamy potatoes with savory brown or mushroom gravy are a perfect match.
- Mac & Cheese: Indulgent and cheesy, this combo is a hit with kids and adults.
- Buttered Corn or Creamed Corn: Sweet, buttery corn balances the savory chop beautifully.
- Green Bean Casserole: Classic and creamy with a crispy onion topping—perfect for Sunday dinners.
Healthy and Light Sides
- Steamed or Roasted Vegetables: Broccoli, carrots, or asparagus with a squeeze of lemon brighten the plate.
- Mixed Green Salad: Tossed with vinaigrette or balsamic glaze to cut through the richness.
- Cauliflower Mash: A low-carb alternative to mashed potatoes.
- Quinoa or Brown Rice: Hearty grains that soak up flavors and offer a fiber boost.
You can mix and match these sides to suit any occasion, from weeknight dinners to holiday feasts.
How to Store and Reheat Leftovers
One of the best things about breaded pork chops? They make amazing leftovers. With proper storage and reheating, you can enjoy them again without sacrificing flavor or crunch.
Refrigeration Tips
- Let the pork chops cool completely before storing.
- Place in an airtight container, separating layers with paper towels to absorb moisture.
- Store in the refrigerator for up to 3–4 days.
Avoid leaving them at room temperature too long after cooking to prevent bacterial growth.
Reheating Without Losing Crunch
The goal is to bring back that crisp crust while warming the inside:
Oven or Air Fryer Method:
- Preheat oven to 375°F (190°C) or use an air fryer.
- Place chops on a wire rack or baking tray.
- Heat for 10–12 minutes or until hot and crispy.
Avoid the Microwave: It softens the crust and makes the breading soggy.
Can You Freeze Breaded Pork Chops?
Absolutely. Here’s how:
- Allow the cooked pork chops to cool.
- Wrap each chop individually in foil or plastic wrap.
- Place in a freezer-safe bag or container.
- Label with the date and freeze for up to 2 months.
To reheat, thaw in the fridge overnight and re-crisp in the oven.
Variations of the Classic Breaded Pork Chop
Once you’ve mastered the classic breaded pork chop, the possibilities for customizing the recipe are endless. With just a few tweaks to your ingredients or technique, you can create global flavor twists that bring new excitement to your dinner table.
Italian-Style Breaded Chops
Craving Mediterranean flavors? This variation adds herbs, cheese, and tomato elements for a rich Italian flair.
Key additions:
- Mix Italian seasoning into your breadcrumbs.
- Add grated Parmesan or Romano cheese for depth and saltiness.
- Serve with marinara sauce on the side or spooned over the top.
- Top with melted mozzarella cheese for a Chicken Parm-style twist.
This version pairs beautifully with pasta, garlic bread, or a crisp Caesar salad.
Spicy Southern Breaded Pork Chops
Looking for heat and Southern soul? This spicy version packs bold flavors and crispy perfection.
Try this:
- Add Cayenne pepper, paprika, and black pepper to your flour mixture.
- Use hot sauce or buttermilk in the egg wash for extra tang.
- Pair with collard greens, mac and cheese, or cornbread.
For an extra Southern touch, drizzle with hot honey or serve with a spicy gravy.
Asian-Inspired Variations
For a lighter, umami-rich twist, take inspiration from Asian flavors:
- Marinate pork in a mixture of soy sauce, ginger, and garlic.
- Use panko breadcrumbs for crunch.
- Add a touch of sesame oil to the breading mix.
- Serve with steamed rice, pickled vegetables, and a drizzle of teriyaki glaze or tonkatsu sauce.
These fusion chops make for an exciting alternative to traditional pork recipes, without the need for hard-to-find ingredients.
Nutritional Information
Let’s be real—breaded pork chops aren’t diet food, but that doesn’t mean they can’t fit into a balanced lifestyle. Here’s what you need to know about the nutrition behind this classic dish.
Caloric Breakdown (Per Medium Chop, Pan-Fried)
- Calories: 380–450 (depending on size and oil absorption)
- Protein: 28–32g
- Fat: 18–22g
- Carbohydrates: 20–25g
- Fiber: 1g
- Sugar: 1g
- Sodium: Varies based on seasoning and added sauces
These values can change depending on ingredients and cooking method (baked vs. fried).
Macronutrients and Micronutrients
Breaded pork chops are rich in protein, which supports muscle growth and repair. They also offer:
- Iron – Boosts red blood cell production
- Zinc – Supports immune function
- B Vitamins (B1, B6, B12) – Aid energy production and brain health
However, the dish can be high in saturated fat and sodium, especially when fried or heavily seasoned, so moderation is key.
Making It Healthier
Want to enjoy breaded pork chops without the guilt? Try these tweaks:
- Bake instead of fry to cut down on oil and fat.
- Use whole wheat breadcrumbs for more fiber.
- Choose lean, boneless chops and trim excess fat.
- Add a big serving of steamed veggies or a side salad.
It’s all about balance—pairing a flavorful main dish with lighter sides makes a big difference.
FAQs about Breaded Pork Chop Recipe
1. Can I use frozen pork chops for this recipe?
Yes, but make sure to thaw them completely and pat dry before breading to ensure even cooking and crispy crust.
2. What can I use instead of eggs for breading?
Try buttermilk, Greek yogurt thinned with water, or a slurry of cornstarch and water.
3. How thick should the pork chops be?
¾ to 1 inch thick is ideal. Thinner chops cook too quickly and may dry out; thicker chops can be hard to cook through.
4. How do I know the oil is hot enough for frying?
Use a thermometer (350°F is ideal), or drop in a breadcrumb—it should sizzle immediately but not burn.
5. Can I prepare breaded pork chops ahead of time?
Yes! Bread them and refrigerate on a tray for up to 6 hours before cooking. Let sit at room temp for 10 minutes before frying or baking.
Final Thoughts
Breaded pork chops are the kind of meal that checks all the boxes—easy, flavorful, comforting, and totally customizable. Whether you’re cooking for a crowd or just treating yourself on a cozy night in, this dish brings classic home-cooked satisfaction every time.
From the first step of selecting the right cut to that satisfying sizzle in the pan, making breaded pork chops is as much about the process as it is the result. And once you’ve nailed the technique, the variations are endless. Go spicy, cheesy, herby, or sweet—it’s all fair game.
So grab your favorite skillet, pick your pork chops, and get cooking. With this guide in hand, you’re more than ready to create a dish that’ll earn rave reviews around your table.


