Bread Machine White Bread Recipe: Nothing compares to the comforting smell of freshly baked bread filling your home. If you’ve ever been intimidated by baking bread from scratch, a bread machine can make it incredibly easy, especially when it comes to the classic favorite: white bread.
This guide will take you through everything you need to know—from ingredients and preparation to a foolproof step-by-step process—to create a perfect loaf every time.
Why Make White Bread at Home?
Ever looked at the long list of unpronounceable ingredients in store-bought bread and felt uneasy? You’re not alone. Making white bread at home is not only healthier but also more satisfying. You get full control over what goes into your loaf—no preservatives, no artificial flavors—just wholesome goodness.
Plus, homemade bread just tastes better. It’s fresher, softer, and you can tweak the flavor to your liking. Want a hint of honey or a bit more crust? Go for it. Your kitchen becomes your bakery.
Homemade white bread is also versatile. From sandwiches to toast, French toast to croutons, it forms the base of countless meals. And the best part? You don’t need to be a professional baker. The bread machine does most of the heavy lifting for you.
Advantages of Using a Bread Machine
Let’s face it: kneading dough by hand, timing your rises, and getting your oven just right can be a hassle. Enter the bread machine—a gadget that automates all these steps. Just dump in your ingredients, press a button, and come back to a perfectly baked loaf.
Here are a few benefits that make bread machines a must-have:
- Consistency: Get a uniform rise, texture, and bake every time.
- Convenience: No need to babysit the dough. The machine handles kneading, proofing, and baking.
- Time-Saving: You can set it and forget it—many machines even have timers so you can wake up to fresh bread.
- Mess-Free: Minimal cleanup since everything happens in one container.
Whether you’re a baking newbie or a seasoned home chef, a bread machine makes life easier—and tastier.
Ingredients You’ll Need
Essential Ingredients Explained
Here’s what you’ll need for a basic white bread recipe in your bread machine:
- Bread Flour – 3 cups
Higher in protein than all-purpose flour, bread flour gives the loaf structure and a chewy texture. - Warm Water – 1 cup (110°F/45°C)
Essential for activating the yeast. Make sure it’s not too hot, or it can kill the yeast. - Dry Milk Powder – 2 tablespoons
Adds richness and enhances the texture. - White Sugar – 2 tablespoons
Feeds the yeast and adds a slight sweetness. - Salt – 1½ teaspoons
Balances the flavor and controls yeast growth. - Unsalted Butter – 2 tablespoons (softened)
Adds moisture and flavor. - Active Dry Yeast – 2¼ teaspoons (or one packet)
The rising agent that makes your bread fluffy.
These ingredients are pantry staples in most kitchens, and once you master this base, you can begin experimenting with variations.
Ingredient Substitutions & Variations
Out of dry milk powder? No worries. You can substitute it with the same amount of regular milk—just reduce the water a bit to adjust for the liquid difference.
Trying to make your bread healthier? Swap out one cup of bread flour with whole wheat flour. Want it sweeter? Add a tablespoon of honey. You can also toss in herbs, cheese, or even garlic for a savory twist.
Popular substitutions include:
- Olive oil instead of butter for a Mediterranean flair.
- Honey or maple syrup instead of sugar for natural sweetness.
- Flaxseed or chia seeds for added nutrition.
Tips on Choosing High-Quality Ingredients
Good bread starts with good ingredients. Here’s how to pick the best:
- Flour: Go for unbleached bread flour for a richer taste and better structure.
- Yeast: Check the expiration date. Old yeast won’t rise properly.
- Butter: Use real unsalted butter—not margarine—for the best flavor.
- Water: Use filtered water if your tap water tastes strongly of chlorine.
Always store your ingredients properly. Keep your flour and yeast in airtight containers in a cool, dry place. Fresh ingredients make a world of difference.
Equipment Needed for Bread Machine White Bread
Choosing the Right Bread Machine
Not all bread machines are created equal. When shopping for one, consider these features:
- Size and Capacity: Some machines can bake 1lb, 1.5lb, or 2lb loaves. Pick one based on your household size.
- Settings: Look for machines with customizable settings (white bread, whole wheat, dough only, crust darkness).
- Timer Function: This lets you delay the start so your bread is ready when you want it.
- Viewing Window: Handy for checking progress without lifting the lid.
Popular brands include Zojirushi, Panasonic, Hamilton Beach, and Cuisinart. Read reviews, compare specs, and choose what fits your budget and kitchen space.
Must-Have Accessories
While your bread machine is the star of the show, a few accessories can make the process smoother:
- Measuring Cups & Spoons – Precision is key in baking.
- Digital Kitchen Scale – Great for measuring flour by weight.
- Silicone Spatula – Helps remove dough from the pan.
- Bread Knife – For slicing without crushing your loaf.
- Cooling Rack – Letting the bread cool properly prevents soggy bottoms.
Now that you’ve gathered your gear and ingredients, it’s time to get baking.
Preparation Tips Before You Start
Measuring Ingredients Accurately
In bread making, accuracy is everything. One extra tablespoon of flour can throw off the texture. Here’s how to measure like a pro:
- Flour: Spoon it into the cup and level it off with a knife. Don’t scoop directly from the bag.
- Liquids: Use a liquid measuring cup and check at eye level.
- Yeast: Use exact measurements. A little too much can cause the dough to over-rise and collapse.
Consider using a kitchen scale for the most accurate measurements, especially for flour.
Preparing Your Bread Machine
Before adding ingredients, inspect your machine:
- Ensure the paddle is attached properly.
- The pan should be clean and dry.
- Place the pan into the machine securely.
Add ingredients in the order recommended by your machine’s manual—typically liquids first, then dry ingredients, with yeast on top.
Step-by-Step Guide to Making Bread Machine White Bread
Step 1: Add Ingredients in the Correct Order
This is one of the most important parts of the bread-making process. The order in which ingredients go into the bread pan can make or break your loaf. Always refer to your bread machine’s manual, but generally, here’s the standard order:
- Liquids go first – This includes warm water, milk (if used), and melted butter or oil.
- Dry ingredients – Add your flour, sugar, salt, and milk powder.
- Yeast goes last – Create a small well in the flour and pour the yeast into it. This keeps it from activating too soon.
Why is this important? If the yeast touches the liquid before mixing starts, especially if you’re using a delay timer, it can activate prematurely and ruin the texture of your bread. By keeping it dry and separate, the machine ensures the yeast activates at just the right time.
Bonus tip: Use room temperature ingredients unless your recipe specifically calls for something different. Cold ingredients can slow down yeast activity, while hot ones can kill it.
Step 2: Selecting the Right Program on Your Bread Machine
Once your ingredients are loaded, it’s time to choose the right program. Most bread machines come with a range of settings like Basic, French, Whole Wheat, and Dough. For a classic white bread loaf, the Basic or White Bread setting is what you want.
Here’s what typically happens during this cycle:
- Kneading (10-20 minutes): The paddle spins and mixes the ingredients into a sticky dough.
- First Rise (30-45 minutes): The dough rests and rises until doubled in size.
- Second Rise (15-20 minutes): The machine gently deflates and lets the dough rise again.
- Baking (40-60 minutes): The bread is baked inside the pan, turning golden brown.
Some machines let you select the crust color (light, medium, dark). Go for medium if you’re not sure—light might be too pale, and dark might dry out the crust.
Also, if your machine offers a “Rapid” option, skip it. While it sounds tempting, quick-rise programs often don’t give the yeast enough time to develop flavor or texture. Stick to the standard cycle for the best results.
Step 3: Monitoring the Dough Consistency
This is a secret that separates good loaves from amazing ones. Open your machine’s lid after about 5-10 minutes into the kneading process and peek inside.
You’re looking for a smooth, elastic ball of dough. It shouldn’t be sticking to the sides or be too dry and crumbly. Here’s what to do if it’s not right:
- Too dry? Add a tablespoon of water, one at a time, until the dough forms a cohesive ball.
- Too sticky? Sprinkle in more flour, also one tablespoon at a time.
This adjustment window is short—about 5 minutes—so be quick. It’s one of the few times during the process you’re allowed to intervene.
Why bother? Because humidity, flour brands, and even altitude can affect how your dough behaves. Monitoring it ensures your loaf turns out perfect every time.
Step 4: Let the Bread Machine Work Its Magic
Now comes the easiest part: do nothing. Seriously. Let the machine run its full cycle.
You’ll hear the kneading paddle working, maybe even some hissing as the bread bakes, and eventually smell the incredible aroma of fresh bread wafting through your home.
Here are a few things to keep in mind during this phase:
- Avoid opening the lid after the kneading phase. It can cause heat loss and mess with the rise.
- If your machine beeps mid-cycle, it might be prompting you to add mix-ins like herbs, seeds, or cheese.
- Some machines have a “Keep Warm” phase after baking. You can let the bread stay in the machine for 10-15 minutes, but don’t leave it too long or the crust might get soggy.
By the time the final beep sounds, you’ll have a warm, beautifully golden loaf waiting for you.
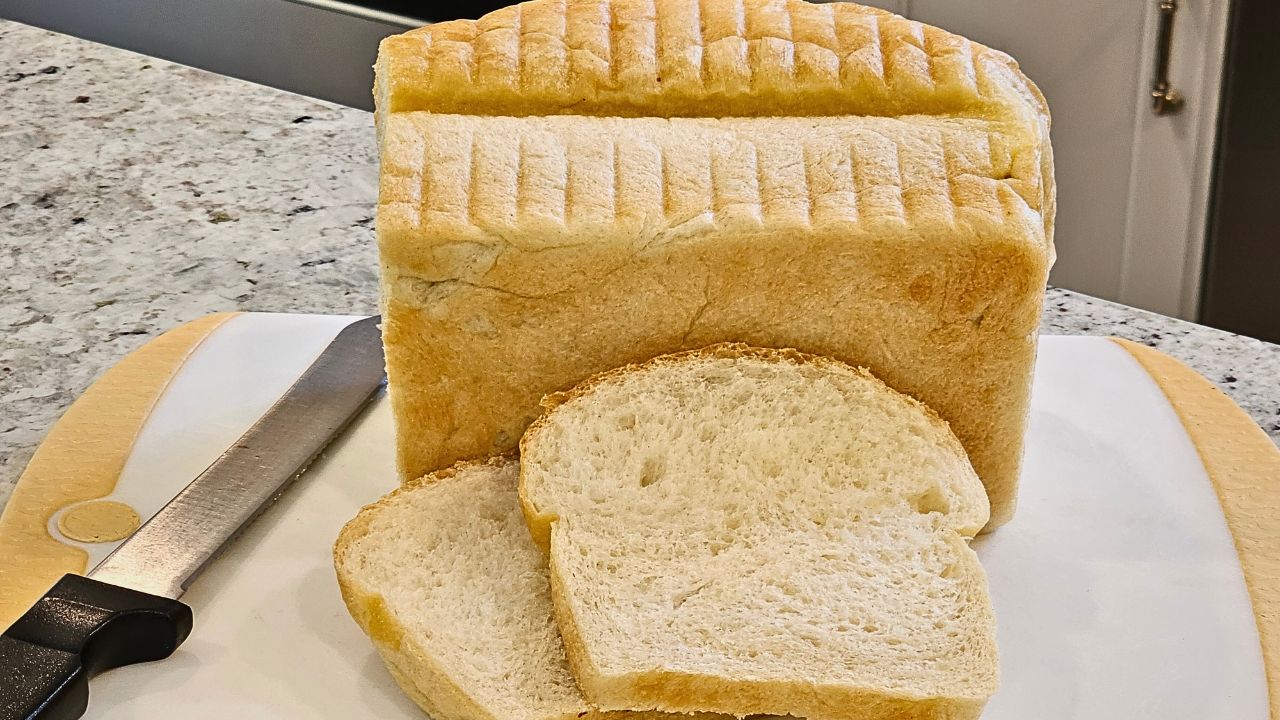
Step 5: Cooling and Slicing the Bread Properly
It’s tempting, but don’t slice into the bread right away. Freshly baked bread needs time to cool so the steam inside can escape and the texture can set.
Follow these steps for perfect cooling and slicing:
- Remove the bread from the pan immediately after baking. If you wait too long, condensation will build up and make the bottom soggy.
- Place the loaf on a wire cooling rack. This allows air to circulate and cool the bread evenly.
- Wait at least 30 minutes before slicing—longer if you can resist.
For slicing, use a serrated bread knife. Pressing down with a dull knife or trying to cut it while hot will crush the loaf. If you bake often, consider investing in a bread slicer guide for even, café-style slices.
Pro tip: Store leftover bread in a paper bag or bread box for best freshness. Avoid plastic unless freezing, as it can make the crust chewy and soft.
Troubleshooting Common Bread Machine Issues
Bread Didn’t Rise? Here’s Why
There’s nothing more frustrating than a flat, dense loaf. If your bread didn’t rise properly, it could be due to a few common issues:
- Old yeast – Always check the expiration date and store yeast in a cool, dry place.
- Wrong water temperature – If the water is too hot, it can kill the yeast. If it’s too cold, it won’t activate.
- Salt and yeast touching – If salt comes into direct contact with yeast before mixing, it can deactivate it. That’s why it’s important to keep them separate in the pan.
- Wrong flour type – Using all-purpose instead of bread flour can lead to poor structure.
- Humidity or altitude – High altitudes or very dry climates can affect rise times. You might need to tweak water content or rising time.
Understanding your ingredients and machine helps fix these problems fast.
Dough Too Dry or Too Sticky
If you notice your dough looks off during the kneading phase, here’s how to fix it:
- Too dry – The dough isn’t forming into a cohesive ball and looks crumbly. Add water a teaspoon at a time until it comes together.
- Too sticky – The dough sticks heavily to the sides of the pan. Add flour gradually until it pulls away cleanly.
Sometimes even a change in seasons can alter how your dough behaves. Don’t panic—it’s totally normal. A few simple adjustments can save your loaf.
How to Store and Preserve Homemade Bread
Best Practices for Storage
Freshly baked bread is a delight, but improper storage can quickly turn that joy into disappointment. Here’s how to keep your bread machine white bread fresh and tasty for as long as possible:
- Cool Completely First
Never store warm bread—it creates condensation that leads to a soggy crust and mold. Always allow the loaf to cool completely on a wire rack before storing. - Use Paper, Not Plastic
While it might be tempting to toss your loaf into a plastic bag, this traps moisture and softens the crust. Instead, use:- A paper bag for maintaining crusty texture
- A bread box to balance moisture and airflow
- A linen bread bag (if you want to be fancy and eco-friendly)
- Avoid Refrigeration
The fridge actually speeds up staling. Keep your bread at room temperature in a cool, dry place. It should stay fresh for 3–4 days. - Slicing Strategy
Slice off pieces as you need them, not all at once. The less surface area exposed to air, the longer your loaf will stay soft.
Freezing Homemade Bread
Want to extend your bread’s shelf life? Freezing is your best bet.
Here’s how to do it right:
- Step 1: Let the loaf cool completely.
- Step 2: Slice it before freezing—this way you can take out individual slices as needed.
- Step 3: Wrap tightly in plastic wrap, then place in a zip-top freezer bag or airtight container.
- Step 4: Label with the date. Homemade bread keeps well for up to 3 months in the freezer.
To reheat: Just pop a frozen slice into the toaster or thaw a whole loaf at room temperature in the bag for a few hours. For best texture, reheat in the oven at 350°F for about 10 minutes.
Freezing preserves taste and texture almost perfectly—no more wasted bread!
Serving Suggestions
What to Pair with White Bread
White bread’s subtle flavor and pillowy texture make it incredibly versatile. Here are some tasty pairings:
For Breakfast:
- Toasted with butter and jam
- French toast with cinnamon and maple syrup
- Egg and cheese breakfast sandwich
For Lunch:
- Classic BLT
- Grilled cheese and tomato soup
- Chicken salad sandwich
For Dinner:
- Garlic bread alongside pasta
- As a base for mini pizza toasts
- Stuffing or breadcrumbs for casseroles
Whether sweet or savory, white bread shines as a base for creativity in the kitchen.
Toasting and Flavoring Ideas
Want to take your white bread up a notch? Here are some quick upgrades:
- Flavored Butters: Spread with garlic herb butter, honey butter, or cinnamon sugar butter.
- Toasting Tips: Toast thicker slices for a crispy outside and soft interior.
- Savory Slices: Top with avocado, cherry tomatoes, and sea salt.
- Sweet Snacks: Spread with Nutella, peanut butter, or fruit preserves.
Bonus: If your bread goes a bit stale, transform it into homemade croutons or bread pudding—it’s the ultimate no-waste strategy.
Nutritional Facts of Bread Machine White Bread
Caloric Breakdown
Homemade white bread is free from preservatives and additives, making it a healthier option than many store-bought varieties. Here’s a typical nutritional profile for one slice (1/16 of a 2 lb loaf):
| Nutrient | Amount per Slice |
|---|---|
| Calories | 120–140 |
| Carbohydrates | 24–26g |
| Protein | 4–5g |
| Fat | 2–3g |
| Sugar | 2g |
| Fiber | 1g |
| Sodium | 200–250mg |
Keep in mind, this varies depending on the ingredients you use (especially flour, butter, and sugar).
Healthy Add-ins for Nutrition Boost
You can boost the nutritional value of your white bread without changing the flavor too much. Try adding:
- Ground flaxseed or chia seeds (1–2 tbsp)
- Wheat germ for added fiber and protein
- Rolled oats on top for texture
- Sunflower or pumpkin seeds for crunch
- Dried herbs like rosemary or oregano for flavor without added calories
These tiny tweaks make your loaf healthier without sacrificing the soft, delicious texture of white bread.
Cleaning and Maintaining Your Bread Machine
Daily Maintenance
To ensure your bread machine lasts for years, clean it after every use. Here’s a quick routine:
- Unplug the machine and let it cool completely.
- Remove the pan and paddle.
- Wipe the interior and paddle with a damp cloth. Don’t use soap inside the machine itself.
- Clean the bread pan with warm water and mild soap, but don’t submerge it fully if it’s not dishwasher-safe.
- Check under the kneading blade—sometimes dough gets stuck underneath.
Avoid using metal utensils or abrasive pads, which can damage non-stick surfaces.
Deep Cleaning Tips
Every month or so, give your bread maker a more thorough clean:
- Use a soft brush to remove flour from vents and corners.
- If there’s any burnt residue, let it soak with a bit of warm water and baking soda before wiping.
- Clean around the lid hinges and buttons using a toothbrush or Q-tip.
Regular maintenance not only extends the lifespan of your machine but also prevents strange odors or mechanical issues.
Benefits of Baking Your Own Bread Regularly
Health Benefits
When you bake your own bread, you’re not just filling your home with the mouthwatering scent of fresh loaves—you’re making a healthier choice. Here’s why homemade bread is often better for your body:
- Fewer Preservatives
Store-bought bread is packed with chemicals to extend shelf life. Homemade bread contains none of that—just fresh, simple ingredients. - Lower in Sugar and Sodium
Many commercial loaves are loaded with hidden sugars and sodium. Baking at home means you control exactly how much goes in. - Allergen-Friendly
Gluten-sensitive? Need dairy-free? Baking your own lets you avoid allergens and craft a loaf that fits your dietary needs. - Whole Grains and Fiber
You can add whole wheat flour, oats, seeds, and nuts to boost the fiber content and make your bread more filling and heart-healthy. - Gut Health Support
Using natural fermentation or sourdough methods adds probiotics that aid digestion.
Baking bread might seem like a small habit, but over time, it contributes significantly to better nutrition and overall well-being.
Cost-Effectiveness
Let’s talk money. While a loaf of artisan bread at the store can set you back $4–$6, you can make an entire loaf at home for under $1. Here’s the math:
| Ingredient | Cost per Loaf |
|---|---|
| Bread Flour | $0.60 |
| Yeast | $0.15 |
| Butter/Oil | $0.20 |
| Sugar/Salt | $0.05 |
| Dry Milk (Optional) | $0.10 |
| Total | $1.10 |
Now multiply that by 4 loaves a month, and you’re saving $15–$20 per month. Over a year? That’s hundreds saved—just from making bread at home.
Plus, your machine pays for itself within months. It’s an investment that brings you daily benefits.
FAQs about Bread Machine White Bread Recipe
1. Can I use all-purpose flour instead of bread flour?
Yes, you can. All-purpose flour works in most bread machine recipes, but your bread may be slightly less chewy or structured. Bread flour has more protein, which helps with rise and texture.
2. Why is my bread dense and heavy?
Common reasons include old yeast, incorrect measurements, too much flour, or not enough kneading. Make sure your ingredients are fresh, your water isn’t too hot, and you’re using the right program on your machine.
3. How long does homemade white bread last?
At room temperature, it lasts 3–4 days if stored properly in a bread box or paper bag. For longer storage, slice and freeze it.
4. Can I add seeds or nuts to this recipe?
Absolutely. Add mix-ins like sunflower seeds, walnuts, or raisins when your bread machine beeps (usually after the first knead). This prevents them from getting crushed or interfering with the kneading process.
5. What’s the best way to slice fresh bread without crushing it?
Let the bread cool completely—this is key. Then use a sharp serrated bread knife and apply gentle, sawing motions. Avoid pressing down too hard.
Conclusion
Making white bread in a bread machine isn’t just a kitchen task—it’s a lifestyle upgrade. It’s about choosing freshness over preservatives, comfort over convenience, and savings over spending. From selecting quality ingredients to slicing into that warm, golden loaf, every step connects you to the food you eat in a meaningful way.
And once you get the hang of the basics, the sky’s the limit. You can start experimenting with mix-ins, specialty flours, or artisan-style shaping. Whether you’re making sandwiches for the kids, prepping for brunch with friends, or just enjoying a slice with butter and tea, homemade white bread is a classic that never gets old.
So go ahead—dust off that bread machine, follow this step-by-step guide, and become your own favorite baker.


