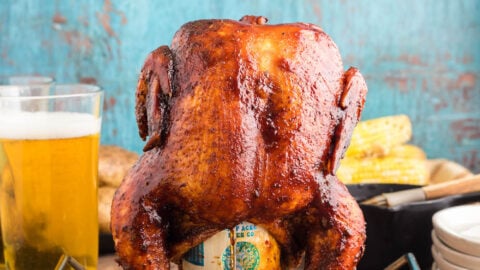
Beer Chicken Recipe: Beer chicken, often known as beer can chicken, is one of those recipes that turns an ordinary cookout into something truly memorable. Picture a whole chicken, juicy on the inside, crispy on the outside, standing upright on a half-filled can of beer while cooking. The result? Moist, flavorful meat with a smoky kick and golden-brown skin that makes everyone reach for seconds.
The origins of beer can chicken are a bit hazy, but many believe it came from Southern barbecue traditions in the United States. Pitmasters were always experimenting with ways to keep chicken juicy while smoking or grilling, and someone decided to try using a can of beer. The idea caught on, and now, beer chicken is a worldwide sensation.
Whether you’re new to grilling or a seasoned backyard chef, this step-by-step guide will walk you through everything you need to know—from gathering ingredients to serving your masterpiece. By the end, you’ll not only master the technique but also understand how to customize the flavors to suit your taste.
Ingredients You’ll Need
Before we jump into the cooking process, let’s talk about what you’ll need. Beer chicken is surprisingly simple, but the right combination of ingredients makes all the difference. Think of it like building a masterpiece—your chicken is the canvas, and the spices, beer, and add-ons are the paint.
Main Ingredients
- 1 whole chicken (4–5 lbs works best)
- 1 can of beer (12 oz; any light lager or ale works well)
The chicken should be thawed and cleaned properly. Choose a medium-sized bird because it balances cooking time and flavor absorption. As for the beer, lighter beers are preferred since they add moisture without overpowering the chicken with bitterness.
Spices and Seasonings
This is where you can really play with flavors. A good dry rub or seasoning mix makes the difference between bland chicken and a mouthwatering feast.
Common seasonings include:
- 2 tbsp olive oil (to help seasoning stick)
- 2 tbsp salt (preferably kosher salt)
- 1 tbsp black pepper
- 1 tbsp garlic powder
- 1 tbsp onion powder
- 1 tbsp paprika (smoked paprika adds great flavor)
- 1 tsp dried thyme
- 1 tsp cayenne pepper (optional, for a spicy kick)
Mix all these spices together to create a homemade rub. You can also use pre-made poultry rubs if you want to save time, but homemade always feels more authentic.
Optional Add-ons for Extra Flavor
- Fresh herbs like rosemary, sage, or parsley (stuff inside the cavity for aroma).
- Lemon or lime wedges (adds brightness and acidity).
- Honey or brown sugar (for a sweet and smoky crust).
- Butter (rubbing under the skin keeps the chicken extra moist).
The beauty of beer chicken is that you can adjust the recipe to fit your taste buds. Love spice? Add more cayenne. Prefer a sweet touch? Rub some honey on the skin before cooking.
Tools and Equipment Required
Beer chicken doesn’t require fancy equipment, but having the right tools makes the process easier and safer. You don’t want your chicken toppling over halfway through cooking or struggling with uneven heat.
Kitchen Tools
- Sharp chef’s knife
- Cutting board (for prepping the chicken)
- Mixing bowls (for spice rubs and marinades)
- Measuring spoons (to keep seasoning consistent)
- Basting brush (for applying oil or butter)
Grilling/Smoking Essentials
- Gas grill, charcoal grill, or smoker (indirect heat method is best)
- Beer can chicken holder (optional but highly recommended for stability)
- Aluminum foil (to line the grill and make cleanup easier)
- Meat thermometer (to ensure the chicken is fully cooked)
If you don’t have a grill, don’t worry—you can also make beer chicken in the oven using the same method. It won’t have that smoky barbecue flavor, but it will still be juicy and delicious.
Safety Precautions
- Always handle raw chicken with care to avoid cross-contamination.
- Keep a spray bottle of water nearby if using charcoal or wood, in case of flare-ups.
- Use oven mitts or grilling gloves when handling hot surfaces.
- Never place cooked chicken on the same plate that held raw chicken.
Having these tools and safety measures in place ensures that your cooking process is smooth, fun, and stress-free.
Step-by-Step Guide to Making Beer Chicken
Now comes the fun part—cooking! The step-by-step process is straightforward, but attention to detail is key. Follow along, and you’ll end up with a chicken that looks like it came straight off a professional barbecue pit.
Step 1 – Preparing the Chicken
Start by rinsing the chicken under cold water and patting it dry with paper towels. A dry surface helps the oil and spices stick better. Next, remove any giblets or excess fat from the cavity. Some people save the giblets for stock, but for this recipe, you won’t need them.
Lightly coat the chicken with olive oil. This helps lock in moisture and gives the skin that crispy, golden finish we all love. Once the chicken is coated, set it aside while you prepare the beer and seasoning.
Step 2 – Preparing the Beer Can
Take your beer can and drink (or pour out) about half of it. You’ll want the can to be half-full so the beer can steam without overflowing. You can add extra flavors to the can if you’d like, such as crushed garlic, herbs, or even a splash of apple juice for a fruity twist.
Place the can on a stable surface. This will be the “throne” your chicken sits on while cooking. If you have a beer can holder, insert the can into it for extra support.
Step 3 – Seasoning the Chicken
Generously coat the chicken, inside and out, with your spice rub. Don’t be shy—the more seasoning, the better the flavor. Make sure to rub some under the skin as well, especially on the breasts, since that’s the part that dries out most easily.
If you’re adding fresh herbs or lemon wedges, stuff them into the cavity before placing the chicken on the beer can.
Step 4 – Setting Up the Grill or Oven
If using a charcoal grill, set up a two-zone fire with hot coals on one side and no coals on the other. Place a drip pan under the chicken to catch juices.
If using a gas grill, turn on one burner and leave the other off, placing the chicken on the cooler side.
For an oven, preheat to 375°F (190°C) and prepare a baking sheet with foil to catch drippings.
The key is indirect heat. You don’t want the flames directly under the chicken, or it will burn before cooking through.
Step 5 – Cooking the Beer Chicken
Carefully place the chicken upright on the beer can, with the can inserted into the cavity. Balance the bird so it stands tall, almost like it’s sitting on a throne. Close the lid of the grill (or oven door) and let the magic happen.
Cooking time will vary depending on the size of your chicken and the heat source, but on average, it takes 1.5 to 2 hours. A good rule of thumb is about 20 minutes per pound.
While cooking, resist the urge to constantly open the grill. Every time you do, you lose heat and extend the cooking time. Instead, relax, grab a cold drink, and let the beer and spices work their magic.
Checking for Doneness and Serving
Cooking beer chicken isn’t just about the process—it’s about making sure your chicken comes out safe, juicy, and packed with flavor. Nothing ruins the mood at a cookout faster than undercooked chicken, so this step is crucial.
How to Check Internal Temperature
The most reliable way to check doneness is by using a meat thermometer. Insert the probe into the thickest part of the thigh without touching the bone. The safe internal temperature for chicken is 165°F (74°C).
Here’s a quick guide to temperature checks:
- Breast meat: 160°F (it will rise to 165°F while resting)
- Thigh meat: 170–175°F (for maximum tenderness)
If you don’t have a thermometer, you can use the old-fashioned method: pierce the thickest part of the thigh with a knife. If the juices run clear and not pink, your chicken is done. But honestly, investing in a thermometer removes all guesswork.
Resting the Chicken Before Serving
Once your beer chicken reaches the right temperature, remove it from the grill or oven. This is where patience pays off—let the chicken rest for 10–15 minutes before carving. Resting allows the juices to redistribute throughout the meat, keeping it moist and tender instead of dry.
Place the chicken on a cutting board and carefully remove the beer can. Use tongs or heatproof gloves because the can will be extremely hot. Stand the chicken upright, then gently lift it off the can. Some of the beer may still be inside, so watch for spills.
Presentation Tips
Presentation matters almost as much as taste. A whole beer chicken looks impressive when brought to the table, and carving it in front of your guests adds a bit of theater to the meal.
Here are some serving ideas:
- Family-style: Place the whole chicken in the center of the table with roasted vegetables surrounding it.
- Carved portions: Slice the breasts, thighs, and wings neatly, then serve on a platter for easy access.
- Garnish: Sprinkle fresh parsley, rosemary sprigs, or lemon wedges for a vibrant look.
Beer chicken pairs beautifully with grilled corn, potato salad, coleslaw, or even a fresh green salad. And of course, don’t forget to serve it with an ice-cold beer—it completes the experience.
Flavor Variations of Beer Chicken
One of the best parts about beer chicken is how customizable it is. You can stick with the classic recipe or experiment with flavors to create your own signature dish.
Different Beer Options
Not all beers create the same results. The type of beer you choose can dramatically affect the flavor profile.
- Light lagers: Mild and crisp, perfect for beginners.
- Amber ales: Slightly sweet with caramel notes.
- Stouts or dark beers: Rich and bold, best for strong flavors.
- Fruit-infused beers: Add subtle sweetness, great for summer.
Pro tip: If you don’t drink alcohol, you can replace the beer with soda, apple cider, or chicken broth. The steaming effect will still work beautifully.
Marinade and Rub Variations
While the classic spice rub is a winner, you can experiment with international flavors:
- Mexican style: Chili powder, cumin, lime, and cilantro.
- Mediterranean style: Oregano, lemon zest, and olive oil.
- Asian style: Soy sauce, ginger, garlic, and sesame oil.
- Sweet & smoky: Brown sugar, smoked paprika, and a drizzle of honey.
Each of these gives the chicken a completely different personality while still keeping the juicy beer-steamed inside.
Stuffing the Beer Can
Instead of just plain beer, you can stuff the can with extra aromatics. Try adding:
- Garlic cloves
- Sliced onions
- Fresh herbs
- Citrus peels
As the beer steams, these flavors infuse into the chicken, giving it a subtle but delicious twist.
Tips for Perfect Beer Chicken Every Time
Even though the recipe is straightforward, a few small tweaks can take your beer chicken from good to legendary.
Control Your Heat
Consistent temperature is key. Keep your grill or oven between 350–375°F (175–190°C). Too hot, and the skin burns before the inside cooks. Too low, and your chicken dries out.
Avoid Opening the Lid
Every time you lift the grill lid, you lose heat. Think of it like baking a cake—you wouldn’t keep opening the oven, right? Trust the process and only check the chicken when necessary.
Crispy Skin Secret
For extra crispy skin, rub a thin layer of butter under the skin before seasoning. The fat helps render the skin beautifully. Another trick is sprinkling baking powder (yes, really!) into your dry rub—it helps the skin blister and crisp up.
Don’t Forget the Drip Pan
Place a drip pan under the chicken to catch the juices. Not only does it make cleanup easier, but you can also use the drippings to make an incredible gravy or sauce.
Leftover Magic
Beer chicken leftovers are gold. Use shredded chicken in tacos, salads, sandwiches, or even soups. The smoky, beer-infused flavor adds depth to any dish.
Common Mistakes to Avoid
Even seasoned grillers can slip up with beer chicken. Here are the top mistakes and how to avoid them.
Mistake 1: Using the Wrong Size Chicken
If the chicken is too large, it may not balance properly on the beer can or cook evenly. Stick with a medium-sized bird (around 4–5 lbs).
Mistake 2: Overcooking
Nobody likes dry chicken. Always use a thermometer and pull the chicken off at the right temperature. Remember, it continues to cook slightly while resting.
Mistake 3: Using the Wrong Beer
Strong, bitter beers can overpower the chicken. Unless you love bold flavors, stick with light beers for a more balanced taste.
Mistake 4: Not Seasoning Enough
Chicken needs bold flavors to shine. Don’t be shy with the rub—coat every part of the bird generously.
Mistake 5: Skipping the Resting Period
Resting may seem optional, but it makes all the difference between juicy and dry meat. Give it at least 10 minutes before carving.
Perfect Side Dishes for Beer Chicken
Beer chicken is already a showstopper on its own, but pairing it with the right side dishes can turn your meal into a true feast. Whether you’re hosting a backyard barbecue or a casual family dinner, the sides you choose should balance the smoky, savory flavors of the chicken.
Classic BBQ Sides
- Grilled Corn on the Cob – Brushed with butter, sprinkled with chili powder, and finished with a squeeze of lime.
- Potato Salad – Creamy and tangy, with a hint of mustard or dill for freshness.
- Coleslaw – Crisp cabbage tossed in a zesty dressing, providing a refreshing crunch to balance the rich chicken.
Comfort Food Favorites
- Mac and Cheese – Gooey, cheesy pasta that pairs perfectly with smoky meat.
- Mashed Potatoes with Gravy – Use the chicken drippings to make a savory gravy that ties the whole meal together.
- Baked Beans – Sweet, smoky beans complement the beer-infused flavors of the chicken.
Lighter Options
- Garden Salad – Fresh greens with vinaigrette for a healthier balance.
- Roasted Vegetables – Carrots, zucchini, and bell peppers seasoned simply with olive oil, salt, and pepper.
- Fruit Salad – Sweet and juicy fruits like watermelon or pineapple to cleanse the palate.
Think of sides as the supporting cast—the chicken is the star, but the right team around it makes the whole meal shine.
Storing and Reheating Beer Chicken
If you’ve made beer chicken once, you know it rarely lasts long. But on the off chance you have leftovers, here’s how to keep them tasting just as delicious.
How to Store
- Refrigerator: Place leftover chicken in an airtight container. It will stay fresh for up to 4 days.
- Freezer: For longer storage, shred the chicken and freeze it in freezer bags. It can last up to 3 months.
Best Reheating Methods
- Oven: Preheat to 325°F, place chicken in a baking dish, cover with foil, and reheat for 15–20 minutes. Keeps it moist.
- Skillet: Heat with a splash of chicken broth for juicy results.
- Microwave: Works in a pinch, but wrap the chicken in a damp paper towel to prevent drying out.
Leftovers are great for quick meals like chicken wraps, quesadillas, or even topping a homemade pizza.
Health Benefits of Beer Chicken
At first glance, beer chicken might sound indulgent, but it can actually be part of a balanced diet if prepared thoughtfully.
Protein-Packed Meal
Chicken is an excellent source of lean protein, which is essential for muscle repair and overall health.
Lower Fat Option
Compared to fried chicken, beer chicken uses little oil and relies on steaming and roasting, making it a healthier choice.
Flavor Without Excess Calories
Because the beer adds moisture and subtle flavor, you don’t need heavy sauces or marinades, keeping the calorie count lower.
Nutrient Retention
Cooking with indirect heat helps preserve more nutrients in the chicken compared to deep frying or over-searing.
Of course, moderation is key—but beer chicken is a satisfying, flavorful way to enjoy a healthier version of roast chicken.
FAQs about Beer Chicken Recipe
1. Can I make beer chicken without alcohol?
Yes! Substitute the beer with apple cider, chicken broth, or even lemon-lime soda. You’ll still get juicy, flavorful results.
2. Do I need a special stand for the beer can?
Not necessarily, but a stand adds stability and prevents the chicken from tipping over. If you don’t have one, make sure the can is placed securely on a flat surface.
3. What’s the best type of beer to use?
Light lagers and pilsners are the most popular because they add moisture without overpowering the chicken. However, feel free to experiment with different beers based on your taste.
4. Can I cook beer chicken in the oven instead of a grill?
Absolutely! Place the chicken upright on a baking sheet and cook at 375°F (190°C). It won’t have the smoky flavor of grilling, but it will still be moist and delicious.
5. How do I keep the chicken skin crispy?
Pat the chicken dry before seasoning, rub it with oil or butter, and cook at a consistent high heat. For an extra crisp finish, broil the chicken for the last 5 minutes of cooking.
Conclusion
Beer chicken is more than just a recipe—it’s an experience. From the sizzling sound of the grill to the steam rising from the beer can, the process is as enjoyable as the result. The beauty of this dish lies in its simplicity: a whole chicken, a can of beer, and a handful of spices come together to create a juicy, flavorful masterpiece.
Whether you stick with the classic method or experiment with different flavors, beer chicken never fails to impress. It’s the perfect dish for family gatherings, summer cookouts, or even a cozy weekend dinner. With the right sides, proper cooking techniques, and a little creativity, you can make beer chicken a signature recipe in your kitchen.
So fire up the grill, grab a can of your favorite beer, and let your chicken take a seat on its throne—it’s time to cook like a pro.


