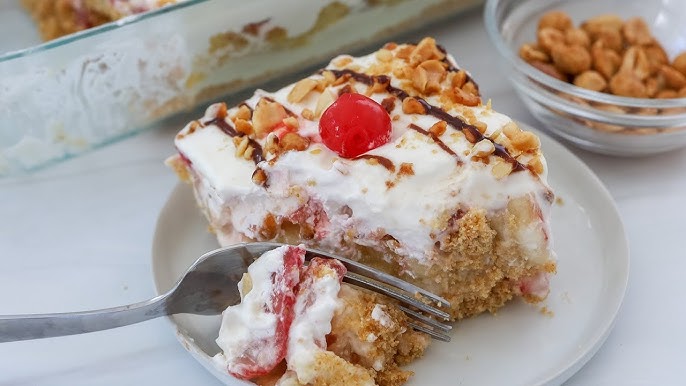
Banana Split Cake Recipe: A banana split cake is a delightful no-bake dessert inspired by the classic ice cream banana split that we all know and love. Instead of being served in a long dish with ice cream scoops, chocolate syrup, and whipped cream, this dessert transforms the flavors into a layered cake form. It usually starts with a buttery graham cracker crust, followed by a creamy filling, fresh banana slices, juicy pineapple chunks, strawberries, fluffy whipped cream, and of course, garnishes like nuts, chocolate drizzle, and maraschino cherries on top. Imagine all the flavors of a banana split, but in a sliceable cake that’s perfect for sharing—it’s indulgent, refreshing, and visually stunning.
This cake isn’t just about taste—it’s about nostalgia. It brings back memories of enjoying ice cream sundaes on hot summer days or celebrating special occasions with loved ones. If you’re someone who enjoys fruity desserts but doesn’t want something overly complicated, banana split cake hits the sweet spot between simple and impressive.
Why You’ll Love This Dessert
There are countless reasons why banana split cake has become a crowd favorite, but here are a few key ones:
- No baking required – Most versions of this cake don’t need an oven, which makes it a perfect summer dessert.
- Layers of flavor – You get sweetness from the bananas, tartness from the pineapple, creaminess from the filling, and crunchiness from the nuts.
- Customizable – Don’t like pineapple? Replace it with mango or peaches. Want extra chocolate? Add a drizzle of hot fudge sauce.
- Visually appealing – This dessert looks as good as it tastes, making it a centerpiece-worthy dish for parties.
- Kid-friendly and family-approved – The fruity and creamy layers appeal to both adults and kids, making it a safe dessert to bring to gatherings.
Think of it as the dessert version of comfort food—it’s familiar, sweet, and always a hit.
Perfect Occasions to Serve Banana Split Cake
Banana split cake is incredibly versatile and works well for many occasions. Some great times to serve it include:
- Summer BBQs and Picnics: Since it’s cool, refreshing, and requires no baking, it’s a natural choice for warm-weather gatherings.
- Birthday Parties: Instead of traditional birthday cake, a banana split cake adds a fun twist that guests won’t forget.
- Potlucks and Family Gatherings: Easy to make in a 9×13 pan, this cake feeds a crowd without much fuss.
- Holiday Dinners: Light, fruity desserts balance out heavier holiday meals.
- Casual Weekends: Who says you need a reason? Make it anytime you’re craving a treat.
Ingredients You’ll Need
When it comes to banana split cake, the ingredients are simple, fresh, and easy to find at your local grocery store. Let’s break them down step by step.
Main Ingredients for the Base
The base of banana split cake usually starts with a crumbly crust that serves as the foundation for all the delicious layers.
- Graham Crackers (or Digestive Biscuits): Crushed into fine crumbs to form the crust.
- Butter (Melted): Helps bind the crumbs together while adding richness.
- Sugar (Optional): Adds a touch of sweetness to the crust, but you can skip it if your graham crackers are already sweet.
Some people also use vanilla wafers or Oreo cookies as a fun twist for the crust. If you want a more chocolatey dessert, Oreo crumbs are a great substitute.
Creamy Filling Essentials
The filling is what makes the cake rich, creamy, and absolutely indulgent. Typical ingredients include:
- Cream Cheese: Softened to room temperature for easy mixing.
- Powdered Sugar: For sweetness and smooth texture.
- Whipped Topping (Cool Whip) or Whipped Cream: Adds fluffiness and balances the tang of cream cheese.
- Vanilla Extract: Enhances flavor and adds a warm, sweet aroma.
This layer is almost cheesecake-like but without baking, giving the cake a luscious yet light texture.
Fresh Fruit Toppings
Fruit is what gives banana split cake its fresh, vibrant flavor. You’ll usually find:
- Bananas: Ripe but firm bananas work best so they don’t turn mushy.
- Pineapple Tidbits: Canned or fresh, drained well to avoid excess liquid.
- Strawberries: Fresh, sliced strawberries add color and natural sweetness.
Optional additions include blueberries, cherries, or even mango for a tropical twist.
Garnishes to Elevate the Dessert
No banana split is complete without toppings, and the same goes for the cake version. Common garnishes include:
- Chopped Nuts: Walnuts, pecans, or peanuts add crunch.
- Chocolate Syrup or Hot Fudge: For drizzling.
- Maraschino Cherries: A must-have for that banana split look.
- Shredded Coconut (Optional): For extra texture.
Substitutions and Variations
The beauty of banana split cake is how adaptable it is. Here are some variations you can try:
- Healthier Version: Use Greek yogurt instead of cream cheese, and honey instead of sugar.
- Chocolate Lovers’ Version: Add cocoa powder to the crust or drizzle with extra fudge.
- Nut-Free Version: Skip the nuts and use cookie crumbles or granola for crunch.
- Vegan-Friendly: Use dairy-free cream cheese and whipped topping alternatives.
Tools and Equipment
Kitchen Essentials
To make banana split cake, you don’t need fancy equipment—just a few basic tools:
- 9×13-inch baking dish (glass or metal)
- Mixing bowls (various sizes)
- Electric mixer or hand whisk
- Measuring cups and spoons
- Spatula (for spreading layers)
- Sharp knife (for slicing fruit)
Optional Tools to Make Preparation Easier
While not required, these tools can make the process smoother:
- Food processor (for crushing graham crackers quickly)
- Piping bag (for a decorative whipped cream topping)
- Cake server (for neat slices)
How to Make Banana Split Cake – Step-by-Step Guide
Step 1 – Preparing the Crust
The crust is the foundation of banana split cake, and getting it right is crucial. Start by crushing your graham crackers into fine crumbs. You can do this using a food processor for quick results, or place them in a zip-top bag and crush them with a rolling pin for a more hands-on approach.
Next, mix the crumbs with melted butter until the texture resembles wet sand. If you want a sweeter base, add a couple of tablespoons of sugar. Once combined, press the mixture firmly into the bottom of a greased 9×13-inch dish. Use the back of a spoon or the bottom of a glass to press it evenly.
The goal is to create a solid crust that holds the layers above without crumbling apart. Place the dish in the refrigerator for at least 15–20 minutes to allow the crust to firm up while you prepare the filling.
Step 2 – Making the Creamy Filling
The creamy filling is the heart of banana split cake—it’s rich, smooth, and perfectly balances the freshness of the fruit. To prepare it, begin by softening your cream cheese to room temperature. This is important because cold cream cheese can turn lumpy and make it difficult to blend smoothly.
In a large mixing bowl, beat the cream cheese until it’s fluffy and lump-free. Gradually add powdered sugar and continue mixing until the mixture becomes silky. Then fold in whipped topping or freshly whipped cream along with a splash of vanilla extract. The vanilla enhances the flavor and gives the filling a subtle sweetness that ties everything together.
Once ready, spread the filling evenly over the chilled crust. Use a spatula to smooth it out, ensuring there are no gaps or uneven spots. This creamy layer is what holds the fruit in place and creates that indulgent cheesecake-like texture. Refrigerate again for about 15 minutes to let it firm up slightly before adding the fruit.
Step 3 – Layering the Fresh Bananas
Now comes the fruit that gives this dessert its name—bananas! Choose ripe yet firm bananas so they stay intact and don’t turn mushy. Slice them into even rounds and place them directly on top of the creamy filling. Arrange them in neat rows to create an even layer.
Here’s a little trick: to prevent the bananas from browning, lightly toss them in lemon juice before layering them. Don’t worry—the lemon juice won’t overpower the flavor, but it will keep the bananas looking fresh and bright.
This banana layer is crucial because it provides sweetness, texture, and of course, that signature banana split flavor. Be generous—more bananas mean a richer bite in every slice.
Step 4 – Adding Pineapple and Strawberries
After bananas, it’s time to add the other fruity stars: pineapple and strawberries. Drain the pineapple tidbits well before using them. Excess liquid can make the cake soggy, and nobody wants a watery dessert. Spread the pineapple evenly over the bananas.
Next, wash and slice your strawberries into thin pieces. Arrange them neatly over the pineapple layer. Not only do strawberries add a pop of color, but they also bring a refreshing tartness that balances the sweetness of bananas and cream.
At this stage, your cake is already looking like a work of art. The contrasting colors of yellow pineapple and red strawberries create a visually stunning presentation, making the dessert look as good as it tastes.
Step 5 – Topping with Whipped Cream
What’s a banana split without fluffy whipped cream? Generously spread whipped topping or freshly whipped cream over the fruit layers. Use a spatula to cover every corner evenly.
For a fancier finish, pipe the whipped cream using a piping bag with a star tip. This creates a decorative look that will impress your guests. If you’re making this cake for a party, you can even layer the whipped cream into swirls or rosettes for a bakery-style effect.
This layer adds a cloud-like lightness that balances the dense crust, creamy filling, and juicy fruits. It also acts as the “glue” for your final toppings—nuts, chocolate, and cherries.
Step 6 – Garnishing with Nuts, Chocolate, and Cherries
Here’s where you can get creative! Just like a traditional banana split, the final touches make all the difference. Sprinkle chopped nuts—walnuts, pecans, or peanuts—over the whipped cream. Next, drizzle chocolate syrup or hot fudge sauce in zigzag patterns for a dramatic effect.
Finally, crown the cake with maraschino cherries. Place them evenly across the top so every slice gets at least one cherry. Not only do they add sweetness, but they also give that classic banana split look.
Optional garnishes like shredded coconut or colorful sprinkles can add extra flair, especially if you’re serving this cake at a birthday party.
Step 7 – Chilling Before Serving
Patience is key here! Once your cake is assembled, cover it with plastic wrap and refrigerate for at least 4–6 hours, or ideally overnight. This chilling time allows all the flavors to meld together and the layers to firm up, making it easier to slice cleanly.
When ready to serve, use a sharp knife dipped in hot water to cut neat squares. The contrast of the crunchy crust, creamy filling, fresh fruit, and fluffy whipped cream creates a perfect balance in every bite.
This final step ensures your banana split cake not only looks beautiful but also holds together when served—just like a professional dessert.
Tips for the Perfect Banana Split Cake
Keeping Bananas Fresh and Bright
One of the biggest challenges with banana split cake is preventing the bananas from turning brown. The trick? A light coating of lemon juice or pineapple juice. Both options work as natural preservatives without altering the flavor too much. Another pro tip is to slice the bananas right before layering them onto the cake rather than preparing them in advance.
Also, make sure the cake stays refrigerated. The cool temperature slows down the browning process and keeps the bananas looking appetizing for longer.
Enhancing the Flavor
If you want to take your banana split cake to the next level, consider these flavor boosters:
- Add a chocolate or caramel drizzle between layers for extra indulgence.
- Use flavored cream cheese (like strawberry or chocolate chip) for a fun twist.
- Sprinkle toasted coconut or crushed cookies on top for texture.
- Infuse the whipped cream with a hint of almond or rum extract for a gourmet touch.
Little tweaks like these can make your cake taste unique while still keeping the essence of the classic banana split.
Storing Leftovers Properly
Banana split cake can be stored in the refrigerator for up to 3 days. Cover it tightly with plastic wrap or store slices in airtight containers to keep it fresh.
Avoid freezing this dessert because the bananas and whipped cream don’t hold up well after thawing. The texture can become mushy, and the whipped cream may separate. Instead, enjoy it fresh within a few days—it’s unlikely there will be much left over anyway!
Variations of Banana Split Cake
No-Bake Version
The no-bake banana split cake is the most popular variation, and for good reason—it’s quick, simple, and requires no oven. Perfect for hot summer days when you don’t want to heat up the kitchen, this version uses a graham cracker crust, cream cheese filling, fresh fruit, and whipped topping. Everything comes together in layers, and the refrigerator does all the work to firm it up.
One of the best things about the no-bake version is how easily it can be adapted. Want to add more chocolate? Use an Oreo crust instead of graham crackers. Prefer a tropical flavor? Swap the pineapple with mango or passion fruit. You can also make individual portions in mason jars or dessert cups for a portable treat.
The no-bake banana split cake is ideal for beginners since it doesn’t require advanced baking skills. If you want a dessert that looks impressive but is easy to assemble, this is the one to start with.
Baked Cheesecake Style
If you’re a fan of rich, decadent cheesecakes, then the baked banana split cake variation is worth trying. This version starts with a baked graham cracker or cookie crust, followed by a cheesecake filling that’s baked in the oven until set. After cooling, you add the banana, pineapple, strawberries, and whipped cream layers.
The baked style is slightly denser than the no-bake version, and it holds together beautifully when sliced. The downside? It takes more time and effort compared to the chilled method. However, if you love the tangy flavor of baked cheesecake combined with fruity toppings, this variation is a dream come true.
It’s especially perfect for special occasions like birthdays or anniversaries, where you want a dessert that feels a little more elegant and substantial.
Mini Banana Split Cups
Looking for a party-friendly option? Mini banana split cups are the way to go. Instead of making one large cake, you create individual servings in small cups, glasses, or jars. Each cup gets a mini crust, a spoonful of creamy filling, sliced bananas, fruit toppings, and whipped cream. Garnish with chocolate drizzle, nuts, and a cherry on top for the full effect.
These mini desserts are not only adorable but also practical. Guests can grab one without needing a plate or fork, making them perfect for buffets, birthdays, and family get-togethers. They’re also customizable—kids might prefer extra sprinkles, while adults may appreciate a drizzle of caramel or even a splash of liqueur in the cream filling.
Mini banana split cups are also great for portion control since you can decide how big or small each serving will be.
Common Mistakes to Avoid
Overripe vs. Underripe Bananas
Bananas are the star of this dessert, but using the wrong ripeness level can make or break your cake. Overripe bananas can turn mushy and release too much liquid, which makes the layers soggy. Underripe bananas, on the other hand, lack sweetness and can taste bland.
The sweet spot? Use bananas that are ripe with a few small brown specks but still firm to the touch. They’ll provide the perfect balance of sweetness and texture. If you’re making the cake a day ahead, slightly firmer bananas are better since they’ll hold up longer without turning mushy.
Soggy Crust Issues
A soggy crust is one of the most common complaints when making banana split cake. This usually happens when the fruit isn’t drained properly. Pineapple, especially if canned, can carry a lot of excess juice. If you skip draining, all that liquid seeps into the crust, ruining its texture.
To avoid this, press the fruit gently with paper towels to remove extra moisture before layering. You can also brush the crust with a thin layer of melted chocolate before adding the filling—this creates a barrier and keeps the crust crisp.
Uneven Layering
Another mistake is rushing through the layering process. Uneven layers not only affect the appearance but can also impact the flavor balance. For example, if one side has more bananas and the other has more strawberries, some slices will taste overly sweet while others will be too tart.
Take your time to spread each layer evenly, and use a spatula to smooth things out. A little patience goes a long way in creating a dessert that’s as beautiful as it is delicious.
Serving Suggestions
Pairing with Drinks
Banana split cake is sweet, creamy, and fruity, so pairing it with the right drink can elevate the experience. Some great options include:
- Iced coffee or cold brew – balances the sweetness with a slight bitterness.
- Sparkling lemonade – adds a refreshing citrusy touch.
- Milkshakes – for an indulgent pairing, especially chocolate or vanilla.
- White wine or champagne – if serving at an adult gathering, these light drinks complement the fruity flavors.
Making it a Party Dessert
Want to wow your guests? Turn banana split cake into a centerpiece. Serve it in a glass trifle bowl so the layers are visible, making it look extra appealing. Add colorful sprinkles, edible glitter, or chocolate shavings on top for a festive touch.
You can also set up a DIY banana split cake bar. Prepare the base and cream filling ahead of time, then let guests choose their own toppings like nuts, chocolate chips, caramel, or different fruits. It turns dessert into an interactive and fun activity.
Nutritional Information
Calories and Macronutrients
Banana split cake is a decadent treat, so it’s not exactly low-calorie. On average, one slice (based on a 9×13 pan cut into 12 pieces) contains:
- Calories: 350–450
- Carbohydrates: 45–55g
- Fat: 18–25g
- Protein: 4–6g
Keep in mind that these numbers vary depending on your ingredients and toppings.
Healthier Ingredient Alternatives
If you love banana split cake but want a lighter version, here are some swaps to try:
- Use low-fat cream cheese or Greek yogurt instead of full-fat cream cheese.
- Replace sugar with honey, stevia, or maple syrup.
- Opt for whole-grain graham crackers for added fiber.
- Use fresh whipped cream made from light cream instead of store-bought whipped topping.
- Reduce or skip nuts and chocolate drizzle if you’re cutting calories.
These small changes can cut down on calories and fat while still letting you enjoy the flavors you love.
FAQs about Banana Split Cake Recipe
1. Can I make banana split cake ahead of time?
Yes! In fact, making it a day ahead allows the flavors to blend beautifully. Just keep it refrigerated until serving.
2. How long does banana split cake last in the fridge?
It typically lasts 3 days in the refrigerator when covered tightly. After that, the bananas may start to brown, and the texture can become less appealing.
3. Can I freeze banana split cake?
Freezing isn’t recommended because the bananas and whipped cream don’t thaw well. They can become mushy and watery.
4. What’s the best substitute for pineapple in this recipe?
Mango, peaches, or even mandarin oranges work well as a substitute if you’re not a fan of pineapple.
5. How do I prevent the bananas from turning brown?
Lightly coat the banana slices with lemon juice or pineapple juice before layering them. This keeps them looking fresh for longer.
Conclusion
Banana split cake is the ultimate crowd-pleasing dessert—creamy, fruity, and topped with all the fun garnishes of a classic banana split. Whether you choose the no-bake version for convenience, the baked cheesecake style for richness, or mini cups for parties, this dessert is guaranteed to impress.
It’s versatile, customizable, and easy enough for beginners while still being impressive enough for special occasions. With the right layering, fresh fruit, and a few pro tips, you’ll have a dessert that’s as beautiful as it is delicious.
So the next time you want a treat that brings smiles to everyone’s faces, whip up a banana split cake—it’s sunshine and happiness in every bite.


