Bacon Gravy Recipe: Bacon gravy is one of those comfort foods that hits all the right notes—creamy, savory, smoky, and packed with rich, homestyle flavor. It’s a Southern staple that has slowly made its way into kitchens across the country for good reason. At its core, bacon gravy is a simple concoction made from crispy, salty bacon, flour, milk, and a few well-chosen seasonings. When done right, it becomes the perfect sauce to smother over biscuits, mashed potatoes, chicken-fried steak, and even fried eggs.
Unlike traditional gravies made from meat drippings or stock, bacon gravy starts with something universally loved: bacon fat. That golden, smoky oil left behind after frying bacon becomes the base for a roux, which is then transformed into a thick, luscious sauce with the addition of milk. The flavor profile is rich and slightly smoky, with just a hint of saltiness from the bacon.
Whether you’re serving it up for a big Sunday brunch, a hearty family dinner, or just looking to upgrade your breakfast-for-dinner routine, bacon gravy is guaranteed to be the star of the table. And the best part? It’s incredibly easy to make with ingredients you probably already have on hand. In this guide, you’ll learn exactly how to make bacon gravy from scratch—even if you’re a total beginner in the kitchen.
Why You’ll Love This Recipe
There are a lot of things to love about this bacon gravy recipe. First off, it’s incredibly versatile. You can pour it over warm, flaky biscuits, mix it into mashed potatoes, or even use it as a base for other sauces. It’s also completely customizable—you can make it creamy, spicy, or even a little sweet depending on your taste.
But the real magic lies in how comforting it is. It brings that down-home Southern diner vibe right into your kitchen. Whether you’re waking up early for a big breakfast or coming home after a long day, bacon gravy gives you that warm, satisfying hug of flavor that makes everything feel just a little bit better.
You’ll also appreciate how quick and forgiving the recipe is. With just a few basic ingredients and a skillet, you can have homemade gravy on the table in under 30 minutes. No fancy tools, no culinary degree required—just you, your stove, and some bacon magic.
Ingredients You’ll Need
Primary Ingredients
Let’s get straight to the good stuff: what you’ll need to make this smoky, creamy, lip-smacking bacon gravy. Most of these ingredients are pantry staples, making this recipe not just delicious but also super convenient.
Here’s what you’ll need:
- Bacon (6–8 strips): The star of the show. Choose a good-quality thick-cut bacon for maximum flavor and fat.
- All-Purpose Flour (3 tablespoons): This helps create the roux that thickens your gravy.
- Whole Milk (2 cups): Gives the gravy that creamy, smooth consistency. You can also use 2% or non-dairy options.
- Salt (to taste): Keep in mind that bacon already adds a salty kick, so don’t go overboard.
- Black Pepper (1 teaspoon or more): Adds a little bite and brings out the smoky notes.
- Butter (optional – 1 tablespoon): If your bacon doesn’t yield enough fat, this can be added to supplement.
- Garlic Powder (optional – ½ teaspoon): Adds a deeper layer of flavor without overpowering the bacon.
- Onion Powder (optional – ½ teaspoon): Another depth-builder that makes your gravy taste gourmet.
These core ingredients are all you need for a classic bacon gravy that’ll have your family asking for seconds. You probably already have most of these in your kitchen, which makes this a fantastic last-minute addition to any meal.
Optional Add-Ins for Flavor Boost
Once you’ve mastered the basic version, you can experiment with some extra ingredients to make it your own:
- Crushed Red Pepper Flakes: For a little heat.
- Fresh Herbs (like thyme or rosemary): Adds a fragrant, earthy twist.
- Cream Cheese or Heavy Cream: For an extra indulgent, richer flavor.
- Grated Cheese (like sharp cheddar): To turn it into a bacon-cheese gravy combo.
- Sautéed Mushrooms or Onions: Mix them into the gravy for added texture and flavor.
These additions aren’t necessary, but they can take your bacon gravy to a whole new level. So if you’re feeling a little adventurous, go for it!
Tools and Equipment Required
Kitchen Tools Checklist
Before you dive into this delicious journey, let’s make sure your kitchen is prepped and ready. You don’t need anything fancy—just the basics:
- Cast Iron Skillet or Heavy-Bottomed Pan: Retains heat well and helps you get the bacon extra crispy.
- Slotted Spoon or Tongs: Perfect for removing the bacon while leaving the fat behind.
- Whisk: Crucial for mixing the roux and ensuring a smooth, lump-free gravy.
- Measuring Cups and Spoons: Helps you get the proportions just right.
- Mixing Bowl (optional): If you want to pre-mix ingredients or reserve bacon bits.
- Wooden Spoon or Silicone Spatula: For scraping the bottom of the pan and stirring evenly.
- Paper Towels and Plate: For draining the bacon after cooking.
- Serving Bowl or Gravy Boat: Because presentation matters too!
Having all your tools ready before you start cooking will save you time and stress. It also helps ensure your gravy turns out as silky and delicious as possible.
Prep Tips for Smooth Cooking
Let’s be honest—gravy can go from smooth to lumpy or burnt in a heartbeat if you’re not careful. That’s why prepping ahead is so important. Here are a few tips:
- Lay Out All Ingredients First: Don’t try to measure flour while your bacon is sizzling. Set up your workstation ahead of time.
- Use Room Temperature Milk: Cold milk straight from the fridge can cause clumps in your roux. Let it sit out for a few minutes before adding.
- Don’t Walk Away: Once you start making the roux, stay close. It only takes a few minutes for it to turn golden and ready for the next step.
- Reserve the Right Amount of Bacon Fat: Too much and your gravy will be greasy, too little and it will be dry. Aim for 2–3 tablespoons of fat for every 2 cups of milk.
Master these prep tips and you’ll be making bacon gravy like a pro in no time.
Prepping the Ingredients
How to Cook Bacon Properly
Let’s talk bacon, because this isn’t just a side ingredient—it’s the flavor foundation of your gravy. The key to excellent bacon gravy starts with perfectly cooked bacon. Here’s how to get it just right:
- Use a Cold Pan: Lay your bacon in a cold skillet before turning on the heat. This allows the fat to render slowly and evenly.
- Medium Heat is Your Friend: Cooking on high will burn the edges before the fat fully renders. Keep it at a medium level and let it sizzle slowly.
- Flip Occasionally: You want both sides crisp but not charred. Flip every couple of minutes.
- Drain but Don’t Discard the Fat: Remove the bacon with a slotted spoon or tongs and place it on paper towels. Leave the glorious golden fat behind in the pan—it’s liquid gold for your gravy.
The bacon should be crispy enough to crumble easily but not overcooked to the point of bitterness. Once it cools slightly, chop it into bite-sized bits for stirring back into the gravy at the end.
Prepping the Base for Gravy
Once the bacon is cooked and removed, the pan will have all those delicious brown bits stuck to the bottom. Don’t clean it—that’s where the flavor lives! You’re going to build your gravy right in that same pan, using the leftover fat as the base.
Here’s how to prepare:
- Measure the Bacon Fat: You need about 3 tablespoons. If you have more, spoon some out and save it for another day.
- Sprinkle in the Flour: This is the beginning of your roux, and the point where the magic starts.
- Whisk Continuously: You want the flour and fat to combine smoothly and cook until it turns a light golden brown. This cooks out the raw flour taste and builds flavor.
This prep stage sets the tone for your entire gravy, so take your time, stir with love, and enjoy the aroma that fills your kitchen.
Step-by-Step Guide to Making Bacon Gravy
Step 1: Cook the Bacon to Perfection
The journey to irresistible bacon gravy starts right here—with how you cook your bacon. While this may seem straightforward, getting it just right makes a big difference. Start by laying your bacon strips in a cold skillet. This helps the fat render slowly and evenly, giving you crisp bacon and plenty of flavorful fat to use for the gravy.
Turn the heat to medium and let the bacon sizzle. As it cooks, flip the strips occasionally to ensure both sides are evenly browned. Depending on the thickness of your bacon, this process takes about 8–10 minutes. You’re looking for a deep golden-brown hue and a satisfying crunch without burning the edges.
Once done, use a slotted spoon or tongs to transfer the cooked bacon onto a plate lined with paper towels. Let it drain and cool slightly before chopping it into small, bite-sized pieces. These crispy bits will get stirred back into the gravy later, adding texture and an extra burst of smoky flavor.
Now don’t touch that pan! All those brown bits and fat left behind? That’s where your flavor base is hiding.
Step 2: Reserve and Measure the Bacon Fat
This step is where you go from just “cooking bacon” to truly crafting bacon gravy. Once your bacon is done, assess how much fat is left in the pan. You’ll need about 3 tablespoons of bacon grease to start your roux. If there’s more, go ahead and spoon the excess into a jar and save it for later (hello, bacon-infused scrambled eggs!). If there’s not quite enough, feel free to supplement with a bit of butter.
Make sure to leave all those flavor-rich brown bits in the pan. They’re going to dissolve into your gravy and give it that incredible, smoky depth.
Once you’ve measured out your fat, return the pan to medium heat and get ready for the next game-changing step—making the roux.
Step 3: Make the Roux with Flour and Fat
The roux is the base that gives your gravy its body and silky texture. Once your fat is hot (but not smoking), sprinkle in 3 tablespoons of all-purpose flour. It’s crucial to whisk immediately and consistently—this ensures your flour doesn’t clump up and burn.
Let the flour and fat cook together for about 2–3 minutes, whisking constantly. You want the mixture to turn a light golden-brown color. This not only adds flavor but also cooks out that raw flour taste. If you like a slightly deeper, nuttier taste, you can let it go a minute longer—but don’t walk away. Roux can go from golden to scorched in a flash.
Your roux should now have a paste-like consistency and smell a bit like toasted nuts and bacon. That’s your cue to move to the next step.
Step 4: Gradually Whisk in Milk
This is where the magic happens—the transformation from bacon paste to velvety gravy. Slowly pour in 2 cups of warm milk, just a little at a time, while whisking constantly. The gradual addition is key—it prevents lumps and allows the roux to absorb the liquid evenly.
As you whisk, the mixture will begin to thicken. Keep the heat at medium and continue stirring until the gravy reaches your desired consistency. This typically takes about 5–7 minutes. If it gets too thick, just add a splash more milk to loosen it up. If it’s too thin, let it simmer a bit longer.
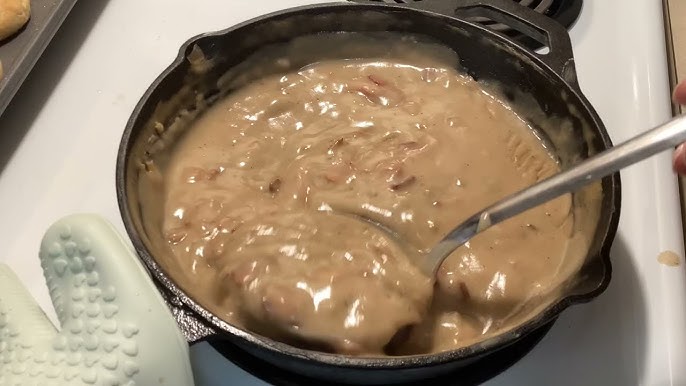
You should now have a creamy, smooth, bacon-infused gravy with a luxurious texture. The smell alone is enough to get mouths watering.
Step 5: Simmer, Stir, and Season to Taste
Now it’s time to finish strong. With the gravy simmering gently, stir in your chopped bacon pieces and let the flavors meld for another 2–3 minutes. This not only warms the bacon but also releases more of its flavor into the gravy.
Next, season your gravy. Start with freshly ground black pepper—about ½ to 1 teaspoon depending on your taste. Go easy on the salt until after you’ve tasted it; bacon is already salty and you don’t want to overdo it. You can also add a pinch of garlic powder or onion powder here if you’re going for a more robust flavor.
Give the gravy one final taste and adjust as needed. If you want it thicker, simmer for another couple of minutes. If it’s too thick, add a splash of milk. Once it’s just right, turn off the heat.
Boom! You’ve got homemade bacon gravy that tastes like it came straight from a Southern diner.
Serving Suggestions
Classic Pairings with Bacon Gravy
Bacon gravy is a versatile dish that pairs beautifully with all sorts of meals. Here are some all-time classics that practically demand a generous ladle of bacon gravy:
- Buttermilk Biscuits: This is the go-to pairing. Soft, flaky, buttery biscuits soak up that rich gravy like a sponge. It’s Southern comfort food at its best.
- Mashed Potatoes: Upgrade your standard mashed potatoes by topping them with bacon gravy. It’s a dinner table showstopper.
- Chicken-Fried Steak: The crispy breading of chicken-fried steak contrasts perfectly with the smooth, smoky gravy.
- Scrambled or Fried Eggs: A spoonful of bacon gravy takes your breakfast eggs to the next level.
- Country-Style Fried Chicken: Why stop at just hot sauce? Pour this gravy over a crispy fried chicken thigh for a next-level meal.
- Grits: Add a savory spin to your morning grits with a drizzle of bacon gravy.
Whether you’re hosting brunch or just treating yourself, bacon gravy adds that savory touch that makes the whole meal feel a little more special.
Creative Ways to Use Bacon Gravy
Once you’ve mastered the basics, you’ll find that bacon gravy can be used in all kinds of creative ways. Here are some ideas you might not have tried yet:
- Gravy Pizza: Use bacon gravy as a base sauce on pizza instead of tomato. Top with cheese, sausage, and scallions for a savory twist.
- Bacon Gravy Burgers: Pour a spoonful onto your burger for a messy, delicious upgrade.
- Savory Bread Pudding: Swap out cream for bacon gravy in your next savory bread pudding recipe.
- Loaded Baked Potatoes: Instead of sour cream and butter, top your baked potato with bacon gravy and cheddar cheese.
- Eggs Benedict with a Southern Twist: Replace the hollandaise with bacon gravy for a bold new take.
The possibilities are endless, and once you start experimenting, you’ll wonder how you ever lived without this gravy.
Tips for Perfect Bacon Gravy
Avoiding Lumps and Burnt Bits
Nobody likes lumpy gravy—or worse, gravy that tastes burnt. If you’ve ever made a roux-based sauce before, you know how easily things can go south. But don’t worry—with a few simple tricks, you can ensure your bacon gravy is smooth, rich, and full of flavor every single time.
First and foremost, the key to lump-free gravy is constant whisking. The moment you sprinkle flour into the hot bacon fat, start whisking vigorously to combine the two into a smooth paste. If you stop stirring or add all the milk at once, you’re asking for clumps. Instead, add the milk slowly, about ¼ cup at a time, while whisking non-stop. Let the roux absorb each portion of milk before adding more.
Another trick? Use warm milk instead of cold. Cold milk can shock the roux, which may cause it to seize and create lumps. If you forgot to take the milk out ahead of time, just pop it in the microwave for 30–60 seconds.
To avoid burnt bits, cook the flour just until it turns golden. Don’t try to rush this step over high heat. Medium is your friend. And always scrape up the brown bits from the bottom of the pan while whisking—that’s where the flavor lives, but if left unattended, they can burn and turn your gravy bitter.
Finally, if you do end up with a lumpy mess (hey, it happens), don’t panic. You can strain the gravy through a fine mesh sieve or give it a quick blend with an immersion blender to bring it back to silky perfection.
How to Fix Common Mistakes
Even experienced home cooks can run into hiccups when making gravy. Here are some of the most common issues and how to fix them fast:
1. Gravy is too thick: This usually means you’ve either added too much flour or not enough liquid. Simply whisk in a bit more warm milk—start with 1 tablespoon at a time—until it reaches your desired consistency.
2. Gravy is too thin: On the flip side, if your gravy is more soup than sauce, let it simmer a bit longer over medium-low heat. Stir constantly to prevent sticking. You can also make a slurry with 1 teaspoon of flour and 2 tablespoons of cold milk, then whisk it in slowly.
3. It tastes too salty: This often happens when using very salty bacon. To balance it out, add a splash of heavy cream or more milk to dilute the saltiness. Serving it with unsalted biscuits or potatoes can also help.
4. It’s too bland: You may need a touch more black pepper or a pinch of garlic/onion powder. If you want to up the umami, try adding a teaspoon of Worcestershire sauce or a small dash of soy sauce.
5. Lumps won’t go away: Don’t stress—just strain the gravy through a fine-mesh sieve or pulse it in a blender for a few seconds. It’ll be smooth again in no time.
Gravy might seem intimidating at first, but once you get the hang of it, it becomes second nature. Keep these tips in your back pocket and you’ll be the gravy master in your kitchen.
Storing and Reheating Leftovers
Best Practices for Storage
So you made a batch of heavenly bacon gravy—but what if there’s some left over? Good news: bacon gravy stores and reheats beautifully when done right. Here’s how to keep it fresh and flavorful.
First, allow the gravy to cool to room temperature before storing. Pour it into an airtight container—a glass jar or BPA-free plastic container works great. Store it in the refrigerator for up to 4–5 days.
Make sure to label the container with the date, especially if you’re planning to meal prep for the week. Bacon gravy doesn’t freeze as well as other sauces due to the milk content, but if you must freeze it, consider using a vacuum sealer or freezer-safe zip bags. Just keep in mind the texture might change slightly upon thawing.
Reheating without Losing Flavor or Texture
Reheating gravy can be tricky if you don’t do it properly. You want it to be warm, creamy, and just as tasty as the day you made it. Here’s the best way to do it:
- Stovetop Method (Preferred):
Pour the gravy into a saucepan and heat over low to medium-low heat. Add a splash of milk to thin it out, as it will thicken in the fridge. Stir constantly to prevent it from sticking or separating. - Microwave Method (Quick Option):
Place the gravy in a microwave-safe bowl. Cover it loosely and heat in 30-second increments, stirring between each burst. Again, add a little milk if needed to restore the right consistency.
Avoid reheating gravy over high heat—this can cause it to separate or develop a film on top. Gentle heat and constant stirring are your friends.
By following these methods, you can enjoy your bacon gravy all week long without sacrificing flavor or texture. In fact, some people say it tastes even better the next day!
Variations of Bacon Gravy
Creamy Bacon and Sausage Gravy
If you thought bacon gravy couldn’t get any better, wait until you try this twist—creamy bacon and sausage gravy. It’s the ultimate Southern breakfast indulgence, and it’s surprisingly simple to pull off.
Start by browning a half-pound of breakfast sausage in your skillet, breaking it up into crumbles. Once it’s fully cooked, add chopped bacon and cook together until crispy. From there, proceed with your roux using the combined fat from both meats.
This version is thicker, heartier, and meatier than classic bacon gravy. It pairs incredibly well with biscuits or over hash browns for a full-on Southern breakfast feast. Add a dash of cayenne or red pepper flakes if you like a little heat.
Spicy Southern Bacon Gravy
For those who love bold flavors, this spicy version brings the heat. Start with your base bacon gravy recipe, but spice things up with the following add-ins:
- ½ teaspoon crushed red pepper flakes
- ¼ teaspoon cayenne pepper
- A dash of hot sauce
- ½ teaspoon smoked paprika
These spices give the gravy a deep, smoky, spicy flavor profile that’s perfect for brunch or even dinner. It’s especially good served over fried chicken, eggs, or savory waffles.
Add some chopped jalapeños or pepper jack cheese for an extra kick. This version turns the classic comfort food into a flavor-packed powerhouse.
Nutritional Information
Calories and Macros Breakdown
Let’s be real—bacon gravy isn’t diet food, but that doesn’t mean you can’t enjoy it in moderation. It’s rich, indulgent, and full of flavor, but if you’re watching your intake, knowing what’s in each serving can help you plan better.
Here’s a rough estimate for one serving (about ¼ cup) of classic bacon gravy:
| Nutrient | Amount per Serving |
|---|---|
| Calories | 180–220 kcal |
| Total Fat | 16–18 g |
| Saturated Fat | 5–6 g |
| Cholesterol | 25–35 mg |
| Sodium | 400–500 mg |
| Carbohydrates | 6–8 g |
| Dietary Fiber | 0 g |
| Sugars | 2–3 g |
| Protein | 4–6 g |
Please Note: These values can vary depending on the type of bacon, milk, and any add-ins you use. For example, using turkey bacon or plant-based milk can significantly reduce fat and calories.
Also, if you’re adding sausage, cheese, or cream, expect the calorie count to go up. That said, bacon gravy is meant to be a treat—enjoy it guilt-free every once in a while!
Tips for a Healthier Version
If you’re looking for a lighter take on this rich classic, there are plenty of ways to cut calories and fat without sacrificing too much flavor:
- Use turkey bacon instead of pork bacon.
- Swap out whole milk for low-fat, skim, or unsweetened plant-based milk like almond or oat.
- Cut back on the roux by using less flour and fat, or substitute with cornstarch.
- Add veggies like mushrooms or spinach for fiber and volume.
- Season with herbs instead of relying on extra salt.
These tweaks may slightly change the texture or richness, but you’ll still get that savory, comforting taste you’re after.
FAQs about Bacon Gravy Recipe
1. Can I make bacon gravy ahead of time for a big brunch?
Yes! Just store it in the fridge for up to 4–5 days. Reheat gently on the stovetop with a splash of milk, and it’s good to go.
2. What can I use instead of milk if I’m lactose intolerant?
Try using unsweetened oat milk or almond milk. They’re creamy and mild enough to blend in perfectly.
3. Can I use the microwave to cook the bacon for gravy?
While you can, skillet-cooked bacon gives better texture and renders more fat—essential for the roux.
4. Is bacon gravy freezer-friendly?
Technically yes, but it may separate when thawed. For best results, store in the fridge and eat within a few days.
5. Can I add cheese to my bacon gravy?
Absolutely! Stir in some shredded cheddar or Parmesan at the end for an extra decadent twist.
Conclusion
Whether you’re slathering it over flaky biscuits for a weekend brunch, drizzling it on mashed potatoes at dinner, or just dipping bread into it straight from the pan (hey, no judgment), bacon gravy always delivers.
And the best part? It’s ridiculously easy to make. With just a handful of ingredients, a few basic kitchen tools, and this step-by-step guide, you can whip up a batch anytime the craving strikes.
So go ahead—grab that skillet, cook up some bacon, and make your own batch of this iconic gravy. One taste and you’ll never go back to the jarred stuff again.