Apple Puff Pastry Recipe: Apple puff pastries are one of those magical creations that bring together the buttery richness of puff pastry with the warm, spiced sweetness of cooked apples. They’re flaky, golden, and filled with gooey apple goodness — the kind of treat that makes your home smell like a bakery and your taste buds dance. If you’re looking for a dessert that’s impressive but incredibly easy to make, this is it.
What’s great about this recipe is that it doesn’t require hours in the kitchen or complicated techniques. Even if you’ve never made puff pastry desserts before, you’ll find this guide easy to follow. You’ll learn exactly how to get that perfect flaky crust, how to prepare the filling so it’s not too watery, and how to make the final product look bakery-worthy.
Perfect for a family gathering, a weekend treat, or just because you want something sweet without a fuss — this apple puff pastry recipe is your new go-to dessert.
What Makes It So Special
So, what sets this recipe apart from the others? It’s the little details. The precise way the apples are seasoned. The golden, crispy layers of pastry. The way everything comes together with minimal effort but maximum flavor. You can even make these pastries your own by tweaking the spices, adding nuts, or glazing them with a light sugar syrup.
Whether you’re serving them for breakfast, brunch, or dessert, this apple puff pastry recipe never fails to impress. And the best part? Your kitchen will smell absolutely heavenly while they’re baking.
List of Ingredients You’ll Need
Fresh and Flavorful Ingredients
Let’s break down exactly what you’ll need to create these flaky, delicious apple puff pastries. Keep in mind, quality matters here — especially when it comes to apples and pastry.
Here’s your go-to list:
- 2 sheets of puff pastry (thawed if frozen)
- 2 large apples (Granny Smith or Honeycrisp for best results)
- 2 tablespoons of unsalted butter
- 1/3 cup of brown sugar
- 1/2 teaspoon of cinnamon
- 1/4 teaspoon of nutmeg (optional but adds warmth)
- 1 tablespoon of lemon juice
- 1 tablespoon of all-purpose flour (for thickening the filling)
- 1 egg (for egg wash)
- 1 tablespoon of water (to mix with the egg wash)
Each ingredient plays a key role. The apples bring the sweet and tart flavor. The sugar and spices turn them into something magical. The puff pastry provides that irresistible crunch and flaky texture. The egg wash? It gives that golden, glossy finish that screams “homemade and delicious.”
Optional Add-ons for Extra Flavor
Want to jazz things up? Try these optional ingredients:
- Chopped walnuts or pecans – for a nutty crunch
- Raisins – for a chewy burst of sweetness
- Caramel drizzle – to take it over the top
- Powdered sugar – for a beautiful dusting before serving
- Vanilla extract – a splash into the filling for depth
These extras aren’t necessary, but they can elevate the pastry into something truly gourmet.
Tools and Equipment Required
Basic Kitchen Tools
Before diving into the recipe, gather all the tools you’ll need. This will make your baking process smooth and stress-free.
Here’s a checklist:
- Cutting board and sharp knife – to peel and slice the apples
- Mixing bowls – for combining your ingredients
- Rolling pin – in case you need to roll out the pastry
- Measuring spoons and cups – precision matters!
- Pastry brush – to apply the egg wash
These basics are enough for even the most novice baker to create something delicious. No fancy equipment required.
Baking Essentials
When it comes to baking, here are the essentials that will make your pastries perfect:
- Baking sheet – lined with parchment paper for easy cleanup
- Oven mitts – safety first!
- Cooling rack – to prevent sogginess on the bottom
- Fork – to crimp the pastry edges and create steam vents
- Knife or pizza cutter – to neatly slice your puff pastry sheets
Having everything prepped ahead of time helps keep the process fun and stress-free — exactly how baking should be.
Step-by-Step Instructions
Step 1 – Preparing the Apples
Start by peeling and slicing your apples into thin, even slices. This helps them cook evenly inside the pastry. If you like a chunkier filling, go for small cubes instead of slices — just make sure they’re consistent in size.
Once peeled and sliced, place the apples in a bowl and toss with lemon juice. This prevents browning and adds a nice zing.
In a small saucepan over medium heat, melt the butter. Add the apples, brown sugar, cinnamon, nutmeg, and flour. Stir well and let the mixture cook for 5–7 minutes until the apples soften slightly and the mixture thickens. You’re not cooking the apples all the way — just enough to draw out their flavor and create a thick, jammy consistency.
Let the mixture cool to room temperature before assembling your pastries. Warm filling can make the puff pastry soggy and hard to work with.
Step 2 – Prepping the Puff Pastry
When it comes to puff pastry, the golden rule is: keep it cold, but workable. If your pastry gets too warm, it becomes sticky and hard to handle, and you’ll lose those beautiful flaky layers when baking.
First, take the pastry out of the fridge (or freezer if you’re using frozen sheets). Let it thaw just until it’s pliable—usually about 30–40 minutes at room temperature. Don’t wait too long, or it’ll get sticky.
Once thawed, lightly flour your surface and roll the puff pastry out slightly. You don’t need to go crazy here — just enough to smooth out the creases and ensure even thickness.
Now, using a sharp knife or pizza cutter, cut the sheet into even squares or rectangles. The size is totally up to you. For individual servings, 4”x4” squares work perfectly.
Keep in mind:
- Don’t overwork the dough.
- Chill the pastry again if it becomes too soft.
- Work quickly, and keep unused pastry covered.
Place the cut squares on a parchment-lined baking sheet and cover them with a damp cloth or plastic wrap to prevent drying out while you work on the rest.
This step is crucial — the quality of your puff pastry directly affects the final outcome. Cold pastry = high rise and flaky texture.
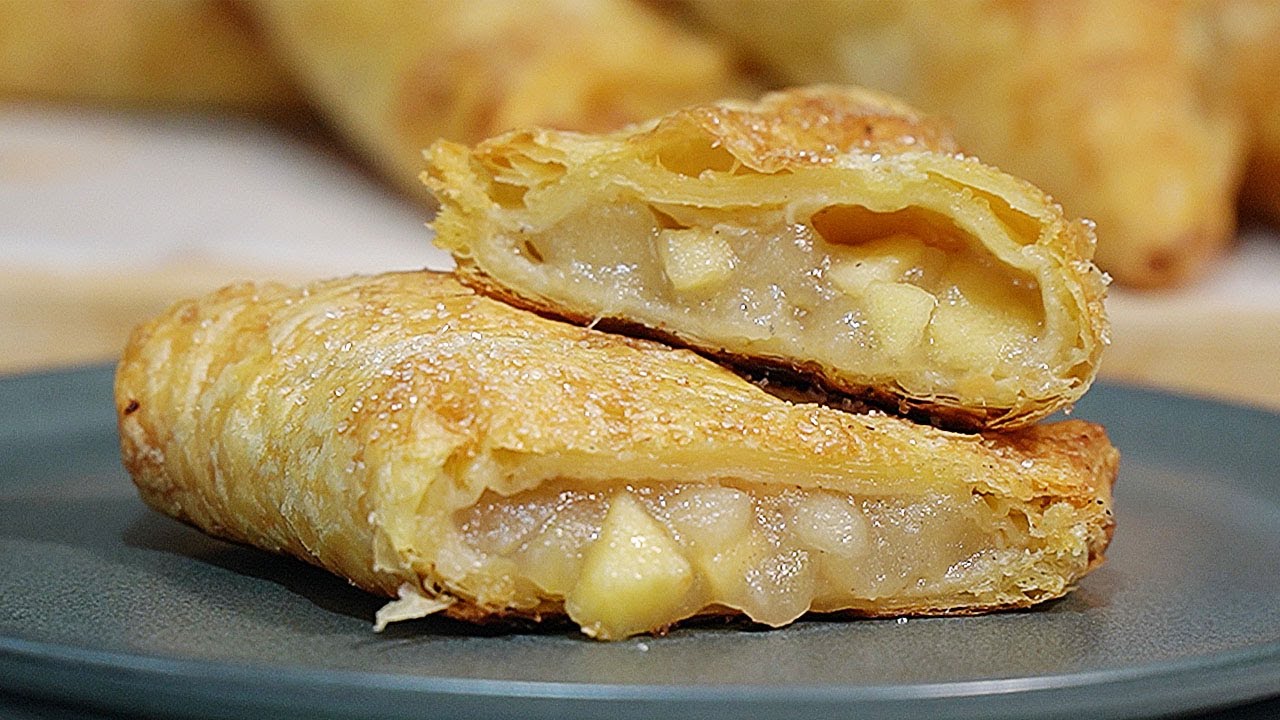
Step 3 – Assembling the Apple Puffs
Now the fun part — putting it all together!
Take one pastry square and spoon about 1 to 2 tablespoons of your cooled apple filling into the center. Don’t overfill it! Too much filling can cause leaks, making the pastry soggy and less attractive.
There are a few folding options, depending on the look you’re going for:
- Classic Turnovers: Fold the square diagonally into a triangle.
- Pocket Style: Place another square on top and seal.
- Open-Faced: Leave the filling exposed for a tart-like look.
Once folded, use a fork to crimp the edges tightly. This helps seal the filling inside and also gives it that homemade touch.
Before baking, create 1–2 small slits on top of each pastry using a sharp knife. This allows steam to escape and prevents bursting.
Brush the tops with your egg wash (egg mixed with water). This gives your pastries a golden, glossy finish that makes them look like they came from a bakery.
For extra flair, sprinkle a bit of granulated sugar or cinnamon-sugar mix on top. Trust me — it adds a delightful crunch and subtle sparkle.
At this point, you can place the assembled pastries in the fridge for 15 minutes. This quick chill helps them keep their shape while baking.
Step 4 – Baking the Apple Puffs
With your oven preheated to 400°F (200°C), it’s time to bake those beauties.
Place your tray in the center of the oven and bake for about 18 to 22 minutes, or until the pastries are puffed up and golden brown. Every oven is different, so start checking at the 18-minute mark.
Watch for the following signs:
- Deep golden color on the tops and edges
- Puff pastry visibly risen and flaky
- Some bubbling of the apple filling at the vents
Pro tip: Rotate your tray halfway through baking for even browning.
Avoid opening the oven door too often. Puff pastry relies on steam to rise properly, and frequent opening can let that steam escape.
Once done, remove from the oven and allow to cool on a wire rack for 10 minutes before serving.
Your kitchen will smell amazing — that buttery, spicy aroma is irresistible.
Step 5 – Cooling and Serving
Cooling might sound like a minor step, but it’s actually super important for puff pastry. If you bite into it too early, you risk burning your mouth on hot sugar syrup. Plus, it gives the filling a few minutes to set properly.
Let the pastries sit on a cooling rack for at least 10–15 minutes. This also helps the bottoms stay crisp and prevents sogginess.
Serving ideas:
- Dust with powdered sugar for a bakery-style look
- Drizzle with warm caramel or vanilla glaze
- Serve warm with a scoop of vanilla ice cream
- Pair with coffee or chai for a cozy treat
These apple puff pastries are best enjoyed fresh but can also be stored and reheated (more on that later). Whether you’re serving them for breakfast, brunch, dessert, or a special occasion, they’re bound to steal the show.
Expert Tips for Perfect Apple Puff Pastries
How to Avoid Soggy Bottoms
Nobody likes a soggy-bottomed pastry. To keep your apple puff pastries crispy and light:
- Cool the filling completely before using. Warm filling melts the butter in the dough too early.
- Use parchment paper to prevent sticking and absorb excess moisture.
- Don’t overfill your pastries. Less is more!
- Seal the edges properly to avoid leakage.
- Bake at high heat (400°F or above) to get a quick rise and golden crust.
- Use an egg wash on the tops only, not the edges — it can make sealing harder if applied to the seams.
If you’re still getting soggy results, try sprinkling a tiny bit of breadcrumbs or ground almonds under the filling to absorb moisture. It’s an old baker’s trick — works like magic.
Choosing the Right Apples
When it comes to apple puff pastries, the apple variety you choose can truly make or break the recipe. Not all apples are created equal—some are too mushy when baked, others are too tart or too sweet. So let’s break it down and help you pick the perfect one.
Best Apples for Baking:
- Granny Smith: These are the go-to apples for baking. They’re tart, firm, and hold their shape well, even under high heat.
- Honeycrisp: Sweet and slightly tart with a satisfying crunch. They also hold up beautifully in the oven.
- Braeburn: Another top contender. They’re juicy, flavorful, and maintain structure.
- Pink Lady: Sweet-tart and firm—perfect for puff pastries if you want a slightly sweeter finish.
- Fuji or Gala: Only use these if you prefer a very sweet apple, but note that they can get mushy during baking.
Avoid using Red Delicious or McIntosh apples. They’re too soft and break down too much in the oven, turning your filling into mush.
Tip: If you like complex flavors, combine two apple varieties (like Granny Smith + Honeycrisp) for a balanced, sweet-tart filling that adds depth to every bite.
The right apple adds not only flavor but also texture. A well-chosen apple will soften slightly during baking but still have a bit of bite — the contrast with the flaky pastry is what makes this dessert such a hit.
Variations to Try
Apple Cinnamon Twists
Want to try something different but equally tasty? Apple cinnamon twists are a fun and easy variation. Here’s how:
- Roll out the puff pastry and spread a thin layer of apple filling across the entire surface.
- Fold the pastry in half lengthwise and cut into strips.
- Twist each strip a few times and place on a baking sheet.
- Brush with egg wash and sprinkle with cinnamon sugar.
- Bake until golden and crispy.
These twists are portable, snackable, and look gorgeous on a brunch spread.
Apple and Cream Cheese Puffs
Another fantastic variation involves cream cheese, which adds a rich, tangy contrast to the sweet apples.
To make:
- Mix softened cream cheese with a bit of sugar and vanilla extract.
- Spoon a layer of cream cheese onto each puff pastry square before adding the apple filling.
- Assemble and bake as usual.
The result? A cheesecake-meets-apple-pie vibe that’s creamy, dreamy, and totally addictive. You could also add a drizzle of caramel on top to make it dessert-table ready.
Storing and Reheating Tips
Best Practices for Storage
Apple puff pastries are best enjoyed fresh, but if you have leftovers (lucky you), here’s how to keep them crispy and tasty:
- Room Temperature: Store in an airtight container for up to 1 day. Reheat before serving.
- Fridge: Wrap individually in plastic wrap and store for up to 3 days. This helps preserve their moisture while preventing them from getting too soggy.
- Freezer: Yes, you can freeze them! After baking and cooling completely, wrap tightly in plastic wrap and foil. Freeze for up to 1 month.
Just remember, puff pastry tends to lose its crispness in storage. Always reheat before serving.
Reheating Without Drying Out
To restore that flaky texture, skip the microwave. Here’s how to do it right:
- Oven Method (Best): Preheat to 350°F (175°C) and bake for 5–10 minutes until warmed through and crispy.
- Air Fryer: Reheat at 320°F (160°C) for 4–5 minutes. Works like a charm!
- Avoid the microwave unless you’re in a serious hurry—it can make the pastry rubbery and soggy.
If you froze your pastries, thaw them in the fridge overnight before reheating in the oven. This method keeps them tasting as fresh as the day they were baked.
Common Mistakes and How to Fix Them
Mistakes While Baking Puff Pastry
Even seasoned bakers can make mistakes with puff pastry. Here are the most common pitfalls — and how to avoid them:
- Working with warm dough: Puff pastry needs to stay cold. If it gets too warm, the butter melts before baking and ruins the layers.
- Underbaking: Puff pastry needs high heat and proper time to rise and crisp up. Pale pastries are usually undercooked in the middle.
- Not venting the top: No slits means trapped steam, which causes soggy or exploded pastries.
- Skipping egg wash: That golden, glossy finish? It doesn’t happen without the egg wash.
Troubleshooting Filling Issues
Your filling can also cause issues if not handled correctly:
- Too much liquid: Watery filling soaks into the pastry. Cook the apples until the mixture thickens and cool completely before filling.
- Overfilling: More isn’t always better. Stick to about 1–2 tablespoons of filling per pastry.
- Uneven apple sizes: This leads to uneven cooking. Slice apples thinly and consistently for best results.
Don’t worry — baking is all about learning. Even “mistakes” can be delicious.
Nutritional Information
Caloric Breakdown
While apple puff pastries are undeniably indulgent, it’s still helpful to know what you’re consuming — especially if you’re tracking calories or just aiming for a balanced diet.
Here’s a rough estimate for one standard apple puff pastry (based on a 4”x4” square):
| Nutrient | Amount (approx.) |
|---|---|
| Calories | 280–320 kcal |
| Total Fat | 16–18g |
| Saturated Fat | 9g |
| Carbohydrates | 35–40g |
| Sugars | 16g |
| Protein | 3–4g |
| Fiber | 2g |
| Sodium | 150–200mg |
These numbers can vary depending on your specific ingredients (store-bought vs. homemade puff pastry, apple type, sugar quantity, etc.).
Healthier Alternatives
Want to enjoy this treat with less guilt? Here are a few simple swaps:
- Use whole wheat puff pastry (available in some health stores).
- Reduce the sugar in the filling, or swap brown sugar for coconut sugar.
- Use light butter or dairy-free margarine if you’re watching fat intake.
- Add oats or flaxseed to the filling for extra fiber.
- Replace egg wash with milk or plant-based milk for a vegan touch.
You can even use phyllo dough for a lighter, crispier version. Just be sure to layer and brush with oil between sheets.
Remember, balance is key — a little indulgence here and there is absolutely okay!
Pairing Ideas
Drinks That Complement Apple Puff Pastry
These flaky, fruity pastries pair beautifully with a range of beverages. Depending on the occasion, you can go warm and cozy or cool and refreshing.
Perfect drink pairings:
- Hot coffee or espresso – the bitterness complements the sweetness.
- Chai latte – cinnamon and spices echo the pastry flavors.
- Hot apple cider – double the apple goodness!
- Vanilla milkshake – for a decadent dessert combo.
- Sparkling wine or Champagne – for brunch or celebration.
Want a cozy weekend vibe? Try dunking a warm apple puff into your morning latte. You won’t regret it.
Side Dishes and Dessert Companions
While apple puff pastries often shine on their own, you can easily elevate your presentation with a few sides or toppings:
- Whipped cream or mascarpone – light, creamy, and easy.
- Vanilla or cinnamon ice cream – a warm and cold contrast.
- Warm caramel sauce – for drizzling.
- Fresh fruit slices – apples, pears, or berries on the side.
- Cheese board – yes, sweet and savory pair well together. Add brie or cheddar next to your pastry for a unique pairing.
Great for brunch tables, tea parties, or casual get-togethers — you can serve them solo or go all out.
FAQs about Apple Puff Pastry Recipe
Can I use store-bought puff pastry?
Absolutely! Store-bought puff pastry is a great time-saver and works beautifully in this recipe. Just be sure to thaw it properly before using.
What’s the best apple for this recipe?
Granny Smith and Honeycrisp apples are top choices due to their firmness and balanced flavor. You can also mix varieties for a more complex taste.
Can I make these ahead of time?
Yes, you can assemble the pastries and refrigerate them (unbaked) for up to 24 hours. Bake when ready. You can also bake and freeze them for up to a month.
How do I prevent sogginess in the pastry?
Cool your filling completely, avoid overfilling, and bake at a high temperature. You can also sprinkle a bit of flour or ground nuts under the filling to absorb moisture.
Can I freeze apple puff pastry?
Definitely. Freeze baked and cooled pastries in an airtight container. Reheat in a 350°F oven for 10–12 minutes to restore crispness.
Conclusion
Whether you’re a beginner baker or a seasoned pastry pro, this step-by-step guide ensures a bakery-worthy result every single time. With simple ingredients, easy techniques, and a bit of patience, you can whip up these beauties in under an hour.
Plus, once you’ve nailed the basics, the possibilities are endless — from creative twists and fillings to elegant serving ideas. So next time you’re craving something sweet, skip the store-bought snacks and bake a batch of these apple puff pastries instead.
Your kitchen will smell amazing. Your tastebuds will thank you.


