Tarte Tatin Recipe: Tarte Tatin is more than just a dessert—it’s a delicious piece of culinary history. This classic French upside-down tart was famously invented by accident in the 1880s by the Tatin sisters, Stéphanie and Caroline, who ran a hotel in the Loire Valley. One day, while trying to make a traditional apple pie, Stéphanie overcooked the apples in butter and sugar. In a rush to rescue the dish, she slapped pastry dough on top and threw it in the oven. She served it upside down, and to everyone’s surprise, it was a massive hit.
Over the years, the Tarte Tatin has grown from humble beginnings to become a celebrated staple in patisseries around the world. With its rich caramelized apples and golden, flaky crust, it’s easy to see why. This dessert strikes a perfect balance between rustic comfort and elegant flair.
Why Tarte Tatin is a Must-Try Dessert
You might ask, “What makes Tarte Tatin so special?” For starters, it’s deceptively simple but delivers big flavor. The caramelized apples offer a deep, rich sweetness balanced by a touch of tartness. The pastry, often puff or shortcrust, brings buttery crispness to every bite. And because it’s baked upside down, the apples get beautifully glossy and infused with caramel.
What also sets it apart is its versatility. You can serve it warm with vanilla ice cream, chilled with whipped cream, or simply on its own. It works as a weeknight treat or a show-stopping holiday dessert. And despite its gourmet appearance, it doesn’t require advanced baking skills—just some patience and attention to detail.
Ingredients You’ll Need
Core Ingredients for the Tarte
To craft a traditional Tarte Tatin, you’ll need just a handful of pantry staples and fresh produce. Here’s a rundown of the essentials:
- Apples – 6 to 8 medium-sized firm apples (Granny Smith, Honeycrisp, or Golden Delicious are ideal)
- Sugar – 3/4 cup (150g) granulated white sugar
- Butter – 1/2 cup (1 stick or 115g) unsalted butter
- Lemon juice – 1 tbsp (to prevent apples from browning and add acidity)
- Puff pastry – 1 sheet (store-bought or homemade)
- Salt – A pinch, to balance sweetness
- Vanilla extract (optional) – 1 tsp for extra flavor
These simple ingredients combine to create a dessert that tastes far more complex than its preparation suggests. Each item has a role—apples provide texture and tartness, butter and sugar make the luscious caramel, and the pastry ties it all together with crunch.
Optional Additions for a Twist
Want to give your Tarte Tatin a creative spin? Try these optional add-ins:
- Cinnamon or nutmeg – Just a pinch adds warmth and depth.
- Bourbon or dark rum – A tablespoon stirred into the caramel brings an adult twist.
- Orange zest – For a bright citrus kick.
- Nuts – Pecans or walnuts can add crunch and richness.
- Maple syrup or honey – Replace part of the sugar with these for a different flavor profile.
These tweaks are totally optional, but they can turn a classic tart into your own signature dish.
Tools and Utensils Required
Before diving in, make sure your kitchen is stocked with the right tools. Here’s what you’ll need:
- Oven-safe skillet or tarte tatin pan (preferably cast iron or non-stick, 9 to 10 inches)
- Cutting board and sharp knife
- Peeler and corer
- Mixing bowl
- Rolling pin (if using homemade pastry)
- Spatula or wooden spoon
- Pastry brush
- Cooling rack
Having everything prepped and ready will make the process much smoother, especially during the caramelization step, which requires close attention.
Preparing for the Tarte Tatin
Choosing the Right Apples
Not all apples are created equal, especially when it comes to baking. For Tarte Tatin, you want firm apples that hold their shape under heat and have a nice balance of sweetness and tartness. Here are the best varieties to consider:
- Granny Smith – Firm and tart, these are ideal for balancing the caramel’s sweetness.
- Honeycrisp – Juicy, slightly sweet, and hold up well.
- Braeburn – Aromatic and balanced; they caramelize beautifully.
- Golden Delicious – Sweet and soft, but they pair well with firmer varieties.
- Pink Lady – A great mix of sweet and tart with excellent texture.
Avoid overly soft apples like Red Delicious or McIntosh, which can become mushy and collapse during baking.
Pro Tip: Mix apple varieties for a more layered flavor profile and texture contrast. Try combining Granny Smith with Honeycrisp for tartness and sweetness.
Tips for a Flaky, Buttery Pastry
A perfect Tarte Tatin has a golden, flaky crust that complements the rich apples. Whether you’re using store-bought puff pastry or making your own, follow these tips:
- Keep it cold – Work with chilled dough to prevent the butter from melting before baking.
- Don’t overwork it – Overhandling can make the dough tough.
- Dock the pastry – Prick the pastry lightly with a fork to help it bake evenly and prevent puffing up too much.
- Trim to size – Cut the pastry about an inch larger than your skillet’s diameter so it can tuck down around the apples.
If you’re feeling ambitious, homemade rough puff pastry will elevate the tart, but a quality store-bought one works just fine.
Step-by-Step Guide to Making Tarte Tatin
Step 1 – Preheat the Oven and Prepare the Pastry
Before you start anything, preheat your oven to 375°F (190°C). This ensures a consistent baking temperature and speeds up the process once your tart is assembled.
Next, roll out your pastry sheet on a lightly floured surface to about 1/8 inch thick. If it’s already rolled, just cut it into a circle slightly larger than your skillet or tart pan. Place it in the fridge to keep cold while you work on the caramel and apples.
This step may seem minor, but prepping the pastry early allows you to move seamlessly from stovetop to oven, which is crucial when dealing with hot caramel.
Step 2 – Caramelizing the Sugar and Butter
Now for the most crucial and slightly dramatic part—making the caramel. This step creates the deep, glossy, and almost toffee-like base that makes the Tarte Tatin unforgettable.
Place your oven-safe skillet over medium heat and add the sugar evenly across the surface. Let it sit undisturbed until it starts to melt and turn a golden amber color. This usually takes about 5 to 7 minutes, but keep a close eye—it can go from perfect to burnt in seconds.
Once the sugar has melted, slowly add the butter a few cubes at a time. Stir gently until everything is well combined. Add a pinch of salt to balance the sweetness. If you’re using vanilla extract or any of the optional flavorings like cinnamon or citrus zest, now’s the time to mix them in.
Once the caramel has thickened slightly and turned a deep amber (but not too dark), remove it from the heat. It will continue cooking slightly in the pan’s residual heat, especially if you’re using cast iron. Swirl the pan gently to ensure an even coating on the base.
Pro Tip: Do not stir too aggressively while caramelizing—it can cause crystallization. Swirling is the secret to that silky, glassy finish.
Step 3 – Arranging the Apples
Time to make your tart as beautiful as it is tasty. Carefully place the apple quarters into the caramel, rounded side down, and pack them tightly—remember, they’ll shrink a bit as they bake. Neatly arranged apples not only look gorgeous when inverted but also cook more evenly.
If your apple slices are thin or irregular, feel free to double-layer them slightly. There’s no rule saying the bottom row has to be perfect—just the ones that’ll be seen after flipping.
Drizzle any remaining lemon juice over the apples for a slight acidic balance. This also helps prevent browning if there’s a bit of delay before going into the oven.
Some chefs prefer to pre-cook the apples slightly in the caramel to soften them, especially if using firmer apples like Granny Smith. If that’s your plan, let them simmer gently for 5–8 minutes, turning once to ensure even coating.
Just remember: the apples will continue cooking in the oven, so don’t go too far or they’ll become mushy and collapse when flipped.
Step 4 – Adding the Pastry on Top
Retrieve your chilled pastry circle from the fridge and gently lay it over the apples. Tuck the edges down inside the pan with a spoon or your fingers, as if you’re tucking a cozy blanket around the apples. This helps trap the juices and gives the tart that signature rounded edge when flipped.
Use a fork to lightly dock the pastry, which allows steam to escape and prevents it from puffing up unevenly. You don’t want a balloon on top—you want that crisp, golden finish that hugs the fruit below.
You can also brush the top with a little milk or egg wash if you want an extra shiny finish, though it’s not required since it’ll be the bottom after flipping.
Give everything one last check. Apples snug? Pastry tucked? Oven ready? Let’s bake!
Step 5 – Baking to Golden Perfection
Place the entire pan in your preheated oven and bake for 35 to 45 minutes, or until the pastry is a deep golden brown and you see caramel bubbling up around the edges.
This stage is crucial because it’s when the caramel and apples truly fuse into one luscious layer beneath that pastry lid. If your pastry looks pale, give it a few more minutes—undercooked pastry is the fastest way to ruin a good tart.
Once done, remove the pan from the oven and let it cool for 5 to 10 minutes. This short rest allows the caramel to slightly firm up without hardening, making the inversion smoother and less messy.
Important: Do not let it cool completely in the pan. The caramel can harden and glue your tart in place.
Inverting and Serving the Tarte Tatin
How to Safely Flip the Tarte
This part can feel like a make-or-break moment—but don’t stress, it’s easier than it looks if you follow the right steps.
- Place a large plate or serving platter (larger than your pan) upside down over the skillet.
- Hold both the skillet and the plate tightly with oven mitts.
- In one smooth motion, flip the skillet and plate together. Use confidence here—hesitation can lead to disaster!
- Let the pan sit over the plate for a minute to allow all the caramel and apples to release.
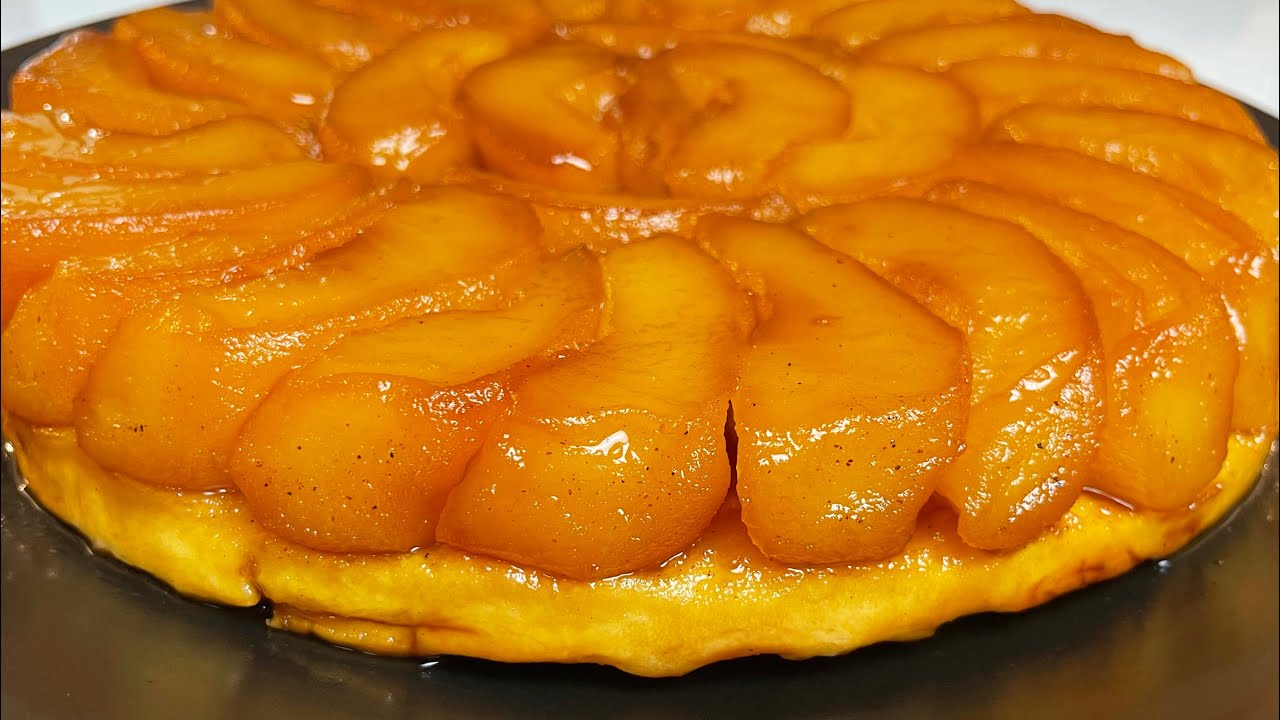
- Slowly lift the pan. You should see a glistening tart with beautifully caramelized apples on top.
If some apples stick to the pan (hey, it happens), gently remove them and place them back into the tart. No one will ever know.
Pro Tip: Warm caramel is sticky and hot—work carefully, and keep kids and pets out of the kitchen during this step.
Best Ways to Serve and Present
Tarte Tatin is best served warm, when the caramel is still gooey and the pastry crisp. But honestly, it’s pretty irresistible at room temperature or even chilled from the fridge.
Top serving ideas include:
- Vanilla bean ice cream (classic and complementary)
- Whipped cream (light, fluffy contrast to the rich tart)
- Crème fraîche (for a tangy French twist)
- A drizzle of salted caramel sauce (for the extra-indulgent crowd)
Want to get a bit fancier? Garnish with a few fresh mint leaves or a dusting of powdered sugar. It’s all about elevating the presentation to match the flavor.
Expert Tips for the Perfect Tarte Tatin
Avoiding Common Mistakes
Even though Tarte Tatin is relatively simple, a few common missteps can trip up home bakers. Let’s break them down so you don’t make the same mistakes:
- Burning the caramel: The line between perfect and burnt is razor-thin. Keep your heat medium-low and watch closely. Once the sugar turns a deep amber, remove it from heat immediately.
- Using the wrong apples: Overly soft apples will collapse and make your tart soggy. Always go for firm, tart varieties like Granny Smith or Honeycrisp.
- Underbaking the pastry: A pale pastry top means a soggy tart bottom. Make sure it turns golden brown, and if necessary, bake a few minutes longer.
- Letting it cool too long in the pan: This can cause the caramel to harden and stick. A 5-10 minute rest is all you need—then flip.
- Not tucking the pastry: If you just plop the dough on top, it won’t hug the apples. Tuck it in around the edges to create that beautiful rim and lock in flavor.
Avoid these blunders and you’ll be well on your way to tart perfection.
Enhancing Flavor with Aromatics
Want your Tarte Tatin to really pop? Use natural aromatics to deepen the flavor without overpowering the caramel:
- Vanilla bean paste or extract: Adds depth and warmth.
- Cinnamon sticks or ground cinnamon: For that cozy, fall flavor.
- Star anise or cloves: Use sparingly for exotic complexity.
- Lemon or orange zest: Brightens and balances sweetness.
- Fresh herbs: A sprig of thyme or rosemary can add a surprising savory note that works beautifully.
Infuse your caramel or sprinkle directly over the apples before baking. Little touches like these can elevate a classic into something unforgettable.
Variations of Tarte Tatin
Pear, Peach, or Banana Tarte Tatin
Apples are the classic, but once you master the basics, why not experiment with other fruits? Here are a few delicious options:
- Pears: Bartlett or Bosc pears work beautifully. They soften quickly, so be gentle during cooking. Add a pinch of nutmeg or allspice for a deeper flavor.
- Peaches: Choose firm, not overly ripe peaches. They pair wonderfully with bourbon or vanilla. Peel them first to prevent the skin from toughening during baking.
- Bananas: Slice them in halves or thick rounds. Caramelize gently—they soften fast. A splash of dark rum or a sprinkle of brown sugar intensifies the flavor.
Each variation brings its own texture and sweetness to the table. You’ll love discovering which one becomes your personal favorite.
Savory Tarte Tatin Ideas
Not in the mood for dessert? Try a savory twist on this French favorite! Swap apples for vegetables or cheese and ditch the sugar:
- Tomato and Goat Cheese Tatin: Caramelized cherry tomatoes with herbed goat cheese and puff pastry.
- Caramelized Onion Tatin: Sweet onions with balsamic vinegar and gruyère or brie.
- Beetroot and Feta Tatin: Earthy beets paired with tangy feta, finished with thyme or oregano.
- Mushroom and Thyme Tatin: A hearty, umami-packed version that works great as a main dish.
Use the same flipping technique for presentation. These savory versions are excellent appetizers, brunch options, or light dinners.
Wine and Beverage Pairings
Perfect Pairings for Dessert Lovers
Pairing the right drink with your Tarte Tatin can elevate the experience. Here are a few go-to pairings for a sweet finish:
- Sauternes or late-harvest Riesling: These dessert wines complement the caramel and apple notes beautifully.
- Sparkling wine or Champagne: The bubbles cleanse the palate and contrast the tart’s richness.
- Calvados (apple brandy): A French classic that enhances the apple flavor.
- Cognac: Deep, warming, and sophisticated.
Serve your drink slightly chilled alongside a warm slice of tart for a truly indulgent experience.
Non-Alcoholic Beverage Options
No alcohol? No problem. These non-boozy beverages are just as delightful:
- Hot spiced apple cider: Amplifies the cozy, autumnal vibe.
- Vanilla chai tea or rooibos: Adds spice and warmth to each bite.
- Sparkling water with lemon: A clean, refreshing contrast.
- Coffee or espresso: A bold pairing for those who love rich flavors.
Whatever you choose, let your drink mirror the mood—comforting, warm, and perfectly paired.
Storing and Reheating Tips
How to Keep It Fresh
So, you have leftovers? Lucky you. Here’s how to keep them tasting as good as the first day:
- Cool completely before storing. This prevents condensation and soggy crust.
- Store in the fridge for up to 3 days, tightly wrapped or in an airtight container.
- Avoid stacking slices. Keep the tart whole if possible—it preserves texture.
If the caramel hardens in the fridge, don’t worry. It’ll soften beautifully when reheated.
Best Practices for Reheating
Want that same fresh-from-the-oven crispness? Here’s how to reheat without ruining the texture:
- Oven (best method): Preheat to 300°F (150°C). Place the tart (or slice) on a baking tray for 10–15 minutes until warmed through and the pastry is crisp.
- Microwave (quick fix): Place a slice on a plate and cover with a paper towel. Heat for 30–45 seconds. Note: This can make the pastry soft.
- Skillet method: Place the slice in a non-stick pan over medium-low heat. Cover with a lid and heat gently for a crisp bottom.
Avoid high heat, which can burn the caramel or make the pastry rubbery.
Nutritional Information
Caloric Breakdown
Tarte Tatin is undeniably indulgent, but knowing what’s inside can help you enjoy it mindfully. Here’s a basic breakdown of a standard slice (1/8 of a 9-inch tart):
| Nutrient | Approximate Amount |
|---|---|
| Calories | 320–400 kcal |
| Carbohydrates | 45–55g |
| Sugars | 30–40g |
| Fats | 15–20g |
| Saturated Fat | 9–12g |
| Protein | 2–4g |
| Fiber | 2–4g |
Of course, this varies depending on your ingredients. Using store-bought puff pastry, adding nuts, or extra caramel can increase the calorie count. But let’s be real—this is dessert, not a green smoothie. It’s okay to treat yourself now and then!
Making It Lighter
Want a lighter version of this decadent treat? Try these swaps:
- Use a reduced-sugar caramel by cutting sugar to 1/2 cup or using a sugar substitute like coconut sugar or stevia blends.
- Opt for light puff pastry or even phyllo dough (layered with minimal butter).
- Reduce the butter to 1/3 cup without sacrificing too much flavor.
- Bulk up the fruit—more apples mean more fiber and natural sweetness, which lets you cut back on added sugars.
You can also add fiber-rich fruit like pears or use whole-grain pastry dough if making from scratch.
FAQs about Tarte Tatin Recipe
1. Can I make Tarte Tatin ahead of time?
Yes! You can make the Tarte Tatin a day in advance. Store it covered in the refrigerator, and when ready to serve, gently reheat it in a 300°F (150°C) oven for about 10–15 minutes to refresh the caramel and crisp the pastry.
2. What’s the best apple variety for Tarte Tatin?
Granny Smith, Honeycrisp, Braeburn, and Golden Delicious are all great. The key is choosing firm apples that hold their shape and offer a nice balance of tartness and sweetness.
3. Can I use store-bought pastry?
Absolutely. Store-bought puff pastry works beautifully and saves time. Just make sure it’s thawed properly and kept cold before baking for the best texture.
4. How do I prevent the caramel from burning?
Use medium to low heat and do not walk away while it’s cooking. Watch for the color shift to amber—then immediately remove it from the heat. Stir gently and avoid overcooking.
5. Is Tarte Tatin supposed to be served warm or cold?
It’s traditionally served warm, which makes the caramel gooey and the pastry crisp. But it’s also delicious at room temperature or even cold, especially with whipped cream or ice cream.
Conclusion
Tarte Tatin is one of those magical desserts that feels fancy but is rooted in simplicity. Born from a kitchen mistake, it’s now celebrated as a symbol of rustic elegance in French cuisine. With its rich caramelized apples, golden buttery crust, and deep, warm flavors, it strikes a beautiful balance between indulgent and comforting.
Whether you’re making it for a dinner party, holiday gathering, or a lazy weekend treat, the steps are straightforward—and the payoff is huge. And once you’ve mastered the classic version, you can play with variations, add your own signature touches, or even venture into savory territory.
So next time you’re craving something sweet, skip the box mix and create your own little slice of French culinary history. Trust me—once you flip your first Tarte Tatin and reveal that glossy, golden beauty, you’ll be hooked for life.


