Taco Beef Recipe: When it comes to easy, flavorful, and universally loved meals, taco beef tops the list. Whether you’re hosting a quick weekday dinner, prepping for Taco Tuesday, or feeding a crowd, a solid taco beef recipe never disappoints. The magic lies in its simplicity: savory, seasoned ground beef wrapped in a warm tortilla or crispy shell, ready to be topped with your favorite ingredients. It’s comfort food, party food, and lazy-night food—all in one.
Taco beef is beloved for its bold flavors and versatility. It’s not just for tacos—you can use it in nachos, burritos, taco bowls, or even stuffed peppers. And the best part? It’s easy to make, budget-friendly, and doesn’t require any fancy ingredients. But there’s a difference between just throwing some beef in a pan and crafting a taco masterpiece. This guide will walk you through every detail, ensuring your taco beef comes out juicy, flavorful, and crave-worthy every time.
You’ll also get tips on seasoning, prepping, and building the perfect taco, along with suggestions for toppings and side dishes that will elevate your taco night into a full-on fiesta. Let’s get cooking!
Ingredients You’ll Need
Getting the ingredients right is the first step to taco greatness. A perfectly seasoned beef taco begins with quality meat and a blend of spices that make your taste buds dance. Here’s what you’ll need to get started:
Main Ingredients
- 1 lb ground beef (80/20 is ideal for juiciness)
- 1 small onion, finely chopped (optional, but adds flavor)
- 2-3 cloves garlic, minced
- 1 packet taco seasoning (or homemade – see later section)
- ½ cup water (to mix with seasoning)
- Salt and pepper, to taste
- Olive oil (for sautéing)
The beauty of taco beef is that these ingredients are pantry staples. Most people have garlic, onions, and olive oil on hand already, so all you need is the meat and seasoning to make taco night a reality.
Optional Toppings and Add-ins
Toppings are where you can get creative and cater to your taste. Here are some popular options:
- Shredded cheddar or Monterey Jack cheese
- Chopped lettuce
- Diced tomatoes
- Sour cream
- Salsa or pico de gallo
- Sliced jalapeños
- Avocado or guacamole
- Chopped cilantro
- Lime wedges
Each topping adds a different texture and flavor, from the crunch of lettuce to the creamy coolness of sour cream.
Choosing the Right Ground Beef
The fat content of your ground beef matters. For the juiciest, most flavorful taco meat, go with 80/20 ground beef. That means 80% lean meat and 20% fat—just enough fat to keep it moist without turning greasy.
Avoid using ultra-lean ground beef (like 90/10 or 93/7) unless you’re okay with a drier, less flavorful result. You can also use ground turkey or chicken for a lighter alternative, though you may need to add extra seasoning to compensate for the milder flavor.
Kitchen Tools & Equipment
Making taco beef doesn’t require fancy gadgets, but having the right tools on hand can make the cooking process smoother and faster.
Basic Cooking Tools You’ll Need
- Large skillet or sauté pan – Preferably nonstick or cast iron
- Wooden spoon or spatula – For stirring and breaking up meat
- Measuring cups and spoons – Especially if making your own seasoning
- Cutting board and sharp knife – For chopping onions and garlic
- Colander – For draining excess fat (if necessary)
These basics are likely already in your kitchen, and they’re all you really need to whip up a great taco beef dish.
Tools That Make Life Easier
If you’re planning taco night on the regular, consider investing in these:
- Taco holders or stands – Keeps your tacos upright while assembling
- Cheese grater – Fresh grated cheese melts better and tastes fresher
- Garlic press – Speeds up garlic prep
- Non-stick meat masher or chopper – Helps break ground beef into fine crumbles for even cooking
Having the right tools ensures that everything cooks evenly, flavors are well-blended, and prep is stress-free.
Preparation Tips Before You Start
Even simple recipes benefit from a little preparation. A few extra minutes spent prepping can make the difference between an average taco night and a truly tasty one.
Chopping and Prepping Ingredients
Before turning on the stove, take a few minutes to prep everything:
- Chop onions and garlic
- Measure out your seasoning or mix it yourself (see seasoning section)
- Rinse and dry any fresh toppings like lettuce or tomatoes
- Set out your taco shells or tortillas to warm up later
Having a “mise en place” (everything in its place) setup helps keep the cooking process smooth and prevents burning or overcooking while you scramble to chop something last minute.
Proper Meat Thawing and Handling
If you’re using frozen ground beef, make sure it’s completely thawed before cooking. Thaw in the fridge overnight or use the defrost setting on your microwave. Cooking frozen or partially frozen beef leads to uneven browning and a rubbery texture.
Also, always wash your hands and any surfaces that touch raw meat. Cross-contamination is a fast way to ruin dinner—and your stomach.
Step-by-Step Taco Beef Cooking Guide
Now let’s get to the meat of the matter—literally. Here’s how to cook taco beef that’s juicy, flavorful, and perfectly spiced every time.
Step 1: Preheat Your Pan
Before adding anything, preheat your skillet over medium-high heat. A hot pan ensures your beef will sear quickly and lock in flavor instead of steaming. Add a drizzle of olive oil if using a stainless steel pan to prevent sticking.
Step 2: Brown the Ground Beef
Add your ground beef to the pan and immediately start breaking it up with a wooden spoon or meat chopper. You want crumbles, not clumps. Let the beef sit for a minute or two before stirring to allow it to brown nicely.
Add chopped onions and garlic at this stage if you’re using them. The onion adds a sweet, aromatic depth, while the garlic brings out savory notes.
Continue cooking until the meat is no longer pink and fully browned—this usually takes about 6-8 minutes.
Step 3: Drain the Fat
Once the beef is browned, assess how much grease is in the pan. If there’s a large amount, carefully tilt the skillet and spoon it out or pour it into a heat-safe container. Do not pour grease down the sink—it will clog your pipes.
Leave a little fat in the pan if you want extra flavor, especially if you’re using leaner beef.
Step 4: Add Seasoning Mix
This is where the magic happens. Once your beef is browned and drained, reduce the heat to medium and sprinkle in your taco seasoning mix. If you’re using a store-bought packet, simply pour it in. If you made your own (we’ll cover that soon), measure out about 2-3 tablespoons per pound of beef.
After adding the seasoning, pour in about ½ cup of water. This helps dissolve the spices and coats every bit of meat with flavorful sauce. Stir everything thoroughly so the seasoning is evenly distributed.
Let the mixture come to a gentle simmer. This allows the beef to absorb the spices and transforms it from plain cooked meat into delicious taco filling. Stir occasionally to prevent sticking.
Simmer for about 4-5 minutes, or until the mixture thickens. You don’t want it soupy, but it should be moist enough to stay juicy in your taco shells without dripping all over the place.
Step 5: Simmer and Blend Flavors
This step might seem simple, but it’s crucial. That last simmer—where all the spices, beef juices, and water blend—is what infuses the meat with bold taco flavor.
Don’t rush this part. If you’ve ever eaten taco beef that tastes like it was thrown together in 10 minutes, it’s likely because it skipped the simmering. Let the meat bubble gently until the liquid reduces and thickens slightly into a rich, flavorful coating.
Taste the beef at this stage. Need more salt? Spice? You can adjust now. If it’s too spicy, stir in a little tomato paste or ketchup to mellow the heat. If it’s too mild, add a pinch of cayenne or a splash of hot sauce.
Once the mixture looks thick, saucy, and irresistible—you’re ready to build your tacos.
How to Make Homemade Taco Seasoning (Optional)
Sure, store-bought taco seasoning is convenient, but making your own is a game-changer. You control the flavor, salt content, and spice level—and it’s free from preservatives and weird additives.
Benefits of Making Your Own Seasoning
- Custom flavor – Add more garlic, dial down the chili, or boost the smokiness—your call.
- Less sodium – Store packets are often loaded with salt.
- No fillers – You avoid thickeners, sugars, and artificial colors.
- Batch-friendly – Make once, use many times.
Once you make it from scratch, you might never go back to the packet.
Taco Seasoning Ingredient Breakdown
Here’s a basic mix you can tweak to your liking:
- 1 tbsp chili powder
- 1 tsp ground cumin
- 1 tsp paprika
- ½ tsp garlic powder
- ½ tsp onion powder
- ½ tsp dried oregano
- ¼ tsp crushed red pepper flakes (optional for heat)
- ½ tsp salt
- ¼ tsp black pepper
Mix all the spices in a small bowl. This yields about 2–3 tablespoons—perfect for 1 lb of beef. Store any extras in an airtight jar or container for up to 6 months.
Want smoky flavor? Add a dash of smoked paprika. Craving heat? More red pepper flakes. Sweet and spicy? Try a pinch of brown sugar. You’re the taco boss here.
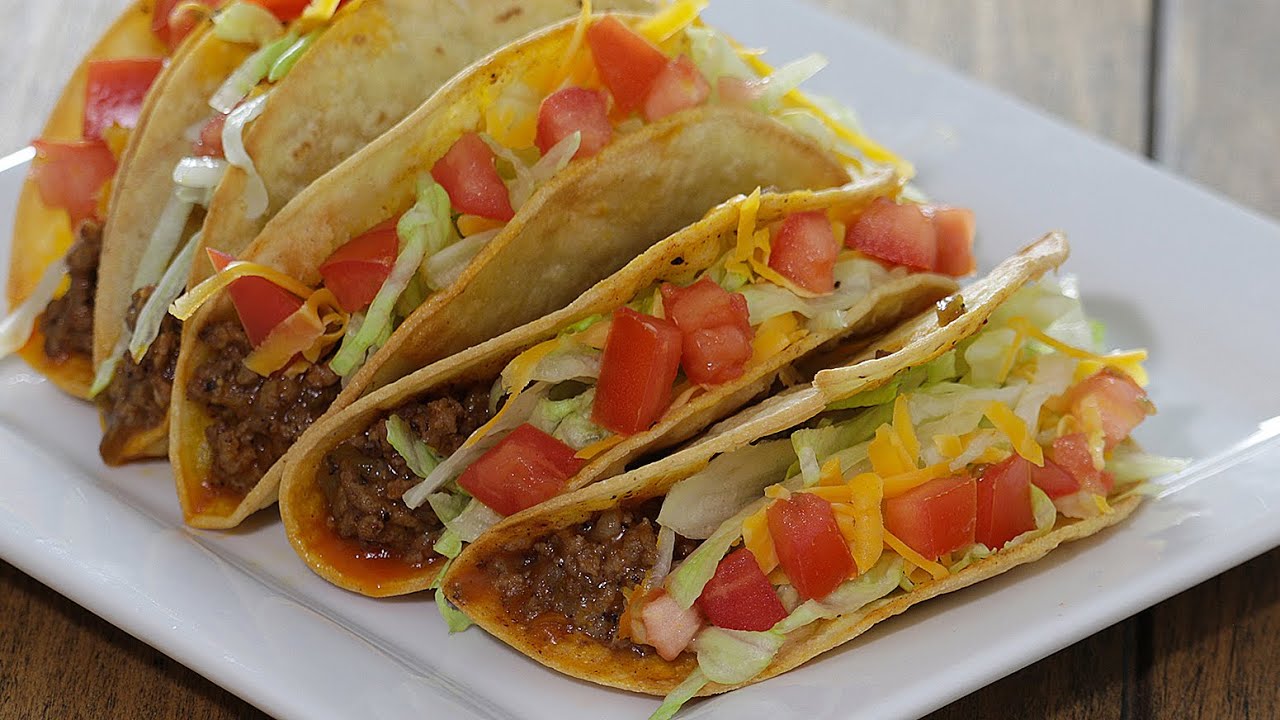
Toppings That Elevate Your Tacos
Toppings are where tacos go from good to mouthwatering. It’s the finishing touch that brings freshness, texture, and balance to the rich, seasoned beef.
Classic Toppings
These are the tried-and-true go-tos that work with almost any taco combo:
- Shredded lettuce – Adds crunch and freshness
- Diced tomatoes – Juicy, sweet contrast to salty meat
- Shredded cheese – Melts over warm beef for creamy richness
- Sour cream – Cool and tangy, balances spice
- Salsa or pico de gallo – Brings a burst of flavor and acidity
- Chopped onions – Red or white, adds a bite
- Chopped cilantro – A fresh, herbal lift
Pro tip: Don’t overload your taco. Stick to 2–3 toppings max for the perfect bite.
Gourmet Topping Ideas
Feeling adventurous or entertaining guests? Step up your topping game:
- Avocado slices or guacamole – Creamy and nutrient-rich
- Pickled red onions – A zingy pop of flavor
- Crumbled queso fresco or cotija cheese – Salty and authentic
- Corn salsa – Sweet, spicy, and colorful
- Hot honey drizzle – Sweet heat explosion
- Fresh lime juice – Brightens up the whole dish
Think of toppings like accessories for your taco outfit. Some are classic, others bold—but the best look comes from balance and coordination.
Best Taco Shells and Tortilla Options
The foundation of any taco is what holds it all together. Whether you prefer crunchy or soft, the shell matters just as much as the filling.
Hard Shell vs. Soft Shell
- Hard Shells – Crispy, crunchy, and nostalgic. These corn-based shells bring texture and snap with every bite. Just be careful—they break easily and can be messy.
- Soft Shells (Flour or Corn Tortillas) – Chewy, pliable, and easy to wrap. Flour tortillas are milder and larger, while corn tortillas bring more traditional flavor.
Some people love the crunch of hard shells, while others swear by the softness of warm tortillas. Can’t decide? Try both—or do “double decker” tacos (wrap a soft tortilla around a hard shell with a layer of refried beans in between).
Store-Bought vs. Homemade Tortillas
Store-bought tortillas are convenient, but if you have time, homemade tortillas are a serious upgrade. They’re fresher, softer, and have a more satisfying chew.
To warm store-bought tortillas:
- Wrap them in foil and bake for 10 minutes at 350°F
- Microwave with a damp paper towel for 30 seconds
- Heat them in a dry skillet for 30–60 seconds per side
Want that authentic street taco feel? Use mini corn tortillas and double them up for extra support.
Building the Perfect Taco
Once your beef is cooked and your toppings are prepped, it’s taco assembly time! This is where creativity meets strategy—you want a taco that’s flavorful, balanced, and not falling apart in your hands.
Taco Layering Tips
Building a taco might seem easy, but there’s a smart way to do it that enhances flavor and avoids sogginess. Here’s a foolproof method:
- Start with a Base: If you’re using a soft tortilla, a thin smear of refried beans or guacamole can act as a moisture barrier to keep the tortilla from getting soggy.
- Add the Beef: Spoon your hot taco beef right in the center. Don’t overfill—about 2-3 tablespoons is perfect.
- Add Cheese Next: If you’re using shredded cheese, place it directly on top of the hot beef so it melts slightly.
- Layer Fresh Toppings: Lettuce, tomatoes, onions, etc., should go on top of the melted cheese.
- Finish with Sauces and Creams: Sour cream, salsa, or hot sauce should be drizzled last to avoid soggy bottoms.
Stack smart. Avoid piling wet ingredients at the bottom, which will cause shells to collapse or tortillas to break.
Portion Control & Plating
Tacos are meant to be eaten with your hands—keep portions manageable so they’re easy to hold and bite into. A good rule of thumb is:
- 6” tortillas or shells for single-serving tacos
- 3-4 tacos per adult, depending on side dishes
Want a beautiful taco spread? Use a wooden serving board or platter. Arrange taco shells standing upright, offer toppings in small bowls, and garnish with lime wedges and chopped cilantro for visual flair.
Plating matters. A well-presented taco plate feels like an upgrade, even if you’re just dining at home.
Serving Suggestions and Pairings
Taco beef is the star, but supporting players can take your meal to the next level. Whether you’re feeding family or guests, great side dishes and drinks make taco night feel complete.
Side Dishes That Go Great with Taco Beef
- Mexican Rice – Lightly spiced and fluffy, the perfect partner for taco beef.
- Refried Beans or Black Beans – Creamy, protein-packed sides that pair beautifully with tacos.
- Elote (Mexican Street Corn) – Grilled corn slathered in mayo, cheese, lime, and spices.
- Tortilla Chips and Salsa – Classic and crowd-pleasing.
- Guacamole and Chips – Creamy, rich, and full of healthy fats.
- Fresh Cucumber Salad – Crisp and refreshing to cut the richness of the beef.
Add color and variety to your plate for a festive, flavorful experience.
Best Drinks to Serve With Tacos
- Classic Margaritas – Limey, salty, and just boozy enough.
- Mexican Beer – Light lagers like Corona, Modelo, or Pacifico complement taco spices.
- Agua Fresca – Fruit-infused water like watermelon or hibiscus for a refreshing non-alcoholic option.
- Jarritos Soda – Authentic Mexican soda with bright flavors like tamarind, mango, or pineapple.
Pairing your tacos with the right drink balances the spice and rounds out your meal. Whether it’s a fizzy soda or a chilled cocktail, don’t forget the beverages!
Storage and Leftover Ideas
Made a big batch? Don’t worry—taco beef stores and reheats beautifully, and there are plenty of ways to give leftovers new life.
How to Store Taco Beef Properly
Let the cooked beef cool completely before storing. Then:
- Refrigerate: Store in an airtight container for up to 4 days.
- Freeze: Place cooled taco beef in a freezer-safe zip-top bag or container and freeze for up to 3 months.
Label containers with the date so you know when to use them. When reheating, add a splash of water or broth to keep the meat moist.
Creative Ways to Use Leftover Taco Meat
Don’t feel like another taco night? Use your leftover beef in fun and tasty ways:
- Taco Salad – Toss over greens with cheese, salsa, and tortilla strips.
- Burritos or Quesadillas – Wrap it up with cheese and rice for a whole new meal.
- Stuffed Peppers – Fill halved bell peppers with beef, top with cheese, and bake.
- Nachos – Layer beef, cheese, and toppings over tortilla chips for a crowd-pleasing snack.
- Breakfast Tacos – Add scrambled eggs for a delicious breakfast twist.
One batch of taco beef = endless possibilities.
Common Mistakes to Avoid
Even though taco beef is simple to make, a few common pitfalls can turn your dish from flavorful to frustrating. Avoid these blunders to ensure taco success.
Overcooking the Beef
Ground beef cooks quickly—especially in a hot skillet. Overcooking leads to dry, tough meat. The moment it’s no longer pink, you should:
- Drain the fat
- Add your seasoning and water
- Simmer gently—not aggressively
Remember: It will continue cooking slightly during the simmer step.
Overseasoning or Underseasoning
Too much seasoning can overpower the beef; too little leaves it bland. If using a store packet, follow the instructions exactly. If you’re seasoning by hand:
- Start light
- Taste after simmering
- Adjust with salt, heat, or acidity (like lime juice)
Balance is everything in taco flavor—think savory, slightly spicy, and just a touch of citrus or tang.
FAQs about Taco Beef Recipe
1. Can I freeze taco beef?
Absolutely. Let it cool completely, then freeze in an airtight container for up to 3 months. Reheat with a little water for moisture.
2. How long can taco beef last in the fridge?
Stored properly in an airtight container, it will stay fresh for about 3–4 days in the refrigerator.
3. What beef-to-fat ratio is best for taco meat?
Go with 80/20 ground beef—it’s flavorful and juicy without being too greasy. Avoid extra-lean blends unless you’re adding fat manually.
4. Can I use ground turkey instead?
Yes! Ground turkey is a great alternative. Just know it’s leaner and less flavorful on its own, so season it generously.
5. How do I keep taco shells from breaking?
Warm them in the oven, skillet, or microwave before filling. This softens them slightly and makes them less likely to crack.
Conclusion
There’s a reason taco beef has become a staple in kitchens around the world—it’s fast, flavorful, and endlessly customizable. Whether you’re keeping it classic or dressing it up with gourmet toppings, this step-by-step guide gives you the tools to make your taco beef unforgettable.
From selecting the right meat and seasoning it perfectly to layering with fresh toppings and storing leftovers the smart way, you’re now equipped to master taco night like a pro. So grab your skillet, load up your tortillas, and get ready for some seriously satisfying bites.
Taco ’bout a win, right?


