Special K Bars Recipe: Special K Bars are one of those nostalgic, no-bake desserts that almost everyone has enjoyed at least once at a family gathering, school bake sale, or holiday party. They’re chewy, chocolatey, and slightly crunchy, making them an irresistible treat for both kids and adults. If you’re looking for a dessert that’s quick, easy, and always a hit, this Special K Bars recipe is exactly what you need.
So, what makes these bars so popular? Well, unlike complicated baked goods that require precise measurements, rising times, and baking temperatures, Special K Bars are delightfully simple. You don’t even need an oven! Instead, you combine pantry staples like peanut butter, corn syrup, sugar, and Special K cereal to create a chewy base. Then, you finish them off with a rich chocolate-peanut butter topping that hardens just enough to give you that perfect bite.
If you’ve ever struggled with finding a treat that pleases a crowd, this is your solution. Special K Bars are portable, hold up well at room temperature, and don’t require refrigeration—making them perfect for potlucks, school lunches, or holiday cookie trays. Plus, they can easily be customized with mix-ins like mini marshmallows, butterscotch chips, or even sprinkles for added flair.
Let’s dive deeper into what makes this recipe special and how you can recreate it at home step by step.
What Are Special K Bars?
Special K Bars are a type of no-bake dessert bar that combines crispy cereal with a sticky, sweet, and nutty syrup, all topped with a chocolate-peanut butter layer. They originated in the Midwest and quickly became a staple for bake sales, church potlucks, and holiday dessert spreads. Some people even call them “Scotcheroos,” though there are slight differences between the two recipes.
The base of Special K Bars is made by melting sugar and corn syrup together, then stirring in peanut butter before mixing it all with Special K cereal. This creates a chewy yet crunchy foundation that’s incredibly satisfying. On top, you’ll usually find a smooth chocolate and peanut butter mixture that firms up as it cools. The result is a layered treat that’s rich, sweet, and slightly salty—basically, the perfect dessert.
Unlike cookies or cakes, Special K Bars don’t need an oven, which makes them especially convenient for hot summer days when you want a treat without heating up the kitchen. They’re also very forgiving—you don’t have to worry about exact baking times or whether they’ll rise correctly. With just a handful of ingredients and a few simple steps, you can whip up a batch in under 30 minutes.
Why This Recipe is a Crowd Favorite
There are countless reasons why Special K Bars have stood the test of time, but let’s break down a few of the main ones:
- Simple Ingredients – You probably already have everything you need in your pantry. No fancy or hard-to-find items are required.
- Quick to Make – The entire recipe takes less than half an hour from start to finish. That’s faster than most baked goods.
- No-Bake Dessert – No oven needed, making it perfect for hot weather or busy schedules.
- Perfect Texture – The combination of chewy cereal, sticky peanut butter, and smooth chocolate is unbeatable.
- Kid-Friendly – Children love both the taste and the process of making these bars. It’s a great recipe to get them involved in the kitchen.
- Customizable – You can adjust the flavors, toppings, and mix-ins to suit your preferences.
Whether you’re making them for a birthday party, a bake sale, or just a cozy night in, Special K Bars always deliver. Now, let’s move on to the most important part: the ingredients you’ll need.
Ingredients You’ll Need
One of the best things about Special K Bars is that they don’t require a long shopping list. With just a handful of staple ingredients, you can make a batch that’s big enough to share—or keep for yourself (we won’t judge!).
Here’s a detailed breakdown of the essential ingredients, optional add-ins, and possible substitutions you can try.
Main Ingredients for Special K Bars
To make classic Special K Bars, you’ll need:
- 6 cups Special K cereal – This is the star of the show, giving the bars their signature crunch.
- 1 cup light corn syrup – Helps bind the bars together and gives them that chewy texture.
- 1 cup granulated sugar – Sweetens the base and balances the salty peanut butter.
- 1 cup creamy peanut butter – Adds richness, creaminess, and that nutty flavor everyone loves.
- 1 ½ cups semi-sweet chocolate chips – Melts into a smooth topping that complements the sweet base.
- ½ cup butterscotch chips (optional but traditional) – Adds depth and a caramel-like flavor to the topping.
These six ingredients are the foundation of Special K Bars. Without them, you won’t get the same texture or taste.
Optional Add-Ins for Extra Flavor
If you want to elevate your Special K Bars, consider adding a little something extra:
- Mini marshmallows – Fold them into the cereal mixture for a gooey surprise.
- Sprinkles – Perfect for birthdays or holidays to add color and fun.
- White chocolate drizzle – A nice contrast to the dark topping.
- Chopped nuts – Almonds, pecans, or peanuts add crunch and richness.
- Sea salt flakes – Sprinkle on top for a gourmet touch.
These aren’t necessary, but they can make your batch stand out and add a personal twist.
Substitutions and Variations
Don’t worry if you’re missing an ingredient—there are plenty of substitutions that work just as well:
- Corn syrup substitute – Use honey, maple syrup, or brown rice syrup (though it may slightly change the texture).
- Nut-free option – Replace peanut butter with sunflower seed butter or soy nut butter for an allergy-friendly version.
- Cereal swap – Try Rice Krispies, Cheerios, or even cornflakes if you don’t have Special K on hand.
- Vegan option – Use dairy-free chocolate chips and a plant-based nut butter.
These variations prove just how versatile Special K Bars can be. You can stick to the classic recipe or get creative depending on what’s in your pantry.
Tools and Equipment Required
Before you jump into making these bars, it’s good to gather the right tools. Having everything ready will make the process smoother and more enjoyable.
Essential Kitchen Tools
Here’s what you’ll need:
- Large saucepan – To melt the sugar, syrup, and peanut butter.
- Mixing spoon or spatula – For stirring the cereal mixture.
- 9×13-inch baking dish – The perfect size for a batch of bars.
- Parchment paper – Makes it easier to lift the bars out of the pan.
- Measuring cups and spoons – To get the ingredient ratios just right.
- Microwave-safe bowl – For melting the chocolate topping.
- Knife – For cutting the cooled bars into squares.
Helpful Tips for Preparation
A few small details can make a big difference in how your bars turn out:
- Grease the pan or use parchment paper to prevent sticking.
- Don’t boil the sugar mixture too long, or the bars will become hard instead of chewy.
- Press the cereal mixture firmly but gently into the pan—too much pressure can crush the cereal, making the bars dense.
- Let the bars cool completely before cutting to get clean, even slices.
With the right tools and preparation, you’ll be ready to make Special K Bars without any hiccups.
Step-by-Step Guide to Making Special K Bars
Now comes the fun part: making the bars! This recipe is broken down into easy-to-follow steps so you can achieve the perfect balance of chewy, crunchy, and chocolatey goodness.
Step 1 – Preparing the Base
Start by lightly greasing your 9×13-inch baking dish or lining it with parchment paper. This will make it much easier to lift the bars out later. Set it aside while you prepare the syrup mixture.
In a large saucepan over medium heat, combine 1 cup granulated sugar and 1 cup light corn syrup. Stir constantly until the sugar dissolves completely and the mixture just begins to bubble. Be careful not to let it boil too long—this is key to keeping the bars chewy instead of rock-hard.
Once the sugar has dissolved, remove the saucepan from heat and immediately stir in 1 cup creamy peanut butter. Mix until smooth and fully combined. The peanut butter should melt easily into the hot syrup, creating a thick, glossy mixture.
This peanut butter-sugar-syrup mixture is the glue that holds everything together. Once it’s ready, you’ll move on to mixing in the cereal.
Step 2 – Melting the Syrup
At this stage, precision is everything. The syrup is the foundation of your Special K Bars—it’s what ensures they hold their shape while still being chewy and delicious.
To start, keep your saucepan with the sugar and corn syrup mixture over medium-low heat. Stir constantly using a wooden spoon or heatproof spatula to prevent scorching. The sugar will begin to dissolve, and you’ll notice the mixture turning glossy and slightly thickened.
Here’s the critical part: allow the mixture to just barely reach a gentle boil—tiny bubbles forming around the edges of the pan. As soon as you see this, remove the pan from the heat. If you let it boil for too long, the sugar will harden as it cools, leaving you with overly stiff bars.
Next, quickly stir in 1 cup of creamy peanut butter. The heat from the syrup will melt the peanut butter, creating a smooth, silky mixture. Make sure there are no lumps. You should end up with a caramel-like consistency that smells absolutely irresistible.
This step sets the tone for the entire recipe, so don’t rush it. Once your syrup is ready, it’s time to coat the cereal.
Step 3 – Mixing with Special K Cereal
Now comes the fun part—bringing the syrup and cereal together to form the base of your bars.
In a large mixing bowl, measure out 6 cups of Special K cereal. You want a spacious bowl so that every flake gets coated evenly. Pour the hot peanut butter-syrup mixture over the cereal, scraping every bit from the saucepan with your spatula.
Using a wooden spoon or silicone spatula, gently fold the mixture into the cereal. Work quickly but carefully—Special K flakes are delicate and can break if you stir too aggressively. Your goal is to coat every flake in that sticky, sweet mixture without crushing them into powder.
At first, it may seem like there isn’t enough syrup, but keep mixing. The warm syrup will spread evenly, binding the flakes together and creating that signature chewy texture. Once everything is well-coated, you’re ready to transfer it into your prepared baking dish.
Step 4 – Spreading the Mixture in the Pan
This step is all about getting the right texture and thickness for your bars.
Pour the coated cereal mixture into your greased or parchment-lined 9×13-inch baking dish. Using the back of a spoon or a spatula, gently press the mixture into an even layer. Don’t press too hard—you don’t want to crush the cereal or compact the bars too tightly. The goal is to have them firm enough to hold together but still airy and light when you bite into them.
If the mixture sticks to your spoon, lightly grease the back with a bit of butter or cooking spray. Another handy trick is to place a piece of wax paper over the top and press down with your hands for a smooth, even surface.
Once the base is evenly spread out, set the pan aside while you prepare the chocolate-peanut butter topping.
Step 5 – Preparing the Chocolate-Peanut Butter Topping
Now for the finishing touch—the rich, glossy topping that makes Special K Bars irresistible.
In a microwave-safe bowl, combine 1 ½ cups semi-sweet chocolate chips with ½ cup butterscotch chips (optional, but highly recommended for that classic flavor). Heat the mixture in the microwave in 30-second intervals, stirring after each one, until the chips are completely melted and smooth. Be careful not to overheat—chocolate can seize if it gets too hot.
If you prefer, you can also melt the chocolate and butterscotch mixture on the stovetop using a double boiler. This gives you more control over the heat and helps prevent burning.
Once melted, stir in 2 to 3 tablespoons of creamy peanut butter for extra richness. This addition makes the topping silky smooth and ensures it complements the peanut butter in the base layer.
Now you’re ready to pour this luscious topping over your cereal mixture, creating that signature two-layer bar everyone loves.
Step 6 – Spreading the Topping Evenly
This is where your Special K Bars truly start to look irresistible. Take your melted chocolate-peanut butter mixture and pour it gently over the cereal base in your baking dish. Use a spatula to spread it evenly, making sure every corner and edge is covered. The goal is to create a smooth, glossy layer that locks in the chewy cereal mixture underneath.
If the topping seems thick, don’t worry—it will spread more easily while still warm. For a perfectly smooth finish, try tilting the pan slightly to let gravity help spread the chocolate. Then, use your spatula to touch up any uneven spots.
Want to get creative? You can add a swirl effect by drizzling melted white chocolate on top and using a toothpick to create patterns. Or sprinkle crushed nuts, sea salt flakes, or colorful sprinkles while the chocolate is still warm so they stick.
Once your topping is spread, the hardest part begins—waiting for it to set before digging in.
Step 7 – Cooling and Setting
Patience is key here. Your Special K Bars need time to cool so the topping can harden and the base can firm up. You have two options:
- Room Temperature Method – Simply leave the pan on your countertop for 1–2 hours until the chocolate has set. This method works great if your kitchen is cool and you’re not in a hurry.
- Refrigerator Method – If you can’t wait, place the pan in the fridge for 30–45 minutes. This speeds up the cooling process but can sometimes make the bars a little harder to cut, as the chocolate may firm up too much.
Whichever method you choose, make sure the bars are completely set before you slice them. Trying to cut them too soon will cause the topping to smear and the base to crumble.
Pro tip: If you’re making these ahead for a party, let them set overnight at room temperature, covered loosely with foil or plastic wrap. That way, they’ll be perfect by the time you need them.
Step 8 – Cutting and Serving
Now comes the most satisfying step—cutting into your beautiful batch of Special K Bars.
Once the bars are fully set, lift them out of the pan using the parchment paper, or if you didn’t use parchment, simply cut them directly in the pan. Use a sharp knife that’s been lightly greased with butter or sprayed with non-stick spray to prevent sticking.
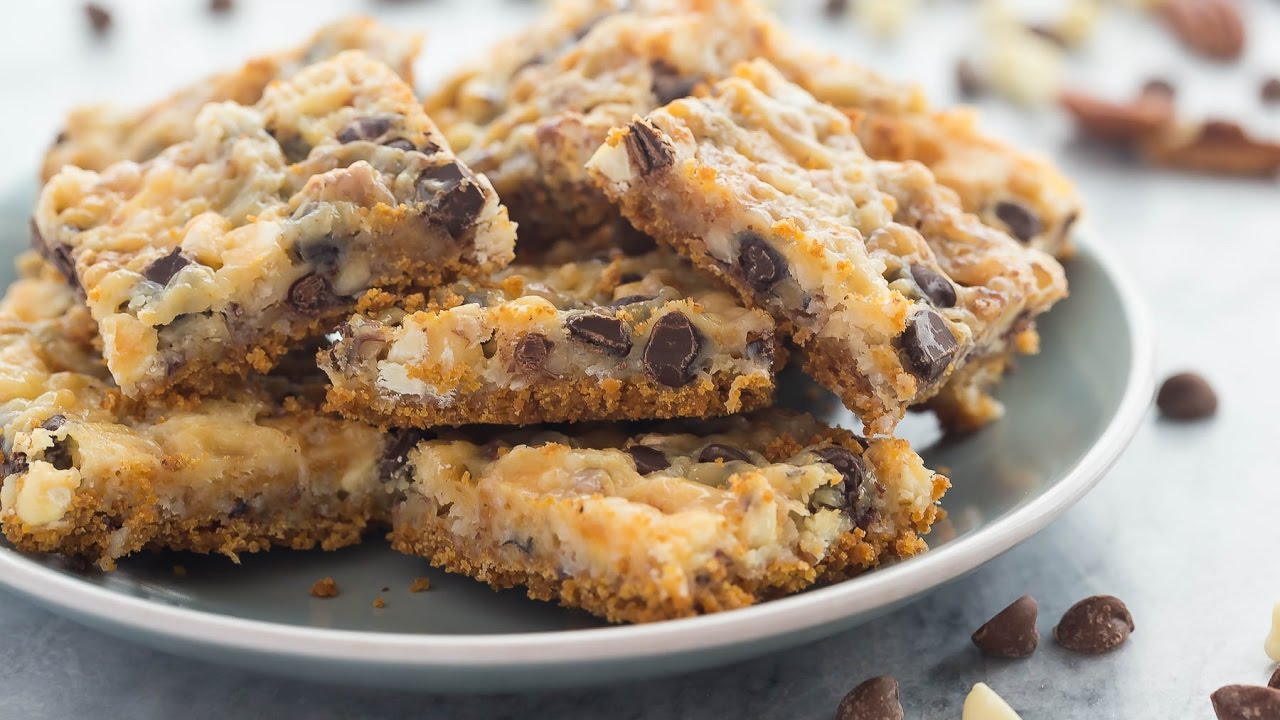
For clean, even slices, cut the bars into squares or rectangles—whatever size suits your occasion. A 9×13-inch pan typically yields about 24 medium bars, but you can make them larger or smaller depending on preference.
Arrange them on a platter, and you’ve got a dessert that looks as good as it tastes. These bars are perfect for school lunches, holiday trays, or just a sweet snack to keep on hand. They store well, travel well, and best of all—they disappear quickly wherever you take them.
Tips for Perfect Special K Bars
Even though this recipe is simple, there are a few tricks to guarantee perfection every time.
How to Keep Them Chewy, Not Hard
The most common issue people run into is bars that turn out too hard. The culprit? Overcooking the sugar and corn syrup mixture. Remember, you only want the mixture to reach a gentle boil before removing it from the heat. Any longer, and the sugar begins to caramelize, which results in rock-hard bars.
Another tip is not to over-press the cereal into the pan. A light, even press gives you chewy bars with just the right amount of crunch.
Common Mistakes to Avoid
- Using the wrong cereal – While substitutions can work, stick with Special K for the classic flavor and texture.
- Skipping the parchment paper – Makes cutting and serving messy if you don’t line the pan.
- Cutting too soon – The topping must be fully set for neat slices.
- Overheating the chocolate – Leads to a grainy or scorched topping instead of a smooth one.
By avoiding these mistakes, you’ll be rewarded with flawless, chewy, and chocolatey bars every single time.
Storage and Shelf Life
Now that you’ve made your batch, you’ll want to know how to store them properly so they stay fresh and delicious.
How to Store at Room Temperature
Special K Bars can be stored in an airtight container at room temperature for up to 5 days. Place parchment paper or wax paper between layers to prevent them from sticking together.
Freezing Instructions
If you want to make a large batch ahead of time, these bars freeze beautifully. Wrap individual bars in plastic wrap, then place them in a freezer-safe container or bag. They’ll keep for up to 2 months. To serve, just let them thaw at room temperature for 15–20 minutes.
Whether you’re keeping them on the counter for quick snacking or freezing them for later, these bars maintain their chewy texture and rich flavor with ease.
Serving Suggestions
Special K Bars are one of those treats that fit almost any occasion. Because they’re easy to make, portable, and universally loved, they’ve become a staple at gatherings big and small. Here’s how you can serve them in style.
Great Occasions for Special K Bars
These bars are perfect for:
- Bake sales – They’re affordable to make in bulk, look appealing, and sell fast.
- School lunches – A little square tucked into a lunchbox makes a sweet surprise.
- Holiday platters – Add them alongside cookies and fudge for a no-bake option.
- Potlucks and parties – Easy to transport, slice, and share.
- Family movie nights – A fun alternative to popcorn or candy.
Because they don’t need refrigeration, they’re especially great for events where food may sit out for a while. They hold their shape, taste amazing at room temperature, and don’t require forks or plates—just grab and enjoy.
Pairing with Drinks or Desserts
Want to elevate your serving game? Pair Special K Bars with:
- Cold milk – The classic combination that kids (and adults) love.
- Coffee or espresso – The bitterness of coffee balances the sweet bars perfectly.
- Hot chocolate – For a double-chocolate treat during the holidays.
- Fruit platters – A fresh, light contrast to the rich bars.
- Vanilla ice cream – Crumble a bar over ice cream for an indulgent sundae topping.
With so many pairing options, these bars can go from casual snack to dessert-table centerpiece in no time.
Nutritional Information
While Special K Bars are undeniably delicious, they are also rich and sweet—so it’s helpful to know what you’re enjoying. Here’s a breakdown of the nutritional profile of one bar (based on a batch of 24 bars from a 9×13 pan).
Calories per Serving
- Calories: ~250
- Carbohydrates: 32g
- Sugar: 22g
- Fat: 11g
- Protein: 4g
Keep in mind that values can vary depending on substitutions, the type of cereal used, and the exact size of your slices.
Healthier Alternatives
If you want to lighten up the recipe, here are some smart swaps:
- Use natural peanut butter with no added sugar.
- Replace corn syrup with honey or brown rice syrup for a less processed option.
- Cut back on sugar by reducing the granulated sugar by ¼ cup (bars will still hold together).
- Opt for dark chocolate instead of semi-sweet for more antioxidants and less sugar.
- Add seeds or nuts (like flaxseeds, chia, or almonds) to increase nutrition.
These swaps won’t drastically change the flavor, but they’ll make the bars just a little more wholesome.
FAQs about Special K Bars Recipe
1. Can I make Special K Bars without peanut butter?
Yes! You can substitute sunflower seed butter, soy nut butter, or even almond butter for a peanut-free version.
2. How do I prevent the bars from getting too hard?
Don’t boil the sugar and corn syrup mixture for too long. Remove it from heat as soon as it starts bubbling gently.
3. Can I use another cereal instead of Special K?
Absolutely. Rice Krispies, Cheerios, or cornflakes all work, but the flavor and texture may differ slightly.
4. How long do Special K Bars last in the fridge?
They’ll stay fresh for about 1 week when stored in an airtight container in the fridge.
5. What type of chocolate works best?
Semi-sweet chocolate chips are the classic choice, but dark chocolate or milk chocolate can be used depending on your preference.
Conclusion
Special K Bars are the ultimate no-bake dessert—simple, chewy, chocolatey, and nostalgic. With just a handful of pantry staples and less than 30 minutes of work, you can create a treat that’s perfect for any occasion. Whether you keep them classic or experiment with fun variations, these bars never disappoint.
They’re easy to make, easy to store, and even easier to enjoy. If you’re looking for a reliable recipe that always earns compliments, this Special K Bars recipe should be at the top of your list.
So, next time you need a quick dessert for a party, school event, or cozy night in, skip the oven and whip up a batch of these irresistible bars. You’ll be glad you did.


