Rosemary Bread Recipe: There’s something magical about the smell of freshly baked bread filling the kitchen, but when you add rosemary into the mix, it becomes irresistible. Rosemary bread isn’t just bread—it’s an aromatic, savory, and flavorful experience. This type of bread has been enjoyed for centuries, often associated with Mediterranean cuisine where rosemary grows abundantly in the warm sun. The herb brings a woodsy, pine-like fragrance that transforms a simple loaf into something extraordinary.
What makes rosemary bread so appealing is its versatility. You can serve it warm with butter, pair it with soups, or even use it as the base for a gourmet sandwich. The balance of soft, fluffy texture and the earthy rosemary aroma makes it a favorite for both beginner bakers and experienced chefs. Unlike plain bread, rosemary bread carries a character of its own—it’s rustic, homely, and full of personality.
Another great thing about baking rosemary bread at home is the control you have over the ingredients. Many store-bought loaves are filled with preservatives and lack that fresh, homemade charm. By baking it yourself, you’re creating something wholesome, healthy, and full of love. Plus, you get to enjoy the rewarding process of kneading, proofing, and baking, which can be surprisingly therapeutic.
Whether you’re a seasoned baker or someone trying bread-making for the first time, this step-by-step guide will walk you through the entire process of making rosemary bread from scratch. From selecting the best ingredients to mastering the art of kneading, you’ll learn everything you need to know to achieve bakery-style results at home.
Ingredients You’ll Need
Every delicious loaf of rosemary bread begins with a handful of simple yet essential ingredients. While bread-making might feel intimidating, the truth is, you don’t need anything fancy. Most of the items required are pantry staples, and with the addition of fresh rosemary, you’re all set to create a bakery-worthy loaf.
Essential Ingredients for Rosemary Bread
- All-purpose flour (or bread flour) – 4 cups. Provides structure and gives the bread a chewy texture.
- Active dry yeast – 2 ¼ teaspoons (one packet). The leavening agent that makes the dough rise.
- Warm water – 1 ½ cups (about 110°F). Helps activate the yeast.
- Olive oil – 3 tablespoons. Adds richness and flavor while keeping the bread moist.
- Salt – 2 teaspoons. Enhances flavor and strengthens the gluten structure.
- Fresh rosemary – 2 tablespoons finely chopped. The star ingredient that infuses the bread with its aromatic flavor.
Optional Ingredients to Enhance Flavor
- Honey or sugar – 1 tablespoon, for a touch of sweetness and to help the yeast activate faster.
- Garlic (minced or roasted) – adds a savory, robust depth.
- Parmesan or mozzarella cheese – for a cheesy twist.
- Black pepper – enhances the earthy notes of rosemary.
Tips on Choosing the Freshest Ingredients
- Always go for fresh rosemary if possible, as it has stronger flavor and aroma compared to dried rosemary. If you must use dried, reduce the quantity by half.
- For the flour, bread flour works best because of its higher protein content, which gives a more elastic and chewy texture. However, all-purpose flour works perfectly fine if that’s what you have at home.
- When buying yeast, check the expiration date. Old yeast may not activate properly, resulting in dense bread.
- Olive oil makes a big difference—choose extra virgin olive oil for the richest flavor.
Once you’ve gathered all these ingredients, you’re ready to dive into the bread-making process.
Tools and Equipment Required
Just like ingredients, the right tools can make the baking process much smoother. Don’t worry—you don’t need a fancy bakery setup to make rosemary bread at home. A few basic tools will do the job perfectly.
Basic Kitchen Tools for Bread Making
- Mixing bowls – For combining and proofing dough.
- Measuring cups and spoons – Accuracy is key in baking.
- Wooden spoon or silicone spatula – For mixing the dough initially.
- Clean kitchen towel or plastic wrap – To cover the dough while it rises.
- Sharp knife or bread lame – For scoring the bread before baking.
- Baking sheet or bread pan – Depending on whether you want a rustic round loaf or a classic loaf shape.
Advanced Tools for Professional Results
- Stand mixer with dough hook – Saves time and effort during kneading.
- Kitchen scale – Ensures precise measurements for consistent results.
- Proofing basket (banneton) – Helps shape artisan-style loaves.
- Pizza stone or Dutch oven – For a crispy crust and bakery-quality finish.
Even if you stick to the basics, you’ll still end up with a delicious loaf. However, if you plan to bake bread regularly, investing in some of these advanced tools can take your bread-making game to the next level.
Step-by-Step Guide to Making Rosemary Bread
Now comes the exciting part—baking your own rosemary bread! Don’t rush through the steps. Bread-making is all about patience and care. Below, you’ll find a detailed process that breaks down each stage so you can follow along easily.
Step 1 – Preparing the Dough
Start by mixing warm water and yeast in a large bowl. Let it sit for about 5–10 minutes until it becomes foamy. This step is called “proofing the yeast,” and it ensures the yeast is active. Next, add olive oil, salt, and chopped rosemary. Slowly incorporate the flour, one cup at a time, mixing with a spoon or spatula until a shaggy dough forms.
At this stage, the dough will look rough and sticky, but that’s completely normal. The key is to ensure all ingredients are evenly distributed before moving on to kneading.
Step 2 – Kneading the Dough Properly
Kneading is one of the most important steps in bread-making because it develops the gluten structure that gives bread its chewy and airy texture. Once your dough has come together, transfer it onto a lightly floured surface. Begin folding the dough over itself, pressing it down with the heel of your hand, and then rotating it slightly before repeating the motion. This push-and-fold method is the traditional way to knead.
If you’re doing it by hand, expect to knead for about 8–10 minutes. The dough will start out sticky, but as you continue, it will become smooth, elastic, and slightly tacky to the touch. If it’s too sticky, add a little flour, but be careful not to overdo it—too much flour can make the bread dense and dry. A properly kneaded dough should be soft, pliable, and spring back when gently pressed.
If you have a stand mixer, you can use the dough hook attachment to knead the dough for about 5–6 minutes on medium speed. This makes the process faster and less labor-intensive.
Think of kneading as the bread’s workout routine—it builds strength and structure, preparing the dough for a perfect rise later on. Once the dough is smooth and elastic, you’re ready to move to the next stage.
Step 3 – First Rise (Proofing the Dough)
After kneading, place your dough into a lightly greased bowl. Cover it with a clean kitchen towel or plastic wrap and let it rest in a warm, draft-free area. The first rise, also known as bulk fermentation, usually takes 1–2 hours, depending on room temperature.
During this stage, the yeast ferments the dough, producing carbon dioxide bubbles that cause it to expand. A well-proofed dough should double in size and feel airy when gently poked. If your kitchen is cooler, the rise might take longer, while a warmer environment will speed things up.
Here’s a simple tip: If your house feels cold, you can place the covered bowl inside your oven with just the oven light on. The gentle warmth helps the dough rise evenly.
Don’t rush this process—allowing the dough enough time to rise is what gives your bread that light and fluffy interior. This stage is where the flavors also begin to develop, especially with the rosemary infusing into the dough.
Step 4 – Shaping the Bread Loaf
Once your dough has doubled in size, gently punch it down to release some of the gas. This doesn’t mean flattening it completely—it’s just about removing excess air so the dough can rise again properly.
Now comes the shaping. If you want a rustic round loaf, simply tuck the edges of the dough under itself to create a smooth, round ball. If you prefer a traditional sandwich-style loaf, flatten the dough into a rectangle, then roll it up tightly into a log shape and place it in a greased bread pan.
Shaping is more than just about looks—it affects how the bread bakes and how the crumb (the inside texture) turns out. A well-shaped loaf rises evenly and has a professional appearance.
This is also a great stage to add any extras, such as sprinkling extra rosemary or cheese on top, brushing with olive oil, or even adding a few slits on the surface for decoration. These slits, known as scoring, not only make the loaf beautiful but also allow steam to escape, preventing cracks during baking.
Step 5 – Second Rise (Final Proofing)
After shaping, your dough needs another rest. Place the shaped loaf back in a warm spot and cover it again. This second rise usually takes 30–45 minutes, though it may vary based on your kitchen temperature.
During this stage, the dough expands further, giving the bread its final shape and volume. You’ll know it’s ready for baking when it has puffed up noticeably and springs back slowly when gently touched. If it collapses when poked, it’s over-proofed—so keep an eye on it!
This final proofing is crucial for achieving a light, airy texture inside the loaf. Skipping or cutting it short can result in dense bread, while over-proofing can cause the loaf to deflate in the oven.
A good trick is to preheat your oven while the dough goes through its second rise. This way, your oven will be hot and ready as soon as the bread is proofed. For rosemary bread, a baking temperature of around 375°F (190°C) works beautifully, ensuring a golden crust without drying out the interior.
Step 6 – Baking to Golden Perfection
Now comes the most rewarding part—baking your rosemary bread. Preheat your oven to 375°F (190°C) if you haven’t already. Place your loaf on a baking sheet, in a bread pan, or inside a Dutch oven for an artisan-style finish.
Bake for 30–35 minutes, or until the top is golden brown and the bread sounds hollow when tapped on the bottom. If you’re unsure, you can check with a kitchen thermometer—the internal temperature should read around 190–200°F (88–93°C).
For an extra-crusty exterior, place a small oven-safe dish of water on the bottom rack of your oven while baking. The steam will help create a bakery-style crust. Another trick is brushing the top of the loaf with olive oil or melted butter before baking for added shine and flavor.
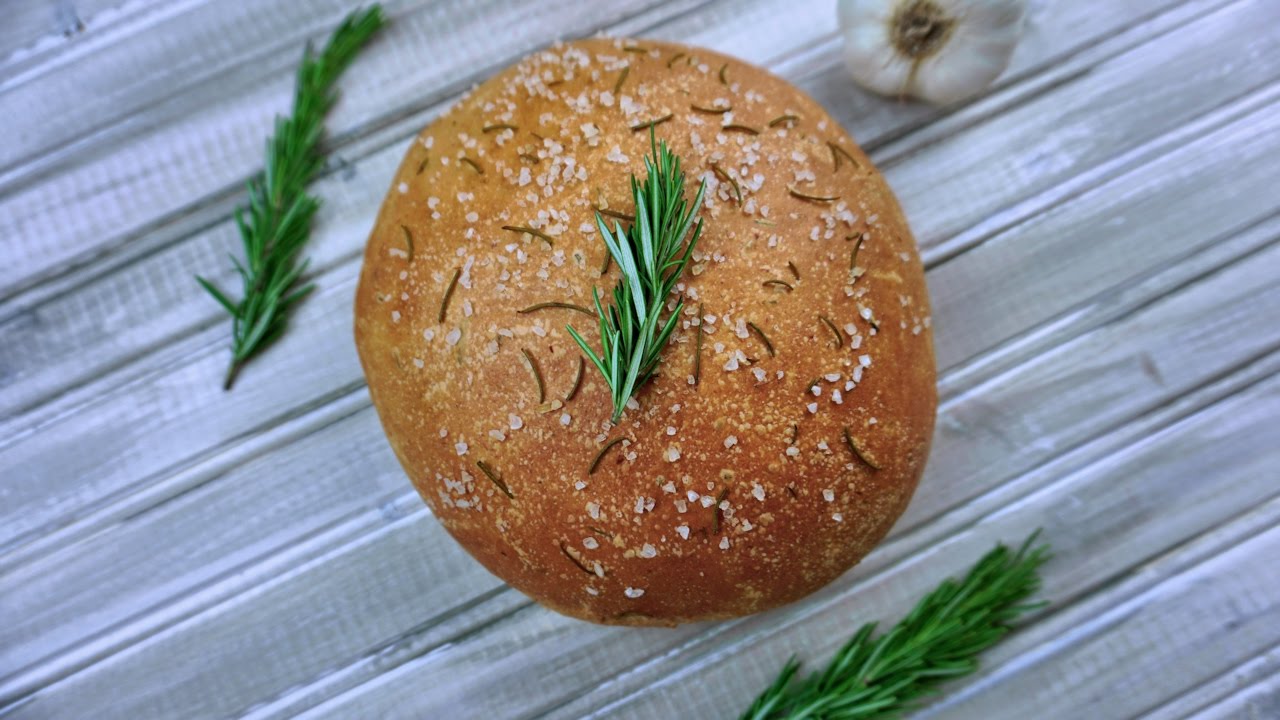
The smell of rosemary filling your kitchen at this stage is nothing short of heavenly. It’s the moment when all your hard work truly pays off.
Step 7 – Cooling and Serving
It’s tempting to slice into your bread the moment it comes out of the oven, but patience here makes all the difference. Freshly baked bread continues to cook slightly as it cools, and cutting too early can result in a gummy texture.
Transfer the loaf to a wire cooling rack and let it rest for at least 20–30 minutes. This allows the steam to escape and the interior crumb to set properly.
Once cooled slightly, slice into your rosemary bread and enjoy! Spread some butter over a warm slice, dip it into olive oil with a dash of balsamic vinegar, or serve it alongside your favorite soup. The soft, aromatic bread with hints of rosemary will quickly become a household favorite.
Variations of Rosemary Bread
Rosemary bread is delicious on its own, but with a little creativity, you can transform it into different variations to suit every craving.
Garlic Rosemary Bread
Adding garlic to rosemary bread is a game-changer. You can mix minced garlic into the dough, or roast whole cloves and fold them in for bursts of flavor. For an even stronger garlic punch, brush the loaf with garlic-infused olive oil before baking.
Cheesy Rosemary Bread
If you love cheese, try adding grated parmesan, cheddar, or mozzarella into the dough. Alternatively, sprinkle cheese on top just before baking for a golden, bubbly crust. The combination of cheese and rosemary makes for a rich, savory loaf that pairs perfectly with pasta dishes.
Whole Wheat Rosemary Bread
For a healthier version, substitute half of the all-purpose flour with whole wheat flour. This gives the bread a nuttier flavor and a denser texture while keeping it hearty and wholesome.
These variations not only add excitement to your baking routine but also allow you to experiment with flavors to find your family’s favorite.
Serving Suggestions
Rosemary bread is incredibly versatile, making it the perfect companion to a wide range of meals. Its earthy, aromatic flavor and soft, fluffy crumb allow it to shine as both a standalone snack and a flavorful side dish. Here are some of the best ways to serve it:
Pairing Rosemary Bread with Soups and Stews
There’s nothing quite like dunking a slice of freshly baked rosemary bread into a hearty bowl of soup or stew. The bread soaks up the rich broth while adding its own herbal notes to each bite. Tomato soup, creamy potato chowder, and beef stew are especially good matches. The rosemary adds depth that complements the warm, comforting flavors of these dishes. For an elegant touch, lightly toast the bread and serve it as croutons on top of your soup.
Rosemary Bread as a Side Dish for Dinner
Rosemary bread makes an excellent side for almost any dinner. It pairs beautifully with roasted chicken, grilled fish, or even a simple salad. For a Mediterranean-inspired meal, serve it alongside hummus, olives, and feta cheese. You can also brush slices with olive oil and grill them for a delicious accompaniment to pasta or steak. The herb’s subtle pine-like aroma elevates even the simplest meals into something special.
Using Rosemary Bread for Sandwiches
Tired of ordinary sandwich bread? Rosemary bread takes sandwiches to the next level. Its rustic texture and flavor complement deli meats, cheeses, and roasted vegetables perfectly. Imagine a warm grilled cheese made with rosemary bread, or a turkey and avocado sandwich with a fragrant herbal twist. The sturdy texture also makes it ideal for paninis and pressed sandwiches, holding up well without getting soggy.
In short, rosemary bread isn’t just bread—it’s an enhancement to your dining experience. Whether you’re serving a simple family dinner or entertaining guests, it adds a touch of rustic charm and gourmet flavor to the table.
Storage and Reheating Tips
One of the best parts of baking rosemary bread at home is enjoying it fresh, but if you have leftovers, proper storage is key to keeping it delicious.
Best Ways to Store Freshly Baked Bread
- Room Temperature: Store your bread in a bread box, paper bag, or wrapped loosely in a clean kitchen towel. This allows the loaf to breathe, keeping the crust crisp while preventing it from drying out. Avoid storing bread in the refrigerator, as it speeds up staling. Properly stored, rosemary bread lasts 2–3 days at room temperature.
- Freezing: For longer storage, slice the bread and freeze it in an airtight bag. This way, you can easily take out individual slices when needed. Frozen bread can last up to 3 months without losing flavor.
How to Reheat Rosemary Bread Without Losing Flavor
- Oven Method: Preheat your oven to 350°F (175°C), wrap the bread in foil, and warm it for about 10–15 minutes. This method keeps the bread moist and revives its fresh-baked aroma.
- Toaster or Pan: For individual slices, pop them in a toaster or warm them in a skillet with a drizzle of olive oil for a crispy edge.
- Avoid Microwave: Microwaving tends to make bread chewy and rubbery, so it’s best avoided unless you’re in a rush.
With these storage and reheating methods, you can enjoy your rosemary bread as if it were freshly baked every time.
Common Mistakes and How to Avoid Them
Even the best bakers run into issues, but knowing the common pitfalls can help you avoid them.
Overproofing or Underproofing the Dough
Proofing is a delicate balance. Underproofed dough leads to dense bread, while overproofed dough collapses and loses structure. The trick is the “finger test”: gently poke the dough—if it springs back slowly, it’s ready to bake. If it springs back too quickly, it needs more time. If it collapses, it has overproofed.
Incorrect Oven Temperature
Bread baking is very sensitive to oven heat. Too hot, and the outside burns before the inside cooks; too low, and the bread comes out dense and pale. Always preheat your oven and use an oven thermometer if possible to ensure accurate temperatures.
Using Too Much or Too Little Rosemary
Rosemary has a bold flavor, and too much of it can overpower your bread. Too little, and you lose its charm. A good rule of thumb is 1–2 tablespoons of fresh rosemary per loaf. If you’re using dried rosemary, cut the amount in half, as it has a more concentrated flavor.
By paying attention to these details, you’ll avoid common mistakes and end up with a loaf that’s bakery-quality every single time.
Health Benefits of Rosemary Bread
While rosemary bread is undeniably delicious, it also comes with a few surprising health perks.
Nutritional Value of Rosemary
Rosemary is more than just a fragrant herb—it’s packed with antioxidants, vitamins, and minerals. It’s known to support digestion, improve memory, and even boost circulation. Adding rosemary to your bread means you’re sneaking in a little nutritional goodness along with great taste.
Why Homemade Bread is Healthier
When you bake bread at home, you’re in complete control of the ingredients. That means no artificial preservatives, additives, or excess sodium that you often find in store-bought bread. You can even experiment with whole grain flours or reduce the amount of salt and sugar for a healthier loaf. Olive oil, commonly used in rosemary bread, is also a source of healthy fats that support heart health.
Eating homemade rosemary bread gives you the best of both worlds—flavor and nutrition—without sacrificing freshness or quality.
FAQs about Rosemary Bread Recipe
1. Can I use dried rosemary instead of fresh?
Yes! If fresh rosemary isn’t available, you can use dried rosemary. Just remember it’s stronger in flavor, so use about half the amount called for in the recipe.
2. How do I know when the bread is fully baked?
The crust should be golden brown, and the loaf should sound hollow when tapped on the bottom. For accuracy, check with a thermometer—the internal temperature should be 190–200°F (88–93°C).
3. Can I freeze rosemary bread?
Absolutely. Slice the loaf, wrap it in plastic or foil, and store it in an airtight freezer bag. It keeps well for up to 3 months.
4. What type of flour works best for rosemary bread?
Bread flour works best because of its higher protein content, which gives the loaf a chewy texture. However, all-purpose flour works just fine if that’s what you have.
5. Can I make rosemary bread without yeast?
Yes, but the texture will be different. You can try a no-yeast quick bread recipe using baking powder as a leavening agent. It won’t be as airy but will still taste delicious.
Conclusion
Baking rosemary bread at home is one of the most satisfying culinary projects you can take on. From the aroma of rosemary filling your kitchen to the golden, crusty loaf cooling on your counter, every step is rewarding. With simple ingredients, a little patience, and the step-by-step process we’ve covered, you can easily make bakery-quality bread at home.
This bread isn’t just about feeding your stomach—it’s about creating a wholesome experience. It connects you to traditional cooking methods, allows for creativity with variations, and gives you something truly special to share with family and friends. Once you try homemade rosemary bread, it’s hard to go back to store-bought loaves.
So grab your flour, yeast, and rosemary—it’s time to bake your way to a fragrant, flavorful masterpiece.


