Pretzels Recipe: There’s something magical about biting into a warm, freshly baked pretzel. That chewy texture, the golden-brown crust, and the slight crunch of coarse salt on top make it a snack that has stood the test of time. While many people are used to grabbing pretzels at the mall or from street vendors, making them at home is a whole different experience. Not only do they taste fresher, but you also get the satisfaction of crafting something from scratch.
Pretzels have an interesting history that dates back centuries. Originating in Europe, they were often associated with good luck and prosperity. The twisted knot shape is believed to represent arms folded in prayer, making pretzels symbolic in many cultures. Today, pretzels are enjoyed worldwide, from soft pretzels served at carnivals to crunchy snack-sized versions sold in stores.
When you make pretzels at home, you can experiment with flavors, toppings, and textures that suit your taste buds. Whether you love them salty, cheesy, or sweet with cinnamon sugar, the homemade version allows you to customize them however you like.
This guide will walk you through everything you need—ingredients, tools, step-by-step instructions, and helpful tips—so that your pretzels come out perfect every time.
Ingredients You’ll Need
Before you start, let’s go over the ingredients. Luckily, pretzels are made from simple pantry staples. The key is in the technique, especially the boiling step, which gives pretzels their unique chewiness.
For the Dough:
- 4 cups all-purpose flour (bread flour works too for extra chewiness)
- 1 packet (2 ¼ teaspoons) active dry yeast
- 1 ½ cups warm water (about 110°F)
- 1 tablespoon sugar (to help activate yeast)
- 1 teaspoon salt
- 2 tablespoons unsalted butter (melted)
For the Boiling Solution:
- 10 cups water
- ⅔ cup baking soda (this is what gives pretzels their brown crust)
For Toppings:
- Coarse sea salt (classic choice)
- Melted butter (for brushing)
- Optional: cinnamon sugar, shredded cheese, sesame seeds, or garlic powder
These ingredients are easy to find, and chances are, you already have most of them in your kitchen. The most important part is the baking soda bath—it’s what separates pretzels from regular bread. Without it, you’d just end up with twisted rolls instead of authentic pretzels.
Tools and Equipment for Making Pretzels
Making pretzels doesn’t require fancy gadgets, but having the right tools will make the process smoother and more enjoyable. Here’s a checklist of what you’ll need:
- Large mixing bowl – for preparing the dough.
- Wooden spoon or stand mixer with dough hook – to mix and knead the dough.
- Plastic wrap or clean towel – to cover the dough while it rises.
- Large pot – for boiling the pretzels in the baking soda solution.
- Slotted spoon or spatula – to lift pretzels out of the boiling water.
- Baking sheet – lined with parchment paper or lightly greased.
- Pastry brush – for brushing butter or egg wash on top before baking.
- Cooling rack – to allow pretzels to cool without getting soggy.
Each tool plays a role in ensuring your pretzels come out bakery-style. For example, using parchment paper prevents sticking, and the cooling rack keeps pretzels crisp on the outside instead of steaming on the tray. If you have a stand mixer, it can save you some muscle power, but hand kneading works just as well.
Step-by-Step Guide to Making Pretzels
Step 1 – Preparing the Dough
Start by activating your yeast. In a large mixing bowl, combine the warm water, sugar, and yeast. Let it sit for about 5 minutes until it becomes foamy. This step is crucial because it ensures your yeast is alive and ready to work.
Once the yeast is activated, stir in the melted butter and salt. Gradually add the flour, one cup at a time, mixing well after each addition. The dough should come together and pull away from the sides of the bowl, but it shouldn’t be too sticky. If it is, add a little extra flour, one tablespoon at a time.
At this point, your dough is ready for kneading, which we’ll cover in the next step.
Step 2 – Kneading and First Rise
Kneading is what develops the gluten in your dough, giving pretzels their chewy texture. You can knead by hand on a lightly floured surface for about 8–10 minutes or use a stand mixer with a dough hook for 5–6 minutes. The dough should become smooth, elastic, and slightly tacky but not sticky.
Once kneaded, place the dough in a greased bowl, cover it with a towel, and let it rise in a warm place for about 1 hour. During this time, the dough should double in size. Patience is key here—rushing the rise will affect the texture of your pretzels.
After the rise, punch down the dough to release air bubbles. Now, you’re ready to shape your pretzels.
Step 3 – Shaping the Pretzels
Shaping pretzels might seem tricky at first, but once you get the hang of it, it’s actually fun and satisfying. Start by dividing the dough into equal portions. Typically, this recipe will yield 8–10 large pretzels or 12–14 smaller ones, depending on your preference.
Take one portion of dough and roll it out into a rope about 20–24 inches long. You want it to be even in thickness from end to end. Then, form the rope into a U shape. Cross the ends over each other twice, then fold them down to the bottom of the U, pressing lightly to stick. This gives you that classic pretzel knot shape we all know.
Don’t stress if your first few pretzels don’t look perfect—the beauty of homemade pretzels lies in their rustic charm. If you’re making these with kids, let them experiment with fun shapes like hearts, twists, or even pretzel bites. They’ll taste just as good regardless of the shape.
Once shaped, place the pretzels onto a baking sheet lined with parchment paper. Leave a little space between each one to allow for expansion during boiling and baking.
Step 4 – Boiling the Pretzels
This step is what transforms simple bread dough into true pretzels. Preheat your oven to 450°F (230°C) before you begin boiling, so it’s ready once you’re done.
In a large pot, bring 10 cups of water to a boil. Carefully add ⅔ cup of baking soda. Be cautious here—when you add baking soda to boiling water, it may bubble up, so add it slowly.
Now, using a slotted spoon, gently lower each pretzel into the boiling water. Let it cook for about 30 seconds on each side. This boiling process gelatinizes the surface starches, giving pretzels their chewy crust and golden-brown shine once baked.
After boiling, remove each pretzel and place it back on the parchment-lined baking sheet. While they’re still damp, sprinkle coarse salt (or any other topping of your choice). This ensures the toppings stick well.
Step 5 – Baking the Pretzels
Now it’s time to bake your pretzels to perfection. Place the tray in the preheated oven and bake for about 12–15 minutes, or until the pretzels turn a deep golden brown. Keep an eye on them—every oven is different, and you don’t want to burn them.
For an extra glossy finish, you can brush the pretzels with an egg wash (1 beaten egg mixed with 1 tablespoon of water) before baking. If you prefer a richer taste, brush them with melted butter right after they come out of the oven.
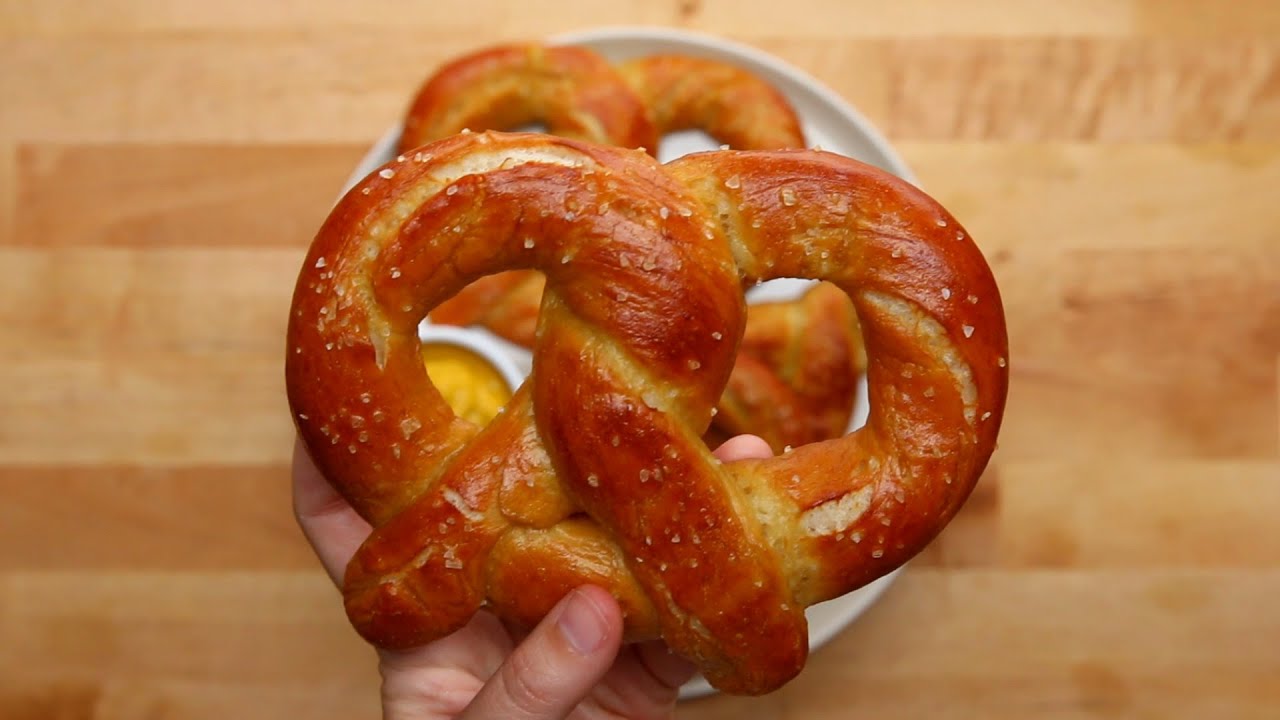
The aroma that fills your kitchen during this stage is incredible. Once baked, transfer the pretzels to a cooling rack for a few minutes before serving. But honestly, the best way to enjoy them is while they’re still warm. Soft, chewy, and full of flavor—they’ll disappear quickly!
Common Mistakes to Avoid
Even though pretzels are straightforward to make, a few common mistakes can affect the outcome. Knowing what to avoid will help you achieve bakery-quality pretzels every time.
- Over-proofing the dough – If you let the dough rise too long, it can collapse or become too airy, losing that chewy bite pretzels are known for. Stick to about 1 hour of rising time.
- Skipping the boiling step – This is a non-negotiable. Without boiling in the baking soda solution, your pretzels won’t have that authentic texture and color. They’ll just taste like regular bread.
- Using the wrong flour – All-purpose flour works, but bread flour gives better results. Using low-protein flour may lead to softer, less chewy pretzels.
- Not sealing the shape – If you don’t press the ends firmly when shaping, pretzels may unravel during boiling or baking.
- Overbaking – Pretzels can dry out quickly if left too long in the oven. Keep an eye on them and remove once golden brown.
Avoiding these mistakes ensures that your pretzels come out looking and tasting just right—soft, chewy, and packed with flavor.
Flavor Variations and Toppings
One of the best things about making pretzels at home is that you can customize them endlessly. While classic salted pretzels are always a hit, why not experiment with different flavors?
Classic Salted Pretzels
Brush the pretzels with egg wash or water and sprinkle generously with coarse sea salt. This is the iconic flavor most people know and love.
Sweet Cinnamon Sugar Pretzels
After baking, brush the warm pretzels with melted butter and roll them in a mixture of cinnamon and sugar. These are perfect for dessert or as a sweet snack.
Cheese-Stuffed Pretzels
Before shaping, roll the dough rope flat and sprinkle shredded cheese inside. Seal it back into a rope and shape as usual. When baked, the cheese melts inside for a gooey surprise.
Garlic Butter Pretzels
Brush the pretzels with garlic butter after baking. Add a sprinkle of parmesan for an Italian twist.
Seed and Spice Toppings
Experiment with sesame seeds, poppy seeds, or even everything bagel seasoning. These add texture and bold flavors.
With a little creativity, you can turn one basic pretzel recipe into endless variations to suit every craving.
Storing and Reheating Pretzels
Freshly baked pretzels taste best right out of the oven, but if you’ve made a big batch, you’ll want to store them properly to keep their texture and flavor intact. Unlike store-bought pretzels that are packed with preservatives, homemade pretzels are best enjoyed within 1–2 days.
How to Store Pretzels:
- Room Temperature: Once completely cooled, place pretzels in an airtight container or a resealable plastic bag. They’ll stay soft for about 2 days. Avoid leaving them uncovered, as they dry out quickly.
- Refrigeration: Storing pretzels in the fridge is not ideal because the cold air can make them stale faster. Stick with room temperature or freezer storage.
- Freezing: If you want to keep pretzels longer, freezing is the way to go. Wrap each pretzel in plastic wrap or aluminum foil, then place them in a freezer bag. They’ll keep for up to 2 months.
How to Reheat Pretzels:
- Oven Method (Best Option): Preheat your oven to 350°F (175°C). Place the pretzels on a baking sheet, sprinkle lightly with water, and cover loosely with foil. Bake for 10 minutes until warm and soft.
- Microwave Method (Quick Fix): Wrap the pretzel in a damp paper towel and microwave for 20–30 seconds. This keeps it soft but may not restore the crispy exterior.
- Air Fryer Method: If you own an air fryer, reheat at 325°F for 3–4 minutes. This brings back the chewiness while keeping the outside slightly crisp.
By storing and reheating them properly, you can enjoy homemade pretzels that taste almost as good as the day you baked them.
Serving Suggestions
Pretzels are delicious on their own, but they truly shine when paired with the right dips and sides. Here are some classic and creative ways to serve them:
Dips and Sauces That Pair Perfectly:
- Cheese Sauce: A warm, creamy cheddar cheese dip is a classic partner for soft pretzels.
- Mustard: From spicy Dijon to honey mustard, this adds tangy flavor.
- Chocolate or Caramel Sauce: Perfect for sweet pretzels, especially cinnamon sugar varieties.
- Beer Cheese Dip: A rich, savory dip made with beer, cheddar, and spices—ideal for parties.
Pairings for Parties and Snacks:
- Charcuterie Board Addition: Soft pretzel bites can be a fun replacement for crackers.
- Soup Sidekick: Pair with creamy soups like cheddar broccoli or potato soup.
- Game-Day Snack: Serve with assorted dips for a crowd-pleasing appetizer.
- Breakfast Twist: Top pretzels with cream cheese or Nutella for a sweet morning treat.
Pretzels are versatile and work for almost any occasion—whether it’s a cozy night in, a big family gathering, or a casual snack.
Nutritional Value of Pretzels
Homemade pretzels are indulgent, but they can be adjusted to suit different dietary preferences. Let’s break down the typical nutritional profile of a large soft pretzel (without toppings):
| Nutrient | Amount (per pretzel) |
|---|---|
| Calories | ~300–350 kcal |
| Carbohydrates | 60–65 g |
| Protein | 7–9 g |
| Fat | 3–4 g |
| Sodium | ~500 mg (varies with toppings) |
While pretzels aren’t the lightest snack, they can fit into a balanced diet if eaten in moderation.
Healthier Substitution Ideas:
- Use whole wheat flour instead of all-purpose for added fiber.
- Skip the coarse salt or reduce it for lower sodium intake.
- Swap butter with olive oil for a lighter fat source.
- Try air frying instead of traditional baking for less oil usage (though the difference is small).
If you’re craving a treat but want something healthier, making your pretzels at home gives you full control over the ingredients.
Tips from Professional Bakers
Professional bakers have their secrets when it comes to pretzel making, and applying a few of them can instantly level up your homemade batch.
- Use Bread Flour for Chewiness: Higher protein content develops more gluten, giving pretzels that classic chewy bite.
- Don’t Skip the Egg Wash: This small step makes a huge difference in appearance. An egg wash adds shine and helps toppings stick better.
- Add Baking Soda Slowly: Dumping it too quickly into boiling water can cause it to overflow. Add gradually and stir well.
- Experiment with Malt Syrup: Some bakers add barley malt syrup to the dough for authentic pretzel flavor and a slightly deeper color.
- Bake on a Pizza Stone: If you have one, using a hot pizza stone instead of a baking sheet gives pretzels a crispier crust.
Following these professional tips can transform your pretzels from homemade-good to bakery-quality.
FAQs about Pretzels Recipe
1. Can I freeze pretzel dough?
Yes! You can freeze the dough right after shaping. Place shaped pretzels on a baking sheet, freeze until solid, then transfer to a freezer bag. When ready to bake, let them thaw and rise slightly before boiling and baking.
2. How do I make pretzels softer?
To keep pretzels extra soft, brush them generously with melted butter right after baking. Also, avoid overbaking, as this can make them dry.
3. Can I make pretzels without yeast?
While yeast is ideal for fluffy pretzels, you can make a quick no-yeast version using baking powder. The texture won’t be as chewy, but it works in a pinch.
4. What’s the difference between soft and hard pretzels?
Soft pretzels are chewy and best eaten fresh, while hard pretzels are baked longer at lower temperatures until they become crunchy and shelf-stable.
5. Why do pretzels have their signature dark brown color?
That rich brown crust comes from the baking soda bath. It changes the dough’s pH, allowing it to brown more deeply during baking.
Conclusion
Homemade pretzels are more than just a snack—they’re a baking experience that combines tradition, creativity, and delicious results. From mixing and kneading the dough to shaping, boiling, and baking, every step contributes to that classic pretzel taste and texture. Whether you like them salty, sweet, cheesy, or with unique toppings, pretzels are versatile enough to please everyone.
The best part? Making pretzels at home is fun, rewarding, and surprisingly easy once you know the steps. With the right ingredients, tools, and techniques, you’ll be enjoying warm, golden-brown pretzels straight from your oven in no time. So, roll up your sleeves and give this recipe a try—your taste buds will thank you.


