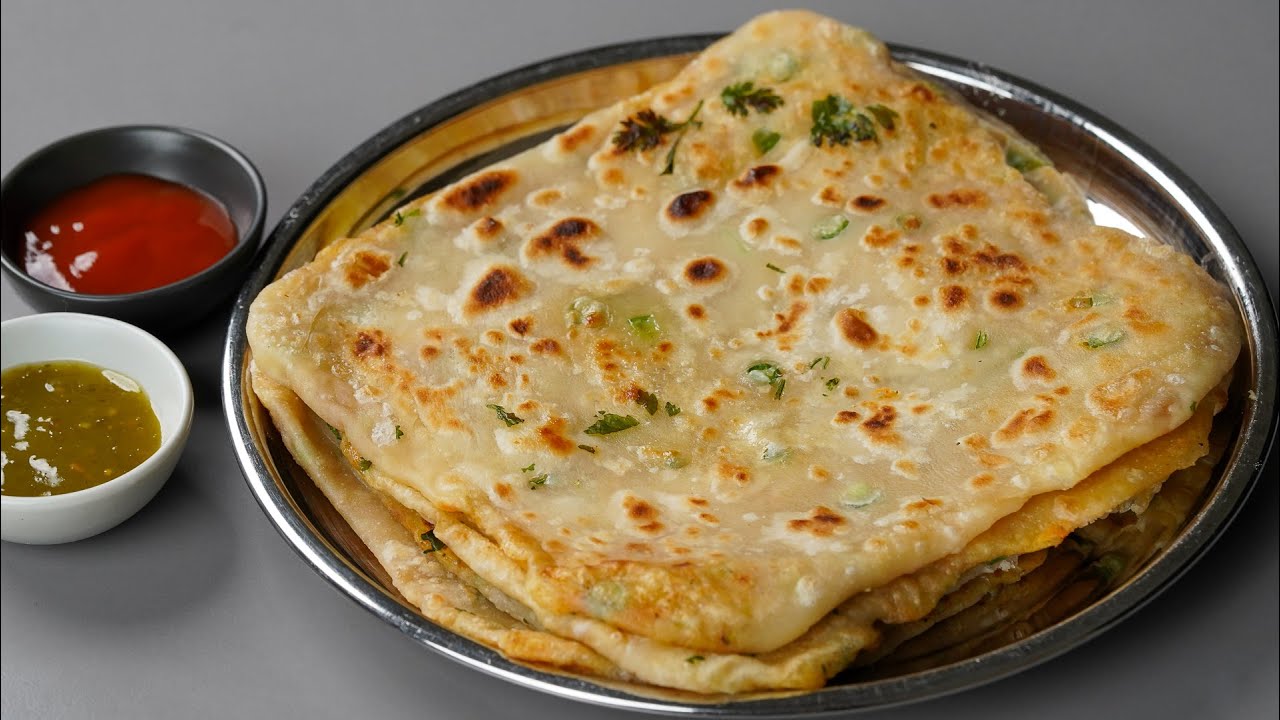
Paratha Recipe: Paratha is a beloved flatbread from South Asia, particularly India and Pakistan. Known for its flaky layers and deliciously crispy texture, paratha has been a staple breakfast and meal companion for centuries. It is made by rolling out dough, often layered with ghee or oil, and then cooking it on a hot griddle until golden brown. Unlike plain chapati or roti, parathas are richer, more indulgent, and can be enjoyed plain or stuffed with flavorful fillings like spiced potatoes, paneer, or even minced meat. The word “paratha” itself comes from the Sanskrit words “parat” (layers) and “atta” (flour), which beautifully describes its texture.
Why Paratha is Loved Worldwide
Parathas have crossed borders and found a place in kitchens across the globe. Their versatility is one of the main reasons—they can be eaten with curries, yogurt, pickles, or even on their own with a dollop of butter. From street-side stalls in Delhi serving hot, stuffed parathas with a glass of lassi, to homely kitchens preparing them as comfort food, parathas symbolize warmth, tradition, and togetherness. In recent years, many variations such as whole-wheat paratha, multigrain paratha, and vegan paratha have gained popularity, making this flatbread adaptable to modern lifestyles.
Ingredients You’ll Need
Basic Ingredients for Paratha
To prepare soft and flaky parathas, you’ll need just a few simple ingredients that are commonly available in most kitchens:
- Whole Wheat Flour (Atta) – 2 cups (for authentic taste and nutrition)
- Water – About ¾ cup (adjust as needed for soft dough)
- Salt – ½ teaspoon (for flavor balance)
- Oil or Ghee – 2 tablespoons (for kneading and cooking)
These basic ingredients create the foundation of your paratha. Wheat flour provides fiber and nutrients, while ghee or oil ensures softness and a delicious taste. Salt enhances flavor, and water brings the dough together into a pliable, workable texture.
Optional Ingredients for Variations
If you’d like to experiment and add extra flavor, here are some optional ingredients you can include:
- Ajwain (Carom Seeds) – Enhances digestion and adds aroma
- Kasuri Methi (Dried Fenugreek Leaves) – Adds a unique earthy taste
- Yogurt – To make the dough softer and tangier
- Stuffing Options – Mashed potatoes, paneer, cauliflower, radish, lentils, or even keema (minced meat)
These ingredients allow you to transform a plain paratha into a wholesome and flavorful dish. Whether you enjoy the simplicity of a classic plain paratha or prefer the richness of a stuffed one, the choice of ingredients is what gives this flatbread its endless variety.
Kitchen Tools and Equipment
Rolling Pin and Board
A rolling pin (belan) and a flat rolling board (chakla) are essential for preparing parathas. These help roll the dough evenly into circular or triangular shapes. The thickness of the paratha largely depends on how you roll it—too thin and it may turn crispy like a chapati, too thick and it might stay raw inside. Mastering the rolling process is key to achieving soft and layered parathas.
Tawa or Skillet
The traditional way to cook parathas is on a flat iron griddle called tawa. It distributes heat evenly and ensures the paratha cooks properly while developing that characteristic golden-brown crispiness. If you don’t have a tawa, a nonstick skillet or cast-iron pan works just as well. The secret lies in maintaining medium heat—too high and the paratha burns, too low and it becomes dry.
Other Useful Tools
- Spatula or Turner – To flip the paratha while cooking.
- Small Bowl – To keep oil or ghee handy for brushing the paratha.
- Kitchen Towel or Cloth – To keep cooked parathas warm and soft until serving.
Having the right tools makes the process easier and ensures your parathas turn out perfect every time.
Step-by-Step Guide to Making Paratha
Step 1 – Preparing the Dough
Start by adding 2 cups of whole wheat flour to a large mixing bowl. Mix in ½ teaspoon salt for flavor. Slowly add water, little by little, and knead the mixture into a soft dough. The dough should not be too sticky or too dry—it should feel smooth and pliable. To enhance softness, you can add a tablespoon of oil or ghee during kneading. This prevents the dough from drying out and gives the paratha a richer texture. Continue kneading for about 8–10 minutes until the dough is elastic. Cover the dough with a damp cloth to prevent it from drying.
This step is crucial because a well-kneaded dough is the foundation of a soft, fluffy paratha. Many beginners either add too much water, making the dough sticky, or too little, making it hard and unworkable. The key is balance—gradually adding water while kneading ensures perfect consistency.
Step 2 – Resting the Dough
Once the dough is prepared, it’s important to let it rest. Cover the dough with a damp kitchen towel or plastic wrap and set it aside for at least 20–30 minutes. This resting time allows the gluten in the flour to relax, making the dough easier to roll out and resulting in softer parathas. If you’re preparing stuffed parathas, this resting period also gives you time to prepare the filling.
During this stage, the dough absorbs moisture evenly, which prevents cracking when rolled. Think of it as letting the dough “breathe.” If you skip this step, you may notice that the parathas turn out tough and chewy rather than soft and flaky. For best results, always rest your dough in a slightly warm place, away from direct airflow, so it doesn’t dry out.
Another useful tip is to rub a drop of oil over the dough ball before covering it. This keeps the surface from forming a crust. Professional chefs and home cooks alike swear by this small trick, as it makes handling the dough much smoother when rolling.
Step 3 – Rolling the Dough
After resting, divide the dough into equal-sized portions. Roll each portion into a smooth ball, then flatten it slightly between your palms. Dust your rolling board and rolling pin lightly with flour to prevent sticking. Now, start rolling the dough ball gently into a circular shape about 6–7 inches in diameter.
The secret here is to apply even pressure. Beginners often press too hard in one spot, which causes uneven thickness. A paratha should be slightly thicker than a roti but not overly thick. If you’re making stuffed parathas, you’ll first roll out a small circle, place the filling in the center, and then fold the edges over to seal it before rolling again.
For layered or lachha paratha, you can apply a little oil or ghee to the rolled dough, fold it in pleats (like a fan), roll it into a coil, and then flatten again. This creates beautiful, flaky layers when cooked. Rolling is an art, and with practice, you’ll master the perfect shape and thickness for your parathas.
Step 4 – Shaping the Paratha
Parathas don’t always have to be round—many households enjoy experimenting with shapes. The most common shapes include:
- Round Paratha – Traditional and easiest to roll.
- Square Paratha – Rolled, folded like an envelope, and then flattened again.
- Triangle Paratha – Folded twice into a triangle shape, giving extra layers.
Each shape gives the paratha a slightly different texture and appeal. For stuffed parathas, the round shape is usually best, as it holds the filling evenly. Meanwhile, lachha or layered parathas look more attractive in triangular or round forms.
Shaping also depends on personal preference and occasion. For kids, fun shapes like hearts or stars can be made using cookie cutters, making paratha meals more exciting. This versatility in shaping is what makes paratha not just food, but also a creative expression in the kitchen.
Step 5 – Cooking the Paratha
Heat a tawa, skillet, or griddle over medium heat. Place the rolled paratha on the hot surface and let it cook for 30–40 seconds until bubbles appear. Flip it over, brush lightly with oil or ghee, and cook for another 30–40 seconds. Flip again and press gently with a spatula to ensure even cooking and puffing.
A perfectly cooked paratha will have golden-brown spots, crispy edges, and a soft inside. Timing is everything—overcooking makes it dry, while undercooking leaves it raw. Adjust the heat as needed; medium heat is ideal for evenly cooked parathas.
For stuffed parathas, cook on low-medium heat so the filling inside gets warmed up without burning the outer layers. Each paratha usually takes about 2–3 minutes to cook completely. Once done, place them in a kitchen towel or casserole to keep them warm and soft until serving.
Cooking paratha is as much about skill as it is about intuition. The sizzling sound, the aroma of ghee, and the golden color tell you exactly when your paratha is ready to be enjoyed.
Types of Paratha
Plain Paratha
The simplest version, plain paratha, is made with just flour, water, and salt. Despite its simplicity, it’s incredibly delicious and versatile. You can pair it with curries, dal, chutneys, or even enjoy it with tea. Many households prefer plain paratha as a quick breakfast option since it doesn’t require stuffing or elaborate preparation.
Plain parathas can be rolled thin for a lighter version or kept thicker for a more filling meal. Adding a touch of ghee while cooking gives them an irresistible aroma and flavor. They’re also a great base for beginners to practice before moving on to stuffed or layered varieties.
Another reason plain paratha is popular is that it can be easily customized. Adding spices like cumin, carom seeds, or chopped herbs to the dough makes it more flavorful. It’s proof that even the simplest recipes can be comforting and satisfying when made with love.
Stuffed Paratha (Aloo, Paneer, etc.)
Stuffed parathas are where creativity shines. Instead of sticking to plain dough, these parathas are packed with flavorful fillings that turn them into a wholesome meal on their own. The most popular variety is the Aloo Paratha, stuffed with a spiced mashed potato mixture. It’s soft, slightly spicy, and pairs beautifully with butter, yogurt, or pickle.
Other favorites include:
- Paneer Paratha – Stuffed with crumbled paneer and spices, offering a protein-rich, mildly tangy taste.
- Gobhi Paratha – Filled with finely grated cauliflower and herbs, giving a crunchy bite and earthy flavor.
- Mooli Paratha – Radish filling adds a refreshing sharpness, often balanced with green chilies and spices.
- Keema Paratha – A hearty option filled with minced meat, ideal for a fulfilling lunch or dinner.
The technique for stuffed paratha involves rolling out a small disc of dough, placing the filling in the center, folding the edges to seal, and then rolling it flat again carefully. The trick is to use just the right amount of filling—too little, and the taste won’t shine through; too much, and it bursts out while rolling or cooking.
These parathas are not just food, they’re comfort. Families often gather around the table, enjoying hot stuffed parathas straight from the tawa with generous dollops of butter. For anyone who grew up eating them, stuffed parathas bring back warm memories of home-cooked meals.
Lachha Paratha
Lachha paratha is a layered version that looks as good as it tastes. The word “lachha” means layers, and this paratha lives up to its name with its beautifully flaky texture. To make it, you roll out the dough, spread a little ghee or oil, fold it in pleats, coil it into a round shape, and then roll it again before cooking.
When cooked, the layers separate slightly, creating a crispy yet soft paratha that almost melts in your mouth. Lachha paratha is usually enjoyed in restaurants with rich gravies like butter chicken, paneer butter masala, or dal makhani. It’s indulgent, satisfying, and perfect for special occasions.
Unlike stuffed parathas, lachha paratha relies purely on the technique of folding and rolling to achieve its layers. It may take a little practice, but the reward is worth it. Each bite offers a mix of crispiness and softness, making it a true delight for paratha lovers.
Tips and Tricks for Perfect Parathas
Common Mistakes to Avoid
Making parathas seems simple, but a few small mistakes can change the result completely. Here are some pitfalls to avoid:
- Too much flour for dusting – Excess flour burns on the tawa and gives a bitter taste. Use just enough to prevent sticking.
- Incorrect heat level – Cooking on very high heat burns the outside while leaving the inside raw. Low heat makes them dry and chewy. Medium heat is best.
- Overstuffing – For stuffed parathas, too much filling leads to tearing and leaking. Always balance dough and filling.
- Skipping dough resting – Dough that hasn’t rested is difficult to roll and results in tough parathas.
- Not using enough ghee or oil – While you can make parathas with little oil, skipping it entirely makes them dry. A small brush of ghee enhances both flavor and texture.
Mastering parathas is about patience and practice. Each time you make them, you’ll notice improvements in rolling, cooking, and taste.
How to Store Parathas
Freshly made parathas are always the best, but you can store them if you’re preparing in bulk. Here’s how:
- Refrigeration – Cooked parathas can be stored in an airtight container for up to 2–3 days. Wrap them in foil or paper towels before sealing to keep them soft.
- Freezing – Half-cooked parathas can be frozen with parchment paper between each one. When needed, cook them directly on a hot tawa without thawing.
- Reheating – To reheat, place parathas on a tawa for a few seconds on each side. Avoid microwaving for too long, as it can make them chewy.
Storing parathas makes them a convenient option for busy mornings or last-minute meals. Many people prepare batches of plain or stuffed parathas over the weekend and store them for quick weekday breakfasts.
Serving Suggestions
Best Side Dishes for Paratha
Parathas are incredibly versatile and pair well with a variety of dishes. Some popular side dishes include:
- Curd (Yogurt) – A cooling balance to spicy stuffed parathas.
- Pickles (Achar) – Adds tanginess and spice, making each bite exciting.
- Curry or Gravy – Dal, chicken curry, or paneer masala elevate parathas into a complete meal.
- Chutneys – Mint chutney, coriander chutney, or tomato chutney work beautifully.
A classic combination is hot parathas with butter on top, served with a glass of lassi (sweet yogurt drink). This pairing is iconic in Punjabi households and is loved across India.
Traditional Pairings
Traditionally, parathas are eaten at breakfast in many Indian homes, especially in North India. Aloo paratha with pickle and curd is a household favorite, while in Punjab, parathas are served with a tall glass of lassi for a hearty start to the day.
In restaurants, parathas are often served with butter chicken, paneer gravies, or dal makhani, making them indulgent dinner options. They also pair well with dry sabzis (vegetable stir-fries) and even eggs for a fusion twist.
The beauty of paratha is its adaptability—you can enjoy it plain with butter for breakfast, with curry for lunch, or even with tea for an evening snack.
Nutritional Value of Paratha
Calorie Count
Paratha is delicious and satisfying, but it is also calorie-dense due to the use of wheat flour, oil, or ghee. On average, a plain paratha contains about 180–220 calories, depending on its size and the amount of ghee used. A stuffed paratha like aloo or paneer can range between 250–350 calories per piece. Lachha parathas, with their multiple layers brushed with ghee, usually fall on the higher end of the scale.
Here’s a quick breakdown for a medium-sized plain paratha:
- Carbohydrates: 25–30 grams
- Protein: 4–5 grams
- Fat: 7–10 grams
- Fiber: 3–4 grams
While parathas are energy-rich and filling, they should be consumed in moderation if you’re watching your calorie intake. A single paratha at breakfast with curd or pickle can keep you energized for hours, but having too many at once may contribute to weight gain.
Healthier Alternatives
If you want to enjoy parathas guilt-free, there are plenty of ways to make them healthier without losing taste:
- Use Multigrain Flour – Replace part of the wheat flour with oats flour, ragi, or millet flour for added nutrients.
- Reduce Oil or Ghee – Brush lightly instead of pouring; a little goes a long way.
- Add Greens to Dough – Spinach, methi (fenugreek), or grated carrots can be kneaded into the dough for extra fiber and vitamins.
- Try Stuffing with Protein – Use paneer, boiled eggs, or moong dal as stuffing to increase protein content.
- Bake Instead of Frying – Though traditionalists may frown, you can bake parathas on a greased tray at high temperature for a less oily version.
These small changes make parathas a nutritious option without compromising much on taste. With the right tweaks, you can enjoy them regularly as part of a balanced diet.
FAQs about Paratha Recipe
1. Can I make paratha without ghee or oil?
Yes, you can dry roast parathas like chapati, but they won’t have the same flaky texture. Using even a small amount of oil or ghee gives better results.
2. How do I prevent stuffed parathas from tearing while rolling?
Make sure the filling is smooth and not watery. Also, don’t overstuff—balance between dough and filling is key.
3. What’s the best flour for paratha?
Whole wheat flour (atta) is traditional and works best. However, you can mix in multigrain flours for added nutrition.
4. Can I prepare parathas in advance?
Yes! You can half-cook them, cool them down, and freeze them. Later, just cook them fully on a hot tawa when needed.
5. What’s the difference between paratha and roti?
Roti is thinner, lighter, and made without oil, while paratha is thicker, often layered or stuffed, and cooked with oil or ghee for a richer taste.
Conclusion
Paratha is more than just bread—it’s a symbol of comfort, tradition, and family gatherings. Whether it’s the simplicity of a plain paratha, the indulgence of a stuffed aloo paratha, or the elegance of a flaky lachha paratha, each variety has a special place in kitchens across the world. With just a few ingredients, some patience, and practice, you can master the art of making parathas at home.
They can be enjoyed at any time of the day, paired with yogurt, pickles, gravies, or even just a pat of butter. And while they’re indulgent, healthier versions ensure you can enjoy them more often without guilt.
So, next time you’re craving something warm, filling, and soul-satisfying, roll up your sleeves and make a batch of parathas. Your kitchen will smell heavenly, and your taste buds will thank you.


