Matcha Cookies Recipe: Matcha is a finely ground powder made from specially grown and processed green tea leaves. Unlike regular green tea, where leaves are steeped and discarded, matcha involves consuming the entire leaf in powdered form. This makes it a powerhouse of antioxidants, particularly catechins, which are known for boosting metabolism and supporting heart health.
Matcha is cultivated in Japan, and its vibrant green color isn’t just pretty—it’s a sign of high-quality chlorophyll. Before harvesting, tea bushes are covered to avoid direct sunlight. This enhances the flavor and texture of the leaves and increases their amino acid content. Once harvested, the leaves are dried, de-stemmed, and stone-ground into a fine powder. The result? A richly flavorful and nutritionally dense green powder used in drinks, desserts, and, of course, cookies!
Why Use Matcha in Cookies?
Adding matcha to cookies gives them a beautiful green hue and a unique flavor profile—earthy, slightly bitter, yet sweet when paired with the right ingredients. It transforms a regular cookie into something exotic, sophisticated, and Instagram-worthy. Matcha cookies are not just a trend; they offer a fantastic way to enjoy the health benefits of green tea in dessert form.
Also, matcha pairs incredibly well with flavors like white chocolate, vanilla, and almond, giving you many opportunities to experiment. For people who want to cut down on overly sugary snacks but still indulge their sweet tooth, matcha cookies are the perfect guilt-free treat. With the right balance of sweetness and earthiness, matcha cookies offer a taste that’s as satisfying as it is wholesome.
Ingredients You’ll Need
When it comes to making matcha cookies, quality ingredients are key. Using fresh, high-quality matcha powder will dramatically impact the flavor, color, and texture of your cookies.
Dry Ingredients
Here’s what you’ll need on the dry side:
- 1 ½ cups all-purpose flour
- 1 ½ tablespoons premium matcha powder
- ½ teaspoon baking soda
- ¼ teaspoon salt
Why it matters: Flour gives your cookies structure, while baking soda helps them rise and stay light. The salt enhances the overall flavor. Most importantly, matcha powder is the star—it brings that bold green tea essence and that vibrant green coloring to your cookie dough.
Wet Ingredients
Next up are the wet ingredients:
- ½ cup unsalted butter, softened
- ¾ cup granulated sugar
- 1 large egg
- 1 teaspoon vanilla extract
Why these?
Softened butter creates that ideal soft-yet-chewy cookie texture. Sugar balances the bitterness of the matcha. The egg binds the ingredients together, and vanilla gives your cookies a subtle aromatic depth that complements the earthy matcha beautifully.
Optional Add-ins
Want to spice up your matcha cookies? Here are some bonus ingredients:
- ½ cup white chocolate chips (for sweetness)
- ¼ cup chopped macadamia nuts (for crunch)
- Zest of one lemon (for a citrus twist)
These aren’t necessary, but they elevate your cookie game to the next level. White chocolate chips, especially, create a contrast to the slightly bitter matcha flavor and melt beautifully inside the dough during baking.
Essential Kitchen Tools for Matcha Cookies
Baking Equipment
To bake matcha cookies like a pro, make sure you have:
- Baking sheet (non-stick or lined with parchment paper)
- Wire cooling rack
- Mixing bowls (one large and one medium)
The baking sheet is where your cookies will take form, so ensure it’s high quality and evenly heats. The cooling rack is essential so your cookies don’t overbake from residual heat.
Measuring Tools
Precision is key in baking. These tools are essential:
- Measuring cups (dry and liquid)
- Measuring spoons
- Kitchen scale (optional but very accurate)
Matcha powder needs to be measured properly because too much will make your cookies bitter, while too little will make them lose their signature flavor and color.
Mixing Essentials
Don’t forget your:
- Electric hand mixer or stand mixer
- Silicone spatula
- Whisk
The mixer helps cream butter and sugar efficiently, the whisk breaks up clumps in dry ingredients, and a silicone spatula is perfect for scraping down the sides of bowls so nothing goes to waste.
Step-by-Step Guide to Make Matcha Cookies
Step 1: Prepare Your Ingredients
Before you even touch your oven dial, start with mise en place—a fancy term for gathering and preparing your ingredients ahead of time. Trust me, this step makes the whole baking process smoother and stress-free.
Pull out your butter first and let it sit at room temperature. This is crucial because cold butter won’t cream properly, which affects the texture of your cookies. While that’s softening, measure your flour, matcha, baking soda, and salt into a bowl. Use a whisk to combine them evenly.
Now crack your egg into a small bowl (it helps avoid shell bits in your batter), and measure out your vanilla extract. Have your sugar ready. If you’re adding extras like chocolate chips or nuts, chop them now and keep them in a separate bowl.
Prepping in advance saves time, avoids last-minute scrambling, and ensures each ingredient is measured and mixed perfectly. It also gives you time to sip on some matcha tea while you bake!
Step 2: Preheat the Oven
Don’t underestimate this step—preheating your oven is crucial in achieving the perfect texture for your matcha cookies. Set your oven to 350°F (175°C) and let it fully heat up while you prepare your dough.
Baking cookies in a cold or unevenly heated oven can lead to inconsistent results. Your cookies might come out too soft, undercooked, or oddly shaped. Preheating ensures your dough starts baking at the right temperature immediately, allowing the baking soda to activate correctly for a light, fluffy interior with a crisp edge.
If you have an oven thermometer, now’s the time to use it. Many home ovens run hotter or cooler than the set temperature, and a thermometer gives you a more accurate reading. Also, prepare your baking sheet by lining it with parchment paper or a silicone baking mat. This not only prevents sticking but also helps the cookies bake more evenly.
A properly preheated oven is like setting the stage for a flawless performance—it’s non-negotiable if you want golden edges and chewy centers.
Step 3: Mix the Dry Ingredients
In a medium bowl, whisk together your dry ingredients:
- 1 ½ cups all-purpose flour
- 1 ½ tablespoons matcha powder
- ½ teaspoon baking soda
- ¼ teaspoon salt
Whisking serves a few important purposes—it breaks up any lumps in the matcha powder and flour, distributes the leavening agents evenly, and ensures the salt blends into every bite. Matcha tends to clump, so you might want to sift it before adding it to the flour to ensure a smooth, lump-free cookie dough.
Make sure to use a fine-mesh sieve or a sifter if your matcha looks clumpy. A smooth, evenly mixed dry base guarantees the matcha flavor is consistent throughout every cookie. It’s also your first chance to really appreciate the vibrant green color that gives matcha cookies their signature look.
Don’t rush this part. Even though it may seem simple, properly mixing dry ingredients ensures your cookies rise evenly and taste the same from edge to center.
Step 4: Cream the Butter and Sugar
In a large mixing bowl, add:
- ½ cup unsalted butter (softened)
- ¾ cup granulated sugar
Use an electric mixer (hand or stand) to cream these together until the mixture becomes light and fluffy. This process usually takes about 2–3 minutes on medium speed. You’re not just mixing the butter and sugar—you’re aerating the mixture, which plays a huge role in how your cookies spread and bake.
Once it’s smooth and fluffy, add in:
- 1 large egg
- 1 teaspoon vanilla extract
Continue mixing until the egg and vanilla are fully incorporated. The dough will appear creamy and slightly thick.
Pro tip: Scrape down the sides of your bowl with a spatula regularly. This ensures everything is mixed evenly and no sugar or butter gets stuck to the bowl. The creaming process is what makes your cookies soft, chewy, and bakery-quality.
If you’re going for a vegan variation, you can substitute the butter with vegan margarine and the egg with a flaxseed egg (1 tablespoon ground flaxseed + 3 tablespoons water). Mix and let sit for 5 minutes before using.
Step 5: Combine Wet and Dry Mixtures
This is the moment your dough starts to come together.
Gradually add the dry ingredients into the creamed butter mixture, about one-third at a time. Beat on low speed to avoid flour flying everywhere, and mix just until the flour disappears. Overmixing at this stage can lead to dense, tough cookies.
Once combined, the dough will be thick, slightly sticky, and vibrant green. Now’s the time to fold in any extras like:
- ½ cup white chocolate chips
- ¼ cup chopped macadamia nuts
- Or even a sprinkle of coconut flakes for a tropical twist
Use a spatula to fold in your add-ins gently. This keeps the dough from being overworked and ensures even distribution of your mix-ins.
Chill or not to chill?
While optional, chilling the dough for 20–30 minutes can enhance the flavor and prevent the cookies from spreading too much during baking. If you have the time, wrap the dough in plastic wrap and let it rest in the fridge.
Once your dough is mixed and (optionally) chilled, you’re ready to scoop and bake.
Step 6: Shape the Dough
Now that your matcha cookie dough is ready, it’s time to shape it into beautiful little balls of green goodness. Use a cookie scoop or tablespoon to portion out even amounts of dough. This not only makes your cookies uniform in size (which looks great and ensures even baking) but also speeds up the process.
Roll each portion into a ball using your hands. If the dough is too sticky, lightly flour your hands or chill the dough for an extra 10 minutes. Space the dough balls about 2 inches apart on your prepared baking sheet—these cookies will spread slightly, and you want to avoid them merging into one giant matcha blob (unless that’s your thing!).
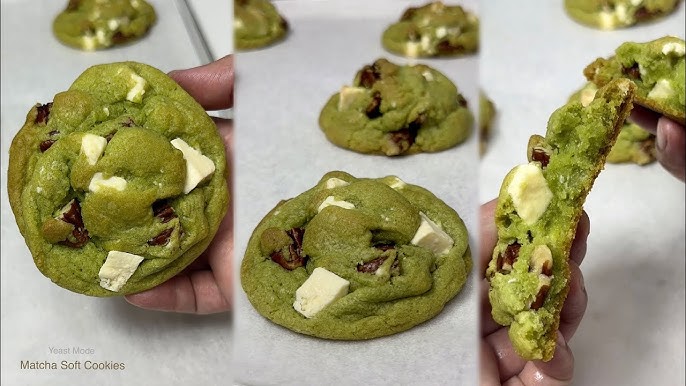
For that picture-perfect finish, gently press a few white chocolate chips on top of each ball before baking. This gives them that bakery-style look and helps identify them as white chocolate matcha cookies.
Pro Tip:
If you like crispy edges and chewy centers, flatten the dough balls slightly with your fingers or the back of a spoon. If you prefer thick, cake-like cookies, leave them as balls and let the oven do the work.
Whether you make big, thick cookies or thin and crisp ones, shaping the dough evenly is key to consistent results and beautiful presentation.
Step 7: Bake the Cookies
Slide your baking tray into the preheated oven (350°F / 175°C) and bake for 10–12 minutes. The cookies should be just set around the edges with soft centers. They will continue to bake on the hot tray even after you take them out, so resist the urge to overbake.
At around the 10-minute mark, check your cookies. The edges should be firm, and the tops may still look slightly undercooked—this is perfect. Overbaking will dull the vibrant green color and make the cookies dry.
If you’re baking multiple trays, rotate them halfway through to ensure even browning. Ovens have hot spots, and rotating trays prevents one side from overcooking.
Pro tip:
Matcha cookies don’t brown the same way traditional cookies do. Don’t wait for a golden color, or you’ll end up with dry, bitter results. Watch the edges and centers instead. If you see a slight crackle on top, you’re in the sweet spot!
Once baked, let the cookies cool on the tray for 5 minutes before transferring them to a wire rack. This short wait allows them to firm up slightly, preventing breakage when moving.
Step 8: Cool and Serve
After baking, transfer your cookies to a wire cooling rack and let them cool completely—though, let’s be honest, you’re going to eat one warm, and that’s totally okay. In fact, that melty white chocolate combined with the warm, soft matcha cookie is an experience everyone deserves.
Cooling your cookies allows the internal structure to set. If you try to eat them straight from the oven, they might fall apart or feel too soft. After about 15 minutes, they’ll have firmed up enough to hold their shape while staying chewy inside.
These cookies are perfect for:
- Afternoon tea
- Gifting during holidays
- Midday pick-me-ups
- Instagram cookie content (seriously, that green hue pops!)
If you made a large batch, arrange them nicely on a tray or stack them in a clear glass jar—they’ll look just as good as they taste. And if you made extra dough, don’t worry. We’ll cover storage options in an upcoming section.
Serve with a cup of milk, iced coffee, or even better—matcha latte—for the ultimate green tea lover’s dream snack.
Tips for Perfect Matcha Cookies
Making matcha cookies is simple, but a few extra tips will take your cookie game from good to “Did you seriously bake these?!”
Choosing the Right Matcha Powder
This is the most critical tip of all. The quality of your matcha directly affects the flavor, color, and even texture of your cookies.
Here’s what to look for:
- Use high-quality culinary-grade or ceremonial-grade matcha: Ceremonial is sweeter and smoother but more expensive; culinary grade works well and is more budget-friendly.
- Avoid low-grade matcha: It’s dull in color, overly bitter, and can make your cookies taste grassy or muddy.
- Check for color: The brighter the green, the better the quality. Dull green or brownish matcha means it’s either old or low-grade.
Store your matcha in an airtight, light-proof container in the fridge to keep it fresh. Matcha is sensitive to light, air, and heat, which can degrade its flavor and color quickly.
Pro Tip: Always sift your matcha before adding it to any mixture. It clumps easily and needs to be evenly dispersed for smooth, lump-free cookies.
Texture and Taste Adjustments
Want your cookies extra chewy or a little crispier? Here’s how you can tweak your recipe:
- For chewy cookies: Use brown sugar in place of half the white sugar. The moisture from brown sugar adds chewiness.
- For crispier cookies: Flatten the dough balls more before baking and bake an extra 1–2 minutes.
- For thicker cookies: Chill the dough for 1 hour before baking.
- For stronger matcha flavor: Add an extra ½ tablespoon of matcha powder, but reduce the flour slightly to keep the texture balanced.
Taste your dough before baking. If you feel it needs a touch more sweetness, add 1–2 teaspoons of sugar. Balance is everything—matcha is bold, and your cookies should highlight its richness without overpowering sweetness or bitterness.
Matcha Cookie Variations
Matcha cookies are amazing on their own, but the fun really begins when you start experimenting. Whether you have dietary preferences or want to spice things up, there’s a matcha cookie for everyone.
White Chocolate Chip Matcha Cookies
This is the most popular variation of matcha cookies. The creaminess of white chocolate pairs incredibly well with the earthy tones of matcha, creating a beautifully balanced cookie that’s both indulgent and sophisticated.
How to make it: Simply add ½ to ¾ cup white chocolate chips to the dough right before baking. For an extra bakery-style appearance, press a few chips on top of the dough balls before they go into the oven. The contrast of the bright green cookie and melty white chips is visually stunning and absolutely delicious.
Pro Tip: You can use white chocolate chunks or chop up a bar for more texture. Want extra richness? Add a pinch of sea salt on top before baking for that sweet-salty finish.
Vegan Matcha Cookies
Yes, you can absolutely enjoy matcha cookies on a plant-based diet. With a few simple swaps, your cookies will be dairy-free, egg-free, and still packed with flavor.
Substitute list:
- Butter: Use vegan margarine or coconut oil
- Egg: Replace with a flaxseed egg (1 tbsp ground flaxseed + 3 tbsp water, mixed and rested for 5 minutes)
- White chocolate chips: Use dairy-free or vegan white chocolate
These cookies come out just as chewy and delicious. The only difference is a little more love for the planet and your health.
Optional add-in: Consider adding chopped nuts or seeds for extra protein and crunch.
Gluten-Free Matcha Cookies
Gluten-free? No problem. You can still enjoy matcha cookies by swapping out regular flour for a gluten-free alternative.
Use a 1:1 gluten-free flour blend that includes xanthan gum. This helps mimic the elasticity and texture of traditional wheat flour.
Other tips for gluten-free matcha cookies:
- Chill the dough for at least 1 hour to reduce spreading
- Add an extra ½ tsp of baking soda if the dough seems too dense
- Use parchment paper to prevent sticking
With these tweaks, you’ll get cookies that are just as soft and flavorful, minus the gluten.
Storage and Shelf Life
Once you’ve baked a batch of these magical green treats, you might wonder how to store them so they stay fresh and delicious. Here’s how:
How to Store Matcha Cookies
Matcha cookies keep surprisingly well if stored correctly.
- Room Temperature: Store in an airtight container for up to 5 days. Keep away from sunlight to preserve the vibrant green color.
- Fridge: If your house is warm or humid, refrigerate in an airtight container for up to 7 days.
- Freezer (baked): Let cookies cool completely, then store in a zip-top bag or airtight container for up to 2 months.
To enjoy, let the frozen cookies thaw at room temperature or give them a 10-second zap in the microwave.
Pro Tip: Place a slice of bread in the cookie container. It helps keep the cookies soft by retaining moisture.
Can You Freeze Matcha Cookie Dough?
Absolutely—and you should if you love fresh-baked cookies on demand.
Here’s how:
- Shape the dough into individual balls
- Place on a baking sheet and freeze for 1–2 hours
- Transfer the frozen dough balls to a ziplock bag or airtight container
- Label with the date and bake-by deadline (use within 3 months)
When you’re ready to bake, you can either thaw the dough in the fridge overnight or bake straight from frozen—just add 1–2 extra minutes to your bake time.
Freezing the dough also allows the flavors to develop, which can actually make the cookies taste even better.
Nutritional Information
While matcha cookies are a treat, it’s always good to know what you’re indulging in. Here’s an approximate breakdown per standard-sized cookie (based on a recipe yielding 20 cookies):
| Nutrient | Amount per Cookie |
|---|---|
| Calories | 130–150 kcal |
| Total Fat | 7–8 g |
| Saturated Fat | 4 g |
| Carbohydrates | 18–20 g |
| Sugars | 10–12 g |
| Protein | 2 g |
| Fiber | <1 g |
| Sodium | 80 mg |
Keep in mind this will vary depending on your choice of ingredients and add-ins. For a lighter version, you can reduce sugar slightly or use a sugar alternative like monk fruit or coconut sugar.
If you’re tracking macros or managing dietary intake, it’s easy to tweak this recipe to fit your needs without sacrificing taste.
Common Mistakes to Avoid
Even though matcha cookies are simple to make, there are a few pitfalls that can trip up even experienced bakers. Avoid these common mistakes to get the best results every time.
Overmixing the Dough
This is a classic baking mistake—especially when you’re excited to get everything just right. But here’s the deal: once you’ve added the dry ingredients to the wet mix, you should mix just until combined. Overmixing activates the gluten in the flour, which can make your cookies dense, tough, or bread-like.
What to do instead: Mix on low speed or fold gently by hand. Stop as soon as you see no more visible flour streaks. Your dough should look cohesive but not overly worked. Even when adding chocolate chips or nuts, fold them in gently with a spatula.
The goal? Soft, tender, chewy cookies that don’t have the texture of biscuits.
Using Low-Quality Matcha
Not all matcha is created equal. If you’ve ever made cookies that turned out dull, bitter, or tasted like hay—chances are, your matcha was to blame. Using poor-quality or old matcha powder can ruin the flavor and color of your cookies.
What to avoid:
- Cheap matcha with a brownish or olive green color
- Matcha that’s been sitting in your cupboard for over a year
- “Green tea powder” that isn’t true matcha
What to use:
Opt for culinary-grade matcha from a trusted brand. Look for bright green powder with a fresh, grassy smell. Store it in an airtight container in the fridge to maintain its color and potency.
Spending a little more on good matcha is worth it—especially since it’s the star ingredient in your recipe.
FAQs about Matcha Cookies Recipe
1. Can I use culinary-grade matcha for cookies?
Yes! Culinary-grade matcha is perfect for baking. It’s more affordable than ceremonial-grade and has a stronger flavor that holds up well during baking. Just make sure it’s fresh and vibrant green in color.
2. How do I prevent cookies from spreading too much?
Chill your dough for at least 30 minutes before baking. Also, make sure your baking sheets are cool and not warm from previous batches. Too much butter or not enough flour can also lead to excessive spreading.
3. What can I substitute for butter in matcha cookies?
You can use vegan margarine, coconut oil, or even applesauce (for a low-fat version). Just note that texture and taste may vary slightly. Coconut oil works best for keeping the same richness.
4. Can I double the batch of this recipe?
Absolutely. Just make sure to mix the ingredients well, and if needed, divide the dough in half for easier handling. When doubling, don’t forget to adjust your baking trays and oven space accordingly.
5. Are matcha cookies safe for kids?
Yes, in moderation. Matcha does contain caffeine (about 30–40mg per teaspoon), so it’s best to offer matcha cookies as an occasional treat for kids rather than a regular snack.
Conclusion
Matcha cookies aren’t just a trend—they’re a delicious blend of modern flavors and ancient ingredients. Whether you’re a seasoned baker or trying this recipe for the first time, these cookies are simple to make and endlessly customizable. The earthy richness of matcha pairs perfectly with sweet additions like white chocolate, while the vibrant green hue adds a touch of elegance to your dessert table.
From choosing high-quality matcha to properly creaming your butter and sugar, every step plays a role in making the perfect cookie. And with variations for vegan and gluten-free diets, there’s truly a matcha cookie for everyone.
So go ahead—gather your ingredients, preheat your oven, and treat yourself to a batch of freshly baked matcha cookies. You’ve earned it.


