King Arthur Bread Recipe: There’s something magical about pulling a fresh loaf of bread out of the oven—the smell, the golden crust, and the soft, airy crumb inside. Among bread lovers, King Arthur bread holds a special place. It’s not just about baking; it’s about tradition, quality, and a recipe that delivers consistency every time.
Whether you’re a first-time baker or someone who has been kneading dough for years, this guide will walk you through the process of making the perfect King Arthur bread step by step. By the end, you’ll not only have a loaf to be proud of but also the confidence to bake it again and again.
The History of King Arthur Flour
King Arthur Flour, founded in 1790, is one of the oldest flour companies in America. It started with a simple mission: to provide bakers with the highest-quality flour. Over the years, the company became synonymous with reliability and consistency. Today, it’s a trusted brand not just for flour but for countless bread, cake, and pastry recipes. When people talk about King Arthur bread, they’re not just referring to a recipe—they’re referring to a legacy that has been built on quality and tradition.
Why King Arthur Bread is Famous
King Arthur bread is famous for its texture, flavor, and versatility. It’s hearty enough to hold up for sandwiches yet soft enough to enjoy with just butter and jam. The secret lies in the flour’s protein content, which creates strong gluten development. This gives the bread structure, chewiness, and that bakery-style finish we all crave. Unlike some recipes that may yield inconsistent results, the King Arthur bread recipe is reliable, even for beginner bakers.
Benefits of Baking Bread at Home
There’s nothing quite like homemade bread. Not only does it taste better than most store-bought loaves, but it’s also healthier. You control the ingredients—no preservatives, no unnecessary additives. Plus, baking is therapeutic. The process of kneading dough, waiting for it to rise, and smelling it bake can be deeply satisfying. For families, it’s an activity that brings everyone together, and for individuals, it’s a rewarding skill that keeps on giving.
Ingredients You’ll Need
Essential Ingredients for King Arthur Bread
To make classic King Arthur bread, you’ll need the following:
- King Arthur Bread Flour (4 cups / 480g) – Provides strength and structure.
- Warm Water (1 ½ cups / 360ml) – Activates the yeast.
- Active Dry Yeast (2 ¼ teaspoons / 7g) – Helps the bread rise.
- Salt (2 teaspoons / 12g) – Enhances flavor and regulates fermentation.
- Sugar or Honey (1 tablespoon) – Feeds the yeast and adds a touch of sweetness.
Optional Add-Ins for Flavor and Texture
If you want to get creative, try adding:
- Seeds (sesame, sunflower, flax) for crunch.
- Herbs (rosemary, thyme, oregano) for aroma.
- Cheese (cheddar, parmesan) for richness.
- Whole grains (rolled oats, wheat germ) for nutrition.
Tips on Choosing High-Quality Ingredients
- Flour: Always go for unbleached bread flour—it provides the best gluten structure.
- Yeast: Check expiration dates; old yeast won’t rise properly.
- Salt: Use fine sea salt for even distribution.
- Water: Use filtered water if your tap water has a strong taste or high chlorine.
Tools and Equipment You’ll Need
Basic Baking Tools
- Large mixing bowl
- Wooden spoon or silicone spatula
- Measuring cups and spoons
- Kitchen scale (for accuracy)
- Clean kitchen towel or plastic wrap
Special Equipment That Improves Results
- Stand Mixer with Dough Hook – Makes kneading easier.
- Bench Scraper – Useful for shaping dough.
- Baking Stone or Dutch Oven – Creates a professional bakery-style crust.
- Instant-Read Thermometer – Ensures the bread is baked to the right internal temperature (190–200°F).
Preparing Your Kitchen Before Baking
Set up a clean workspace. Dust your counter lightly with flour, and keep everything within reach. Bread-making is a process where timing matters, so having your tools and ingredients ready will make the experience much smoother.
Step-by-Step Guide to Making King Arthur Bread
Step 1 – Mixing the Ingredients
Start by dissolving the yeast in warm water with a pinch of sugar. Let it sit for 5–10 minutes until foamy. This step is called “proofing the yeast” and ensures it’s active. Next, combine the flour and salt in a large bowl. Slowly add the yeast mixture, stirring until it forms a rough dough. The dough should be slightly sticky but not overly wet. At this stage, you’re just bringing everything together—it doesn’t have to be perfectly smooth yet.
Step 2 – Kneading the Dough
Kneading is the heart of bread-making. This is where the magic happens—where simple flour and water transform into a structured dough capable of holding air pockets and rising beautifully. Place your dough onto a lightly floured surface and begin to knead it by pushing it forward with the heel of your hand, folding it over, and turning it slightly. Repeat this motion rhythmically. If you’re using a stand mixer with a dough hook, let it knead on medium speed for about 8–10 minutes.
The goal is to develop gluten, the network of proteins that gives bread its chew and structure. You’ll know the dough is ready when it passes the “windowpane test.” Simply stretch a small piece of dough between your fingers; if it stretches thin enough to let light through without tearing, your dough is kneaded enough. If it rips too easily, give it another few minutes.
Don’t be afraid if your dough feels a little sticky in the beginning—resist the urge to dump in too much extra flour. Sticky dough often leads to lighter bread, while adding too much flour makes the loaf dense. Instead, lightly flour your hands and work surface as needed to manage the stickiness. Remember, patience pays off here, and kneading is also a great arm workout.
Step 3 – First Rise (Bulk Fermentation)
Once kneading is complete, shape the dough into a ball and place it in a lightly greased bowl. Cover it with plastic wrap or a damp kitchen towel to keep moisture in. Leave it in a warm, draft-free spot to rise. This stage, called bulk fermentation, usually takes about 1 to 2 hours, depending on your room temperature. The dough should roughly double in size.
During this time, the yeast is feasting on sugars in the flour, producing carbon dioxide and alcohol. The gas creates air pockets, while the alcohol adds flavor. If your kitchen is cold, you can create a warm environment by placing the bowl inside an oven that’s turned off but with the light on. Alternatively, put the bowl near a sunny window.
One way to test if the dough has risen enough is the “poke test.” Gently press a finger into the dough about half an inch deep. If the indentation slowly springs back but doesn’t completely disappear, the dough is ready. If it bounces back immediately, let it rise longer. This step develops flavor, texture, and structure, so don’t rush it—bread baking is about patience.
Step 4 – Shaping the Dough
After the first rise, gently punch down the dough to release excess gas. This doesn’t mean slamming it with force—just a gentle press to deflate the air pockets. Now, transfer it to a lightly floured surface and shape it into your desired loaf.
For a classic sandwich loaf, flatten the dough into a rectangle, fold the sides inward, and then roll it up tightly, pinching the seam to seal. Place it seam-side down into a greased loaf pan. If you want a round artisan-style loaf, shape it into a smooth ball by tucking the edges underneath, creating surface tension on top. For baguettes, roll the dough into long cylinders.
Shaping is not just about appearance—it also affects how the bread bakes. Proper shaping creates surface tension, which helps the loaf rise upward instead of spreading outward. If you’re a beginner, don’t stress too much about perfection. With practice, shaping becomes second nature, and even a “rustic” loaf will taste amazing.
Step 5 – Second Rise (Proofing)
The second rise, or proofing, is the final stage before baking. Place your shaped dough back into the pan or onto a baking sheet, cover it loosely, and let it rise again for 30–60 minutes. The dough should puff up but not quite double this time. This rise gives the bread its final volume and ensures a soft, airy crumb inside.
This step is delicate—proof too little, and your bread will be dense; proof too long, and it may collapse in the oven. Again, use the poke test: if the dough springs back slowly and leaves a slight indentation, it’s ready to bake. If it collapses, it’s over-proofed, and you’ll need to reshape and let it rise again (though the texture may change slightly).
For added flavor and texture, you can brush the top with an egg wash (for a shiny golden crust) or sprinkle seeds, oats, or flour for decoration. Some bakers even score the top of the dough with a sharp knife or razor blade to allow controlled expansion and create beautiful artisan-style patterns.
Step 6 – Baking to Perfection
Now comes the best part—baking! Preheat your oven to 375°F (190°C) for a sandwich loaf or 450°F (230°C) for artisan-style bread. Place your dough in the oven and let the magic happen.
If you’re baking in a loaf pan, the process is straightforward—just pop it in and bake for 30–35 minutes, until golden brown. For artisan loaves, a baking stone or Dutch oven can make a big difference. The enclosed space of a Dutch oven traps steam, which creates that beautiful crusty exterior.
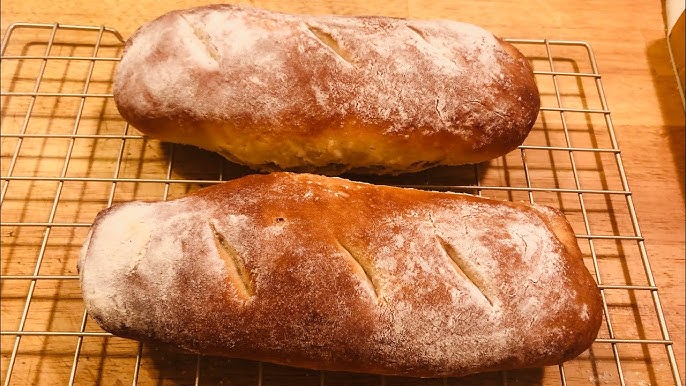
Bread is done when it sounds hollow when tapped on the bottom or when its internal temperature reaches 190–200°F (88–93°C). Remove it from the oven and let it cool on a wire rack. Resist the temptation to slice it immediately—bread continues to cook slightly as it cools, and cutting too soon can lead to a gummy texture.
When you finally cut into your loaf, you’ll be greeted by the aroma of fresh bread, a crisp crust, and a soft, pillowy inside. That’s the reward of patience and effort—the true joy of baking.
Common Mistakes and How to Avoid Them
Overproofing and Underproofing
One of the most common issues beginners face is over- or under-proofing. Over-proofed dough collapses and bakes flat, while under-proofed dough results in a dense loaf. Always rely on the poke test and watch the dough, not the clock.
Measuring Ingredients Accurately
Another common pitfall is inaccurate measurements. Baking is a science, and even small errors can throw off the balance. Use a kitchen scale for best results, especially for flour. Scooping flour with a cup often leads to packing, which means you’re using more flour than the recipe calls for.
Troubleshooting Dough Consistency
Too sticky? Resist adding too much flour—knead a little longer instead. Too dry? Add small splashes of water until the dough feels right. Remember, dough should be soft and slightly tacky, not stiff or crumbly.
Tips for Achieving the Perfect King Arthur Bread
Making great bread is equal parts science and art. Even if you follow the recipe step by step, small details can make a huge difference in the final outcome. Here are some tips that experienced bakers swear by when baking King Arthur bread.
Use the Right Flour
King Arthur Bread Flour is specially milled for high protein content, usually around 12.7%. This higher protein level is what gives your bread its chewiness and structure. If you substitute it with all-purpose flour, your loaf may turn out softer and less structured. While that might not be a disaster, it’s not the signature King Arthur texture. Stick to bread flour for best results.
Control Your Water Temperature
Water that’s too hot can kill your yeast, while water that’s too cold will slow down the rise. The ideal temperature for activating yeast is between 105–110°F (40–43°C). If you don’t have a thermometer, aim for water that feels warm to the touch but not hot.
Don’t Skip the Rest Periods
Sometimes the dough benefits from short rest periods during kneading or shaping. For example, if your dough keeps shrinking back when you try to shape it, let it rest for 10 minutes. This relaxes the gluten and makes shaping easier.
Create Steam in the Oven
Professional bakeries use steam ovens to achieve that crisp crust. At home, you can mimic this by placing a pan of hot water on the bottom rack of your oven while baking or by spritzing the loaf with water just before baking. This prevents the crust from hardening too quickly, allowing the bread to expand fully.
Cool Before Slicing
It’s tempting to cut into a warm loaf, but slicing too early will make the crumb gummy. Let your bread cool for at least 30–45 minutes before cutting. This allows the starches inside to set properly, giving you a clean slice and a perfect texture.
Variations of King Arthur Bread
One of the best parts about mastering the basic King Arthur bread recipe is that it becomes a canvas for endless variations. Once you get comfortable with the process, try experimenting with these delicious twists.
Whole Wheat King Arthur Bread
Swap out half the bread flour for whole wheat flour. This gives the bread a nuttier flavor and a denser, more nutritious crumb. Whole wheat flour absorbs more liquid, so you may need to add a bit of extra water.
Herb and Garlic Bread
Mix in 2–3 teaspoons of dried herbs (like rosemary, thyme, or oregano) and 2–3 minced garlic cloves during the mixing stage. The aroma while baking is irresistible, and the flavor pairs beautifully with soups or pasta dishes.
Cheese Bread
Add 1–1 ½ cups of shredded cheese (cheddar, parmesan, or mozzarella) to the dough after the first rise. You can also sprinkle cheese on top before baking for an extra golden crust.
Seeded Loaf
Sprinkle sesame seeds, sunflower seeds, flaxseeds, or poppy seeds on the top before baking. Seeds not only add crunch but also boost nutrition.
Sweet Cinnamon Swirl Bread
Flatten the dough into a rectangle after the first rise, brush with melted butter, and sprinkle with cinnamon sugar. Roll it up tightly and bake for a sweet, comforting loaf that’s perfect for breakfast.
Storing and Freezing King Arthur Bread
Freshly baked bread is best enjoyed within the first couple of days, but with the right storage, you can keep it fresh longer.
Room Temperature Storage
Wrap the cooled loaf in a clean kitchen towel or store it in a bread box. This keeps the crust from drying out while still allowing airflow. Avoid storing bread in plastic bags unless you plan to eat it quickly, as this traps moisture and makes the crust soft.
Freezing for Later
Bread freezes beautifully. To freeze, slice the loaf first, wrap it tightly in plastic wrap or foil, and place it in a freezer bag. This way, you can take out just a few slices at a time. Bread will keep well in the freezer for up to 3 months. When ready to eat, toast or warm the slices directly from frozen—no need to thaw.
Reviving Stale Bread
If your bread starts to go stale, don’t throw it away! Sprinkle it lightly with water, wrap it in foil, and reheat in the oven at 350°F (175°C) for about 10 minutes. It will taste almost as fresh as the day you baked it.
Serving Ideas for King Arthur Bread
Once you have a gorgeous loaf of King Arthur bread, the possibilities for serving are endless.
- Classic Sandwiches – The sturdy yet soft crumb makes it perfect for ham and cheese, BLTs, or grilled sandwiches.
- Breakfast Toast – Top with butter and jam, avocado, or nut butter for a quick meal.
- Soup Companion – Nothing beats dipping a slice of fresh bread into a hot bowl of tomato soup or chowder.
- Garlic Bread – Slice and brush with garlic butter, then toast in the oven.
- Bread Bowls – With artisan loaves, you can hollow out the center and use it as a bread bowl for chowders or dips.
FAQs about King Arthur Bread Recipe
Q1: Can I use all-purpose flour instead of King Arthur bread flour?
Yes, but the texture will be softer and less chewy. Bread flour gives better structure.
Q2: How do I know if my dough has risen enough?
Use the poke test—gently press your finger into the dough. If it springs back slowly, it’s ready.
Q3: Can I make this bread without a stand mixer?
Absolutely! Hand kneading works just as well, though it takes more time and effort.
Q4: How long does King Arthur bread stay fresh?
It’s best within 2–3 days at room temperature but can be frozen for up to 3 months.
Q5: Why is my bread too dense?
This usually happens if the dough was under-kneaded, under-proofed, or if too much flour was added.
Conclusion
Baking King Arthur bread is more than just following a recipe—it’s an experience that connects you to a centuries-old tradition of home baking. From mixing the ingredients to kneading the dough, watching it rise, and finally pulling that golden loaf out of the oven, every step is rewarding. The process may seem long at first, but with practice, it becomes second nature.
The beauty of King Arthur bread lies in its versatility—you can enjoy it plain, dress it up with seeds or cheese, or adapt it into sweet or savory versions. And the best part? Once you master the basics, you’ll always have the skills to bake bread at home whenever you want. So roll up your sleeves, preheat your oven, and get ready to enjoy one of life’s simplest yet most satisfying pleasures: a warm loaf of homemade bread.


