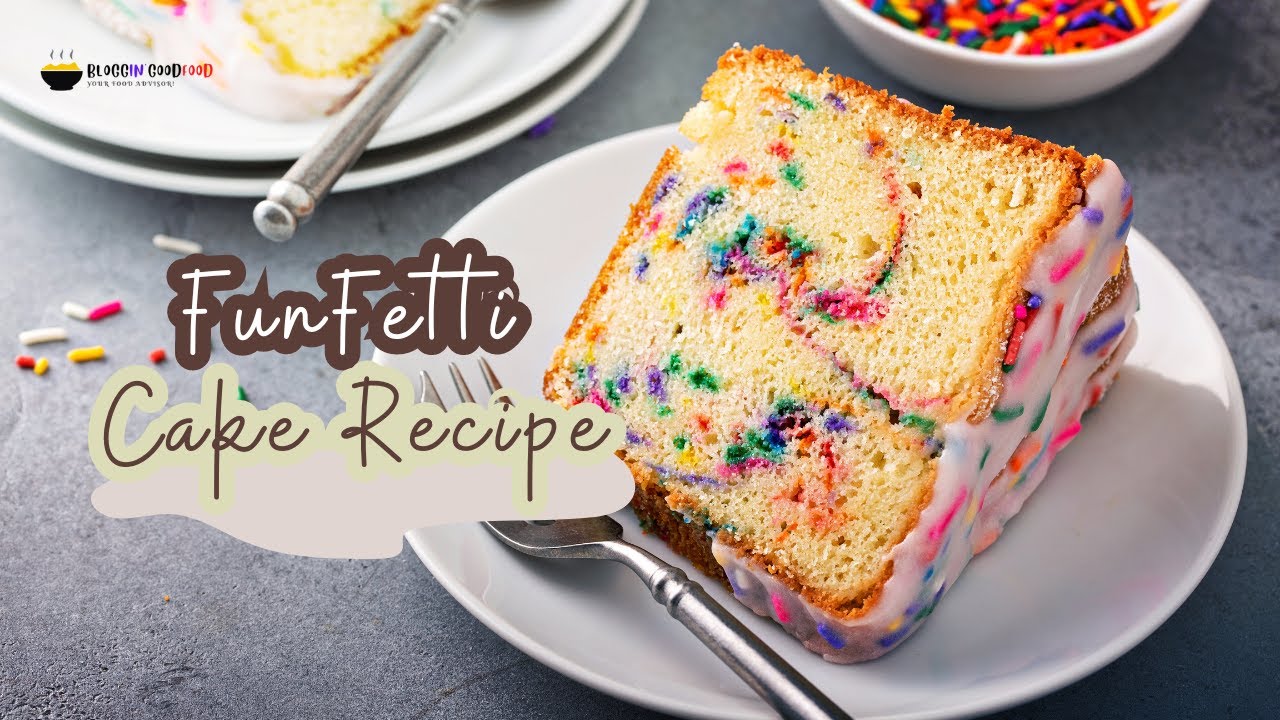
Confetti Cake Recipe: Confetti cake is more than just a dessert—it’s a celebration in every bite. Imagine a soft, fluffy cake with colorful sprinkles baked right inside, creating a vibrant surprise when you slice into it. The cheerful appearance, combined with a sweet and moist flavor, makes it a universal crowd-pleaser. Whether you’re baking it for a child’s birthday, a festive holiday, or simply to brighten up an ordinary day, confetti cake brings instant joy to the table.
It’s the kind of cake that instantly sparks nostalgia. For many of us, our first introduction to confetti cake came in childhood—maybe from a box mix, maybe from a bakery—but the excitement of seeing those colorful bursts inside the cake never fades. And the best part? Making it from scratch means you can control the sweetness, choose your favorite sprinkles, and add personal touches that make it even more special.
The beauty of confetti cake is its adaptability. You can stick to the classic vanilla base for a light, sweet flavor, or experiment with almond, lemon, or even coconut undertones. Plus, because the sprinkles are folded directly into the batter, each slice looks like a little party. This cake isn’t just eaten—it’s experienced.
The History of Confetti Cake
While it’s tempting to think that confetti cake has been around forever, it actually rose to popularity in the mid-20th century. The earliest commercial versions appeared in boxed cake mixes, where manufacturers marketed them as “funfetti” or “party cakes.” These cakes quickly became staples for children’s birthdays, partly because they were easy to make and partly because they had that magical, colorful element.
The concept itself—adding colorful bits into a neutral cake batter—has roots in European baking traditions, where candied fruits or nuts were sometimes mixed into cakes for festive occasions. In the U.S., sprinkles replaced candied fruit, offering a more playful and visually striking effect.
Over the years, confetti cake has evolved from a boxed mix novelty into a full-fledged homemade baking trend. Bakers started experimenting with premium ingredients, natural food colorings, and artisan sprinkles to create gourmet versions. Today, it’s a staple not just for birthdays, but also for weddings, anniversaries, and even corporate celebrations.
Benefits of Making Confetti Cake at Home
Sure, store-bought or boxed mix versions are convenient, but making confetti cake from scratch has unbeatable advantages.
First, you get total control over the ingredients. You can choose high-quality flour, fresh eggs, and real butter instead of artificial additives or preservatives. If you or your guests have dietary restrictions, you can swap out ingredients for gluten-free flour, dairy-free milk, or plant-based butter without compromising taste or texture.
Second, the customization options are endless. Want a richer flavor? Add almond extract. Prefer a tangy twist? Try a hint of lemon zest. You can even mix in different sprinkle types—jimmies, nonpareils, or shaped sprinkles—to match your event’s theme.
Finally, there’s the pure satisfaction of knowing you made it yourself. Baking is a creative, rewarding process, and the moment you slice into your homemade confetti cake to reveal the rainbow inside is worth every minute in the kitchen. Plus, your guests will taste the difference. Freshly baked cake has a tender crumb, richer flavor, and just the right amount of sweetness—something that’s hard to replicate with pre-made mixes.
Ingredients You’ll Need
Making the perfect confetti cake starts with gathering the right ingredients. Let’s break it down into categories for easy prep.
Dry Ingredients
- All-purpose flour – Provides the structure for the cake. For a softer texture, you can substitute with cake flour.
- Baking powder – Helps the cake rise and stay fluffy.
- Salt – Balances sweetness and enhances flavor.
- Granulated sugar – The main sweetener, ensuring a light crumb.
Wet Ingredients
- Unsalted butter – Adds richness and a moist texture.
- Eggs – Bind ingredients together and add structure.
- Vanilla extract – Classic flavor base for confetti cake.
- Milk – Moistens the batter; whole milk gives the richest flavor.
Optional Add-ons
- Sour cream or yogurt – For extra moisture and a slight tang.
- Almond extract – A subtle, nutty flavor boost.
- Food coloring – If you want to tint the batter itself for extra vibrancy.
And of course…
- Sprinkles (jimmies) – The star of the show. Opt for good-quality sprinkles that hold their color during baking. Avoid nonpareils inside the batter as they tend to bleed.
Tools and Equipment Required
Having the right tools on hand makes the baking process smoother and ensures your cake turns out just right.
Baking Essentials
- Cake pans (two 8-inch or 9-inch rounds work best)
- Mixing bowls – One for dry ingredients, one for wet.
- Electric mixer – Stand mixer or hand mixer for even blending.
Measuring Tools
- Measuring cups and spoons – Accuracy matters in baking.
- Kitchen scale – For precise flour measurement.
Decorating Supplies
- Offset spatula – For smooth frosting application.
- Piping bags and tips – For decorative frosting designs.
- Extra sprinkles – For garnishing the top and sides.
Having everything laid out before you start—known as mise en place—not only saves time but also prevents last-minute stress when you realize you’re missing something.
Step-by-Step Guide to Making Confetti Cake
Step 1 – Preparing Your Baking Pans
Before you even touch the flour, the first step is to prep your cake pans. Proper preparation ensures your cake doesn’t stick and comes out perfectly shaped. Start by greasing your cake pans generously with butter or non-stick cooking spray. Then, line the bottom of each pan with a circle of parchment paper—this extra step makes cake removal foolproof. Once lined, lightly flour the pans, tapping out any excess.
Why is this step so important? If your cake sticks, it can tear when you remove it, ruining the smooth surface you want for frosting. Taking just two minutes to prepare your pans can save you a lot of frustration later. Also, make sure you’re using pans of the same size so your cake layers bake evenly. If you have older pans that tend to warp, consider investing in heavy-duty aluminum ones—they heat evenly and last for years.
Step 2 – Mixing the Dry Ingredients
In a large bowl, whisk together your flour, baking powder, and salt. This step might seem simple, but it’s more important than it looks. Whisking helps to evenly distribute the baking powder so your cake rises uniformly, and it prevents clumps of salt or flour from creating uneven spots in the batter.
Many bakers skip sifting nowadays, but if you want an ultra-light texture, you can sift your flour mixture before whisking. It’s a small detail that can make a noticeable difference in the cake’s tenderness. Keep this bowl aside—you’ll add it gradually to your wet ingredients later.
Step 3 – Combining the Wet Ingredients
In another large mixing bowl, cream together the butter and sugar until light and fluffy. This usually takes 3–4 minutes with an electric mixer on medium speed. Don’t rush this step—creaming incorporates air into the batter, which is what gives the cake its soft texture.
Once creamed, beat in the eggs one at a time, mixing well after each addition. Add the vanilla extract and, if using, almond extract for a hint of nutty depth. Then, alternate adding the dry ingredients and milk to the mixture, starting and ending with the dry ingredients. This keeps the batter from becoming too wet at once and helps prevent overmixing.
If you’re adding sour cream or yogurt for extra moisture, blend it in at this stage. The batter should be thick but smooth, with no visible lumps.
Step 4 – Folding in the Sprinkles
This is where the magic happens. Using a spatula, gently fold in your sprinkles. The key word here is gently—stirring too aggressively can cause the colors to bleed into the batter, leaving you with a murky mix instead of vibrant pops of color.
The best sprinkles for confetti cake are “jimmies,” which are long, rod-shaped sprinkles that hold their shape and color when baked. Avoid using nonpareils inside the batter—they tend to melt and create streaks. You can, however, use nonpareils for decorating the outside of the cake later.
As a rule of thumb, about ½ cup of sprinkles is perfect for an 8- or 9-inch two-layer cake, but feel free to add more if you want an even more colorful cake.
Step 5 – Baking the Cake
Preheat your oven to 350°F (175°C) and make sure the racks are positioned in the middle. Divide the batter evenly between the prepared pans—using a kitchen scale helps ensure your layers are the same size. Smooth the tops with a spatula to ensure even baking.
Bake for 25–30 minutes, or until a toothpick inserted into the center comes out clean. Avoid opening the oven door too early—this can cause the cake to sink. Once baked, remove the pans from the oven and place them on a wire rack to cool for about 10 minutes before turning the cakes out of the pans.
At this point, your kitchen will smell like a bakery, and it’s tempting to dive right in—but patience is key. The cakes need to be completely cool before frosting, or your icing will melt into a sticky mess.
Cooling and Layering the Cake
Cooling is just as important as baking when it comes to achieving a perfect confetti cake. After removing your cakes from the pans, let them cool on a wire rack for at least one hour. If you try to frost while the cake is still warm, the butter in your frosting will soften and slide off, making decorating a nightmare.
For perfectly even layers, you can use a serrated knife or cake leveler to trim the tops of your cakes. This ensures that when you stack them, they sit flat and stable. If you want extra moistness, brush each layer with a light sugar syrup before adding the frosting—it’s a trick professional bakers use for wedding cakes.
When stacking, place one layer on your serving plate or cake board, spread a generous layer of frosting over it, and then place the second layer on top. Apply a “crumb coat”—a thin layer of frosting that seals in crumbs—and chill the cake for 15–20 minutes before applying the final decorative coat. This gives your cake that clean, bakery-style finish.
Frosting Ideas for Confetti Cake
Classic Vanilla Buttercream
If there’s one frosting that pairs perfectly with confetti cake, it’s a smooth, creamy vanilla buttercream. This frosting is rich yet fluffy, with a sweet flavor that complements the colorful sprinkles without overpowering them.
To make it, beat unsalted butter until light and creamy, then gradually add powdered sugar. A splash of vanilla extract and a few tablespoons of heavy cream or milk bring it to the perfect spreading consistency. The key to great buttercream is to whip it long enough to incorporate air—at least 5 minutes—so it’s not dense or heavy.
Vanilla buttercream also provides the perfect blank canvas for decorating. You can keep it pure white for a classic look, or tint it with pastel colors for a more whimsical cake.
Cream Cheese Frosting
If you prefer a tangy twist, cream cheese frosting is a fantastic option. It’s slightly less sweet than buttercream, with a rich, smooth texture. This frosting works especially well if your confetti cake is on the sweeter side, as the tang balances the flavors.
To make it, beat together softened cream cheese and butter, then gradually add powdered sugar and vanilla. The trick is to use full-fat cream cheese for the best flavor and texture—low-fat versions can be too watery and cause the frosting to be runny.
Whipped Cream Frosting
For a lighter, less sweet option, whipped cream frosting is unbeatable. It’s airy, refreshing, and doesn’t weigh the cake down. Simply whip heavy cream with a little powdered sugar and vanilla until stiff peaks form.
One important note: whipped cream frosting is less stable than buttercream or cream cheese frosting, so it’s best used if you’re serving the cake within a few hours. If you need more stability, you can add a tablespoon of instant pudding mix or mascarpone cheese while whipping.
Decorating Tips for a Showstopper Cake
Decorating your confetti cake is where you can let your creativity shine. Here are a few ideas to inspire you:
- Sprinkle Borders – After frosting the cake, press extra sprinkles around the base and top edges for a polished look.
- Rainbow Layers – Tint each cake layer a different pastel color before baking for a surprise when sliced.
- Piped Rosettes – Use a star piping tip to add swirls of frosting around the edges.
- Ombre Effect – Gradually blend colors from light to dark up the sides of the cake.
The key to a stunning confetti cake is balance—too many sprinkles can overwhelm the design, but just the right amount creates a playful, elegant look. Also, make sure your cake is completely chilled before adding intricate piping details, as cold frosting holds its shape better.
Serving and Storage Tips
Once your confetti cake is decorated, it’s time to serve it up. For clean, neat slices, dip a sharp knife into hot water, wipe it dry, and then cut through the cake—repeating between each slice. This prevents frosting from smearing and gives you perfect, Instagram-worthy pieces.
When it comes to storage, confetti cake can be kept at room temperature for up to two days if frosted with buttercream, as long as it’s covered. For longer storage, refrigerate it in an airtight container for up to five days, but allow it to come to room temperature before serving so it’s soft and moist.
If you need to make it ahead, you can freeze the unfrosted cake layers for up to two months. Just wrap each layer tightly in plastic wrap and aluminum foil to prevent freezer burn. When you’re ready to decorate, thaw them overnight in the fridge, then bring to room temperature before frosting.
Common Mistakes to Avoid
Even experienced bakers can run into issues with confetti cake. Here are some pitfalls to watch out for:
- Overmixing the Batter – This can make the cake dense instead of fluffy. Stop mixing as soon as the dry ingredients are incorporated.
- Adding Sprinkles Too Early – If you mix them in before all your wet and dry ingredients are combined, they may sink or bleed color.
- Using the Wrong Sprinkles – Stick to jimmies for baking; other types can melt or dissolve.
- Skipping the Parchment Paper – This can cause the cake to stick and break apart.
- Frosting a Warm Cake – This will cause your frosting to melt and slide off. Always let your cake cool completely.
By avoiding these mistakes, you can ensure your confetti cake turns out bakery-perfect every time.
Creative Variations of Confetti Cake
Gluten-Free Version
If you’re baking for someone with gluten intolerance, you can still enjoy the fun of confetti cake. Simply replace the all-purpose flour with a high-quality gluten-free baking blend that contains xanthan gum. This helps mimic the elasticity and structure of traditional flour. The rest of the recipe remains the same—just be sure to use sprinkles that are labeled gluten-free, as some brands may contain wheat-based binders.
Vegan Version
A vegan confetti cake swaps out animal-based ingredients without sacrificing flavor or texture. Use plant-based butter, non-dairy milk (like almond or oat), and an egg replacer such as flax eggs or aquafaba. For frosting, a vegan buttercream made with dairy-free butter and powdered sugar works beautifully.
Flavor Twists
- Chocolate Confetti Cake – Add cocoa powder to the batter for a rich chocolate base.
- Strawberry Confetti Cake – Mix in freeze-dried strawberry powder for a fruity flavor.
- Coconut Confetti Cake – Replace part of the milk with coconut milk and sprinkle shredded coconut over the frosting.
Nutritional Information
While confetti cake is a treat and not necessarily a “health food,” it’s still good to know what you’re eating. On average, a slice (1/12 of a 9-inch two-layer cake with buttercream) contains:
| Nutrient | Amount |
|---|---|
| Calories | ~420 |
| Total Fat | 20g |
| Saturated Fat | 12g |
| Carbohydrates | 56g |
| Sugar | 38g |
| Protein | 4g |
You can reduce the sugar by cutting back slightly in both the cake and frosting, or opt for natural sweeteners. For a lighter version, try replacing part of the butter with unsweetened applesauce and using a whipped cream frosting instead of buttercream.
FAQs about Confetti Cake Recipe
1. Can I use any sprinkles for confetti cake?
Not quite—jimmies are the best choice for baking because they hold their color and shape in the oven. Nonpareils tend to melt and bleed into the batter.
2. How far in advance can I make confetti cake?
You can bake the cake layers up to two days ahead and store them wrapped at room temperature. Frosting can be made the same day or one day in advance.
3. Can I freeze confetti cake?
Yes! Wrap unfrosted cake layers tightly and freeze for up to two months. Thaw in the fridge overnight before decorating.
4. Why did my sprinkles melt into the batter?
This usually happens if you used the wrong type of sprinkles or mixed them too vigorously into the batter. Always fold them in gently at the very end.
5. What frosting goes best with confetti cake?
Classic vanilla buttercream is the most popular choice, but cream cheese frosting and whipped cream frosting also pair beautifully.
Conclusion
Confetti cake isn’t just dessert—it’s a mood lifter, a centerpiece, and a slice of pure happiness. From its colorful history to the endless ways you can customize it, this cake proves that baking is as much about creativity as it is about taste. Whether you stick to the classic vanilla base or explore bold flavor twists, the process of making a confetti cake is almost as joyful as eating it.
By following this guide, you’ll not only bake a delicious, moist, and fluffy cake but also master the little tricks that make it look bakery-perfect. So gather your ingredients, turn up the music, and get ready to bake something that will put a smile on everyone’s face—because with confetti cake, the party starts the moment you take the first bite.


