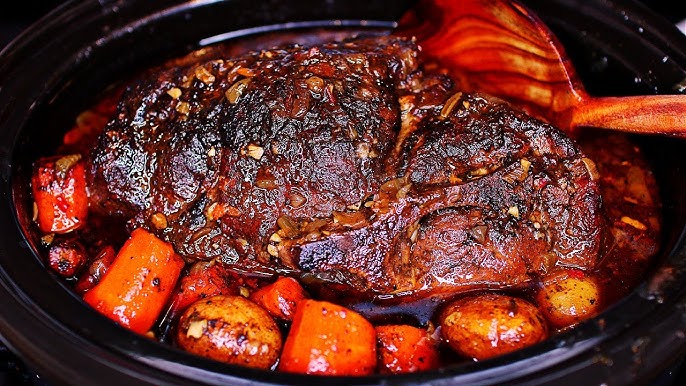
Chuck Pot Roast Recipe: There’s something magical about a chuck pot roast. It’s the kind of meal that fills your kitchen with an irresistible aroma, warms your heart, and makes everyone at the table smile before the first bite. Chuck pot roast is one of those classic, all-American comfort dishes that works for both a casual Sunday dinner and a holiday feast.
The beauty of a pot roast lies in its transformation: you start with a humble, inexpensive cut of meat, and through slow, gentle cooking, it becomes melt-in-your-mouth tender and infused with rich flavors from herbs, vegetables, and savory broth. If you’ve ever wondered how to make a pot roast that rivals your grandmother’s, you’re in the right place.
Why Chuck Roast is Perfect for Pot Roast
Chuck roast comes from the shoulder section of the cow. It’s a hardworking muscle with a lot of connective tissue and marbling (those little streaks of fat running through the meat). This makes it less tender if cooked quickly—but when you slow cook it, all that connective tissue melts down into gelatin, giving the meat a silky texture and incredible flavor.
Some key reasons chuck roast is ideal:
- Affordable – It’s usually much cheaper than premium steaks.
- Flavorful – The marbling keeps it juicy and adds depth of flavor.
- Tender when slow cooked – Patience pays off with fall-apart meat.
Think of chuck roast like the underdog in a sports movie—it may not start glamorous, but with the right coaching (or in this case, cooking), it ends up the star.
The Comfort Food Factor
Pot roast isn’t just food—it’s an experience. It’s the kind of meal that makes you linger at the table a little longer, maybe share a story or two. It’s hearty, nourishing, and satisfying in a way that lighter meals just can’t match. And here’s the thing—once you learn the method, it’s almost foolproof. Even if you’re not a seasoned cook, you can make a chuck pot roast that tastes like you’ve been perfecting it for decades.
Ingredients You’ll Need
Before you turn on the stove or oven, you’ll want to gather everything you need. Having your ingredients prepped and ready (a cooking practice called mise en place) will make the entire process smooth and stress-free.
Main Ingredients for the Roast
- Chuck Roast – Aim for 3–4 pounds. This will feed about 6 people generously.
- Salt & Pepper – Simple, but absolutely essential for bringing out the meat’s natural flavor.
- Olive Oil or Vegetable Oil – For searing the meat before braising.
Vegetables for Flavor and Texture
- Carrots – Peeled and cut into large chunks. They add natural sweetness.
- Celery – Chopped into thick pieces for extra flavor.
- Onions – Yellow or white onions work best; they caramelize beautifully.
- Potatoes – Yukon Gold or red potatoes hold their shape well during cooking.
Herbs, Spices, and Seasonings
- Garlic – Fresh cloves are best for maximum aroma.
- Rosemary & Thyme – Fresh sprigs give a fragrant, earthy note.
- Bay Leaves – A couple of leaves infuse a deep, savory undertone.
Optional Add-ins for Extra Flavor
- Red Wine – Adds richness and complexity to the gravy.
- Beef Broth – For braising and keeping the meat moist.
- Tomato Paste – Deepens the sauce’s flavor and adds color.
Tip: If you want a slightly different twist, you can also toss in mushrooms or parsnips for added depth.
Kitchen Tools and Equipment
Having the right tools makes the process not only easier but also ensures consistent results.
Essential Cookware
- Dutch Oven – A heavy, lidded pot that’s perfect for browning and slow cooking.
- Large Skillet – If you don’t have a Dutch oven, you can sear in a skillet and transfer to a roasting pan.
- Slow Cooker or Instant Pot – Great alternatives for set-it-and-forget-it cooking.
Helpful Gadgets for Perfect Results
- Meat Thermometer – To check doneness without guessing.
- Wooden Spoon – For stirring without scratching your cookware.
- Cutting Board & Sharp Knife – For safe and efficient chopping.
Think of these tools as your culinary toolkit. You wouldn’t fix a car without the right wrench—same goes for cooking. Good equipment helps ensure your chuck pot roast turns out restaurant-quality every time.
Step-by-Step Preparation Guide
Now that you’ve got your ingredients ready and tools on standby, it’s time to bring this chuck pot roast to life. We’ll go step-by-step so you can follow along easily—even if you’ve never made one before.
Step 1 – Preparing the Meat
Start by patting your chuck roast dry with paper towels. This might seem like a throwaway step, but it’s actually critical. Moisture on the surface will prevent proper browning, and you want that beautiful golden crust for maximum flavor.
Generously season all sides of the meat with salt and freshly ground black pepper. Don’t be shy here—this is a big piece of meat, and the seasoning needs to penetrate. If you want to get fancy, you can also rub on a little garlic powder or smoked paprika at this stage for extra depth.
Some people like to let the seasoned roast sit at room temperature for about 30 minutes before cooking. This helps it cook more evenly. Think of it like letting a runner stretch before a race—it’s just good prep work.
Step 2 – Searing for Flavor
Searing is the magic trick that transforms “good” pot roast into “amazing” pot roast. Heat a few tablespoons of oil in your Dutch oven over medium-high heat until shimmering. Carefully place the roast in the pot—don’t crowd it, and don’t move it for the first few minutes. You want that Maillard reaction (the chemical process that browns the meat) to work its magic.
Sear each side for about 4–5 minutes until a rich, deep brown crust forms. This isn’t just for looks; those browned bits at the bottom of the pot will flavor your entire dish. Once seared on all sides, transfer the roast to a plate and set aside.
Step 3 – Adding Vegetables and Seasonings
In the same pot (don’t you dare wash it yet—those browned bits are gold), toss in your onions, carrots, and celery. Cook for about 5 minutes, stirring occasionally, until the onions are soft and lightly browned.
Add in minced garlic and stir for another minute—just enough to release its aroma without burning it. Now’s the time to add your tomato paste if you’re using it. Stir it in and let it cook for a minute or two to get rid of that raw tomato taste.
Sprinkle in your fresh rosemary, thyme, and bay leaves. This is when your kitchen will start smelling like a cozy winter evening.
Step 4 – Choosing Your Cooking Method
You’ve got options here, and the method you choose depends on your schedule and tools:
- Oven Method – Preheat to 300°F (150°C). Return the roast to the Dutch oven, pour in your broth and wine (if using), cover, and let it cook low and slow for 3–4 hours.
- Slow Cooker – Transfer everything to the slow cooker, add liquids, cover, and cook on low for 8–10 hours or high for 5–6 hours.
- Instant Pot – Add liquids, seal, and cook on high pressure for 60–70 minutes, then allow natural release for 15 minutes.
Each method works beautifully—it’s just about how hands-on you want to be. Personally, I love the oven method for that deep, rich flavor, but the slow cooker wins when I’m busy.
Step 5 – Cooking Time and Temperature
The key to perfect pot roast is patience. Chuck roast needs time for the collagen to break down into gelatin, which makes the meat tender. If you rush it, you’ll end up with chewy beef—not exactly the goal here.
Aim for an internal temperature of 190–205°F (88–96°C) for that melt-in-your-mouth texture. Don’t worry—this is one of the few meats where “well done” is actually the goal. You’ll know it’s ready when you can pull it apart easily with a fork.
Serving Your Chuck Pot Roast
Now comes the reward for all that patience—you get to plate up and enjoy.
Making the Perfect Gravy
Once your roast is cooked, remove it and the vegetables from the pot, leaving the cooking liquid behind. Skim off excess fat, then place the pot over medium heat. Whisk in a slurry of flour and water (or cornstarch for gluten-free) until the sauce thickens into a rich, glossy gravy.
If you used red wine, the gravy will have a beautiful depth of flavor that’s almost impossible to achieve with broth alone.
Side Dish Pairings
Pot roast is hearty enough to stand on its own, but it absolutely shines when paired with the right sides:
- Creamy mashed potatoes – Perfect for soaking up that gravy.
- Buttered green beans – Adds a fresh, crisp contrast.
- Crusty bread – Because nobody wants to waste gravy.
Garnishing and Presentation Tips
A sprinkle of fresh parsley over the top brightens the dish visually and adds a hint of freshness to each bite. Serve it family-style in a large dish so everyone can help themselves—that’s the beauty of comfort food.
Storing and Reheating
You’ve made a beautiful chuck pot roast, but maybe you’ve got leftovers—or you planned ahead and cooked extra for the week. Good news: pot roast actually tastes better the next day because the flavors have more time to mingle.
Refrigeration and Freezing Tips
- Refrigerator: Allow the roast to cool slightly, then store it in an airtight container with the gravy. Keeping it in the liquid helps prevent the meat from drying out. It will stay fresh in the fridge for 3–4 days.
- Freezer: For longer storage, freeze portions with their cooking liquid in freezer-safe containers or heavy-duty bags. Chuck pot roast freezes beautifully for up to 3 months. Just be sure to label it with the date so you don’t forget it in the icy depths.
How to Reheat Without Losing Flavor
The best way to reheat pot roast is low and slow:
- Stovetop: Simmer gently in a covered pot with a splash of broth until heated through.
- Oven: Place in a covered dish with a bit of liquid and warm at 300°F (150°C) until hot.
- Microwave: If you must, use short intervals and cover with a damp paper towel to keep moisture in.
Tip: Never reheat without some of the cooking liquid—it’s the secret to keeping the meat juicy.
Common Mistakes to Avoid
Even though pot roast is forgiving, there are a few pitfalls that can keep it from reaching its full potential.
Overcooking or Undercooking
While pot roast needs a long cooking time, there’s a sweet spot. If you pull it too early, the collagen hasn’t broken down, leaving it tough. Too long, and the vegetables turn to mush. Stick to the time and temp guidelines for your chosen method.
Using Too Little Seasoning
Chuck roast is a big, dense cut. If you skimp on seasoning, the final dish can taste bland. Season generously at the start, and taste your gravy before serving—it’s your last chance to adjust.
Skipping the Searing Step
You might be tempted to toss everything into the pot and walk away, but searing the meat first builds layers of flavor you can’t get any other way. Those caramelized bits at the bottom? That’s where the magic is.
Nutritional Information
While chuck pot roast is definitely comfort food, it’s worth knowing what’s on your plate.
Calories and Macronutrients (per 1-cup serving, with gravy and veggies—approximate values)
- Calories: 350–400
- Protein: 25–30g
- Fat: 18–22g
- Carbohydrates: 12–15g
Healthier Variations
- Lean Cut Option: Use a leaner cut like bottom round, but be aware it may be less tender.
- Light Gravy: Skim fat from the cooking liquid before making the gravy.
- More Veggies: Bulk it up with extra vegetables like mushrooms, parsnips, or turnips to add nutrition and fiber.
FAQs about Chuck Pot Roast Recipe
1. Can I Make This Recipe Ahead of Time?
Absolutely. In fact, it’s even better the next day after the flavors meld together.
2. What’s the Best Cut of Meat for Pot Roast?
Chuck roast is ideal, but brisket or bottom round are good alternatives.
3. Can I Make it Without Wine?
Yes—just replace the wine with more beef broth.
4. How Do I Keep the Meat Moist?
Cook it low and slow in plenty of liquid, and store leftovers in the cooking gravy.
5. Can I Cook It from Frozen?
You can, but it will take significantly longer. For best results, thaw first.
Conclusion
Chuck pot roast is proof that you don’t need expensive ingredients or complicated techniques to make a meal that feels special. With a bit of patience, a good sear, and the right balance of herbs and vegetables, you can turn a simple cut of beef into a dish that’s rich, tender, and deeply satisfying.
It’s the kind of recipe that makes a home feel warmer, that gets passed down through generations, and that always tastes just a little better when shared with family or friends.


