Chocolate Crinkle Cookie Recipe: There’s something magical about biting into a Chocolate Crinkle Cookie. The outside is dusted with powdered sugar, cracked open like a snow-dusted mountain peak, while the inside remains soft, chewy, and loaded with rich chocolate flavor. These cookies aren’t just delicious—they’re also visually stunning, making them perfect for holidays, parties, or whenever you want to impress guests with minimal fuss.
Chocolate crinkle cookies are the kind of dessert that seems fancy but is surprisingly simple to make. They combine the deep, indulgent flavor of brownies with the texture of a classic cookie. The magic happens during baking: as the dough expands in the oven, the powdered sugar coating splits apart, revealing dark chocolate crinkles beneath. That contrast is what gives the cookie its signature look.
These cookies are especially popular during the winter holiday season because they resemble snowy landscapes, but honestly, they’re just as good any time of the year. They also pack well, making them a great option for bake sales or gift boxes. Plus, the recipe is flexible—you can adapt it for dietary needs or experiment with flavors.
If you’ve never made them before, don’t worry. This guide will walk you through everything—from choosing the right ingredients to mastering the technique—so your cookies turn out bakery-worthy every single time. By the end, you’ll not only know how to bake them but also understand the little tricks that make all the difference between “good” and “irresistible.”
So, preheat that oven, grab your mixing bowls, and get ready—we’re about to make the most delightful batch of Chocolate Crinkle Cookies you’ve ever tasted.
What Makes Chocolate Crinkle Cookies Special?
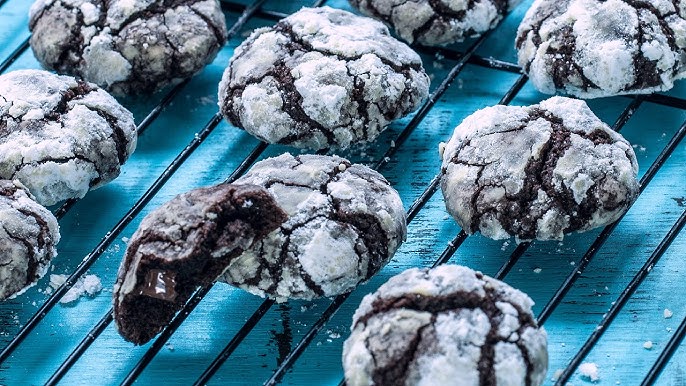
Chocolate crinkle cookies aren’t just another chocolate treat—they’re a texture lover’s dream. The outside is slightly crisp from the sugar coating, while the inside remains soft and fudgy. Think of it as the lovechild of a brownie and a cookie.
One of the key factors that make these cookies stand out is the contrast between the dark chocolate center and the snowy white powdered sugar exterior. This isn’t just for looks; the sugar also helps balance the deep cocoa flavor, giving you a perfectly sweet bite every time.
Another unique aspect is the baking process itself. Most cookies spread evenly in the oven, but crinkle cookies expand in a way that naturally creates fissures and cracks. This happens because the outside of the dough sets before the inside is fully baked, causing the dough to break open and reveal the chocolatey goodness beneath.
They’re also incredibly versatile. You can keep them classic with just chocolate and sugar, or you can add flavor twists like orange zest, espresso powder, or peppermint extract for a seasonal touch. For those who love rich desserts, you can even stuff them with chocolate chips or caramel bits for an extra indulgent surprise.
In short, Chocolate Crinkle Cookies deliver on three fronts: appearance, texture, and flavor. They’re as beautiful as they are delicious, and with just a few ingredients, you can make a treat that looks like it came from a high-end bakery.
A Brief History of This Classic Treat
Chocolate crinkle cookies have been around for decades, but their exact origin is a little mysterious. Many believe they were first made in the United States in the mid-20th century, as part of the wave of creative baking recipes that appeared in community cookbooks and home economics classes.
One of the earliest documented recipes appeared in Betty Crocker’s cookbooks in the 1950s, and it quickly became a household favorite. The visual appeal, combined with the chocolatey flavor, made it a hit during holidays—especially Christmas—when snowy, festive-looking desserts were in high demand.
The “crinkle” effect was likely inspired by similar sugar-coated cookies in European baking traditions, such as powdered sugar-dusted shortbread or almond cookies. However, the chocolate version gave it a distinctly American twist.
Over the years, the recipe has traveled and evolved. In some countries, bakers add local spices like cinnamon or cardamom. In others, they switch the chocolate for matcha or lemon flavors, creating colorful variations while keeping the signature crackled look.
Today, chocolate crinkle cookies remain a beloved classic—passed down in family recipe boxes, featured in festive cookie swaps, and reimagined by modern bakers. Their charm lies in their simplicity, making them just as enjoyable to bake now as they were 70 years ago.
Ingredients You’ll Need
Making Chocolate Crinkle Cookies doesn’t require a long list of fancy ingredients. In fact, you probably have most of these items in your pantry already. Here’s what you’ll need for a standard batch:
Main Ingredients for the Dough:
- All-purpose flour – the foundation for the cookie structure.
- Unsweetened cocoa powder – for deep, rich chocolate flavor.
- Baking powder – helps the cookies puff up and form cracks.
- Salt – balances sweetness and enhances flavor.
- Granulated sugar – for sweetness and structure.
- Eggs – bind the ingredients together and add moisture.
- Vegetable oil or melted butter – adds richness and keeps the cookies soft.
- Vanilla extract – a warm, aromatic note that complements chocolate.
For Rolling:
- Powdered sugar – creates the snowy coating.
- Granulated sugar – helps the powdered sugar stick.
Kitchen Tools and Equipment
While Chocolate Crinkle Cookies don’t require fancy gadgets, having the right tools on hand makes the baking process smoother and ensures better results. Here’s a rundown of what you’ll need:
Must-Have Baking Tools:
- Mixing bowls – You’ll need at least two: one for dry ingredients and one for wet ingredients. Glass or stainless steel bowls work best.
- Whisk and spatula – A whisk helps blend your dry ingredients evenly, while a silicone spatula is perfect for folding in the wet ingredients without overmixing.
- Measuring cups and spoons – Precision matters in baking. Use a proper set rather than guessing.
- Electric hand mixer or stand mixer – Not strictly necessary, but it makes creaming and mixing much easier, especially for thick cookie dough.
- Baking sheet – A light-colored, heavy-duty baking sheet ensures even baking and prevents cookies from burning on the bottom.
- Parchment paper or silicone baking mat – Prevents sticking and makes cleanup a breeze.
Helpful Extras for Perfect Results:
- Cookie scoop – Ensures uniform cookie sizes, so they bake evenly.
- Cooling rack – Allows cookies to cool without trapping steam underneath, which could make them soggy.
- Small bowls – For rolling dough in granulated sugar and powdered sugar before baking.
While you can improvise if you’re missing something, using the right tools really does make a difference. A cookie scoop, for example, might seem unnecessary, but it ensures that every cookie is exactly the same size—which not only looks better but also means they’ll all finish baking at the same time.
Step-by-Step Guide to Making Chocolate Crinkle Cookies
Here’s where the magic happens. Follow this process carefully, and you’ll end up with perfect crinkle cookies every time.
Step 1 – Mixing the Dough
- In a medium bowl, whisk together your flour, cocoa powder, baking powder, and salt. Set aside.
- In a separate large bowl, beat the eggs and granulated sugar together until light and fluffy—about 2–3 minutes with an electric mixer.
- Add in your oil (or melted butter) and vanilla extract, and mix until fully combined.
- Gradually add your dry mixture into the wet mixture, stirring gently until you form a soft, thick dough.
Step 2 – Chilling the Dough
The chilling stage is non-negotiable. Without it, your cookies will spread too much, and you won’t get that classic crinkle effect.
- Cover the bowl tightly with plastic wrap and refrigerate for at least 3–4 hours. For best results, chill overnight.
Step 3 – Rolling in Sugar
- Preheat your oven to 350°F (175°C).
- Scoop tablespoon-sized portions of dough and roll them into smooth balls.
- Roll each ball first in granulated sugar (helps powdered sugar stick), then generously in powdered sugar.
Step 4 – Baking to Perfection
- Place dough balls about 2 inches apart on your prepared baking sheet.
- Bake for 10–12 minutes, or until cracks have formed and the cookies look slightly set but still soft in the center.
Step 5 – Cooling and Serving
- Let the cookies cool on the baking sheet for 2 minutes, then transfer them to a wire rack to cool completely.
- Serve fresh, or store them once fully cooled.
Tips for the Perfect Crinkle Cookie
Making Chocolate Crinkle Cookies isn’t difficult, but there are a few tricks that will take your results from “good” to “absolutely amazing.”
- Chill, Chill, Chill – The dough needs to be cold so the cookies puff and crack properly. If you rush this step, the cookies will spread flat and lose their signature look.
- Generous Powdered Sugar Coating – Don’t skimp here. A thick coating ensures a strong visual contrast and prevents the sugar from melting into the dough while baking.
- Don’t Overbake – These cookies should be soft in the center. They’ll continue to cook slightly after being removed from the oven.
- Use High-Quality Cocoa Powder – Since cocoa is the star flavor, using a good brand makes a huge difference in richness.
- Size Consistency – Use a cookie scoop for even portions. If the cookies vary in size, some will bake faster than others.
- Experiment with Flavors – Try adding espresso powder for depth, or a touch of cinnamon for warmth.
- Room Temperature Ingredients – Eggs should be at room temperature for better mixing and a smoother dough.
Following these tips will give you cookies that are soft, crackly, and absolutely picture-perfect.
Storing and Freezing Your Cookies
One of the best things about Chocolate Crinkle Cookies—besides how good they taste—is how well they store. If you plan to make them ahead or want to enjoy them over several days, proper storage is key to keeping them soft, fresh, and flavorful.
Short-Term Storage Tips
- Airtight Container: Once your cookies are completely cooled, place them in an airtight container to prevent moisture loss. If they’re stored while still warm, condensation will form, making them soggy.
- Layer with Parchment Paper: If stacking cookies in the container, place parchment paper between layers to keep them from sticking together.
- Room Temperature: They will stay fresh at room temperature for up to 4–5 days. Keep them away from direct sunlight or heat sources.
Freezing for Later Enjoyment
Chocolate Crinkle Cookies freeze exceptionally well, making them a perfect make-ahead treat for holidays or special occasions.
- Freezing Baked Cookies: Place cooled cookies on a baking sheet in a single layer and freeze for 1–2 hours. Once solid, transfer them to a freezer-safe bag or container. They’ll keep well for up to 3 months.
- Freezing Dough Balls: For fresh-baked cookies anytime, roll the dough into balls, coat them in sugars, and freeze them on a baking sheet. Once frozen, store in a freezer bag. When ready to bake, let them thaw slightly before putting them in the oven.
- Reheating Frozen Cookies: You can enjoy them straight from the freezer or warm them in a 300°F (150°C) oven for 5 minutes to bring back that freshly-baked softness.
Proper storage and freezing ensure that you can enjoy these rich, chocolatey treats whenever the craving strikes—without sacrificing texture or flavor.
Variations on the Classic Recipe
While traditional Chocolate Crinkle Cookies are irresistible, you can get creative and put your own twist on them. Here are some tasty variations to try:
Adding Spices and Flavor Twists
- Espresso Crinkle Cookies: Add 1 teaspoon of instant espresso powder to enhance the chocolate flavor.
- Peppermint Crinkles: Stir in ½ teaspoon peppermint extract and sprinkle crushed candy canes over the cookies before baking for a holiday touch.
- Orange Chocolate Crinkles: Mix in 1 tablespoon of orange zest for a refreshing citrus contrast.
Making Gluten-Free Versions
- Replace all-purpose flour with a 1:1 gluten-free baking blend. Be sure it contains xanthan gum for proper structure.
- Check that your cocoa powder and powdered sugar are labeled gluten-free.
Vegan Chocolate Crinkle Cookies
- Replace eggs with flax eggs (1 tablespoon ground flaxseed + 3 tablespoons water per egg).
- Use plant-based butter or neutral vegetable oil.
- Choose dairy-free chocolate chips if adding mix-ins.
These variations let you tailor the recipe to dietary needs or seasonal flavors while keeping the beloved crinkle look and fudgy texture intact.
Serving Suggestions
Chocolate Crinkle Cookies are delicious all on their own, but with a little creativity, you can turn them into an extra-special treat.
Pairing with Beverages
- Coffee or Espresso: The rich cocoa pairs beautifully with a bold, hot coffee.
- Hot Chocolate: Double up on chocolate for a cozy winter indulgence.
- Cold Milk: The classic pairing—perfect for balancing sweetness.
Gift Ideas for Special Occasions
- Stack them in a clear cellophane bag tied with ribbon for a charming homemade gift.
- Add them to a holiday cookie tin alongside other festive treats like shortbread and gingerbread cookies.
- Personalize the powdered sugar coating by adding a little cocoa or cinnamon for a custom look.
You can even sandwich two cookies together with a layer of chocolate ganache or marshmallow fluff for a decadent dessert upgrade. These small touches turn a simple cookie into something memorable—whether for a friend, a party, or just a personal treat-yourself moment.
Nutritional Information
While Chocolate Crinkle Cookies are a treat best enjoyed in moderation, it’s always helpful to know what’s in each serving—especially if you’re keeping an eye on your sugar or calorie intake.
Estimated Nutritional Values (per cookie, based on a batch of 24):
- Calories: 110–120
- Total Fat: 5g
- Saturated Fat: 1.5g
- Cholesterol: 10mg
- Sodium: 40mg
- Total Carbohydrates: 17g
- Dietary Fiber: 1g
- Sugars: 12g
- Protein: 1g
These values may vary depending on ingredient brands and exact measurements.
Making a Lighter Version
If you want to reduce the calorie content, try these swaps:
- Use unsweetened applesauce in place of half the oil.
- Reduce the sugar by 2–3 tablespoons (the powdered sugar coating will still make them sweet).
- Opt for whole wheat pastry flour for a little extra fiber without affecting the texture too much.
Remember, cookies are a joy food—not a health food—so it’s fine to savor them in moderation without guilt.
FAQs about Chocolate Crinkle Cookie Recipe
Q1: Can I use butter instead of oil in this recipe?
Yes, melted butter works beautifully and adds a richer flavor. Just note that butter may make the cookies slightly denser.
Q2: Why do I roll the dough in both granulated and powdered sugar?
Granulated sugar helps the powdered sugar stick and prevents it from melting too quickly during baking, giving a more defined crinkle look.
Q3: Can I freeze the baked cookies without losing the texture?
Absolutely. Just follow the freezing steps outlined earlier and thaw at room temperature before serving.
Q4: What cocoa powder works best?
Use high-quality unsweetened cocoa powder for the richest flavor. Dutch-processed cocoa gives a deeper color and smoother taste.
Q5: Can I make these cookies without eggs?
Yes. Substitute each egg with a flax egg or a commercial egg replacer. The texture will still be soft and chewy.
Conclusion
Chocolate Crinkle Cookies are more than just a dessert—they’re a baking tradition that never goes out of style. With their snowy powdered sugar coating, rich chocolate flavor, and soft, chewy center, they’re a crowd-pleaser every single time. Whether you stick to the classic recipe or experiment with flavors, the process is simple, fun, and deeply rewarding.
From mixing the dough to watching the cracks form in the oven, every step is part of the magic. And with the tips, variations, and storage advice we’ve covered, you’ll have everything you need to bake a batch that looks beautiful, tastes incredible, and stays fresh.
So, the next time you want a treat that delivers both flavor and visual wow-factor, whip up these crinkly, chocolatey gems. Chances are, they’ll disappear faster than you expect—so you might want to make a double batch.


