Cheese Ravioli Recipe: Cheese ravioli is one of those comforting, heartwarming dishes that can instantly bring people together around the dinner table. Imagine biting into soft, delicate pasta pillows stuffed with rich, creamy cheese, then topped with your favorite sauce — whether it’s a fresh tomato marinara, a velvety Alfredo, or a simple drizzle of sage-infused butter. This dish is loved across the globe because it’s versatile, satisfying, and, when made from scratch, absolutely unbeatable.
The Origins of Cheese Ravioli
Ravioli is a traditional Italian pasta, believed to have originated in the regions of Lombardy and Emilia-Romagna. Its name comes from the Italian word riavvolgere, meaning “to wrap,” which perfectly describes how the pasta dough envelops the filling. While fillings can vary — from spinach to mushrooms to meat — cheese ravioli is a classic that’s stood the test of time. Italians have been crafting these pockets of joy for centuries, often passing recipes down through generations. Today, it’s a staple not just in Italy, but in kitchens worldwide.
Why This Recipe Works Every Time
Many people shy away from making ravioli at home because they think it’s complicated. But with the right recipe, it’s surprisingly easy — and fun. The key lies in balancing a soft, elastic dough with a creamy, flavorful filling. In this guide, I’ll walk you through each step so you can confidently make restaurant-quality cheese ravioli in your own kitchen. We’ll cover the dough, the filling, the assembly, and even cooking tips so nothing goes wrong. By the end, you’ll feel like an Italian chef — without needing to book a flight to Rome.
Ingredients You’ll Need
Before we start rolling dough and folding ravioli, let’s make sure you have everything ready. Having your ingredients prepared ahead of time will make the process smoother and more enjoyable.
Essential Ingredients for Pasta Dough
For the pasta dough, you’ll need:
- 2 cups (250g) all-purpose flour (or “00” Italian flour for silkier texture)
- 3 large eggs
- 1 tablespoon olive oil
- 1/2 teaspoon salt
These simple ingredients create a dough that’s easy to work with and holds up well during cooking. “00” flour is recommended because it produces a more delicate pasta, but all-purpose flour works just fine for beginners.
Filling Ingredients – Creamy and Flavorful
For the cheese filling, you’ll need:
- 1 cup ricotta cheese (drained well)
- 1/2 cup grated Parmesan cheese
- 1/2 cup shredded mozzarella cheese
- 1 egg yolk
- Salt and pepper to taste
- Optional: a pinch of nutmeg for warmth
This combination gives you a creamy, slightly tangy filling with a mild sweetness from the ricotta. Parmesan adds depth, mozzarella provides a gentle stretch, and the egg yolk binds everything together.
Optional Add-Ons for Extra Flavor
If you want to elevate your ravioli, consider:
- Fresh herbs like parsley or basil, finely chopped
- Roasted garlic for a deeper flavor
- Lemon zest for a bright twist
Kitchen Tools & Equipment
You don’t need a fancy pasta-making machine to make cheese ravioli at home — though it can help. A simple rolling pin, a sharp knife, and a fork can do the trick. Still, here’s a checklist so you’re fully prepared.
Must-Have Tools for Homemade Ravioli
- Rolling pin or pasta machine
- Large mixing bowl
- Whisk or fork (for beating eggs)
- Measuring cups and spoons
- Knife or pizza cutter (for cutting pasta)
- Fork (for sealing edges)
- Large pot for boiling
Handy Extras to Make Cooking Easier
- Ravioli mold or stamp (for even shapes)
- Pastry brush (to apply egg wash or water)
- Slotted spoon (for gently removing ravioli from boiling water)
While molds and stamps can make your ravioli perfectly uniform, hand-cut ravioli often has that rustic charm that makes homemade pasta so special.
Preparing the Pasta Dough
Making your own pasta dough might sound intimidating, but it’s really just mixing, kneading, and resting. Here’s the breakdown.
Mixing the Perfect Dough
- On a clean surface or in a large mixing bowl, make a mound with the flour and create a well in the center.
- Crack the eggs into the well, add olive oil, and sprinkle in the salt.
- Use a fork to whisk the eggs, slowly incorporating the flour from the edges until a sticky dough forms.
Tip: If the dough feels too dry, add a teaspoon of water. If it’s too wet, sprinkle a little more flour.
Kneading Tips for a Smooth Texture
Kneading is essential for developing gluten, which gives your pasta structure and chew. Push the dough away from you with the heel of your hand, fold it over, rotate it, and repeat. Knead for about 8–10 minutes until the dough is smooth and elastic.
Resting the Dough – Why It Matters
Wrap the dough in plastic wrap and let it rest at room temperature for at least 30 minutes. Resting allows the gluten to relax, making the dough easier to roll out later without snapping back.
Making the Cheese Filling
The filling is what makes ravioli irresistible. We’re aiming for a creamy, flavorful mixture that doesn’t leak during cooking.
Choosing the Right Cheese Combination
While ricotta is the traditional base, combining it with Parmesan and mozzarella creates a richer taste and a more satisfying bite. Make sure your ricotta is well-drained to avoid watery filling.
Mixing for the Perfect Creamy Consistency
- In a bowl, combine ricotta, Parmesan, and mozzarella.
- Add egg yolk, salt, pepper, and nutmeg (if using).
- Mix until smooth.
- Taste and adjust seasoning if needed.
Keep the filling chilled until ready to use. Cold filling is easier to work with and less likely to seep out while assembling the ravioli.
Rolling Out the Pasta Dough
Now that your dough is rested, it’s time to roll it into thin sheets. This step determines how delicate and tender your ravioli will be.
Using a Rolling Pin
If you’re going the traditional route without a pasta machine:
- Lightly flour your work surface and rolling pin.
- Cut the dough into smaller portions to make it easier to handle.
- Roll each portion into a long, thin sheet — aim for about 1–2mm thick.
Tip: Rotate the dough often to keep it from sticking, and flour lightly as you work.
Using a Pasta Machine
If you have a pasta machine:
- Flatten the dough portion slightly and feed it through the widest setting.
- Fold it in half, feed it through again, and repeat 2–3 times for a smooth texture.
- Gradually reduce the machine’s setting until you reach the desired thinness.
Consistency is key — all sheets should be the same thickness to ensure even cooking.
Assembling the Ravioli
This is where your pasta sheets and cheese filling come together to form the perfect ravioli.
Laying the Base Sheet
Lay one pasta sheet flat on a floured surface. If it’s sticking, dust lightly with flour.
Adding the Filling
- Place small spoonfuls of filling about 1–2 inches apart along the sheet.
- Avoid overfilling — too much can cause leaks during boiling.
Topping with the Second Sheet
Lay a second sheet of pasta over the top, gently pressing around the filling to seal out any air. Air pockets can cause ravioli to burst while cooking.
Sealing and Cutting Ravioli
Proper sealing ensures that your ravioli holds together during cooking.
Sealing the Edges
- Use your fingers or a pastry brush to apply a little water or beaten egg around the filling before pressing the sheets together.
- Press firmly around each mound of filling to seal completely.
Cutting the Ravioli
- Use a ravioli cutter, knife, or pizza wheel to cut out squares or circles.
- Press the edges with a fork for a decorative touch and extra sealing.
Place finished ravioli on a floured tray to prevent sticking.
Cooking the Ravioli
Fresh pasta cooks quickly, so this step is short but important.
Boiling
- Bring a large pot of salted water to a gentle boil.
- Add ravioli in small batches to avoid crowding.
- Cook for 3–4 minutes or until they float to the surface.
Draining
Use a slotted spoon to remove the ravioli, letting excess water drip off before plating.
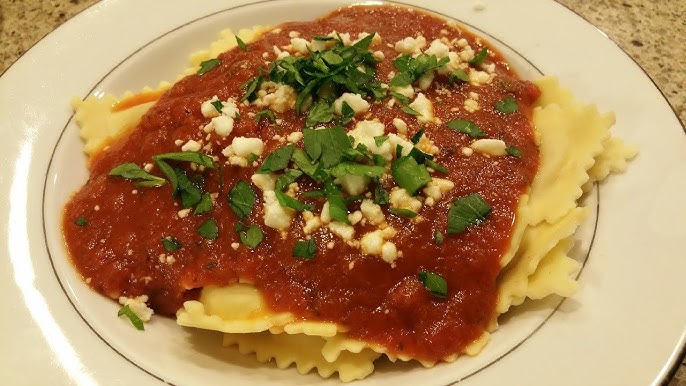
Serving Suggestions
Ravioli is incredibly versatile when it comes to sauces and toppings.
Classic Options
- Marinara Sauce: A tangy tomato sauce for a fresh, vibrant taste.
- Brown Butter and Sage: Nutty butter paired with fragrant sage leaves.
- Alfredo Sauce: Creamy and rich for indulgent dinners.
Garnishes
- Freshly grated Parmesan
- A sprinkle of chopped parsley
- A drizzle of good olive oil
Tips for Perfect Homemade Cheese Ravioli
Even though ravioli is simple in concept, a few small mistakes can lead to burst pasta, bland filling, or sticky dough. Here’s how to avoid those pitfalls.
Tip 1: Keep the Dough Soft but Not Sticky
Too much flour will make the pasta tough, while too little can cause it to stick and tear. Aim for a dough that feels smooth and elastic, with just enough flour to keep it manageable.
Tip 2: Chill the Filling
Warm cheese filling can ooze out during assembly. Always keep it in the refrigerator until you’re ready to spoon it onto your pasta sheets.
Tip 3: Work in Batches
If you roll out all the pasta at once, it may dry before you assemble it. Instead, roll and fill one portion at a time.
Tip 4: Eliminate Air Bubbles
Air pockets inside ravioli act like mini steam bombs when cooking. Press around the filling firmly to remove excess air before sealing.
Tip 5: Salt Your Water Generously
Think of the boiling water as your first seasoning step — salted water enhances the pasta’s flavor from the inside out.
Common Mistakes to Avoid
Even experienced cooks slip up when making ravioli. Here’s what to watch out for:
Overstuffing
Too much filling not only makes sealing harder but also risks leaks in the pot. A teaspoon or less per raviolo is usually perfect.
Rolling the Dough Too Thick
Thick pasta overwhelms the delicate filling and makes the ravioli heavy. Thin dough cooks faster and gives a more balanced bite.
Not Resting the Dough
Skipping the resting period leads to elastic, hard-to-roll dough that snaps back when stretched.
Cooking at a Rapid Boil
A violent boil can tear delicate ravioli. Keep the water at a gentle simmer to protect your pasta.
Storing and Freezing Ravioli
Homemade ravioli is best eaten fresh, but you can store it for later without losing quality.
Refrigeration
Place uncooked ravioli in a single layer on a floured baking sheet, cover with plastic wrap, and refrigerate for up to 24 hours.
Freezing
- Arrange ravioli on a tray in a single layer.
- Freeze until solid (about 1–2 hours).
- Transfer to a freezer-safe bag or container.
- Cook from frozen — just add an extra minute to boiling time.
Avoiding Clumps
Lightly dust with flour before storage to prevent sticking.
Variations on Cheese Ravioli
One of the best parts of ravioli is its versatility. You can change the filling, the dough, or the sauce to suit your tastes.
Different Fillings
- Spinach and ricotta
- Butternut squash and mascarpone
- Mushroom and cream cheese
Flavored Dough
Add spinach puree for green pasta, beet puree for pink, or squid ink for dramatic black ravioli.
International Twists
Try fillings inspired by other cuisines — feta and herbs for a Greek spin, or spiced pumpkin for a Moroccan touch.
Pairing Cheese Ravioli with Wine
If you want to take your meal to the next level, pair your ravioli with the right wine.
White Wines
A crisp Pinot Grigio or Sauvignon Blanc works beautifully with cheese-based pasta, especially when paired with lighter sauces.
Red Wines
For tomato-based sauces, a Chianti or Sangiovese balances acidity with richness.
Sparkling Wines
Prosecco adds a refreshing contrast to creamy sauces, cleansing the palate between bites.
FAQs about Cheese Ravioli Recipe
1. Can I make cheese ravioli without a pasta machine?
Yes! A rolling pin works perfectly fine — just take your time to get the dough thin enough.
2. How do I stop my ravioli from bursting during cooking?
Make sure they’re well-sealed and avoid overcooking. Also, simmer gently instead of boiling violently.
3. Can I make ravioli ahead of time?
Absolutely. You can refrigerate them for up to 24 hours or freeze them for up to 2 months.
4. What’s the best cheese combination for ravioli?
Ricotta, Parmesan, and mozzarella make a classic trio, but you can experiment with others like goat cheese or mascarpone.
5. Do I need to drain ricotta before using it?
Yes. Excess moisture can make the filling runny and harder to seal.
Conclusion
By following this step-by-step guide, you now have everything you need to make authentic, restaurant-quality ravioli right in your own kitchen. The secret lies in fresh ingredients, careful dough handling, and a little patience. Whether you’re cooking for a special occasion, hosting a dinner party, or simply treating yourself, this recipe will never disappoint.
So, roll up your sleeves, flour that countertop, and get ready to create something truly delicious. And remember — the best part of homemade ravioli is that every bite carries the taste of your effort and love.


