Cake Balls Recipe: Cake balls are bite-sized dessert treats made from crumbled cake mixed with frosting, rolled into small balls, and coated with chocolate or candy melts. They’re soft, sweet, and incredibly versatile, allowing for endless flavor and decoration possibilities. Originally, cake balls were created as a way to use leftover cake scraps, but over the years, they’ve become a trendy dessert in their own right. Whether served on a stick as cake pops or simply enjoyed as they are, cake balls are a crowd-pleasing indulgence.
Imagine taking a forkful of your favorite cake, mixing it with just enough creamy frosting to hold it together, then encasing it in a smooth chocolate shell—that’s the magic of a cake ball. They’re a delightful combination of textures: moist and fluffy on the inside, crisp and rich on the outside.
Cake balls are also one of the most customizable desserts. You can make them for birthdays, weddings, holidays, or even just to satisfy a sweet tooth on a rainy afternoon. Best of all, they’re relatively easy to make, even for beginner bakers. With just a handful of ingredients and some patience, you can whip up a batch that looks and tastes like something from a professional bakery.
Why Cake Balls Are So Popular
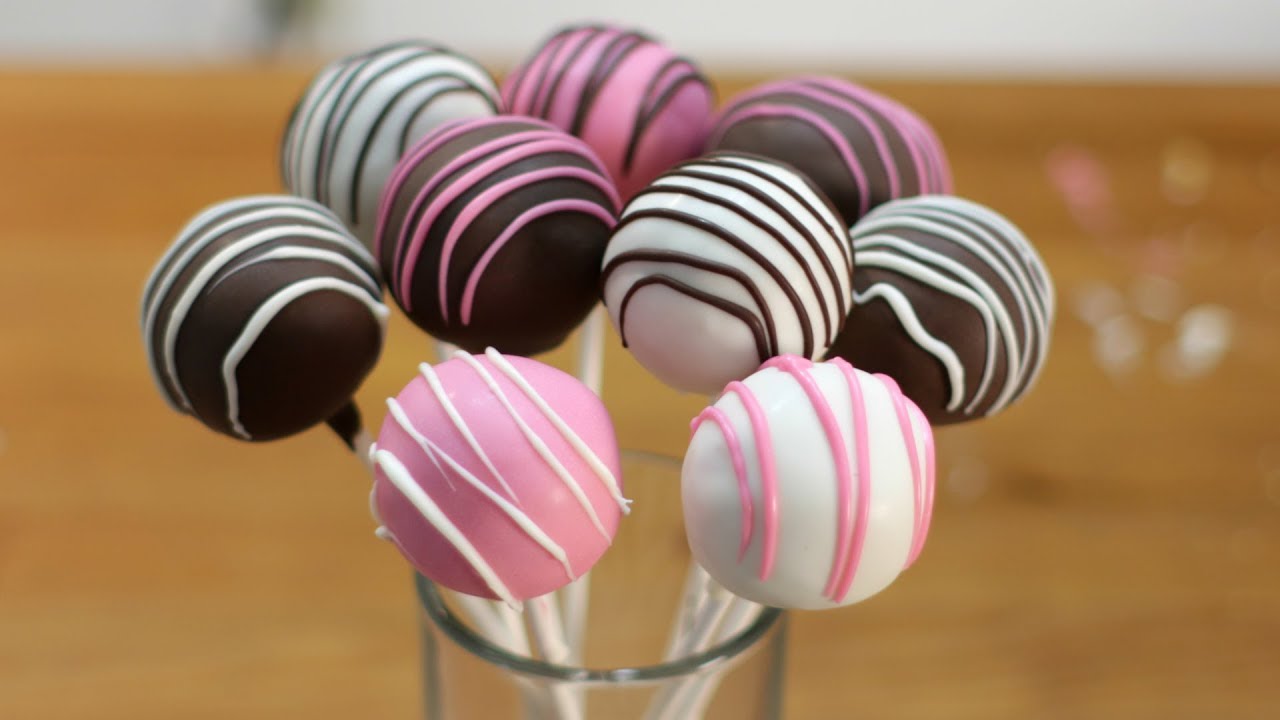
Cake balls have skyrocketed in popularity over the past decade, partly thanks to social media and the rise of creative home baking. Their small size makes them perfect for parties, and their beautiful appearance—often decorated with sprinkles, drizzles, or edible glitter—makes them Instagram-worthy.
Another reason they’re so loved is their versatility. You can use any cake flavor and pair it with any frosting. This means you can create endless combinations, from a classic chocolate cake ball dipped in milk chocolate to a lemon cake ball coated in white chocolate with a zesty drizzle.
Cake balls also make great edible gifts. Wrap them in clear cellophane bags, tie them with ribbons, and you have a beautiful, homemade present that’s both personal and delicious. Because they’re small, they’re easy to package and transport, making them ideal for bake sales, weddings, and office parties.
But perhaps the biggest reason for their popularity is that they taste incredible. Every bite is a mix of rich, moist cake and smooth, decadent coating. It’s a flavor and texture combination that keeps people coming back for more.
Ingredients Needed for Cake Balls
Essential Ingredients
For a basic batch of cake balls, you’ll need:
- Cake – Any flavor works. You can bake a cake from scratch, use a box mix, or even repurpose leftover cake.
- Frosting – Buttercream, cream cheese frosting, or ganache are common choices. This acts as the “glue” that holds the cake crumbs together.
- Coating – Melted chocolate or candy melts to encase the cake balls.
- Optional Decorations – Sprinkles, edible glitter, crushed nuts, or drizzled chocolate.
A standard ratio for cake balls is 1 cake (9×13 inch) + about 1 cup frosting + 12–16 ounces of coating chocolate. This makes around 40–45 cake balls, depending on their size.
Quality ingredients make a big difference. Use a moist, flavorful cake and a rich frosting to ensure the inside of your cake balls is as delicious as the outside.
Optional Flavor Enhancers
If you want to take your cake balls from “good” to “extraordinary,” consider adding:
- Extracts – Vanilla, almond, or peppermint extract for extra aroma.
- Zest – Lemon, lime, or orange zest for brightness.
- Liquor – A splash of Baileys, Kahlúa, or rum for adult versions.
- Spices – Cinnamon, nutmeg, or pumpkin spice for seasonal flavors.
- Fillings – A dab of caramel, peanut butter, or jam in the center before coating.
These little extras can completely transform the flavor profile of your cake balls and make them stand out at gatherings.
Tools and Equipment Required
Baking Tools
Before you start, gather the following baking essentials:
- Mixing Bowls – One large for mixing cake crumbs and frosting, plus smaller ones for coatings.
- Baking Pan – For baking your cake if you’re starting from scratch.
- Measuring Cups and Spoons – Accuracy matters for consistent results.
- Cooling Rack – To cool the cake before crumbling.
- Parchment Paper or Silicone Mats – To prevent sticking when shaping and coating.
Decorating Tools
For that professional bakery finish, you’ll need:
- Melting Pot or Microwave-Safe Bowls – For melting chocolate or candy melts.
- Dipping Tool or Fork – To coat the cake balls smoothly.
- Piping Bags – For drizzling decorative chocolate.
- Sprinkle Bowls – For easy dipping and decoration without mess.
Having the right tools not only makes the process smoother but also ensures your cake balls look neat and appealing.
Step-by-Step Guide to Making Cake Balls
Step 1 – Bake the Cake Base
This is the foundation of your cake balls. You can either bake a cake from scratch using your favorite recipe or opt for a boxed cake mix for convenience. Follow the baking instructions carefully, making sure the cake is fully cooked but not overbaked. Overbaking will make your cake dry, which can affect the texture of your cake balls.
Once baked, let the cake cool completely before moving to the next step. This prevents the frosting from melting when you mix it in later. If you’re in a hurry, you can place the cake in the fridge for faster cooling.
Step 2 – Crumble the Cake
When the cake is cooled, use clean hands or a fork to crumble it into fine, even crumbs. This step is oddly satisfying—it’s like turning a fluffy cake into soft sand. The finer the crumbs, the smoother your cake balls will be. Avoid leaving big chunks, as they can make your cake balls lumpy.
Step 3 – Mix with Frosting
Add a spoonful of frosting to the cake crumbs and mix thoroughly. Start with less frosting—you can always add more if needed. The mixture should be moist enough to hold its shape when rolled, but not so wet that it feels sticky.
If you add too much frosting, the cake balls may become soggy and hard to coat. If you add too little, they may crumble apart. The sweet spot is when you can squeeze the mixture into a compact ball without it cracking or sticking to your hands excessively.
Shaping the Cake Balls
How to Form Perfect Balls
Shaping is where your cake balls start to take their final form. Scoop a small portion of your cake-and-frosting mixture using a tablespoon or a small cookie scoop to ensure uniformity. Roll it gently between your palms until it forms a smooth, round ball. If the mixture feels sticky, lightly dust your hands with powdered sugar or cocoa powder to prevent sticking.
The goal here is consistency. Having evenly sized cake balls not only looks better but also ensures even coating and presentation. Ideally, each ball should be around 1 to 1.5 inches in diameter—big enough for a satisfying bite but small enough to pop in your mouth without crumbling.
Work in small batches to keep the mixture fresh and easy to roll. If your kitchen is warm, the frosting in the mixture may soften quickly, making the balls harder to shape. In this case, you can chill the mixture for about 10 minutes before rolling again.
Tips for Consistency
Uniform cake balls make for a more professional presentation, so here are a few tips to keep them consistent:
- Use a Cookie Scoop – This helps portion the same amount of mixture every time.
- Roll Gently – Pressing too hard can make them dense, while rolling too lightly can make them fall apart.
- Cool Hands – Warm hands can melt the frosting, so rinse your hands in cold water and dry them before rolling.
- Double Check Size – Lining them up on a tray lets you spot and fix any that are too big or small.
Once shaped, place the cake balls on a parchment-lined baking sheet. This will keep them from sticking and make them easier to transfer to the fridge or freezer later.
Chilling the Cake Balls Before Coating
Why Chilling is Important
Chilling is not just an optional step—it’s essential for success. Cake balls that are too soft will fall apart when dipped in melted chocolate. Cooling them solidifies the frosting inside, making them firm enough to handle the dipping process without crumbling.
Think of it like working with modeling clay. If it’s too soft, it loses shape; if it’s chilled, it holds form beautifully. The same principle applies here.
Recommended Chilling Time
Place your tray of shaped cake balls in the refrigerator for at least 2 hours or in the freezer for 30–45 minutes if you’re short on time. They should be firm but not frozen solid—over-freezing can cause the coating to crack as the balls thaw.
If you’re making them ahead of time, you can keep them chilled overnight before coating. Just be sure to cover them with plastic wrap to prevent them from absorbing fridge odors.
Choosing the Perfect Coating
Chocolate Options
When it comes to coating cake balls, your choice of chocolate makes a big difference in flavor and texture. Here are some options:
- Milk Chocolate – Sweet and creamy, perfect for classic flavors.
- Dark Chocolate – Rich and slightly bitter, great for balancing sweeter cakes.
- White Chocolate – Sweet and smooth, ideal for adding food coloring or flavor extracts.
For the best results, choose high-quality chocolate. Cheap chocolate often contains more sugar and additives, which can affect melting and coating.
Candy Melts vs. Real Chocolate
Candy melts are popular because they’re easy to work with. They melt smoothly and set quickly without tempering, making them beginner-friendly. They also come in a variety of colors, which is great for themed parties.
Real chocolate, on the other hand, offers superior flavor but requires tempering for a glossy, firm finish that won’t melt at room temperature. If you skip tempering, real chocolate can set with streaks or a dull surface.
If you want the convenience of candy melts but prefer the taste of real chocolate, you can mix the two for a balance of flavor and ease of use.
Dipping and Coating Techniques
Step-by-Step Dipping Method
- Melt your chocolate or candy melts in a microwave-safe bowl, heating in 20–30 second intervals and stirring between each until smooth.
- Using a fork or dipping tool, gently lower a chilled cake ball into the melted coating.
- Roll it around until fully covered, then lift it out, allowing excess coating to drip back into the bowl.
- Place it back on the parchment-lined tray.
Avoiding Cracks and Coating Problems
Cracking can happen when the cold cake balls cause the coating to set too quickly. To avoid this, let the cake balls sit at room temperature for about 5 minutes after chilling before dipping.
If your coating is too thick, add a teaspoon of vegetable oil or shortening to thin it out. This will give you a smoother, more even finish.
Once dipped, you can immediately sprinkle toppings on before the coating sets, or let them harden completely before adding decorative drizzles.
Decorating Cake Balls Like a Pro
Simple Decoration Ideas
Not every cake ball needs to be a showstopper—sometimes, simple is best. Once your coating is still wet, sprinkle your cake balls with colorful sprinkles, sanding sugar, or shredded coconut. These decorations add both visual appeal and a little extra texture.
You can also keep things classy with a simple chocolate drizzle. Melt a contrasting chocolate (for example, white chocolate on a dark chocolate–coated ball), place it in a piping bag or a plastic sandwich bag with a tiny corner snipped off, and drizzle thin lines over the top. This gives an elegant, bakery-style finish with minimal effort.
For themed events, match your decorations to the occasion. Red and green sprinkles for Christmas, pastel shades for Easter, or gold dust for weddings make your cake balls stand out while fitting the mood perfectly.
Advanced Decorating Techniques
If you want to take your cake balls to the next level, there are plenty of ways to get creative:
- Edible Glitter or Gold Leaf – Adds a luxurious, shimmering finish.
- Shaped Decorations – Tiny fondant flowers, edible pearls, or sugar shapes can make each ball unique.
- Marbled Coating – Swirl two different melted chocolates together before dipping for a stunning marbled effect.
- Hand-Painted Designs – Use edible paint or food coloring mixed with vodka to create patterns on the hardened coating.
Remember, presentation plays a big role in how people perceive your desserts. Even the simplest cake ball can become a centerpiece with thoughtful decoration.
Flavor Variations for Cake Balls
Classic Flavors
Sometimes, nothing beats the tried-and-true combinations:
- Chocolate Cake + Chocolate Frosting – Rich and indulgent, the ultimate chocolate lover’s dream.
- Vanilla Cake + Buttercream Frosting – Light, sweet, and perfect for any occasion.
- Red Velvet Cake + Cream Cheese Frosting – A Southern classic with a tangy twist.
These classic flavors are crowd-pleasers and a safe choice when you’re baking for a group with varied tastes.
Creative and Seasonal Flavors
If you like experimenting in the kitchen, cake balls are the perfect canvas:
- Pumpkin Spice Cake + Cream Cheese Frosting – Ideal for autumn gatherings.
- Lemon Cake + Lemon Curd Frosting – Bright, tangy, and refreshing.
- Strawberry Cake + White Chocolate Coating – Sweet and fruity, perfect for spring.
- Cookies and Cream Cake Balls – Mix crushed Oreos into vanilla cake for a crunchy surprise.
For the holidays, you can make peppermint chocolate cake balls by adding crushed candy canes to the coating or the cake mixture. For summer, try piña colada cake balls with pineapple cake, coconut frosting, and white chocolate coating.
Storing and Preserving Cake Balls
How to Store for Freshness
Cake balls can be stored at room temperature if they will be eaten within 2–3 days, but for longer storage, keep them in an airtight container in the refrigerator. This helps maintain their texture and flavor while preventing the coating from melting in warm conditions.
Separate layers of cake balls with parchment paper to prevent them from sticking together. If you’ve decorated them with delicate designs, store them in a single layer to avoid smudging.
Freezing Cake Balls
Cake balls freeze beautifully, making them an excellent make-ahead dessert. To freeze, arrange them in a single layer on a baking sheet and freeze until solid. Then transfer them to a freezer-safe bag or container. They can last up to 3 months in the freezer.
When you’re ready to serve, thaw them in the refrigerator overnight. Avoid thawing at room temperature, as condensation can cause the coating to become sticky.
Serving Suggestions
Perfect Occasions for Cake Balls
Cake balls fit right in at almost any event:
- Birthday Parties – Kids love their bite-sized fun and bright colors.
- Weddings – Elegant, customizable, and easy to serve to a crowd.
- Baby Showers – Can be made in gender-reveal colors or themed designs.
- Holiday Gatherings – Easily adapted with seasonal flavors and decorations.
They also work well as part of dessert platters, paired with cookies, brownies, and chocolate-covered fruit for variety.
Pairing with Drinks and Desserts
Pair cake balls with beverages to enhance the experience:
- Coffee or Espresso – Pairs well with rich chocolate or nut-flavored cake balls.
- Tea – Works beautifully with lighter flavors like lemon or vanilla.
- Champagne – Elevates red velvet or white chocolate–coated varieties for special celebrations.
You can even serve cake balls alongside ice cream for a decadent dessert duo. Imagine a scoop of vanilla ice cream topped with a warm chocolate cake ball—pure bliss.
Common Mistakes and How to Avoid Them
Problems During Baking
- Dry Cake – Leads to crumbly cake balls that don’t hold together. Avoid overbaking and measure ingredients accurately.
- Too Much Frosting – Makes them soggy and difficult to coat. Add frosting gradually until the mixture holds together without being sticky.
Issues with Coating
- Cracked Coating – Happens when cake balls are too cold before dipping. Let them warm slightly after chilling.
- Thick or Lumpy Coating – Melt chocolate slowly and stir frequently; add a bit of oil to thin if needed.
By following these tips, you’ll consistently get smooth, professional-looking results.
Healthier Cake Ball Alternatives
Low-Sugar Options
Swap traditional cake and frosting for sugar-free or reduced-sugar versions. Use dark chocolate with at least 70% cocoa for coating to cut sweetness while adding a richer flavor.
Vegan and Gluten-Free Cake Balls
Vegan cake balls can be made using plant-based cake recipes and dairy-free frosting. For gluten-free versions, use a gluten-free cake mix and ensure your coating is certified gluten-free.
Even with dietary adjustments, these treats can still be indulgent and satisfying.
FAQs about Cake Balls Recipe
1. Can I Make Cake Balls Without Frosting?
Yes! You can bind the cake crumbs with cream cheese, ganache, or even condensed milk.
2. How Long Do Cake Balls Last?
Up to 3 days at room temperature, a week in the fridge, or 3 months in the freezer.
3. Can I Use Store-Bought Cake Mix?
Absolutely—it’s a time-saver and works just as well as homemade cake.
4. How to Prevent Cake Balls from Falling Apart?
Make sure the mixture has enough binding agent and chill before coating.
5. Best Way to Transport Cake Balls?
Place them in a sturdy container with layers separated by parchment paper.
Conclusion
Cake balls are a delightful, versatile dessert that’s as fun to make as it is to eat. Whether you stick with classic flavors or venture into creative territory, the process is straightforward and rewarding. With the right techniques and a little creativity, you can make cake balls that are not only delicious but also visually stunning—perfect for any occasion.


