Brown Butter Cookie Recipe: There’s something magical about biting into a cookie that’s soft in the center, crisp at the edges, and bursting with a nutty, caramel-like aroma. That magic often comes from one secret ingredient—brown butter. Unlike regular melted butter, brown butter (also known as beurre noisette in French) is butter that has been gently cooked until the milk solids turn golden brown, giving it a deep, toasty flavor that can transform even the simplest cookie into a gourmet treat.
Brown butter cookies are a delightful twist on the traditional chocolate chip or sugar cookie. The nutty undertones blend beautifully with vanilla, sugar, and flour, creating a cookie that feels rich and indulgent without being overpowering. In recent years, these cookies have surged in popularity, partly because food bloggers and professional bakers can’t stop raving about how easy it is to upgrade a basic recipe with browned butter.
But these cookies aren’t just about flavor—they’re also about texture. Brown butter adds a slight chewiness while enhancing the crisp edges, making every bite irresistible. If you’ve never tried baking with brown butter, you’re in for a treat. This guide will walk you through each step so you can confidently bake a batch that looks (and tastes) like it came straight from a bakery.
Why Brown Butter Elevates Cookie Flavor
You might be wondering: Is browning butter really worth the extra five to ten minutes? Absolutely! Browning butter changes its composition in a way that boosts flavor intensity. As the butter melts and cooks, the water evaporates, and the milk solids begin to toast, releasing nutty, butterscotch-like notes. This process creates Maillard reactions, which are responsible for the rich, complex taste.
When you add brown butter to cookie dough, you’re essentially layering flavors before you even introduce sugar, flour, or chocolate. That depth of flavor lingers with each bite and pairs exceptionally well with ingredients like brown sugar, dark chocolate, and even sea salt. The aroma alone is enough to make your kitchen feel like a high-end bakery.
The Origin and Popularity of Brown Butter Cookies
While brown butter has been a staple in French cooking for centuries, the concept of using it in cookies is more modern. The rise of home baking blogs and social media food trends has played a huge role in popularizing brown butter cookies. Influencers and chefs often describe them as “the grown-up version” of regular cookies—something familiar yet sophisticated.
Many bakers consider brown butter the secret handshake of the baking world: once you know how to use it, you’ll never go back to plain melted butter. And trust me, after one bite, you’ll understand why these cookies have a cult following.
Ingredients You’ll Need
If you’ve baked cookies before, you’ll notice that the ingredients list for brown butter cookies isn’t wildly different from standard recipes. The magic lies in how you treat the butter before adding it to the mix.
Core Ingredients for Perfect Brown Butter Cookies
Here’s a basic ingredient list to make about 24 cookies:
- 1 cup (227g) unsalted butter – this will be browned for flavor.
- 1 cup (200g) brown sugar – provides moisture and a deep caramel taste.
- ½ cup (100g) granulated sugar – adds sweetness and helps with crisp edges.
- 2 large eggs – bind the dough and add richness.
- 2 tsp vanilla extract – complements the nutty flavor of brown butter.
- 2 ½ cups (315g) all-purpose flour – gives structure to the cookies.
- 1 tsp baking soda – ensures a good rise.
- ½ tsp salt – enhances all the flavors.
- 1 ½ cups (270g) chocolate chips or chunks – semi-sweet works best.
This list is the foundation of your brown butter cookie journey, but you can always experiment once you’ve mastered the basics.
Optional Add-Ins for Creative Variations
Once you’ve nailed the core recipe, you can make your cookies truly unique by adding mix-ins. Here are a few ideas:
- Toasted nuts (pecans, walnuts, almonds) for extra crunch.
- White chocolate chips for a sweeter twist.
- Dried fruits like cranberries or cherries for a tangy balance.
- A sprinkle of flaky sea salt right before baking for a gourmet touch.
- Espresso powder to enhance the chocolate flavor.
The beauty of brown butter cookies is their versatility—you can easily adapt them to your taste or the season.
Tools and Equipment Required
Before you start browning butter and mixing dough, make sure you have the right tools. The process is straightforward, but having the correct equipment will make everything smoother.
Essential Baking Tools
- Heavy-bottomed saucepan – for evenly browning butter without burning it.
- Heatproof spatula or whisk – to stir the butter during browning.
- Mixing bowls – at least two: one for wet ingredients and one for dry.
- Electric mixer (hand or stand) – for creaming sugars and incorporating ingredients.
- Measuring cups and spoons – accuracy is key in baking.
- Baking sheet – lined with parchment paper or a silicone baking mat.
- Cooling rack – to cool cookies evenly after baking.
Helpful Extras for Better Results
- Cookie scoop – for uniform cookie sizes (ensures even baking).
- Digital kitchen scale – for precise measurements, especially flour and sugar.
- Thermometer – optional, but can help you avoid overheating the butter.
- Rubber spatula – for scraping every last bit of batter.
Investing in these tools might feel unnecessary at first, but once you start baking regularly, you’ll appreciate the difference they make.
Preparing the Brown Butter
This is the step that sets these cookies apart. Browning butter is simple, but you need to watch it closely—one moment it’s golden and fragrant, the next it can burn.
Step-by-Step Process to Brown Butter Perfectly
- Start with cold, unsalted butter – cut into even pieces so it melts evenly.
- Melt over medium heat – stir frequently with a heatproof spatula.
- Watch for foaming – after melting, the butter will start to foam as water evaporates.
- Smell the change – it will go from creamy to nutty as the milk solids toast.
- Look for golden specks – once you see brown flecks at the bottom, you’re there.
- Remove from heat immediately – to avoid burning, transfer to a heatproof bowl.
Common Mistakes to Avoid While Browning Butter
- High heat rushing – it’s tempting to crank up the heat, but that leads to burning.
- Walking away – butter can go from browned to burnt in under 30 seconds.
- Forgetting to scrape – those brown bits are flavor gold, don’t leave them behind.
- Not cooling enough before mixing – hot butter can scramble eggs in the dough.
Mixing the Cookie Dough
Now that your butter is beautifully browned and cooled, it’s time to mix the dough.
Combining Wet and Dry Ingredients Correctly
- Whisk dry ingredients (flour, baking soda, salt) in a separate bowl.
- In another bowl, cream together the cooled brown butter, brown sugar, and granulated sugar until light and fluffy.
- Add eggs one at a time, mixing well after each.
- Mix in vanilla extract.
- Gradually add the dry ingredients into the wet mixture, mixing just until combined.
- Fold in chocolate chips with a spatula.
Tips for Achieving the Perfect Dough Texture
- Don’t overmix—overworking the dough develops gluten, making cookies tough.
- If dough seems too soft, chill it for 30 minutes before shaping.
- Taste the dough (safely) to check sweetness before adding extras.
Shaping and Chilling the Dough
Shaping your dough correctly and giving it proper time to chill are two steps that can make or break your cookie game. A well-shaped cookie bakes evenly, while chilled dough develops a deeper flavor and better texture.
To shape your dough:
- Use a cookie scoop to measure equal portions. This not only ensures that all your cookies are the same size but also promotes even baking.
- Roll each portion into a smooth ball. If you want your cookies to have those beautiful bakery-style crinkles, slightly flatten the top before baking.
- Space cookies about 2 inches apart on your baking sheet to give them room to spread.
Why chilling is important:
Chilling your dough for at least 30 minutes (and up to 24 hours) allows the flour to hydrate, the fat to firm up, and the flavors to meld. Cold dough spreads more slowly in the oven, which results in thicker, chewier cookies with golden edges. If you’re short on time, even a quick 20-minute chill in the freezer can make a noticeable difference.
Pro tip: If you plan to bake only part of the batch, freeze the portioned dough balls on a tray, then store them in a freezer-safe bag. This way, you can have fresh cookies anytime—straight from the freezer to the oven.
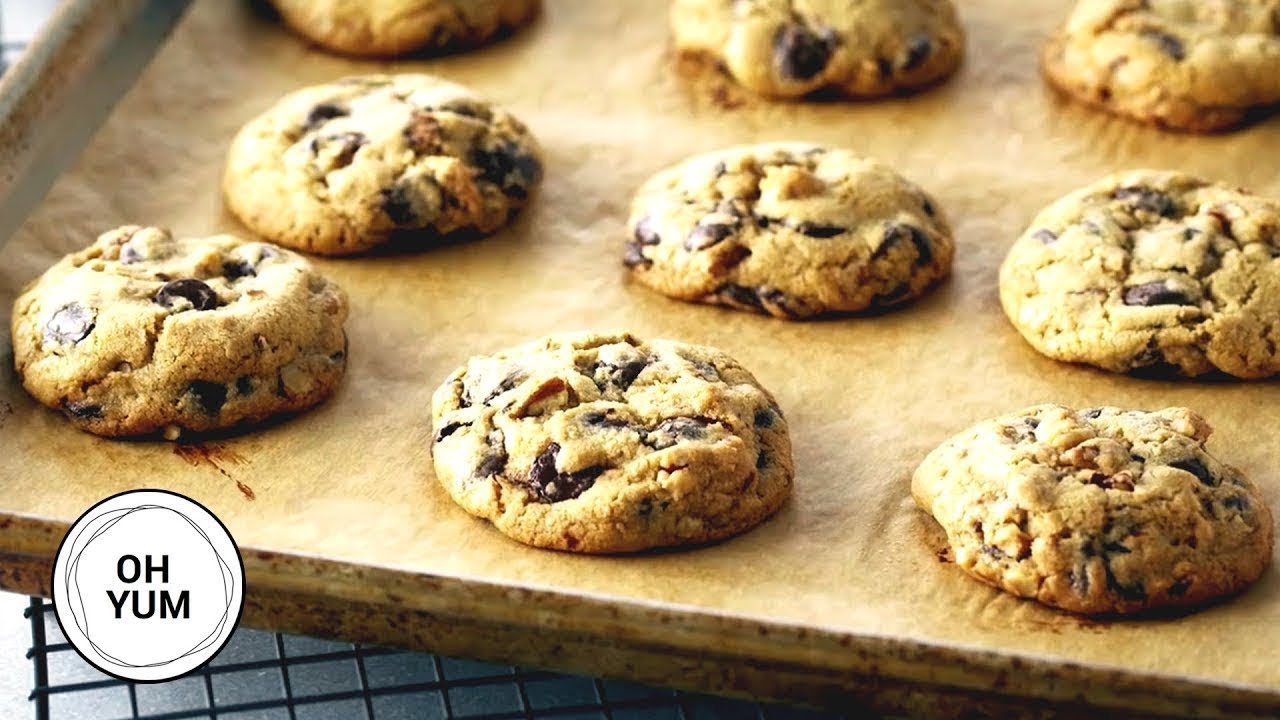
Baking the Cookies to Perfection
Baking is where the magic finally happens, and every minute counts. The ideal cookie is golden around the edges, slightly soft in the center, and fragrant with the nutty aroma of brown butter.
- Preheat your oven to 350°F (175°C) before you take the dough out of the fridge. This ensures the oven is ready the moment your cookies go in.
- Line your baking sheets with parchment paper or a silicone mat to prevent sticking and ensure even browning.
- Place the shaped dough balls on the baking sheet, keeping them spaced evenly apart.
- Bake for 9–12 minutes, depending on size. Keep an eye on them—edges should be set and golden, but the centers can look slightly underdone. They’ll continue to bake on the hot pan after removal.
- Let them rest on the baking sheet for 2–3 minutes, then transfer to a wire rack to cool completely.
Baker’s tip: For that Instagram-worthy look, press a few extra chocolate chips into the tops of the cookies right after they come out of the oven. The residual heat will melt them just enough for a glossy finish.
Cooling and Storing Your Cookies
Cooling is just as important as baking. If you move cookies too early, they may break apart; too late, and they might overcook on the hot baking sheet.
- On the baking sheet: Let cookies cool for about 2–3 minutes to set their structure.
- On a wire rack: Transfer them to cool completely. This prevents the bottoms from becoming soggy from trapped steam.
Storing cookies:
- Room temperature: Store in an airtight container for up to 5 days. Add a slice of bread to the container to keep cookies soft—the bread absorbs excess moisture and prevents them from drying out.
- Freezer: Once cooled, place cookies in a freezer bag and freeze for up to 3 months. Thaw at room temperature or warm briefly in the oven for that fresh-baked feel.
If you’ve baked a big batch, storing part of them in the freezer is a great way to enjoy fresh cookies over time without baking every day.
Flavor Variations and Add-Ins
Once you’ve mastered the classic recipe, it’s time to have some fun. Brown butter cookies are an ideal canvas for experimenting with flavors and textures.
Some delicious variations:
- Salted Caramel Brown Butter Cookies: Add small caramel bits to the dough, and sprinkle the baked cookies with flaky sea salt.
- Brown Butter Pecan Cookies: Fold in toasted pecans for a nutty crunch.
- Espresso Chocolate Chip: Add 1–2 teaspoons of instant espresso powder to the dough for a coffee-flavored boost.
- Holiday Spiced Cookies: Mix in cinnamon, nutmeg, and ginger for a festive twist.
- White Chocolate and Cranberry: The tartness of cranberries balances the sweetness of white chocolate beautifully.
Tips for success with add-ins:
- Limit total add-ins to about 1 ½ cups to maintain dough balance.
- For stronger flavors (like espresso or spices), start small—you can always add more next time.
- Pre-toast nuts to bring out their oils and enhance their taste.
Serving Suggestions and Pairings
Fresh from the oven, brown butter cookies are irresistible on their own, but pairing them with the right drink or dessert can elevate the experience.
- Classic milk pairing: Nothing beats dunking a warm cookie into cold milk.
- Coffee or espresso: The nutty notes of brown butter complement coffee perfectly, making this a great afternoon treat.
- Hot chocolate: On a chilly day, serve cookies alongside a rich mug of hot cocoa for a cozy indulgence.
- Ice cream sandwich: Use two cookies to sandwich a scoop of vanilla bean or salted caramel ice cream.
- Gift packaging: Place cooled cookies in a decorative tin or box lined with parchment paper. Perfect for holidays, birthdays, or “just because” surprises.
Presentation matters—especially if you’re baking for guests or giving cookies as gifts. A simple ribbon or handwritten tag can turn your homemade cookies into a thoughtful, personal present.
Gluten-Free and Vegan Alternatives
Just because someone is gluten-free or vegan doesn’t mean they should miss out on the joy of brown butter cookies. With a few smart substitutions, you can create a batch that’s every bit as delicious as the original.
For gluten-free cookies:
- Replace all-purpose flour with a high-quality gluten-free baking blend (one that contains xanthan gum for structure). Bob’s Red Mill 1-to-1 Baking Flour and King Arthur Measure for Measure are popular choices.
- Keep in mind that gluten-free doughs can sometimes be more crumbly, so chilling the dough is especially important.
For vegan cookies:
- Swap butter for vegan butter—but note that vegan butter doesn’t brown quite like dairy butter. To mimic the flavor, melt the vegan butter with a tablespoon of nutty tahini or toasted coconut oil for depth.
- Replace eggs with flax eggs (1 tbsp ground flaxseed + 3 tbsp water = 1 egg) or aquafaba (the liquid from canned chickpeas).
- Use vegan-friendly chocolate chips—many brands now make dairy-free options.
Extra tip: Even when adapting recipes, follow the same chilling and baking principles. Brown butter flavor may need a little help from roasted nuts, maple syrup, or dark brown sugar if you’re going vegan.
Troubleshooting Common Issues
Even experienced bakers hit snags now and then. Here’s a quick guide to solving the most common brown butter cookie dilemmas.
Cookies spread too much:
- Dough was too warm—chill longer before baking.
- Too little flour—measure accurately with the spoon-and-level method.
Cookies are too puffy:
- You may have added too much flour. Weigh it for precision.
- Reduce baking soda slightly for a flatter cookie.
Butter flavor isn’t strong enough:
- Ensure you’re browning the butter long enough to get golden specks.
- Try adding a pinch more salt to bring out the nutty notes.
Cookies too dry:
- Overbaking is the culprit—remember they continue baking on the tray after removal.
- Use more brown sugar than white sugar to retain moisture.
Uneven baking:
- Rotate trays halfway through baking.
- Make sure your oven is properly preheated and calibrated.
Nutritional Breakdown of Brown Butter Cookies
While these cookies are definitely a treat, it’s still nice to know what’s in each one—especially if you’re mindful of your intake.
| Nutrient (per cookie) | Approximate Amount |
|---|---|
| Calories | 210 |
| Total Fat | 11g |
| Saturated Fat | 7g |
| Cholesterol | 30mg |
| Sodium | 110mg |
| Total Carbs | 28g |
| Dietary Fiber | 1g |
| Sugars | 17g |
| Protein | 2g |
Note: Values are approximate and can vary depending on portion size and add-ins. If you substitute ingredients for dietary needs, the nutritional profile will change accordingly.
FAQs about Brown Butter Cookie Recipe
1. Can I make the dough ahead of time?
Yes! You can store the dough in the fridge for up to 48 hours or freeze it for up to 3 months. Just add 1–2 extra minutes to the baking time if baking from frozen.
2. Can I brown salted butter instead of unsalted?
You can, but it’s harder to control the saltiness of the final cookie. Unsalted butter gives you better flavor control.
3. How can I get perfectly round cookies?
While the cookies are still hot, use a round cookie cutter slightly larger than the cookie and swirl it around gently to shape the edges.
4. Why do my cookies taste bitter?
Your butter may have burned instead of browning. Keep the heat moderate and watch carefully.
5. Can I make these cookies without a mixer?
Yes, though it requires more elbow grease. A sturdy whisk and spatula will work—just make sure to mix thoroughly.
Conclusion
Brown butter cookies aren’t just a dessert—they’re a baking experience. From the moment you start browning butter and catch that irresistible nutty aroma, to the first bite of a warm, chewy cookie, this recipe delivers pure comfort and satisfaction.
The beauty of this recipe lies in its versatility. You can keep it classic, or get creative with add-ins and variations. Whether you’re baking for a holiday, a party, or simply because you deserve a treat, these cookies will never disappoint.
Once you’ve made them, you might find it hard to go back to regular cookies. And honestly? That’s not a bad problem to have.
So, grab your ingredients, warm up that oven, and let the magic of brown butter turn your next baking session into something truly unforgettable.