Bread Rolls Recipe: Bread rolls have been a part of family meals for generations, and for good reason. They are soft, fluffy, and versatile enough to pair with almost any dish—whether it’s a bowl of creamy soup, a juicy burger, or a festive dinner spread. Their simple flavor and texture make them universally appealing, and the process of making them is both rewarding and surprisingly therapeutic. Imagine the aroma of freshly baked bread wafting through your kitchen—it’s enough to bring everyone to the table in anticipation. Bread rolls also have a nostalgic quality, reminding many of Sunday dinners or holiday gatherings where a warm basket of rolls was a staple. The beauty of bread rolls is that they can be made plain for versatility or flavored with herbs, cheese, or even cinnamon sugar for something special. They’re a baking project that feels both indulgent and homey, perfect for both beginners and seasoned bakers.
The Joy of Baking at Home
Baking bread rolls at home offers a sense of accomplishment that’s hard to match. Unlike store-bought rolls, which may contain preservatives or lack the fresh-baked aroma, homemade rolls are fresher, healthier, and often tastier. You have complete control over the ingredients—choosing organic flour, adjusting the sweetness, or experimenting with healthier alternatives like whole wheat or oat flour. The process is also an exercise in mindfulness: measuring ingredients, kneading the dough, watching it rise, and then savoring the transformation in the oven. It’s almost like a slow, delicious science experiment. Plus, baking at home allows you to create rolls that perfectly suit your needs, whether that’s a soft and fluffy dinner roll, a crusty artisan-style bun, or a sweet pastry-like roll. Once you’ve made them from scratch, you’ll likely find yourself making them again and again.
Ingredients Needed for Perfect Bread Rolls
Essential Ingredients for Bread Dough
Making bread rolls starts with just a few basic ingredients:
- Flour – All-purpose or bread flour is ideal for soft rolls. Bread flour contains more protein, which helps develop gluten for a chewier texture.
- Yeast – Either active dry yeast or instant yeast works, though instant yeast requires no proofing.
- Sugar – A small amount feeds the yeast and adds a subtle sweetness.
- Salt – Enhances flavor and balances the sweetness.
- Milk or Water – Milk adds richness and tenderness; water keeps it lighter.
- Butter or Oil – Fat gives the rolls a soft crumb and extra flavor.
- Egg (optional) – Adds richness and helps with browning.
These basic elements are the foundation of bread-making. The magic happens when yeast reacts with the sugar and flour, creating carbon dioxide that makes the dough rise. The balance of ingredients is key—too much flour can make rolls dense, while too little can make them collapse.
Optional Add-Ons for Flavor Variations
Once you’ve mastered the basic dough, you can customize your bread rolls:
- Herbs & Spices – Rosemary, thyme, oregano, or garlic powder for savory rolls.
- Cheese – Cheddar, parmesan, or mozzarella can be mixed into the dough or sprinkled on top.
- Seeds – Sesame, poppy, or sunflower seeds for added crunch and nutrition.
- Sweet Additions – Cinnamon, raisins, or chocolate chips for dessert-style rolls.
- Toppings – Egg wash for a shiny crust, butter glaze for extra softness, or a sprinkle of coarse salt for flavor.
By playing with these additions, you can create a variety of rolls from the same basic recipe, making bread-baking a never-ending adventure.
Tools and Equipment for Making Bread Rolls
Kitchen Essentials
To make perfect bread rolls, you don’t need a professional bakery setup—just a few reliable tools:
- Mixing Bowls – One large for dough mixing, smaller ones for ingredients.
- Measuring Cups & Spoons – Accuracy matters in baking.
- Wooden Spoon or Dough Hook – For mixing; a stand mixer can make things easier.
- Bench Scraper – Useful for shaping and dividing dough.
- Clean Kitchen Towel or Plastic Wrap – To cover dough during proofing.
- Baking Sheet or Pan – Rolls can be baked free-form on a tray or in a dish for pull-apart style.
- Oven Thermometer – Ensures your baking temperature is spot on.
Optional Baking Tools for Better Results
If you want to elevate your bread game, consider these extras:
- Stand Mixer – Saves time and effort with kneading.
- Digital Kitchen Scale – For precision in measurements.
- Silicone Baking Mat – Prevents sticking and helps with even baking.
- Cooling Rack – Allows steam to escape so rolls don’t get soggy.
- Pastry Brush – For applying egg wash, butter, or glazes.
While these aren’t essential, they can make your baking process smoother and your bread rolls more consistent in quality.
Step-by-Step Bread Roll Preparation
Step 1 – Preparing the Dough
Start by warming your milk or water to around 100–110°F (37–43°C)—warm enough to activate the yeast but not so hot it kills it. If using active dry yeast, dissolve it in the warm liquid with a teaspoon of sugar and let it sit for 5–10 minutes until foamy. For instant yeast, you can mix it directly into the flour. Combine your flour, sugar, and salt in a large bowl. Add the yeast mixture (or dry yeast), then gradually stir in the warm milk or water. Add softened butter or oil and, if using, an egg. Mix until a shaggy dough forms. At this stage, it might look rough and sticky, but that’s normal—the magic happens during kneading. Make sure all the flour is incorporated so the yeast has access to all the dough, ensuring an even rise.
Step 2 – Kneading the Dough
Turn the dough out onto a lightly floured surface and begin kneading by pushing the dough away from you with the heel of your hand, then folding it back over and turning it. Repeat this motion for about 8–10 minutes, or until the dough is smooth, elastic, and slightly tacky but not sticky. Kneading develops the gluten structure, which gives bread rolls their soft yet chewy texture. If you’re using a stand mixer with a dough hook, knead on medium speed for 6–8 minutes. Be careful not to over-flour the dough during kneading—adding too much flour can lead to dense rolls. The windowpane test is a great way to check readiness: stretch a small piece of dough; if it stretches thin enough to let light pass through without tearing, it’s ready.
Step 3 – First Rise (Proofing)
Place the kneaded dough in a lightly oiled bowl, turning it once to coat all sides with oil to prevent drying. Cover the bowl with a kitchen towel or plastic wrap and place it in a warm, draft-free spot. Let the dough rise until it doubles in size—usually 1 to 2 hours depending on room temperature and yeast activity. This proofing stage allows the yeast to ferment, creating air bubbles that give bread its soft texture. Avoid over-proofing, as this can cause the dough to collapse during baking. If your kitchen is cold, you can place the bowl in an oven with just the light on, or near a warm appliance.
Step 4 – Shaping the Rolls
Once the dough has doubled in size, gently punch it down to release excess gas. Transfer it to a lightly floured surface, then use a bench scraper or knife to divide it into equal portions—typically 10 to 12 pieces for standard dinner rolls. For uniform rolls, you can weigh each piece on a kitchen scale. To shape, take each portion and pull the edges into the center, then pinch them together. Flip the dough seam-side down and roll it gently against the surface with your palm to create a smooth, round ball. This technique ensures an even rise and a pretty, rounded shape. Place the shaped rolls on a greased baking tray or in a baking dish, spacing them slightly apart for individual rolls, or close together for pull-apart rolls. The shaping step may seem small, but it makes a big difference in presentation and texture.
Step 5 – Second Rise
Cover the shaped rolls with a clean kitchen towel and let them rest in a warm spot for their second rise, usually 30–45 minutes. During this time, the dough will puff up again, giving the rolls a lighter texture when baked. Don’t rush this stage—if the rolls haven’t risen enough before going into the oven, they may turn out dense. You’ll know they’re ready when they’ve nearly doubled in size and feel soft to the touch. While they rise, preheat your oven to 375°F (190°C) so it’s ready when proofing is done.
Step 6 – Baking to Perfection
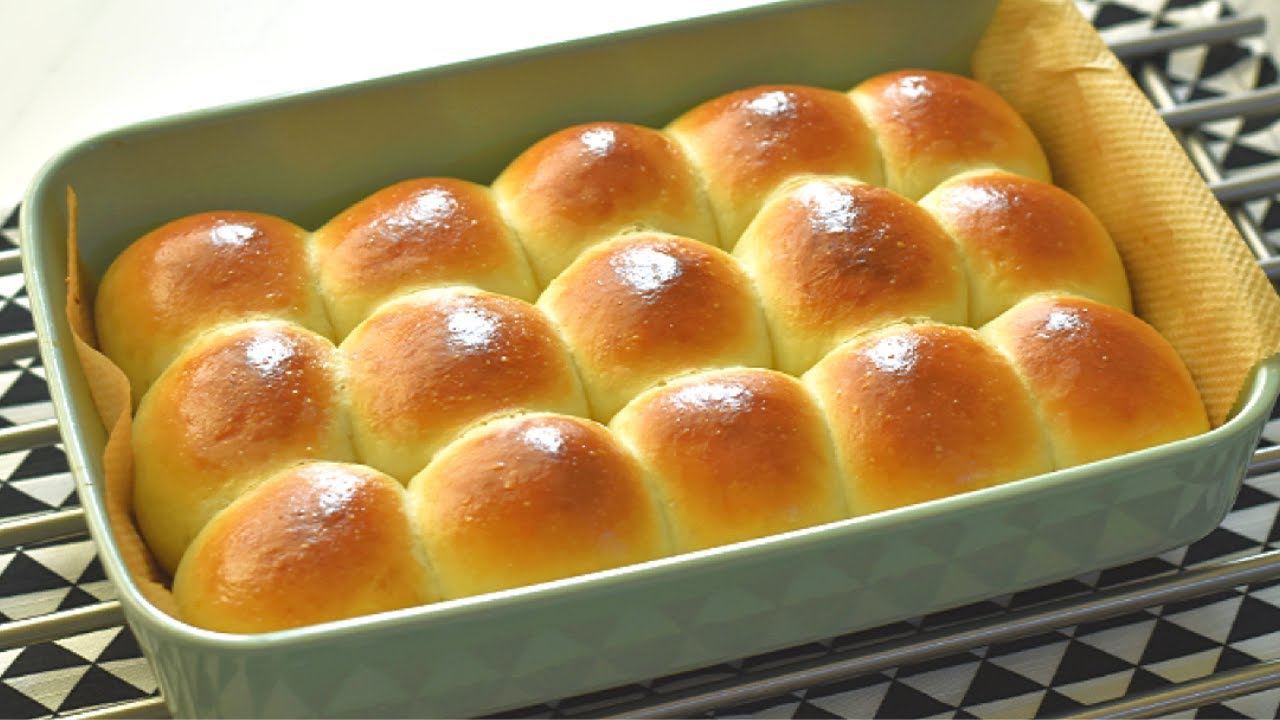
Before placing the rolls in the oven, brush them lightly with egg wash (a beaten egg with a splash of milk) for a glossy, golden-brown crust, or melted butter for a softer, richer finish. Bake for 15–20 minutes, depending on their size, until the tops are beautifully golden and the bottoms sound hollow when tapped. Keep an eye on them toward the end of baking—overbaking can make them dry. Once baked, transfer the rolls to a wire cooling rack to prevent sogginess from steam. For extra flavor, brush the tops with melted butter immediately after removing them from the oven. The result? Soft, fluffy, and utterly irresistible rolls that smell as amazing as they taste.
Tips for Fluffy and Soft Bread Rolls
Dough Handling Tips
- Don’t over-flour: Too much flour during kneading makes rolls dense.
- Keep it warm: Yeast thrives in warmth; cold dough rises slowly.
- Avoid over-proofing: This causes rolls to deflate after baking.
- Handle gently after proofing: Rough handling can knock out too much air.
When making bread rolls, small adjustments in technique can make a huge difference in texture. For example, if your kitchen is cool, proofing may take longer, but the flavor can actually improve with slower fermentation. Likewise, using milk instead of water will make your rolls softer and richer. If you want them extra fluffy, try adding a little potato starch or mashed potato to the dough—this trick is used by many professional bakers for an ultra-soft crumb.
Baking Temperature and Time Hacks
Baking temperature directly impacts crust texture. A hotter oven (around 400°F or 200°C) will give you a crisper crust, while a slightly lower temperature (350–375°F or 175–190°C) keeps the crust soft. Another tip is to place a small pan of hot water in the oven during baking; the steam will help create a tender crust and prevent dryness. If you like rolls with a shiny finish, apply the egg wash just before baking. For a rustic look, dust the tops with flour before baking instead.
Flavor Variations and Add-Ins
Sweet Bread Rolls
For a dessert-like twist, you can transform the basic dough into sweet rolls by adding:
- Cinnamon and sugar – Sprinkle inside rolled-out dough before shaping.
- Raisins or dried fruit – Mix into the dough for bursts of sweetness.
- Glaze – Drizzle with icing after baking for a bakery-style treat.
Sweet bread rolls are perfect for breakfast, brunch, or as an afternoon snack with tea or coffee. They’re also great for holiday mornings—think cinnamon swirl rolls for Christmas or Easter.
Savory Bread Rolls
If you want rolls that pair beautifully with dinner, try:
- Garlic butter – Spread inside before shaping or brush on top after baking.
- Herbs – Mix rosemary, oregano, or parsley into the dough.
- Cheese – Fold in shredded cheddar or parmesan for cheesy bread rolls.
Savory variations work wonderfully alongside soups, stews, or roasted meats. They can also be sliced and used for sandwiches or sliders.
Storing and Reheating Bread Rolls
Short-Term Storage
Freshly baked bread rolls are best enjoyed the same day, but if you have leftovers, proper storage keeps them soft for days. Place completely cooled rolls in an airtight container or resealable plastic bag. Store them at room temperature for up to 3 days. To maintain moisture, you can wrap them individually in cling film before placing them in the container. Avoid refrigerating bread, as it speeds up staling by drying out the starches in the dough. If your kitchen is warm or humid, storing rolls in a cool, dark cupboard is ideal.
Long-Term Freezing
Bread rolls freeze beautifully, making them perfect for meal prep. Once they’re fully cooled, wrap each roll tightly in plastic wrap or foil, then place them in a freezer-safe bag. They can be frozen for up to 3 months without losing quality. To reheat, thaw them at room temperature, then warm them in a 300°F (150°C) oven for 8–10 minutes. For a “freshly baked” effect, brush with melted butter before reheating. If you want to freeze unbaked rolls, shape them, freeze them on a tray until solid, then transfer to a freezer bag. When ready to bake, thaw overnight in the fridge, proof, and bake as usual.
Serving Suggestions for Bread Rolls
Perfect Breakfast Ideas
Bread rolls are incredibly versatile for breakfast. Slice them in half and spread with butter, jam, or honey for a simple start to the day. They’re also excellent for breakfast sandwiches—fill them with scrambled eggs, bacon, cheese, or avocado for a hearty morning meal. For a sweet treat, transform them into French toast rolls by dipping in egg and frying until golden, then dusting with cinnamon sugar. If you prefer a lighter option, serve with Greek yogurt and fresh fruit on the side.
Dinner and Party Pairings
At lunch or dinner, bread rolls shine as a side dish. Serve warm rolls with soups like tomato basil or creamy mushroom, or alongside stews and casseroles for soaking up the flavorful broth. They make excellent burger buns or slider rolls for parties, and pull-apart rolls can be the centerpiece of a dinner table. For a Mediterranean twist, pair them with olive oil, balsamic vinegar, and a sprinkle of sea salt as a dipping bread. Their mild flavor means they complement both rich, hearty meals and light, fresh dishes.
Common Mistakes and How to Avoid Them
Dense Rolls
Dense bread rolls are often the result of insufficient kneading, too much flour, or under-proofing. Always knead the dough until smooth and elastic, and avoid adding excessive flour—stick to lightly dusting the work surface. If your rolls aren’t rising enough, check that your yeast is fresh and active, and ensure the proofing environment is warm enough for yeast activity.
Overbaked or Undercooked Rolls
Overbaking leads to dry, crumbly rolls, while underbaking leaves them doughy inside. The best way to avoid either is to monitor baking time closely and check doneness early. Rolls should be golden brown on top, and the bottoms should sound hollow when tapped. An instant-read thermometer can be your best friend—bread is done when the internal temperature reaches about 190–200°F (88–93°C).
Healthier Alternatives
Whole Wheat Bread Rolls
Whole wheat rolls are denser than white flour rolls but offer more fiber and nutrients. To keep them soft, replace only half the white flour with whole wheat flour and add a little extra liquid, as whole grains absorb more moisture. You can also add honey or molasses for a touch of sweetness and improved texture.
Gluten-Free Bread Rolls
Gluten-free bread baking requires a different approach since gluten is what gives bread its structure. Use a gluten-free flour blend with xanthan gum to mimic gluten’s elasticity. Adding an extra egg or some psyllium husk can also improve texture. Gluten-free rolls tend to be more delicate, so handle them gently after shaping.
FAQs about Bread Rolls Recipe
Can I Make Bread Rolls Without Yeast?
Yes—use baking powder or baking soda as a leavening agent for quick bread rolls. However, they will have a different texture and flavor compared to yeast rolls, being more biscuit-like.
How to Make Rolls Soft the Next Day?
Store them in an airtight container, then reheat in the oven with a small pan of water to reintroduce steam and soften the crust.
Can I Use Milk and Water Together?
Absolutely—combining them can balance richness (from the milk) with lightness (from the water).
Can I Make the Dough in Advance?
Yes—you can refrigerate shaped rolls overnight. In the morning, allow them to come to room temperature and proof before baking.
What’s the Best Way to Get a Golden Crust?
Brush with egg wash before baking or melted butter after baking for a rich, golden finish.
Conclusion
Baking homemade bread rolls is a rewarding experience that combines the art and science of baking into one delicious result. With just a few simple ingredients, a little patience, and some care in handling the dough, you can create rolls that are far superior to anything you can buy at the store. Whether you enjoy them plain, sweet, savory, or as part of a meal, the process of making them from scratch fills your home with an irresistible aroma and gives you a product you can be proud of. Once you master the basics, you can customize and experiment endlessly, ensuring you’ll never run out of ways to enjoy this timeless bread.


