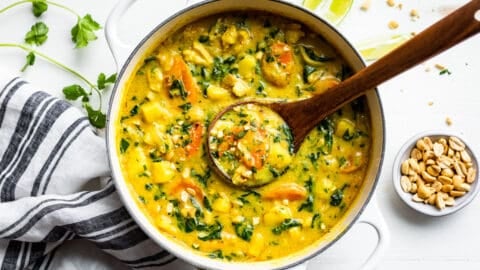
Thai Yellow Curry Recipe: If you’re craving something rich, creamy, and deeply aromatic, Thai Yellow Curry might just be the dish for you. It’s a vibrant and comforting dish that blends spices, coconut milk, and your choice of meat or vegetables into a meal that hits all the right notes. Whether you’re a newbie in the kitchen or a seasoned home cook, this guide will walk you through every step. Let’s dive into the golden bowl of goodness.
A Brief Overview of Thai Yellow Curry
Thai Yellow Curry, or “Kaeng Kari” in Thai, is one of the milder curries in Thai cuisine. Don’t let the mellow heat fool you, though—this dish is bursting with layers of flavor. The base usually features turmeric (which gives it its signature golden hue), cumin, coriander, lemongrass, garlic, and ginger. All these ingredients combine beautifully with creamy coconut milk to create a curry that’s not just flavorful but also comforting and hearty.
Compared to its fiery red and green counterparts, yellow curry leans more on the savory and slightly sweet side. It’s the ideal starting point for those new to Thai food. The dish is often loaded with hearty vegetables and your choice of chicken, tofu, or shrimp, making it incredibly versatile for different palates and dietary needs.
Origins and Cultural Significance
Thai Yellow Curry is influenced heavily by Indian spices brought to Thailand through centuries of trade and migration. Over time, the dish evolved with the addition of local Thai herbs and techniques. Today, it holds a cherished place in Thai households and is a popular dish in restaurants around the globe.
It’s not just food—it’s a reflection of Thailand’s rich history and its open-armed approach to blending flavors and traditions. Every bite tells a story of cultural fusion and culinary creativity.
Ingredients You’ll Need
Essential Spices and Herbs
Before we get cooking, let’s talk ingredients. A good Thai Yellow Curry starts with a vibrant, aromatic paste. Whether you’re making it from scratch or using store-bought, here are the core spices and herbs:
- Turmeric – This is the MVP for color and earthy flavor.
- Coriander Seeds – Adds a warm, citrusy depth.
- Cumin Seeds – Brings in that slightly smoky, nutty undertone.
- Lemongrass – Adds a bright, citrusy pop.
- Garlic & Shallots – Essential aromatics for the base.
- Galangal or Ginger – Lends a peppery, zesty kick.
- Dried Red Chilies – Optional, but they bring a gentle warmth.
These herbs and spices are what give yellow curry its bold, yet approachable flavor profile. You’ll either grind these into a paste yourself or check for these ingredients on a quality store-bought curry paste label.
Vegetables and Proteins
One of the best things about Thai Yellow Curry is how flexible it is. Here’s a go-to list of vegetables and proteins you can mix and match based on your taste and dietary preference:
- Proteins: Chicken (thighs or breasts), tofu, shrimp, or chickpeas.
- Vegetables: Potatoes, carrots, bell peppers, green beans, and onions.
Potatoes and carrots are the classics—they soak up the curry sauce beautifully and provide that hearty, stew-like texture. Chicken is often the go-to protein in traditional recipes, but tofu is a great substitute for a plant-based version.
Optional Add-ins for Extra Flavor
Want to add a twist? These optional ingredients can take your curry to the next level:
- Kaffir lime leaves – Adds a fragrant citrus aroma.
- Fish sauce or soy sauce – For added umami.
- Palm sugar or brown sugar – Balances the spice with a touch of sweetness.
- Thai basil or cilantro – Freshens up the final dish.
- Lime juice – A splash at the end brightens all the flavors.
Use these sparingly and taste as you go. The key to a great curry is balance—spice, sweetness, saltiness, and tang all playing in harmony.
Preparing the Yellow Curry Paste
Homemade vs. Store-bought Curry Paste
Let’s be real: not everyone has the time or energy to grind their own curry paste, especially on a busy weeknight. That’s where store-bought pastes come in handy. Brands like Mae Ploy or Thai Kitchen offer ready-made yellow curry paste that’s pretty darn good. These are perfect for when you want something quick, easy, and still full of flavor.
But if you’re feeling adventurous and want full control over your ingredients (plus that unbeatable fresh flavor), homemade is the way to go. Making your own curry paste isn’t as complicated as it sounds—it just takes a little prep and the right tools. A mortar and pestle is traditional, but a food processor will get the job done in a flash.
How to Make Thai Yellow Curry Paste from Scratch
Here’s a simple recipe to whip up your own authentic Thai yellow curry paste:
Ingredients:
- 1 tbsp coriander seeds
- 1 tbsp cumin seeds
- 1 tsp turmeric powder
- 1 tsp curry powder
- 3 dried red chilies (soaked in warm water for 10 minutes)
- 1 stalk lemongrass (chopped)
- 3 cloves garlic
- 2 shallots (chopped)
- 1 thumb-sized piece of galangal or ginger (sliced)
- 1 tsp shrimp paste (optional for authenticity)
- 1 tbsp oil (to help blend)
Instructions:
- Toast coriander and cumin seeds in a dry pan over medium heat for 1–2 minutes until fragrant.
- Grind the toasted seeds with a mortar and pestle or spice grinder.
- Add remaining ingredients and grind or blend until a smooth paste forms. You can add a bit of oil or water to help the process along.
Voila! Your homemade curry paste is ready to go and can be stored in the fridge for up to a week or frozen for longer shelf life.
Cooking the Curry – Step-by-Step Instructions
Step 1: Sauté the Curry Paste
Start by heating 1–2 tablespoons of oil in a large saucepan or wok over medium heat. Add about 2–3 tablespoons of your yellow curry paste (store-bought or homemade) to the pan. Sauté the paste for 2–3 minutes until it becomes fragrant—this step is key to unlocking all those bold, layered flavors.
The heat helps the oils in the spices bloom, releasing aromas that are both earthy and inviting. You’ll know you’re on the right track when your kitchen starts to smell like your favorite Thai restaurant.
Step 2: Add Coconut Milk and Simmer
Once your curry paste is nice and toasty, pour in one can (about 14 oz) of full-fat coconut milk. Stir it well to incorporate the paste into the milk. Let the mixture simmer gently for 5–7 minutes. You’ll start to see the curry thicken and take on a rich, golden color.
This is where the magic happens. The coconut milk balances out the spices, adding a creamy richness that makes the curry irresistibly smooth. Keep the heat on medium-low—don’t let it boil too hard, or you risk curdling the milk.
Step 3: Add Proteins and Vegetables
Now it’s time to bulk up the curry with your choice of proteins and veggies. Add your diced chicken, tofu, or shrimp to the pot and let it cook until just done (chicken usually takes about 8–10 minutes).
After your protein is mostly cooked, toss in your chopped vegetables—potatoes, carrots, and bell peppers are a classic combo. Cover the pot and let everything simmer together for another 10–15 minutes until the veggies are fork-tender.
Pro tip: Cut your vegetables into evenly sized pieces so they cook at the same rate. No one likes biting into an undercooked potato!
Step 4: Seasoning and Simmering
At this point, your curry should be looking and smelling absolutely divine. But we’re not done yet—it’s time to balance the flavors. Taste your curry and adjust with the following:
- Fish sauce or soy sauce for saltiness
- Brown sugar or palm sugar for sweetness
- Lime juice for acidity
Add these ingredients little by little, tasting as you go. The goal is a balanced harmony where no one flavor overwhelms the others. Let the curry simmer uncovered for 5 more minutes to meld the flavors together.
Step 5: Final Touches Before Serving
Almost there! Before serving, give the curry a final stir and adjust seasoning if needed. Add a handful of fresh Thai basil or cilantro for a pop of color and herbal freshness.
If your curry is too thick, thin it with a bit of water or chicken stock. If it’s too watery, let it simmer longer to reduce.
Turn off the heat and let the curry rest for 5 minutes—this lets the flavors settle and ensures a perfect texture when serving.
Serving Suggestions
Best Side Dishes for Thai Yellow Curry
So you’ve cooked up a beautiful pot of Thai Yellow Curry—now what? Let’s talk about the best ways to serve it. The obvious go-to is steamed jasmine rice. The fluffy texture and slightly sweet aroma of jasmine rice pair beautifully with the creamy, spicy curry sauce. It acts like a sponge, soaking up every delicious drop.
But you don’t have to stop there. Here are some other fantastic side dishes to round out your curry experience:
- Brown rice or wild rice – For a healthier or nuttier base.
- Sticky rice – More traditional in northern Thai cuisine; perfect for scooping curry.
- Roti or naan – A great option for dipping and wiping your bowl clean.
- Rice noodles – Offers a twist and turns the curry into a hearty noodle soup.
You can also serve your curry with a side of Thai cucumber salad (called “Ajad”), which brings a cool, tangy crunch that balances the rich curry. And if you’re feeling extra indulgent, a fried egg on top of your curry rice can take it to the next level.
Garnishes and Presentation Tips
You eat with your eyes first, right? A few simple garnishes can transform your curry from just “tasty” to restaurant-worthy. Try these:
- Chopped cilantro or Thai basil – Adds freshness and color.
- Sliced red chilies – For a spicy kick and visual appeal.
- Lime wedges – A squeeze just before eating enhances the flavor beautifully.
- Toasted sesame seeds or crushed peanuts – Adds crunch and depth.
For presentation, serve your curry in a shallow bowl or plate with high sides. Place the rice on one side and ladle the curry next to it, allowing the sauce to slightly pool over the rice. This kind of plating feels homey and makes it easier to scoop up a perfect bite.
And don’t forget the finishing touch: a drizzle of coconut milk or a few drops of chili oil can really elevate the dish’s look and taste.
FAQs about Thai Yellow Curry Recipe
1. Can I make Thai yellow curry vegan?
Absolutely! Just skip the fish sauce and shrimp paste, and opt for soy sauce and a vegan-friendly curry paste. Use tofu or chickpeas for protein, and fill it with your favorite veggies.
2. How do I store and reheat leftovers?
Store your curry in an airtight container in the fridge for up to 4 days. Reheat it on the stove over medium heat, adding a splash of water or coconut milk to loosen it if needed.
3. Is yellow curry spicy?
Thai Yellow Curry is typically the mildest of Thai curries. However, the spice level can vary based on the paste used and the amount of chili added. You can adjust the heat to your liking.
4. Can I freeze yellow curry?
Yes! It freezes well for up to 2 months. Let it cool completely, store in freezer-safe containers, and thaw overnight in the fridge before reheating.
5. What’s the difference between Thai yellow curry and Indian curry?
While both use turmeric and other warm spices, Thai yellow curry includes Thai herbs like lemongrass and galangal and is typically cooked with coconut milk. Indian curry often uses yogurt or cream and has a different spice profile.
Conclusion
Thai Yellow Curry is more than just a meal—it’s an experience. From its golden hue and complex flavor to the comforting warmth it brings, it’s a dish that deserves a spot in your regular recipe rotation. Whether you’re making it from scratch or using a shortcut with store-bought paste, the result is always satisfying and full of flavor.
This dish shows off the beauty of Thai cuisine: bold yet balanced, spicy yet soothing, simple yet deeply layered. It’s perfect for a weeknight dinner, meal prep for the week, or impressing friends over the weekend.
Try experimenting with different vegetables, proteins, or spice levels to make the dish uniquely yours. And remember, cooking should be fun—so don’t be afraid to play around a little. Enjoy your curry adventure!