Tamagoyaki Recipe: Tamagoyaki is one of those dishes that immediately brings comfort and joy to anyone who has tasted it. A staple in Japanese cuisine, this sweet, fluffy, and slightly savory rolled omelet has charmed breakfast tables, bento boxes, and sushi platters for centuries. The name “Tamagoyaki” literally translates to “grilled egg,” and it’s made by layering thin sheets of seasoned egg mixture into a tidy roll. But it’s much more than just eggs—it’s a delicate balance of flavor, texture, and technique.
This dish may look simple at first glance, but it showcases the artistry and attention to detail that defines Japanese cooking. When done right, Tamagoyaki has a custardy interior, a slightly caramelized exterior, and an irresistible taste that blends umami with a hint of sweetness. It’s not just a dish; it’s a tradition passed down through generations.
Whether you’re a seasoned chef or someone trying their hand at Japanese cuisine for the first time, Tamagoyaki offers a fun and rewarding cooking experience. Plus, once you get the hang of it, it becomes a versatile favorite that can be enjoyed on its own, used in sushi, or even served over rice.
Why Tamagoyaki is Loved Worldwide
So, what makes Tamagoyaki so universally adored? First off, its flavor is incredibly approachable. The combination of eggs, soy sauce, mirin, and sugar creates a taste profile that’s familiar yet intriguing, appealing to both kids and adults alike. It’s soft enough for toddlers, tasty enough for picky eaters, and elegant enough to serve at formal gatherings.
Tamagoyaki also wins points for versatility. It can be breakfast, lunch, or dinner. It’s equally at home in a kid’s lunchbox as it is in a high-end sushi restaurant. For vegetarians or those looking for high-protein meals, it offers a nutritious and satisfying option.
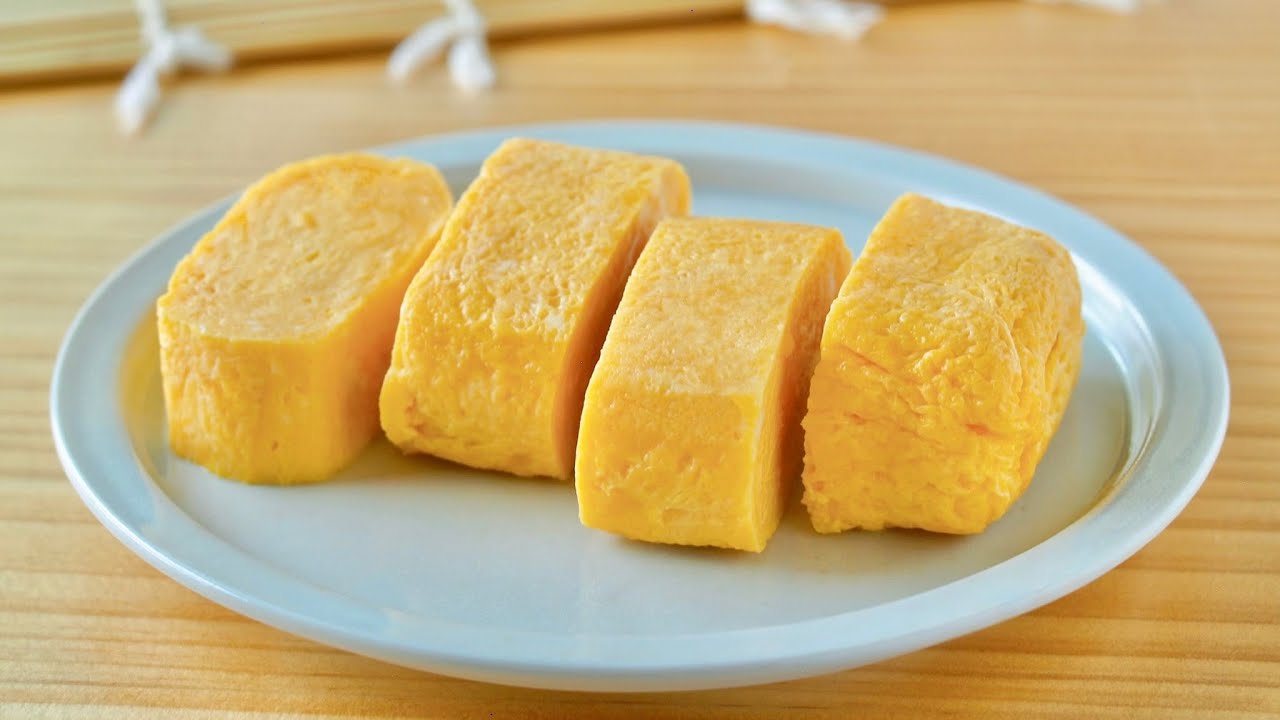
Another reason for its popularity is its visual appeal. When sliced, Tamagoyaki reveals beautiful golden layers that speak to the care taken during preparation. Social media has only boosted its fame, with food lovers across the world sharing their perfect Tamagoyaki rolls online.
But beyond all the trends and aesthetics, Tamagoyaki represents something more profound: the appreciation for simple, well-executed food. With just a few ingredients and a little patience, you can create something extraordinary.
Essential Ingredients for Tamagoyaki
Traditional Ingredients
The magic of Tamagoyaki lies in its simplicity, and its flavor foundation is built on just a handful of traditional Japanese ingredients. Here’s what you’ll need for the most authentic version:
- Eggs – The star of the show. Use fresh, high-quality eggs for the best results. Around 3 to 5 large eggs are typical for one roll.
- Soy Sauce – Adds that umami depth. Light soy sauce is preferred to keep the color bright.
- Mirin – A sweet rice wine that brings a subtle sweetness and aroma.
- Sugar – Yes, sugar! Tamagoyaki is slightly sweet, and regular white sugar is commonly used.
- Dashi (optional) – A Japanese soup stock made from kombu (kelp) and bonito flakes. Adding dashi gives Tamagoyaki a savory boost and soft texture.
Each ingredient serves a purpose—eggs form the structure, sugar and mirin offer sweetness, soy sauce adds umami, and dashi provides that signature soft, custard-like consistency. Together, they create a delicate and balanced flavor profile.
Optional Additions for Extra Flavor
Want to put your own spin on this traditional dish? There are plenty of ways to customize Tamagoyaki without straying too far from its roots:
- Green onions or chives – Add freshness and color.
- Nori (seaweed) – Layer thin sheets inside the egg roll for a salty contrast.
- Grated carrots or daikon – For texture and nutrition.
- Sesame seeds – Sprinkle some in for a nutty twist.
- Cheese or ham – A more Westernized take, but surprisingly delicious.
These variations keep things interesting and allow you to tailor Tamagoyaki to your taste. Whether you’re making it for kids, guests, or just yourself, feel free to experiment and find your perfect combo.
Tools You Need to Make Tamagoyaki
Special Pan – The Makiyakinabe
You can technically make Tamagoyaki in a round skillet, but if you want that authentic shape and texture, investing in a Makiyakinabe or Tamagoyaki pan is a game-changer.
This special rectangular pan is designed specifically for making rolled omelets. The straight sides help shape the egg into neat layers, and the flat bottom ensures even cooking. These pans come in various sizes and are typically non-stick, which makes flipping and rolling much easier.
You can find Makiyakinabe pans made from:
- Non-stick coated aluminum – Easy to use and clean.
- Copper – Conducts heat evenly and is favored by professionals.
- Iron – Traditional and long-lasting, but requires seasoning.
If you’re serious about mastering Tamagoyaki, this is one tool worth having in your kitchen arsenal.
Utensils That Make It Easier
Besides the pan, here are a few must-have tools to make your Tamagoyaki journey smoother:
- Chopsticks or cooking chopsticks (Saibashi) – Great for rolling and flipping.
- Spatula – A small silicone spatula can help lift and roll the egg gently.
- Mixing bowl – For beating the eggs and mixing in seasonings.
- Sieve or fine strainer – For straining the egg mixture, which results in a smoother texture.
- Paper towels – Use them to oil the pan evenly between layers.
With the right tools, even beginners can achieve a restaurant-quality Tamagoyaki at home.
Preparing the Tamagoyaki Mixture
Beating the Eggs Correctly
This may seem like a no-brainer, but how you beat your eggs makes a big difference. You want a uniform mixture without froth. Over-beating can introduce air, leading to bubbles and uneven cooking.
Here’s the technique:
- Crack your eggs into a mixing bowl.
- Use chopsticks or a fork to stir gently in a circular motion.
- Don’t whisk vigorously—just enough to combine yolks and whites.
- If you want a super silky texture, pass the mixture through a fine-mesh sieve.
Straining the eggs removes chalaza (the ropey white strands), resulting in a smoother, more refined finish. This extra step is totally worth it for that melt-in-your-mouth feel.
Balancing the Seasoning
Now it’s time to add flavor. For 4 eggs, a good starting ratio is:
- 1 tablespoon sugar
- 1 tablespoon mirin
- 1 teaspoon soy sauce
- 2 tablespoons dashi (if using)
Mix gently after adding the seasonings to avoid foaming. Taste the raw mixture with a clean spoon if you’re comfortable, or make a mini test omelet to adjust seasoning.
You want a taste that’s slightly sweet, lightly savory, and well-rounded. Some like it sweeter, while others prefer a more umami-heavy profile. There’s no wrong answer here—just trust your taste buds.
Cooking Tamagoyaki – Step-by-Step Instructions
Heating the Pan to the Right Temperature
Let’s face it: when cooking eggs, temperature is everything. Too hot, and your eggs brown too quickly or burn. Too cool, and they spread out instead of setting. For Tamagoyaki, getting the pan to the perfect medium heat is key to success.
Start by placing your Makiyakinabe over medium heat for about 2 minutes. Then, take a paper towel, dip it lightly in oil, and rub it evenly across the surface. Don’t overdo the oil—you’re not frying here—but you need enough to prevent sticking and help with smooth rolling.
To test the heat, drop a bit of egg mixture into the pan. If it sizzles gently and cooks within a few seconds without browning, you’re ready. If it sits without movement, the pan is too cold. If it bubbles violently or browns right away, reduce the heat.
Once the pan is heated properly, you’re ready to move on to the fun part: layering and rolling!
Layering and Rolling Technique
Here’s where the magic happens—and where patience pays off. Tamagoyaki is cooked in thin layers, each rolled over the previous one to form those beautiful, airy spirals.
Step-by-step layering guide:
- Pour a thin layer of the egg mixture into the heated pan—just enough to coat the bottom.
- Tilt the pan to spread the mixture evenly.
- Pop any air bubbles with chopsticks or a fork for a smooth surface.
- When the layer is half-cooked but still moist on top, start rolling it toward you using chopsticks or a small spatula.
- Once rolled, push the rolled egg to the top of the pan.
- Use a paper towel to re-grease the pan lightly.
- Pour another layer of egg into the empty space, lift the rolled egg slightly to let the raw mixture flow underneath.
- Repeat the process until you’ve used all your egg mixture.
Each layer should be thin—think crepe-like—and allowed to set just enough to hold together but not too firm. This is what gives Tamagoyaki its signature tender and bouncy texture.
Pro tip: Don’t rush! Let each layer cook slowly for an even golden hue.
Tips to Get That Perfect Golden Finish
Want that flawless, glowing golden Tamagoyaki that looks like it came out of a sushi restaurant? It’s all about precision and gentle care. Here are some tips to help:
- Use low to medium heat: High heat will scorch the egg, making it tough and uneven.
- Strain the egg mixture: This removes impurities and creates a silkier texture.
- Avoid overcooking: Tamagoyaki should be moist and tender inside, not dry.
- Press the roll gently after cooking with a bamboo mat (makisu) or paper towel to shape and set the layers. Let it rest for 5 minutes—this makes slicing easier.
- Slice with a sharp, wet knife: Wipe the blade between cuts for clean, picture-perfect slices.
And if the first few times don’t look perfect—don’t sweat it! Even Japanese chefs practice for years to get it right. The goal is flavor and texture first; aesthetics will follow naturally with practice.
Serving and Presentation Ideas
Traditional Japanese Presentation
Tamagoyaki isn’t just about taste—it’s a visual delight. In Japan, it’s often served in neat rectangular slices, showcasing the beautifully rolled layers. If you’re going for authenticity, here’s how to present it:
- Slice into 1-inch thick pieces after resting the roll.
- Serve with a small mound of grated daikon radish (daikon oroshi) on the side.
- Add a drizzle of soy sauce or a small dipping bowl for balance.
On a traditional Japanese plate, the contrast of yellow Tamagoyaki, white daikon, and dark soy sauce is pure elegance.
Tamagoyaki also shines in bento boxes. It adds color, protein, and a touch of sweetness that contrasts beautifully with savory rice and pickles.
In sushi, Tamagoyaki is often served nigiri-style—a slice laid over vinegared rice and wrapped with a thin band of nori. It adds a light, sweet element that’s always a hit.
Creative Modern Twists
Want to get a little playful? Tamagoyaki is surprisingly flexible when it comes to modern, Instagram-worthy upgrades:
- Tamagoyaki sandwich: Tuck a thick slice between two slices of soft milk bread with a bit of mayo or spicy mustard.
- Mini Tamagoyaki rolls: Use small pans to make bite-sized versions for party appetizers.
- Add toppings: Try sesame seeds, chili flakes, or even a brush of teriyaki glaze on top.
- Mix-ins: Stir in spinach, mushrooms, or cheese before cooking for a fusion flair.
The soft, layered nature of Tamagoyaki makes it a great vehicle for creative expression. Whether you’re sticking to tradition or experimenting with flavors, there’s no wrong way to enjoy it—as long as you love what’s on your plate.
Health Benefits of Tamagoyaki
A Protein-Packed Start to Your Day
Tamagoyaki is more than just a tasty breakfast item—it’s a powerhouse of nutrients packed into a neat, flavorful roll. The primary ingredient, eggs, are rich in high-quality protein, which helps in muscle repair, supports immune health, and keeps you full longer. If you’re trying to start your day on a protein-rich note, Tamagoyaki is a great go-to.
Each serving of Tamagoyaki typically provides:
- 6–10 grams of protein
- Essential amino acids
- Vitamin D, B12, and riboflavin
- Healthy fats (especially if cooked with minimal oil)
Adding ingredients like dashi brings in minerals like iodine, while vegetables or seaweed mixed into the egg increase the fiber and vitamin content. It’s also relatively low in carbs, making it suitable for those watching their carbohydrate intake.
Even when served as part of sushi or a bento box, it adds a gentle sweetness and nutrition boost without overwhelming your daily calorie count. With the right balance of ingredients, Tamagoyaki becomes a guilt-free indulgence that’s both filling and nourishing.
Low-Calorie and Nutrient-Dense
One of the most beautiful aspects of Tamagoyaki is how light and satisfying it can be. Unlike heavy Western-style omelets full of cheese and meat, Tamagoyaki is delicate in texture and often contains minimal oil. A single slice generally contains around 70–90 calories, depending on size and added ingredients.
This makes it ideal for:
- People on a calorie-conscious diet
- Kids needing easy-to-digest nutrition
- Seniors who require soft, protein-rich food
- Anyone looking to add variety to their clean-eating routine
Pair it with steamed rice, miso soup, or even a fresh salad, and you have a complete, wholesome meal. Tamagoyaki proves that healthy eating doesn’t have to mean sacrificing flavor or tradition.
Common Mistakes to Avoid
Overcooking or Burning the Egg
If you’ve ever ended up with a tough, brown-bottomed Tamagoyaki instead of a light, golden one—you’re not alone. Overcooking is the most common mistake beginners make. Eggs cook quickly, and when exposed to high heat, they can go from perfectly set to dry and rubbery in seconds.
Here’s how to avoid that:
- Always cook on medium-low heat
- Keep your eye on the pan at all times
- Don’t let each layer cook fully before rolling—aim for 75% doneness
If the surface starts browning too fast, reduce the heat immediately. A perfectly cooked Tamagoyaki should have a soft, even texture without any crispy or dark spots.
Not Oiling the Pan Properly
While you don’t need a puddle of oil, you also don’t want to skip it. Eggs love to stick, especially in corners. Lightly oil the pan between every layer using a folded paper towel dipped in oil. This prevents sticking, helps create a glossy exterior, and ensures the roll comes together without tearing.
A poorly greased pan results in:
- Torn layers
- Uneven rolling
- Frustrating clean-up afterward
Make oiling a habit—it pays off with a smoother cooking process.
Storing and Reheating Tips
How to Store Tamagoyaki Properly
Tamagoyaki is one of those rare egg dishes that holds up well for later. If you’ve made a batch and have leftovers, you can store them in an airtight container in the fridge for up to 2–3 days. The key is to cool it down to room temperature before refrigerating to avoid condensation, which can make it soggy.
To store:
- Wrap the cooled roll in plastic wrap or parchment paper
- Place it in an airtight bento box or container
- Avoid storing with moist foods to prevent sogginess
When stored correctly, Tamagoyaki retains its texture and flavor remarkably well, making it ideal for meal prepping or packing into next-day lunches.
Best Methods to Reheat Without Drying Out
Reheating eggs can be tricky—they’re notorious for turning rubbery. Here’s how to reheat Tamagoyaki without ruining its soft, delicate texture:
Microwave (best method):
- Place the slices on a plate
- Cover with a damp paper towel
- Microwave on low (50% power) for 20–30 seconds
Steam (second best):
- Use a steamer basket over boiling water
- Steam for 1–2 minutes until warm
Avoid pan-frying unless you’re okay with a firmer, slightly crisp texture
Reheating slowly and gently preserves that original fluffiness, keeping your Tamagoyaki as delicious as when you first made it.
FAQs about Tamagoyaki Recipe
Q1: Can I make Tamagoyaki without a rectangular pan?
Yes! While a rectangular pan gives the traditional shape, a small round non-stick skillet works just fine. Your roll may be a little less tidy, but it’ll taste just as good.
Q2: Is Tamagoyaki supposed to be sweet or savory?
Traditionally, it has a sweet-savory balance. You can adjust the sugar and soy sauce to suit your taste—some regions in Japan prefer sweeter Tamagoyaki, while others keep it more savory.
Q3: Can Tamagoyaki be frozen?
It’s best fresh, but you can freeze it. Wrap tightly in plastic wrap, then place in a freezer bag. Reheat gently in a steamer or microwave with a damp towel.
Q4: How do I keep the layers from breaking apart?
Make sure each layer is cooked just enough before rolling, and keep your pan lightly oiled. Practice makes perfect!
Q5: Is Tamagoyaki gluten-free?
It can be, if you use gluten-free soy sauce and dashi. Always check ingredient labels if you’re cooking for someone with gluten sensitivity.
Conclusion
Tamagoyaki may look like just another egg dish, but behind its simple ingredients lies a rich tradition and a satisfying cooking ritual. Whether you’re making it for breakfast, slipping it into a bento box, or impressing dinner guests with sushi rolls, Tamagoyaki has a place in every kitchen.
With the right tools, patience, and a bit of practice, you can master the art of making this delightful Japanese rolled omelet. From selecting the freshest eggs to perfecting your rolling technique, every step contributes to a result that’s as rewarding to eat as it is to create.
So go ahead, grab that pan, whisk those eggs, and roll your way into Japanese culinary bliss. Once you taste homemade Tamagoyaki, you’ll never look at scrambled eggs the same way again.


