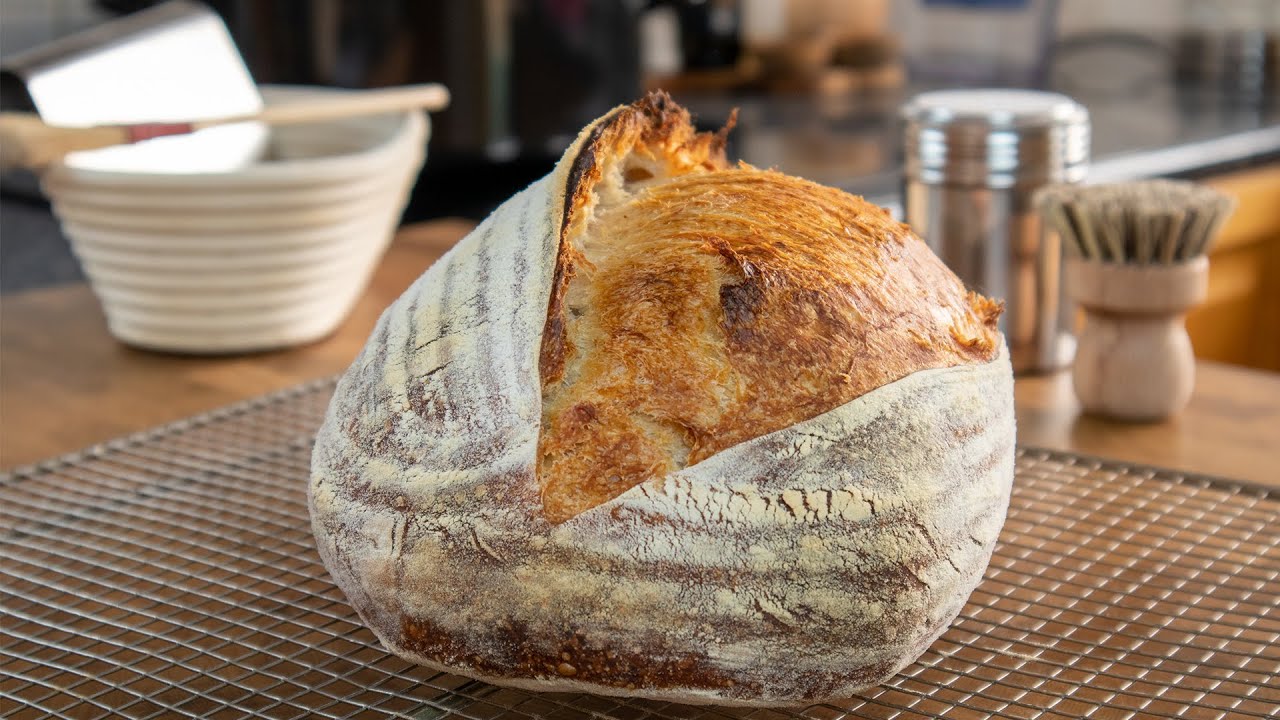
Rustic Bread Recipe: Rustic bread is the soul of old-world baking—simple, hearty, and satisfying. It’s the kind of bread you imagine cooling on a windowsill in a quaint countryside cottage. What makes rustic bread stand out is its crusty exterior and soft, chewy interior. It’s usually made with minimal ingredients—flour, water, yeast (or sourdough starter), and salt—but the magic lies in the process. There’s something deeply fulfilling about creating a loaf with your own hands, watching it rise, and filling your kitchen with that unmistakable fresh-baked aroma.
Unlike mass-produced loaves with their uniform shapes and chemical preservatives, rustic bread embraces imperfections. The crust may crack, the shape might be irregular, but that’s all part of its charm. You won’t need fancy ingredients or complicated techniques to master this loaf—just patience and a willingness to get your hands a little floury. Whether you’re serving it with soup, cheese, or just a swipe of butter, rustic bread delivers comfort in every bite.
Why Make Rustic Bread at Home?
Baking rustic bread at home isn’t just about the final product—it’s about the experience. In a world of fast food and convenience, making your own bread is a refreshing return to basics. It slows you down. It connects you to a tradition that’s been around for centuries. Plus, when you bake at home, you control every ingredient, ensuring there are no unwanted additives, preservatives, or sugars. It’s healthier, cheaper in the long run, and tastes infinitely better than store-bought.
Also, the pride of pulling a golden, crusty loaf from your oven is unmatched. That satisfying crackle when you slice it open and the steamy aroma wafting out—it’s pure therapy. And once you’ve nailed the basics, the world of rustic bread opens up to endless variations. Add herbs, olives, roasted garlic, or even seeds. But first, let’s master the classic.
Ingredients You’ll Need
Basic Ingredients List
To make a classic rustic bread, you only need a handful of pantry staples:
- All-purpose or bread flour – 3½ cups (around 420g)
- Water – 1½ cups warm (about 110°F/45°C)
- Instant yeast – 1¼ teaspoons
- Salt – 2 teaspoons
That’s it. No eggs, no sugar, no dairy—just the basics. You can easily double the recipe if you want to bake two loaves or if you’re hosting a gathering. While many traditional recipes use sourdough starter, this version sticks with commercial yeast for simplicity and reliability.
If you want to experiment later, feel free to substitute up to 20% of the flour with whole wheat or rye for added depth and complexity. But for your first go, keep it simple and stick with white flour. It’s more forgiving and yields a light, airy crumb—perfect for tearing and dipping into olive oil.
Importance of Each Ingredient
Let’s quickly break down the role of each ingredient:
- Flour is the backbone of your bread. It provides structure, texture, and flavor. Bread flour has more protein, leading to a chewier texture, but all-purpose flour works just fine.
- Water activates the yeast and helps hydrate the flour to create gluten. The temperature is key: too cold, and your yeast will be sluggish; too hot, and you’ll kill it.
- Yeast is what gives the bread its rise. We’re using instant yeast for speed, but you can also use active dry yeast with a longer proofing time.
- Salt does more than flavor—it regulates yeast activity and strengthens gluten, giving you a better texture and rise.
Optional add-ins like herbs, seeds, or cheeses are great once you’ve mastered the base recipe. But these four ingredients are all you need to create a beautiful, crusty loaf that rivals anything from a bakery.
Tools Required for Baking Rustic Bread
Must-Have Kitchen Tools
You don’t need a full bakery setup to make rustic bread, but a few key tools will make your life easier:
- Large mixing bowl – For combining your dough and letting it rise.
- Dutch oven or baking stone – Essential for a crisp crust, thanks to even heat distribution.
- Measuring cups and spoons – Precision matters in baking, so use these instead of eyeballing.
- Kitchen scale (optional but ideal) – Measuring by weight ensures accuracy and consistency.
- Wooden spoon or dough whisk – For mixing; hands work fine too.
- Bench scraper or spatula – Helpful when shaping sticky dough.
- Clean kitchen towel or plastic wrap – To cover your dough during rising stages.
Rustic bread dough can be quite sticky and soft, especially if it’s high hydration. These tools will keep the mess under control and help you shape your dough more confidently.
Optional but Helpful Equipment
- Proofing basket (banneton) – Great for holding your shaped dough during the final rise and creating that beautiful spiral pattern.
- Lame or razor blade – For scoring the dough before baking, which helps control the rise.
- Oven thermometer – Home ovens often lie; this helps ensure proper baking temperature.
- Cooling rack – Prevents soggy bottoms and helps your loaf cool evenly.
You don’t need to spend a lot to get started. A basic Dutch oven and a mixing bowl will get you 90% of the way there. The rest is just icing on the crusty cake.
Step-by-Step Rustic Bread Recipe
Step 1: Mixing the Dough
This is where the magic begins. In a large bowl, combine your flour, yeast, and salt. Mix well to distribute everything evenly. Then, add your warm water and stir until a shaggy dough forms. Don’t overthink it. You’re not kneading yet—just mixing until all the flour is hydrated. It will look messy and sticky, and that’s perfect.
Once it comes together, cover the bowl with a clean towel or plastic wrap and let it sit for 30 minutes. This is called autolyse—a fancy word for letting the flour absorb water before kneading. After that, give it a few gentle stretch-and-folds using wet hands or a dough scraper. This helps build gluten without traditional kneading.
Cover the dough again and let it rest at room temperature for about 8–12 hours. Yes, overnight. The long ferment develops flavor and texture. When it’s ready, the dough will be doubled in size, bubbly, and jiggly. You’re now halfway to rustic bread heaven.
Step 2: First Rise (Bulk Fermentation)
After mixing, your dough begins its journey of transformation through the process known as bulk fermentation. This is when the yeast gets to work, feeding on the flour’s sugars and releasing gas that makes the dough rise. Don’t rush this stage—it’s where the flavor and structure begin to develop.
Leave your dough covered in a warm area of your kitchen. If your room is cool, you can extend the fermentation overnight for 10–12 hours. Warmer rooms might only need 6–8 hours. The dough should be visibly puffy and have doubled in size when it’s ready. Look for bubbles on the surface and around the edges—those are signs of fermentation success.
During this time, you can perform a few “stretch and folds” to strengthen the gluten. Simply wet your hands, grab a side of the dough, stretch it up, and fold it over. Rotate the bowl 90 degrees and repeat three more times. Doing this 2–3 times during the first couple of hours of the rise will help give your loaf that beautiful open crumb.
Step 3: Shaping the Dough
Once your dough has fermented, it’s time to shape it. Turn the dough onto a lightly floured surface. Be gentle—you want to preserve all those beautiful air pockets. Use your bench scraper or floured hands to shape it into a round or oval loaf.
To shape a round loaf, pull the edges of the dough toward the center, then flip it over seam-side down. Cup your hands around the dough and rotate it in small circles to tighten the surface tension. If you’re going for a batard (oval shape), flatten the dough into a rectangle, fold one side over the center, then the other, and roll it gently into shape.
Place your shaped dough into a floured proofing basket or bowl lined with a towel, seam-side up. This helps hold its shape during the final rise and gives it that signature rustic look.
Step 4: Final Rise (Proofing)
Proofing is the last rise before baking. It gives your loaf that final bit of lift and ensures a better oven spring (the rise that happens in the oven). You have two options here: a short proof at room temperature (1–2 hours), or a longer cold proof in the fridge (8–12 hours).
The cold proof is especially great for flavor—it slows fermentation, allowing deeper aromas to develop. Plus, it makes the dough easier to score and handle.
To check if your dough is proofed and ready to bake, give it a gentle poke with your finger. If the indentation springs back slowly and partially, it’s ready. If it springs back immediately, give it more time. If it doesn’t spring back at all, it may be over-proofed—still usable, but it may not rise as well in the oven.
Step 5: Baking the Bread
Now for the best part—baking! Preheat your oven to 475°F (245°C) with a Dutch oven inside. It’s important that your pot is hot when the dough goes in to create that crusty exterior we all love. If you’re not using a Dutch oven, place a cast iron pan on the bottom rack and add water for steam when the bread goes in.
Carefully turn your dough onto a piece of parchment paper, seam-side down. Score the top with a sharp blade or lame. This isn’t just for looks—it helps control how your bread expands in the oven.
Using oven mitts, remove the hot Dutch oven, place the parchment and dough inside, cover, and bake for 30 minutes. Then remove the lid and bake for another 15–20 minutes, or until the crust is deep golden brown and sounds hollow when tapped.
Let the bread cool on a wire rack for at least an hour before slicing. This helps finish the cooking process and gives you a cleaner slice. Trust us—this wait is worth it.
Tips for Perfect Rustic Bread
Common Mistakes to Avoid
Baking rustic bread can seem deceptively simple, but there are a few common missteps that can trip you up. Learning what to avoid can save you a lot of frustration and wasted ingredients.
One major mistake is using cold water or overheating it. Yeast is sensitive, and using water that’s too cold will slow fermentation, while water that’s too hot can kill the yeast entirely. Aim for lukewarm water—around 105–110°F (40–43°C).
Another common error is over-kneading or under-kneading. Rustic bread typically doesn’t need vigorous kneading like other breads. Overworking the dough can break down the gluten network, leading to a tough, dense loaf. Use stretch-and-folds or a no-knead method instead to maintain an open crumb structure.
Poor fermentation is also a frequent culprit. If your dough hasn’t risen enough during bulk fermentation, your final bread will be flat and gummy. If it’s over-proofed, it might collapse. Watch for signs of readiness—jiggly dough, visible bubbles, and a noticeable rise.
And finally, skipping the preheat or baking in a cold Dutch oven. Rustic bread needs that initial burst of steam and heat to form a good crust. Always preheat your oven and your pot thoroughly for at least 30–45 minutes.
Enhancing Flavor and Texture
Once you’ve mastered the basic loaf, there are several ways to take your rustic bread to the next level.
- Cold fermentation: Placing your dough in the fridge for a long, slow rise (12–24 hours) builds complex flavor. The cold slows yeast activity and enhances enzymatic reactions that deepen the taste and improve texture.
- Use of pre-ferments: Techniques like poolish or biga (pre-fermented doughs) can add nutty and slightly tangy notes to your loaf. These take more time but offer more character.
- Scoring with purpose: Don’t just slash randomly—score to help control oven spring and add artistic flair. A well-scored loaf is not only functional but beautiful.
- Experiment with hydration: A higher hydration dough (more water) creates a more open crumb and chewy texture. It’s harder to handle, but the results are worth it. Start with 70% hydration and work your way up.
- Add-ins for depth: Herbs like rosemary, roasted garlic, sun-dried tomatoes, or olives can dramatically change the flavor profile while still keeping the “rustic” identity.
With every loaf you bake, you’ll learn something new. Don’t be afraid to experiment, take notes, and tweak based on your taste and kitchen conditions.
Cooling and Storing the Bread
Proper Cooling Methods
After spending hours nurturing your dough and baking it to golden perfection, the last thing you want is a soggy loaf. That’s why cooling is just as crucial as mixing or baking. Freshly baked bread continues to cook as it cools, and slicing it too soon can result in a gummy texture and collapsed crumb.
Once your bread is out of the oven, transfer it immediately to a wire cooling rack. This allows air to circulate freely around the loaf, preventing condensation and keeping the crust nice and crisp. Let it cool for at least an hour before slicing—yes, it’s tempting, but trust us, it’s worth the wait.
You’ll hear the crust crackling as it cools—this is music to a baker’s ears and a sign that your crust is perfect.
Storing for Freshness
Rustic bread is best enjoyed the day it’s baked, but if you need to store it, wrap it in a clean kitchen towel or place it in a paper bag. This helps preserve the crust while keeping the inside from drying out too quickly.
Avoid plastic bags if you want to maintain the crusty exterior, as they trap moisture and can make the bread soggy. However, if you prefer a softer crust, then plastic wrap or a zip-top bag will do.
To store for more than a couple of days, slice the bread, place parchment paper between slices, and freeze it in a zip-lock bag. You can toast slices straight from the freezer without thawing.
Avoid refrigerating your bread—this dries it out and ruins both the flavor and texture. If stored properly, your rustic bread will stay delicious for 2–3 days at room temperature and up to a month in the freezer.
Health Benefits of Homemade Rustic Bread
Nutritional Value
Homemade rustic bread isn’t just tasty—it can also be a nutritious addition to your diet. Unlike many store-bought loaves filled with preservatives, added sugars, and unnecessary fats, rustic bread is made with just a handful of whole ingredients. That means you’re consuming fewer processed chemicals and more natural nutrients.
At its core, rustic bread made with high-quality flour is a solid source of complex carbohydrates, which provide sustained energy throughout the day. When you use whole grain or stone-ground flours, the bread retains more fiber, vitamins, and minerals. Fiber supports digestive health, helps regulate blood sugar, and keeps you full longer.
If you’re using natural fermentation methods like sourdough, the health benefits increase. Fermented doughs may help with nutrient absorption, and some people find sourdough bread easier to digest. That’s because the fermentation process breaks down gluten and phytic acid, two elements that can cause discomfort for sensitive stomachs.
Digestive Perks
One of the biggest benefits of rustic bread, especially when naturally fermented, is how gentle it is on the gut. The longer fermentation process encourages the development of lactic acid bacteria, which helps pre-digest some of the starches and proteins in the flour.
These bacteria also produce enzymes that reduce phytic acid, an anti-nutrient that can interfere with the absorption of minerals like calcium, magnesium, and zinc. Reducing phytic acid means your body can better absorb these essential nutrients.
In addition, the slow rise and natural leavening help lower the bread’s glycemic index. That means it won’t spike your blood sugar as quickly as refined, commercial breads, making it a better option for people watching their glucose levels.
Creative Variations to Try
Adding Seeds, Herbs, and More
Once you’ve mastered the classic loaf, it’s time to get creative. Rustic bread is like a blank canvas—ready to soak up whatever flavors you throw at it. Add-ins can elevate your loaf from basic to gourmet in minutes.
Here are some flavorful combinations to try:
- Rosemary and sea salt: Adds a savory, earthy aroma.
- Sun-dried tomatoes and basil: Perfect for a Mediterranean twist.
- Cheddar and jalapeño: Adds spice and gooey richness.
- Cranberries and walnuts: A sweet, nutty combo ideal for breakfast or cheese boards.
- Sesame, poppy, or flax seeds: Toasted seeds add crunch and nutrition.
Incorporate these ingredients during the final stretch-and-folds, just before the shaping step. Be gentle to avoid deflating your dough. Remember to avoid overly wet or heavy ingredients as they can affect the structure.
Different Flour Types
Swapping flours is another fun way to explore variations. Each flour brings its own flavor, texture, and nutritional profile.
- Whole wheat flour: Adds nuttiness and fiber but absorbs more water. Start by substituting 25–30% of the white flour.
- Rye flour: Dense and flavorful. Best used in combination with bread flour to maintain lift.
- Spelt flour: An ancient grain with a sweet, mild flavor and excellent digestibility.
- Multigrain blends: These offer a mix of grains and seeds for added complexity.
Experiment slowly. Different flours behave differently and affect hydration levels, so you may need to tweak the water content as you go. Keep notes and learn with each loaf.
Serving Suggestions
Perfect Pairings
Rustic bread is endlessly versatile. Here are a few ideas to make the most of every slice:
- With soups and stews: That chewy crumb is made for soaking up broths and sauces.
- Toasted with butter: A golden slice topped with real butter or ghee is pure joy.
- As bruschetta or crostini: Toast slices and top with tomatoes, mozzarella, or smoked salmon.
- With cheeses and charcuterie: A rustic loaf turns any cheese board into a gourmet affair.
- For breakfast: Try with jam, honey, or a poached egg and avocado.
Its firm structure also makes it perfect for paninis or open-faced sandwiches. Slice it thick, grill it, or rub with garlic and olive oil for the ultimate rustic toast.
Rustic Bread in Meals
You can also integrate rustic bread into recipes. Tear it into pieces for croutons or breadcrumbs, use it for stuffing, or make French toast with stale slices. It holds up well and adds a hearty, homemade touch to any dish.
Rustic bread is more than a side—it’s a culinary building block that elevates everything it touches.
Tips for Beginners
Best Practices for First-Time Bakers
If you’re just starting out, rustic bread can feel intimidating. But don’t worry—every great baker was once a beginner. Here are some key tips to keep you confident and successful:
- Start simple: Stick with basic ingredients and one loaf until you’re comfortable with the process.
- Hydration matters: Aim for a hydration level around 70% (water weight compared to flour weight). Higher hydration gives you bigger holes, but is harder to handle.
- Don’t rush the rise: Fermentation takes time. The longer the rise, the better the flavor and texture.
- Use a Dutch oven: It creates a steamy environment for that perfect crust. If you don’t have one, bake on a stone with a pan of hot water.
- Let it cool: Slicing too soon will ruin the crumb. Wait at least an hour after baking.
- Practice scoring: Use a sharp blade and quick, confident motions. This controls the rise and creates those beautiful rustic patterns.
- Keep notes: Track what works and what doesn’t. Each loaf teaches you something new.
Mistakes are part of the journey. Maybe your first loaf is flat or too dense—so what? You’ll learn, improve, and before long, you’ll be baking beautiful loaves on repeat.
FAQs about Rustic Bread Recipe
1. Can I use active dry yeast instead of instant yeast?
Yes! Just activate it in warm water for 10 minutes before adding to the flour.
2. What if I don’t have a Dutch oven?
You can bake on a pizza stone with a pan of water underneath for steam, but a Dutch oven works best for crust.
3. How do I know when my dough is done proofing?
Gently press the dough with your finger. If the indentation springs back slowly, it’s ready to bake.
4. Can I make rustic bread gluten-free?
You can try with gluten-free flour blends, but the texture will differ and it may require additional binding agents.
5. How long does homemade rustic bread last?
It stays fresh for 2–3 days at room temperature when stored in a cloth or paper bag and can be frozen for up to a month.
Conclusion
Rustic bread is more than just a recipe—it’s a journey into the heart of traditional baking. With just four ingredients, a bit of patience, and a touch of care, you can produce a loaf that’s crusty, airy, and deeply satisfying. Whether you’re a novice or a seasoned home baker, this timeless bread never fails to impress. And as you grow more confident, the possibilities are endless—from new flours and add-ins to creative serving ideas. So roll up your sleeves, flour your counter, and let the magic begin.