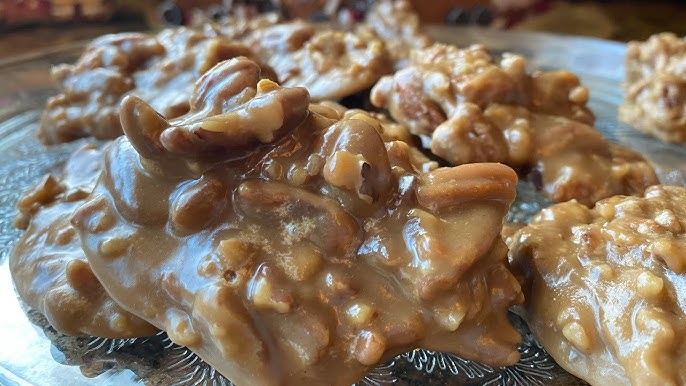
Pralines Recipe: Pralines are a southern delicacy that melts in your mouth, leaving behind the sweet crunch of pecans wrapped in buttery sugar goodness. Traditionally made with just a few ingredients—pecans, sugar, butter, and cream—these treats are iconic in Southern American cuisine, especially in New Orleans. Think of them as a nutty, creamy candy that captures the heart of Southern comfort in every bite. Their texture is soft yet slightly crumbly, offering the perfect balance between creamy and crunchy.
History and Origin of Pralines
The origin of pralines can be traced back to France in the 17th century. The treat was named after César, duc de Choiseul, Comte du Plessis-Praslin, and originally consisted of almonds coated in caramelized sugar. French settlers brought the recipe to Louisiana, where local cooks adapted it using pecans, which were more abundant in the South. Cream was added to the mix to create a softer, creamier texture. Over the years, this evolved into the Southern praline we know today. Pralines became a staple in New Orleans candy shops and are now beloved across the U.S.
Ingredients for Classic Southern Pralines
Choosing the Right Pecans
Pecans are the star of the show in pralines, so choosing high-quality nuts is crucial. Always opt for fresh, whole pecan halves. Stale or chopped pecans can affect the final taste and texture. Roasting or toasting the pecans before adding them to your praline mix enhances their natural nuttiness and adds an extra depth of flavor. If possible, buy pecans from local sources or farmers’ markets to ensure freshness.
Here are a few tips:
- Look for pecans with a rich, brown color and uniform size.
- Avoid any that are shriveled or have a bitter smell.
- Store them in the fridge or freezer if you’re not using them right away.
Sweet Essentials – Sugar, Butter, and Cream
A perfect praline hinges on its sweet base—sugar, butter, and cream. Each component brings a unique element to the recipe:
- Sugar: Most recipes use a combination of white granulated sugar and brown sugar. Brown sugar adds a deeper, molasses-like richness.
- Butter: Unsalted butter works best. It provides a creamy foundation and smooth texture.
- Heavy Cream or Half-and-Half: Cream gives pralines their signature soft, fudgy consistency. Don’t substitute with milk—it won’t give you the same richness or texture.
Optional ingredients might include:
- Vanilla extract for added flavor
- Salt to balance the sweetness
- Maple syrup or corn syrup to prevent crystallization and add smoothness
Tools You’ll Need for Making Pralines
Before diving into the recipe, make sure your kitchen is equipped with the essentials. Pralines are simple, but timing and precision are everything.
- Heavy-bottomed saucepan: Helps distribute heat evenly to avoid burning the sugar.
- Candy thermometer: Ensures your mixture reaches the ideal temperature (around 235°F – 240°F or the soft-ball stage).
- Wooden spoon or silicone spatula: For stirring your mix without reacting with the sugar.
- Baking sheet lined with parchment paper: This is where you’ll drop your pralines to cool and harden.
- Ice water bowl (optional): Helps test the sugar stage if you don’t have a thermometer.
Having everything ready before you start will make the process smooth and stress-free. Timing is everything with candy-making, and a small delay can mean the difference between creamy perfection and a grainy mess.
Step-by-Step Guide to Making Pralines
Step 1 – Toasting the Pecans
Start by toasting your pecans. Preheat your oven to 350°F (175°C), spread the pecan halves on a baking sheet in a single layer, and toast them for about 5-7 minutes. Stir halfway through for even roasting. Toasted pecans have a more robust flavor that balances perfectly with the sweetness of the praline mixture.
Once done, let them cool completely before using. You can also chop them coarsely if you prefer smaller nut bits in each bite of your praline.
Step 2 – Cooking the Sugar Mixture
In your heavy saucepan, combine 1 cup granulated sugar, 1 cup packed brown sugar, 1/2 cup heavy cream, and 1/4 cup unsalted butter. Stir gently over medium heat until the sugars dissolve and everything is well combined.
Once dissolved, stop stirring and insert your candy thermometer. Allow the mixture to boil without stirring until it reaches the soft-ball stage (235°F – 240°F). Be patient—this usually takes about 10-12 minutes. Stirring too much or heating too quickly can cause crystallization, ruining that smooth, creamy finish.
Once the mixture reaches temperature, remove it from heat immediately.
Step 3 – Mixing in the Pecans
Now that your sugar mixture has reached the ideal temperature, it’s time to stir in the toasted pecans. Add about 1½ cups of the toasted pecans into the hot sugar mixture, along with a splash of vanilla extract (about 1 teaspoon). Stir everything together quickly but thoroughly.
Here’s where the magic starts. As you stir, you’ll notice the mixture begin to thicken and lose some of its glossy shine. This is exactly what you want—it means it’s starting to cool and crystallize, forming that familiar creamy, slightly gritty praline texture. Work fast but don’t rush—overmixing can dry out the pralines, while undermixing can leave them too gooey.
Make sure each pecan is coated well with the sugary blend. You should end up with a thick, rich mixture that’s ready to be portioned out.
Step 4 – Dropping the Pralines
Quickly spoon out the praline mixture onto your parchment-lined baking sheet. Use a tablespoon or a small cookie scoop to form each praline, spacing them about an inch apart. The size is up to you, but typically, pralines are around 2 to 3 inches in diameter.
Don’t worry if they’re not perfectly round—part of their charm is in their rustic, hand-dropped look. Work as quickly as you can before the mixture hardens in the pot. If it starts to get too thick, you can place the pan back on the burner for a few seconds just to loosen it up again.
Avoid touching the pralines with your hands while hot—they’re extremely sticky and can cause burns.
Step 5 – Letting Them Set
After you’ve dropped all the pralines, let them sit at room temperature to cool and harden. This can take anywhere from 30 minutes to an hour, depending on the humidity and temperature in your kitchen. Don’t be tempted to move or refrigerate them—they need to set on their own for that signature smooth top and creamy center.
Once set, your pralines should peel easily from the parchment paper. They’ll have a slightly glossy surface, a firm outside, and a soft, melt-in-your-mouth interior. Congratulations—you’ve just made homemade Southern pralines!
Tips for Perfect Pralines Every Time
Pralines are simple to make, but they do require a bit of finesse. Here are some pro tips to ensure your pralines turn out perfect every time:
- Use a candy thermometer: This takes the guesswork out of reaching the soft-ball stage. Even a few degrees too high or low can ruin the texture.
- Don’t stir too much after sugar dissolves: Stirring can cause crystallization, leading to a grainy praline instead of a creamy one.
- Humidity matters: Pralines don’t like moisture. Avoid making them on rainy or humid days if possible. The sugar can absorb moisture and prevent them from setting properly.
- Be prepared: Have all your ingredients measured and tools ready before you start cooking. Timing is crucial.
- Use quality ingredients: Fresh pecans and real butter make all the difference.
Making pralines is part science, part Southern soul. With a little practice, you’ll get the hang of it—and maybe even start tweaking your recipe to create your signature version.
Common Mistakes to Avoid
Making pralines might seem straightforward, but there are a few pitfalls that can easily ruin your batch. Here’s a rundown of the most common mistakes and how to avoid them:
1. Overcooking or Undercooking the Sugar Mixture
The biggest issue many face is not reaching the correct temperature. If you undercook the sugar, your pralines won’t set properly and will be gooey or sticky. Overcook it, and they’ll turn into hard, brittle candy. Always aim for the “soft-ball stage” (235°F to 240°F). Use a candy thermometer or test by dropping a little mixture into cold water—it should form a soft, pliable ball.
2. Stirring Too Much
Once your sugar is dissolved and starts to boil, don’t stir again until you’re ready to mix in the pecans. Stirring during boiling encourages crystallization, which can lead to grainy or gritty pralines.
3. Not Toasting the Pecans
Skipping the toasting step might not seem like a big deal, but it significantly impacts flavor. Toasted pecans offer a deeper, richer nutty profile that enhances the overall praline.
4. Waiting Too Long to Drop the Pralines
Once the mixture is off the heat and pecans are stirred in, you need to work quickly. The candy cools rapidly and can become too stiff to drop properly, leading to odd shapes or clumps. Have your parchment paper and spoon ready.
5. Making Pralines on a Humid Day
Humidity can wreak havoc on sugar-based candy. Moisture in the air can prevent the pralines from setting correctly, leaving them tacky or runny. Try to make them on a dry day, or use a dehumidifier in your kitchen if possible.
By understanding and avoiding these common errors, you’ll significantly improve your praline-making game and enjoy consistent, delicious results.
How to Store Your Pralines
Once your pralines have cooled and set, storage becomes key to preserving their texture and flavor. Here’s how to keep them fresh:
Short-Term Storage (1–2 Weeks)
Place pralines in an airtight container. Separate layers with parchment or wax paper to prevent sticking. Store at room temperature in a cool, dry place. Avoid refrigeration—it can cause sugar to crystallize or draw in moisture, making them sticky.
Long-Term Storage (Up to 2 Months)
If you want to keep them longer, wrap each praline individually in wax paper or plastic wrap and store them in a zip-top bag or airtight container in the freezer. When you’re ready to eat them, let them thaw at room temperature for a few hours—do not microwave.
Packaging for Gifting
Pralines make wonderful gifts. Use cellophane bags, decorative tins, or mason jars. Add a ribbon and a handmade tag for a personal touch. Just make sure they’re well-sealed to keep out moisture.
Proper storage ensures your pralines remain just as creamy and dreamy as when you first made them. Whether you’re keeping them for yourself or giving them away, they’ll stay delightful for days (if they last that long!).
Variations of the Classic Praline
While the classic Southern praline is hard to beat, there are some mouthwatering variations worth trying. These offer a creative twist on the original and allow you to personalize the recipe to suit your taste.
Chocolate Pralines
Love chocolate? Adding cocoa or melted chocolate to your praline mixture can take things to a whole new level. You can either:
- Add 2 tablespoons of unsweetened cocoa powder during the sugar-cooking stage, or
- Stir in ½ cup of melted semi-sweet chocolate chips after removing the mixture from heat.
The result is a fudgy, chocolate-laced praline that’s rich and decadent—perfect for chocoholics.
Maple Pralines
For a deeper, earthier sweetness, try replacing some or all of the brown sugar with pure maple syrup. This variation pairs especially well with toasted walnuts or almonds if you want to switch up the nuts too.
Here’s how:
- Use ¾ cup maple syrup and ¾ cup brown sugar.
- Cook and mix the same way as the original recipe.
The maple praline has a slightly softer set and a flavor that screams fall. These are especially great during the holiday season.
FAQs about Pralines Recipe
1. Can I use milk instead of heavy cream in pralines?
Heavy cream is recommended because of its fat content, which gives pralines their creamy texture. Milk won’t produce the same richness and can cause the candy to set improperly.
2. Why did my pralines turn out gritty?
This usually happens when the sugar crystallizes during cooking. Avoid stirring once the mixture starts to boil, and make sure it reaches the correct temperature.
3. Can I make pralines without a thermometer?
Yes, you can test the sugar stage by dropping a small amount into cold water. If it forms a soft ball that flattens in your hand, it’s ready.
4. How long do pralines last?
At room temperature in an airtight container, they can last up to 2 weeks. Frozen, they can stay fresh for about 2 months.
5. Can I use other nuts instead of pecans?
Absolutely! Walnuts, almonds, or even cashews can be used for a different flavor profile. Just make sure they’re fresh and toasted.
Conclusion
Pralines are more than just a sweet treat—they’re a piece of Southern tradition, lovingly made and joyfully shared. With just a few ingredients, a little technique, and a touch of patience, you can create a candy that brings warmth and nostalgia in every bite.
Whether you stick with the classic or explore fun variations like chocolate or maple, pralines offer a world of delicious possibilities. They’re perfect for holiday gifts, party favors, or just a cozy kitchen project on a weekend afternoon. And once you’ve mastered the basic recipe, the sky’s the limit.
So go ahead—grab your pecans, sugar, and cream, and start cooking up a batch of these sweet, nutty treasures. Your taste buds (and everyone around you) will thank you!


