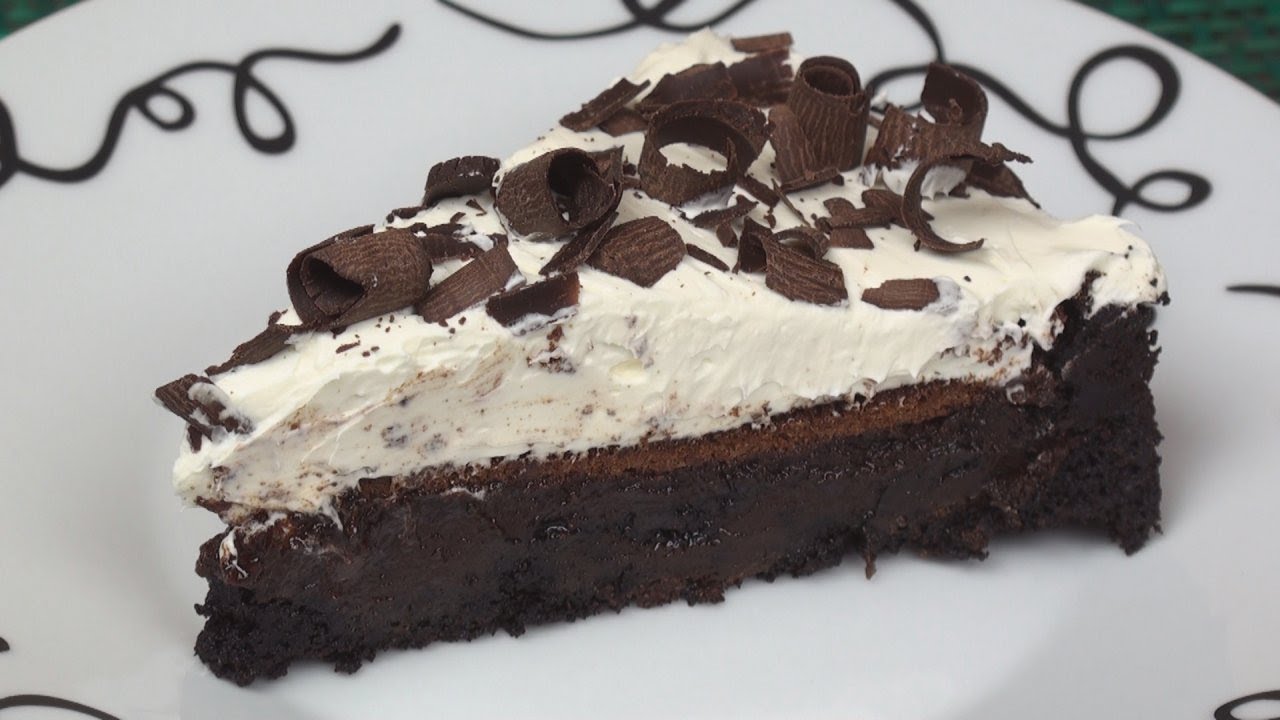
Mud Pie Recipe: Mud pie isn’t what it sounds like – there’s no real mud involved (thankfully). It’s a rich, decadent, chocolate-lovers’ dream. Think layers of chocolate cookie crust, creamy chocolate pudding or mousse, and fluffy whipped cream, all piled high in one drool-worthy dessert. Some versions even throw in ice cream, fudge, or crushed cookies for extra indulgence.
The origins of mud pie are a bit fuzzy, but it’s widely believed to have started in the American South. The name comes from its gooey, muddy appearance – not exactly neat or dainty, but oh-so-delicious. It’s the kind of dessert that doesn’t need to be perfect because the flavor does all the talking.
This pie is often served cold, making it a fantastic treat for hot days, birthday parties, or just whenever you’re craving something chocolatey and comforting.
Why You’ll Love This Dessert
If you’re a fan of chocolate (and really, who isn’t?), this dessert is your soulmate in pie form. Here’s why it wins hearts instantly:
- Easy to Make: No fancy baking skills required.
- Customizable: Add ice cream, nuts, caramel, or extra chocolate – make it your own.
- Perfect for All Occasions: Whether it’s a casual family dinner or a holiday gathering, mud pie fits the bill.
- Make-Ahead Friendly: Ideal for prepping a day before a party.
- Crowd-Pleaser: It’s hard to find someone who won’t go back for seconds.
This recipe walks you through each step clearly, so even kitchen beginners can nail it. And once you’ve tasted it, there’s no going back.
Ingredients Needed
Before diving into the action, let’s talk ingredients. Great desserts start with great components. This mud pie has three main parts – crust, filling, and topping.
For the Crust
The crust is where it all begins. We’re going for a chocolate cookie base – think Oreos or chocolate graham crackers.
- 24 chocolate sandwich cookies (like Oreos)
- 5 tablespoons unsalted butter, melted
That’s it! Two ingredients, and you get a crunchy, chocolatey base that holds everything together beautifully.
For the Filling
This is where the magic happens. The filling is rich, creamy, and packed with chocolate flavor.
- 1 cup semisweet chocolate chips
- 3 tablespoons unsalted butter
- 3/4 cup granulated sugar
- 2 tablespoons cornstarch
- 2 cups whole milk
- 3 large egg yolks
- 1 teaspoon vanilla extract
- 1/4 teaspoon salt
Some recipes use chocolate ice cream or pudding mix, but we’re going homemade for maximum flavor.
For the Topping
The finishing touch is a mountain of whipped cream with optional garnishes.
- 1 cup heavy whipping cream
- 2 tablespoons powdered sugar
- 1/2 teaspoon vanilla extract
- Optional: chocolate shavings, crushed cookies, fudge drizzle
This topping balances out the richness of the filling with airy lightness and a touch of sweetness.
Tools You’ll Need
Let’s keep things simple – no high-tech gadgets required here. You’ll need:
- Food processor (or ziplock bag and rolling pin)
- 9-inch pie dish
- Mixing bowls
- Whisk
- Saucepan
- Spatula
- Electric mixer (for whipped cream)
Having your tools ready before you start makes the process smoother and stress-free.
Step-by-Step Instructions
Step 1: Prepare the Crust
First things first – the crust. This step is all about creating a strong, crunchy base for your mud pie.
- Crush the cookies: Use a food processor to pulse the cookies into fine crumbs. No food processor? Toss the cookies in a zip-top bag and crush them with a rolling pin. You want the texture to be similar to wet sand.
- Add the melted butter: Pour the melted butter into the crumbs and mix until well combined. It should resemble damp sand and hold its shape when pressed.
- Press into pie dish: Pour the mixture into a 9-inch pie dish. Press the crumbs evenly across the bottom and up the sides using the back of a spoon or your fingers.
- Chill or bake: For a no-bake pie, pop the crust in the fridge for 15–20 minutes to set. For a firmer, more flavorful crust, bake at 350°F (175°C) for 8–10 minutes, then cool completely.
This crust is the backbone of your mud pie. Whether you go the no-bake route or bake it for extra crispiness, make sure it’s firm before moving to the next step.
Step 2: Make the Chocolate Filling
Now for the heart of the pie – the chocolate filling. This is what gives mud pie its signature gooey, luscious texture and bold chocolate flavor.
- Melt chocolate and butter: In a heatproof bowl, melt the chocolate chips and butter together. You can do this in the microwave (in 20-second bursts, stirring each time) or over a double boiler. Stir until completely smooth and set aside to cool slightly.
- Whisk the dry ingredients: In a medium saucepan, whisk together the sugar, cornstarch, and salt. This step ensures even thickening and no clumps.
- Add wet ingredients: Slowly whisk in the milk, then the egg yolks, making sure everything is well combined. Cook over medium heat, whisking constantly to prevent lumps and scrambling.
- Thicken the mixture: After about 5–7 minutes, the mixture will start to bubble and thicken. Once it’s the consistency of pudding, remove from heat.
- Combine with chocolate: Stir in the melted chocolate-butter mixture and vanilla extract. Keep stirring until silky smooth.
- Cool slightly: Let the filling cool for about 10–15 minutes. It should still be pourable but not too hot – this keeps your crust from getting soggy.
This filling is rich, velvety, and full of deep chocolate flavor. You can even sneak a little espresso powder into the mix if you want to enhance the chocolate notes even more.
Step 3: Assemble the Layers
Now that your crust is ready and your filling is smooth and chocolatey, it’s time to bring the pie together.
- Pour the filling into the crust: Carefully pour the chocolate filling into the prepared crust. Use a spatula to spread it evenly.
- Tap to settle: Gently tap the pie dish on the counter to eliminate any air bubbles and even out the surface.
- Cover and chill: Press plastic wrap directly onto the surface of the filling to prevent a skin from forming. Then refrigerate the pie for at least 4 hours – overnight is even better.
This step requires a bit of patience, but it’s worth the wait. As it chills, the filling firms up to a creamy yet sliceable consistency.
Step 4: Chill and Set the Pie
Chilling is critical for mud pie success. Without it, you’ll end up with a delicious mess instead of neat slices.
- Minimum chill time: 4 hours is the absolute minimum. This gives the filling time to fully set.
- Overnight is ideal: For the best texture, refrigerate your mud pie overnight. The flavors meld together, and the pie becomes easier to slice.
Don’t try to shortcut this step by freezing it too soon. Let the fridge do its job first.
Step 5: Add Final Toppings
The final flourish – whipped cream and toppings – is what transforms this from a good dessert into an unforgettable one.
- Whip the cream: In a chilled mixing bowl, beat the heavy cream, powdered sugar, and vanilla extract until soft peaks form. You want it thick and billowy, but not grainy or over-whipped.
- Spread or pipe: Spread the whipped cream over the chilled chocolate filling using a spoon or spatula. For a more decorative look, pipe it with a pastry bag and star tip.
- Garnish: Add chocolate shavings, fudge drizzle, crushed cookies, or even chopped nuts. Get creative – this is your masterpiece.
Now your mud pie is officially ready to wow anyone lucky enough to grab a slice.
Pro Tips for the Perfect Mud Pie
Want to take your mud pie game to the next level? Here are some expert tips:
- Use high-quality chocolate: The better the chocolate, the better the pie. Go for real chocolate chips or bars, not baking melts.
- Chill your bowl before whipping cream: A cold bowl helps the cream whip faster and fluffier.
- Don’t overbake the crust: If you’re baking it, keep a close eye – burnt crust ruins everything.
- Use plastic wrap directly on the filling: This prevents that weird skin from forming on top.
- Let it sit at room temp for 10 minutes before slicing: This softens it just enough for perfect slices.
Common Mistakes to Avoid
Even the simplest recipes can go sideways if you’re not careful. Here are some common mud pie pitfalls and how to steer clear of them:
1. Not Chilling Long Enough
If you try to slice into your mud pie before it’s fully chilled and set, it’ll fall apart into a chocolatey puddle. Always chill for at least 4 hours, but ideally overnight. Trust the process – it’s worth it.
2. Overwhipping the Cream
Whipped cream should be soft and fluffy, not stiff and grainy. Overbeating can turn it buttery and ruin the light, airy texture. Stop whipping as soon as soft peaks form and the cream holds its shape.
3. Using Low-Fat Milk or Cream
This is a dessert – lean into the indulgence! Whole milk and heavy whipping cream give the filling and topping their luxurious texture. Low-fat alternatives just won’t deliver the same results.
4. Not Pressing the Crust Firmly
A loose crust will crumble when you slice the pie. Make sure you press it firmly into the dish, especially around the edges. A measuring cup or flat-bottomed glass works great for this.
5. Skipping the Plastic Wrap on Filling
If you don’t cover the chocolate filling before chilling, you’ll end up with a thick skin on top – not ideal. Press plastic wrap directly onto the surface of the filling for a smooth finish.
Avoiding these mistakes ensures your mud pie comes out picture-perfect every time.
Variations of Mud Pie
Mud pie is wonderfully flexible – you can tweak it to fit your tastes or dietary needs. Here are a few popular variations:
1. Ice Cream Mud Pie
Instead of pudding or mousse, use softened chocolate or coffee ice cream as the filling. Just press into the crust and freeze until firm. Add whipped cream and toppings just before serving.
2. Mocha Mud Pie
Add a shot of espresso or a teaspoon of instant coffee to the chocolate filling. It deepens the flavor and pairs beautifully with the whipped cream topping.
3. Peanut Butter Mud Pie
Swirl in a layer of creamy peanut butter between the crust and the chocolate filling. You can also drizzle peanut butter on top for a Reese’s-style twist.
4. Nutty Mud Pie
Add chopped pecans, walnuts, or hazelnuts into the filling or sprinkle them on top of the whipped cream for extra crunch.
5. Boozy Mud Pie
Mix a splash of coffee liqueur, Irish cream, or rum into the chocolate filling for a grown-up version. Just a tablespoon or two will do the trick.
These variations keep things interesting and allow you to create your own signature dessert.
How to Store Mud Pie
Proper storage is key to keeping your mud pie fresh and tasty for days.
In the Refrigerator
- Covered tightly: Store in the fridge, covered with plastic wrap or foil. It’s best to keep it in the pie dish so it retains its shape.
- Shelf life: Mud pie stays fresh for 4–5 days in the fridge. The crust may soften slightly, but it’ll still taste great.
In the Freezer
- Freeze before topping: If you want to freeze your mud pie, do it before adding whipped cream or garnishes.
- Wrap well: Wrap the pie (or individual slices) tightly in plastic wrap, then foil. It’ll keep for up to 1 month.
- Thaw properly: Move to the fridge to thaw overnight before serving. Add toppings fresh.
Freezing is especially handy if you’re making the pie ahead of time for an event or holiday.
Serving Suggestions
You’ve made the perfect mud pie – now serve it like a pro. Here are a few tips to elevate the experience:
- Chilled plates: Serve slices on cold dessert plates to help the pie hold its shape.
- Warm knife trick: Dip your knife in hot water and wipe it dry before slicing. This helps you cut clean, neat slices.
- Pair with coffee: The richness of the pie pairs beautifully with a strong cup of coffee or espresso.
- Add fruit: A few fresh raspberries or sliced strawberries on the side cut through the richness and add color.
- Make it a sundae: Top a slice with vanilla ice cream, hot fudge, and crushed nuts for the ultimate dessert mashup.
Whether you’re serving this at a dinner party or just treating yourself on a Tuesday night, mud pie delivers joy in every bite.
FAQs about Mud Pie Recipe
Can I make mud pie ahead of time?
Absolutely! In fact, mud pie tastes even better the next day. Just store it in the fridge, covered, and add whipped cream and toppings before serving.
What’s the best chocolate to use?
Use high-quality semisweet or dark chocolate for the best flavor. Chocolate chips work well, but chocolate bars you chop yourself often melt smoother.
Is mud pie supposed to be frozen or chilled?
Classic mud pie is chilled in the fridge. Ice cream versions are frozen. It depends on your variation, but both are equally delicious.
Can I use store-bought crust?
Yes, a pre-made Oreo crust saves time and still tastes great. Just make sure it’s deep enough to hold the filling.
How long does mud pie last in the fridge?
Mud pie will stay fresh in the refrigerator for up to 4–5 days. For longer storage, freeze it (without the whipped topping).
Conclusion
Mud pie is the ultimate comfort dessert – rich, creamy, chocolatey, and completely irresistible. It’s surprisingly easy to make, totally customizable, and always a hit with friends and family. Whether you keep it classic or add your own twist, this step-by-step guide ensures delicious results every time.
From the crunchy chocolate crust to the dreamy whipped topping, every bite is pure indulgence. And the best part? You don’t need to be a baking pro to pull it off. Just follow the steps, chill it well, and get ready for dessert bliss.


