Mochi Donut Recipe: Mochi donuts are a delicious hybrid treat that blends the chewy texture of Japanese mochi with the familiar shape and crispy edges of American donuts. What really sets them apart is the use of glutinous rice flour, which gives them their signature stretch and bouncy chew—something traditional donuts can’t replicate.
Imagine biting into something that’s soft on the inside, lightly crispy on the outside, and so springy it almost feels like a dessert with personality. That’s the magic of mochi donuts. Unlike their yeast-based or cake-based cousins, mochi donuts feel lighter, less greasy, and somehow even more fun to eat.
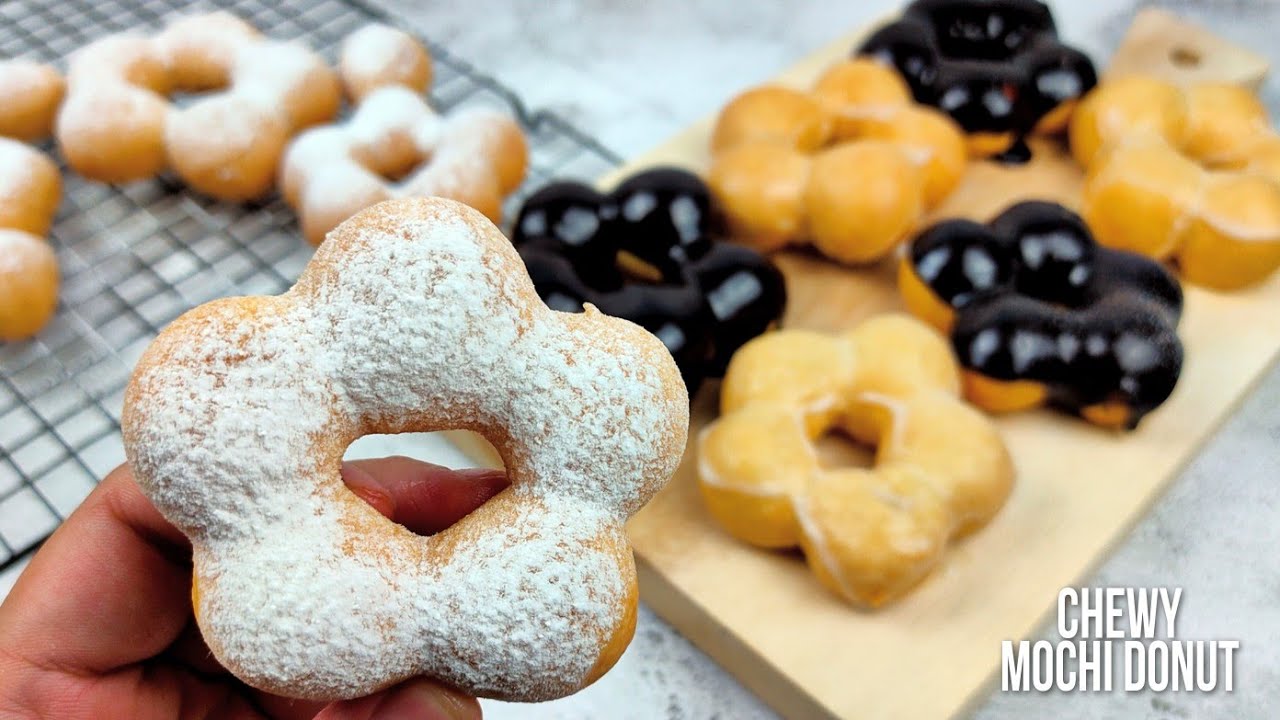
Not to mention, they’re super Instagrammable. With their adorable “pon de ring” shape—a ring of mini balls linked together—they catch eyes before they even hit your taste buds. Plus, they’re a blank canvas for vibrant glazes and creative toppings, which makes them perfect for home bakers who love to experiment.
The Origin and Rise in Popularity
Mochi donuts have roots in Japanese snack culture but gained popularity thanks to chains like Mister Donut in Japan and later through trendy bakeries in the U.S. and Southeast Asia. These donuts are inspired by “pon de ring” donuts from Japan, first introduced in the early 2000s.
Fast-forward to today, and mochi donuts have taken over social media feeds and dessert menus everywhere. They’ve become a food phenomenon, not just for their aesthetic appeal but also for their addictive texture and unique twist on a beloved classic. Whether you’re seeing them at a food truck in LA or a dessert café in Bangkok, one thing’s for sure—mochi donuts are here to stay.
Essential Ingredients for Mochi Donuts
Main Ingredients You’ll Need
To make perfect mochi donuts at home, you’ll want to have the following essentials ready:
- Glutinous Rice Flour (Sweet Rice Flour) – This is the key ingredient. Don’t substitute with regular rice flour; it won’t give you the right texture.
- All-purpose flour – Adds some structure and balances the chewiness.
- Baking powder – Gives the dough some rise.
- Sugar – Regular granulated sugar works best.
- Milk – Whole milk is ideal for richness, but you can use alternatives.
- Eggs – Helps bind everything together and adds moisture.
- Butter or oil – For richness and soft texture.
- Vanilla extract – Adds flavor depth.
- Vegetable oil – For deep frying.
Optional but helpful: a small bit of cornstarch to lightly coat your work surface and hands—it makes handling the sticky dough way easier.
Optional Toppings and Glazes
Here’s where things get creative. Once you have your base donuts, you can go wild with toppings. Some classic ideas:
- Matcha glaze – Mix matcha powder with powdered sugar and a touch of milk.
- Chocolate glaze – Melted chocolate with a bit of cream.
- Strawberry glaze – Pureed strawberries, powdered sugar, and lemon juice.
- Toppings – Sprinkles, shredded coconut, crushed Oreos, chopped nuts.
Want to make them healthier? You can even bake them using a donut pan, although you won’t get the same texture as frying. But hey, options are always nice.
Kitchen Tools You’ll Need
Basic Equipment for Mochi Donuts
Good news—mochi donuts don’t require a lot of fancy tools. Here’s what you’ll need to get started:
- Mixing bowls – For your dry and wet ingredients.
- Whisk or hand mixer – Helps combine everything evenly.
- Piping bag or ziplock – Useful for shaping the donut rings.
- Parchment paper – You’ll pipe the dough onto this.
- Kitchen scissors – To cut the donuts from the parchment before frying.
- Slotted spoon or tongs – For safely flipping and removing donuts from hot oil.
- Cooling rack – Keeps them crisp after frying.
- Thermometer – Helps maintain oil at the right temperature (around 320-340°F or 160-170°C).
Substitutes for Specialized Tools
Don’t have a piping bag? Use a sturdy ziplock bag and snip the corner. No cooling rack? A plate with paper towels works. The only must-haves are something to mix with, something to shape with, and a pot to fry in.
Step-by-Step Guide to Making Mochi Donuts
Step 1: Preparing the Dough
Start by mixing your dry ingredients in one bowl—glutinous rice flour, all-purpose flour, baking powder, and sugar. In a separate bowl, combine your wet ingredients: milk, egg, melted butter, and vanilla extract. Slowly pour the wet mix into the dry mix and stir until a thick, sticky dough forms.
It should be stretchy and tacky, but not runny. If it’s too loose, add a bit more rice flour. If too dry, a splash more milk should fix it. Let the dough rest for about 10 minutes. This allows the flour to fully hydrate and makes the dough easier to handle.
Lightly dust your hands and surface with cornstarch. Take small balls of dough (about 1 inch wide) and roll them between your palms. Arrange 8 balls in a ring shape on small squares of parchment paper—this forms the signature pon de ring look.
Step 2: Shaping the Donuts
Shaping mochi donuts is a bit different from your typical donut molds. Here’s where the fun starts. Once you’ve formed your dough into small balls (about 1 inch each), you’ll want to group 8 of them into a circle on a square of parchment paper. Think of it like forming a donut out of little dough pearls. This is how you get that cute “pon de ring” appearance.
It’s important to make sure each ball is touching the next so they stick together while frying. If you’re working with kids or guests, this is a fun part to get everyone involved in—it’s like crafting with edible clay!
Once all your donuts are shaped, let them rest for 10–15 minutes. This gives them a slight proofing time and makes them more stable before they hit the oil. Also, make sure each donut is formed on its own parchment square. You’ll use these to lower the donuts gently into the hot oil without them falling apart or sticking.
If you’re planning to bake rather than fry, place the formed rings in a lightly greased donut pan or on a lined baking sheet. Keep in mind that baked mochi donuts will have a different texture—not quite as crispy but still chewy and delicious.
Step 3: Frying to Perfection
This is the most critical step and where your mochi donuts go from dough to delectable. Fill a deep pot with vegetable oil and heat it to about 320°F to 340°F (160°C to 170°C). Use a thermometer if you have one—keeping a consistent temperature is key to evenly cooked, non-greasy donuts.
Carefully lower each donut into the oil using the parchment paper square. The paper will naturally release after a few seconds—you can gently pull it out using tongs. Fry 1–2 donuts at a time to avoid crowding the pan, which can drop the oil temperature.
Each side should take around 2–3 minutes, or until golden brown. You’ll know they’re ready when they float, puff up slightly, and develop a light crisp on the outside.
Once fried, transfer the donuts to a wire rack or paper towel-lined plate to cool. Let them sit for at least 5 minutes before glazing—this prevents the glaze from melting right off. Plus, the texture settles a bit more as they cool, making them that much better.
Pro tip: Always do a test donut first to check oil temperature and cooking time. That way, you can perfect your technique before committing to the whole batch.
Step 4: Glazing and Decorating
Now comes the creative part—glazing and decorating. Mochi donuts are the perfect blank slate for all sorts of toppings, whether you love a classic look or want to go wild with flavors and colors.
Here are a few glaze ideas to try:
- Classic Vanilla Glaze
Mix powdered sugar, a splash of milk, and a few drops of vanilla extract. Adjust consistency by adding more sugar or milk as needed. - Matcha Glaze
Whisk together powdered sugar, a teaspoon of matcha green tea powder, and milk. This gives a beautiful green hue and a subtle earthy flavor. - Chocolate Glaze
Melt semi-sweet chocolate with a little cream or milk for a rich coating. - Strawberry Glaze
Blend strawberries, mix with powdered sugar and a dash of lemon juice for a fruity pink finish.
To glaze your donuts, dip the top of each cooled donut into your chosen glaze, then gently lift and let the excess drip off. Place them back on the rack and let them set for a few minutes.
Want to take it up a notch? Top your donuts with sprinkles, chopped nuts, freeze-dried fruit, or even edible glitter. The sky’s the limit here. You can also drizzle them with caramel or white chocolate for added flair.
Once the glaze has set, they’re ready to eat—and trust me, they won’t last long.
Tips for Perfect Mochi Donuts
Troubleshooting Common Issues
Making mochi donuts isn’t hard, but a few things can go wrong if you’re not careful. Here’s how to fix the most common problems:
- Dough too sticky
Add a touch more glutinous rice flour. It should be tacky, not runny. - Donuts fall apart while frying
Make sure each ball is firmly touching the next. Also, don’t skip the parchment square when lowering into oil—it keeps the shape intact. - Too oily or soggy
Oil temperature was too low. Keep it between 320°F and 340°F. Use a thermometer for accuracy. - Too hard or chewy
Overcooked. Stick to 2–3 minutes per side. Also, don’t let the oil get too hot. - Glaze melts off
Let donuts cool completely before glazing. Hot donuts will liquify your glaze.
Making perfect mochi donuts might take a try or two, but once you get the hang of it, you’ll find the process super fun—and deliciously rewarding.
Flavor Variations to Try
Once you’ve nailed the basic mochi donut recipe, it’s time to get creative. Mochi donuts are like a blank canvas for your imagination. Their mild flavor makes them perfect for adding all kinds of fun and unique twists. Here are some tried-and-true flavor variations you can explore:
1. Chocolate Lovers’ Mochi Donuts
Add 2 tablespoons of cocoa powder to your dry ingredients and increase sugar slightly to balance the bitterness. Top with chocolate glaze and crushed chocolate cookies for double the chocolate thrill.
2. Ube Mochi Donuts
Mix in ube halaya (purple yam jam) or ube extract to the wet ingredients. You’ll get a gorgeous purple color and a naturally sweet, nutty flavor. Top with ube glaze or white chocolate for a colorful treat.
3. Taro-Flavored Mochi Donuts
Similar to ube, taro gives a subtly sweet and earthy taste. Use taro powder in your dough or glaze for that signature pale lavender hue.
4. Coconut Mochi Donuts
Substitute part of the milk with coconut milk and add shredded coconut to the glaze. Sprinkle with toasted coconut flakes for an island-inspired flavor.
5. Lemon Poppy Seed
Add a teaspoon of lemon zest to the dough and glaze with lemon juice and powdered sugar. Sprinkle with poppy seeds for texture and a burst of brightness.
6. Black Sesame Mochi Donuts
Mix ground black sesame seeds into the dough and pair with a sweet black sesame glaze. This combo gives a nutty, slightly smoky flavor that’s totally unique.
7. Pumpkin Spice (Seasonal Favorite)
Add pumpkin puree and pumpkin spice mix into the batter for a fall twist. Top with cinnamon glaze or maple syrup glaze.
These variations can turn your basic mochi donut into a show-stopping dessert that matches any season, holiday, or mood. Don’t be afraid to mix and match glazes with flavored doughs for new and surprising combos. Trust your taste buds—they know what’s up!
FAQs about Mochi Donut Recipe
1. Can I bake mochi donuts instead of frying them?
Yes! You can use a donut pan and bake them at 350°F (175°C) for about 15–18 minutes. Just know that the texture will be slightly less crispy than frying.
2. What’s the difference between mochi donuts and regular donuts?
Mochi donuts use glutinous rice flour, which gives them a chewy, stretchy texture unlike traditional cake or yeast donuts.
3. How long do mochi donuts stay fresh?
They’re best eaten fresh on the same day, but you can store them in an airtight container for up to 2 days. Reheat in the oven for a few minutes to revive texture.
4. Can I freeze mochi donuts?
Yes, you can freeze them after frying (before glazing). Reheat in the oven or air fryer to bring back their chewiness, then glaze before serving.
5. What if I don’t have glutinous rice flour?
Unfortunately, it’s essential for the chewy texture. Regular rice flour or other flours won’t produce the same result. Look for “mochiko” or “sweet rice flour” at Asian markets or online.
Conclusion
So there you have it—your complete step-by-step guide to making the most addictive, chewy, and fun-to-make mochi donuts. They’re not just pretty on the outside—they’re full of character and flavor that traditional donuts just can’t compete with. Whether you stick with the classic recipe or try out wild new flavors, mochi donuts are guaranteed to wow anyone who takes a bite.
What’s even better? They’re fun to make, especially if you love trying new things in the kitchen. From mixing the chewy dough to frying them golden brown and decorating them like a dessert artist, every step is a delicious experience.
So next time you’re craving a treat that’s different, fun, and totally irresistible, skip the store-bought stuff. Grab your ingredients, roll up your sleeves, and get cooking. Mochi donuts are more than just a snack—they’re your new favorite homemade adventure.


