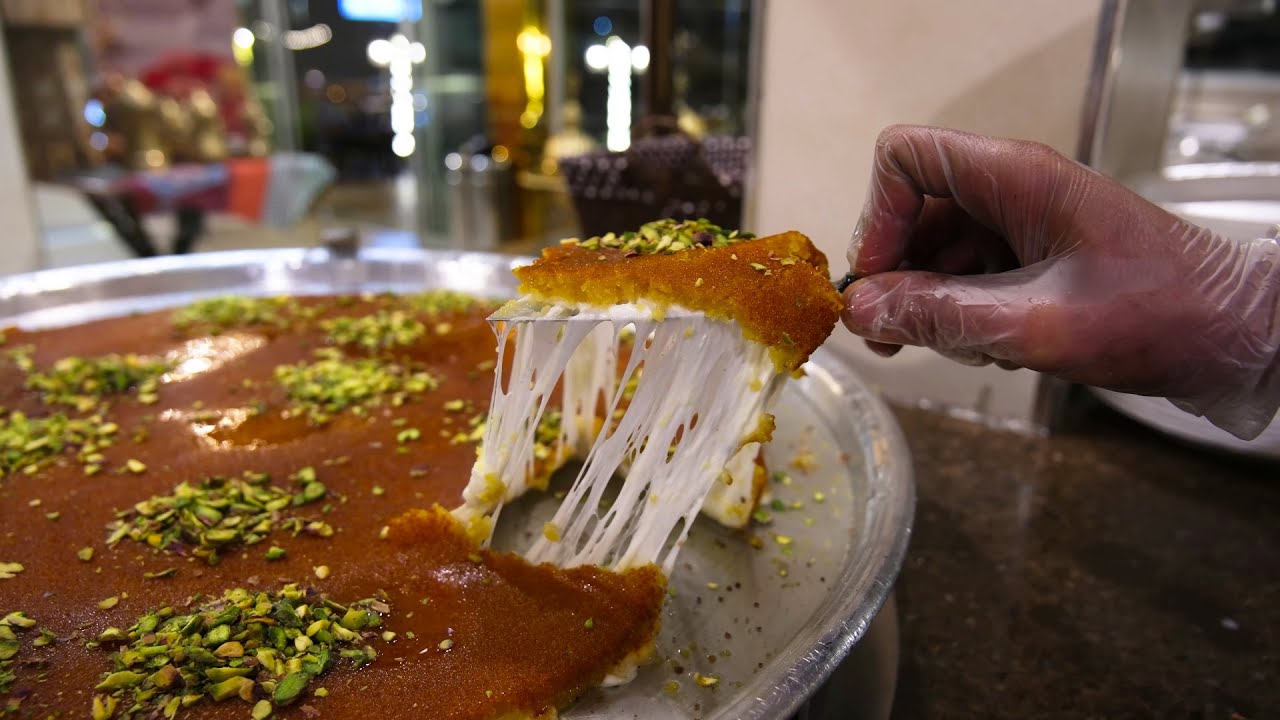
Palestinian Knafeh Recipe: Knafeh (also spelled Kunafa, Kanafeh, or Konafa) is a deliciously decadent Middle Eastern dessert made from shredded phyllo dough (kataifi), layered with sweet cheese or semolina, soaked in aromatic sugar syrup, and topped with crushed pistachios. It’s a dish that commands attention the moment it’s served – golden, crisp, sticky, and rich – and it melts in your mouth like a dream. Think of it as the Middle Eastern equivalent of a warm cheesecake encased in crispy pastry.
Originating from the Levant, this sweet treat has many regional variations, but the Palestinian version – particularly from the city of Nablus – is considered the crown jewel. Knafeh Nabulsi is the most famous and boasts a gooey cheese interior under a crisp, buttery, vermicelli-like crust.
Whether served at weddings, family gatherings, or special religious holidays like Eid, Knafeh has a way of bringing people together around the table.
Cultural Significance in Palestine
Knafeh isn’t just food in Palestine – it’s a heritage. It tells a story of hospitality, of family traditions passed down through generations, and of Palestinian resilience. You’ll find Knafeh served in the bustling streets of Nablus by local vendors, where the aroma fills the air and the sound of sizzling butter teases passersby.
It’s especially popular during Ramadan, often served to break the fast or as a post-dinner treat. It’s not just about the taste – it’s about the shared experience. Preparing Knafeh is often a family affair, with each person taking a role in the process, making it as much about bonding as baking.
Now that we’ve set the stage, let’s roll up our sleeves and dive into the kitchen.
Ingredients You’ll Need
Creating an authentic Palestinian Knafeh doesn’t require a professional kitchen, but it does need the right ingredients. The magic lies in the balance of sweet and savory, creamy and crispy.
For the Base – The Kataifi Dough
- 500g kataifi dough (shredded phyllo, found in Middle Eastern stores or frozen sections)
- 1 cup (225g) unsalted butter, melted
- A pinch of orange food coloring (optional, traditional for Knafeh Nabulsi)
Kataifi dough is the backbone of Knafeh. It’s essentially shredded phyllo, and when baked with butter, it turns incredibly crisp and golden. If you can’t find it, you might be tempted to use regular phyllo sheets – while it can work in a pinch, the texture won’t be quite the same.
For the Filling – Cheese Mixture
- 450g of Akawi cheese (soaked to reduce saltiness)
- 150g mozzarella (for extra meltiness)
- 2 tablespoons sugar
- 2 tablespoons semolina (optional, for a more custard-like texture)
Traditional Knafeh uses Nabulsi or Akawi cheese – both are salty white cheeses that melt beautifully. You’ll need to soak the cheese in water for several hours to remove the excess salt. Some people add mozzarella for that perfect stretch and creaminess. The sugar enhances the sweetness, and semolina can be added to give the filling more body.
For the Syrup – Sweet Touch
- 2 cups sugar
- 1 cup water
- 1 tablespoon lemon juice
- 1 teaspoon rose water or orange blossom water
The syrup (or ater) brings everything together. It’s poured over the hot Knafeh right after baking, so it soaks into every layer. The floral essence from rose or orange blossom water is subtle but essential – it’s what gives Knafeh its distinctive Middle Eastern flair.
Essential Kitchen Tools
Traditional Tools vs Modern Alternatives
You don’t need a fancy setup to make Knafeh, but having the right tools can make the process smoother.
Traditional Tools:
- Large round copper pan (for even baking and presentation)
- Cheese grater (for prepping the cheese)
- Wooden spatula (for even layering)
Modern Alternatives:
- Non-stick round cake pan or pizza tray
- Food processor (to shred or combine cheeses)
- Oven-safe skillet or baking dish
While the traditional copper trays are ideal (and iconic), a modern non-stick pan works just fine for home cooks. The key is even heat distribution and easy release once baked.
Step-by-Step Guide to Making Knafeh
Step 1 – Preparing the Syrup
Let’s start with the syrup because it needs time to cool.
Ingredients:
- 2 cups sugar
- 1 cup water
- 1 tbsp lemon juice
- 1 tsp rose or orange blossom water
Instructions:
- Combine sugar and water in a saucepan over medium heat.
- Stir until the sugar dissolves completely.
- Once it starts boiling, reduce heat and simmer for 10 minutes.
- Add lemon juice and floral water, then simmer for another 2 minutes.
- Remove from heat and let it cool completely.
This syrup should be thick but pourable. Cooling is crucial so it doesn’t overcook or make your Knafeh soggy. You want it to seep into the dough, not drown it.
Step 2 – Prepping the Dough
This is where the crispy magic happens. Kataifi dough can be a bit tricky if you’ve never worked with it before, but don’t worry – once you get the hang of it, it’s a breeze.
Instructions:
- If using frozen kataifi, thaw it completely. Then pull apart the strands gently with your fingers until it becomes fluffy.
- In a large mixing bowl, pour the melted butter over the shredded dough.
- Add the optional food coloring here if you want that iconic golden-orange hue.
- Using your hands, massage the butter evenly into the dough until every strand is coated. You don’t want any dry spots.
The butter-to-dough ratio matters – too little and your Knafeh will be dry; too much and it’ll be greasy. The goal is a moist, buttery texture that crisps up beautifully in the oven.
Tip: If the dough is too long, give it a few cuts with kitchen scissors to make it more manageable.
Step 3 – Making the Cheese Filling
The filling is the heart of Knafeh – melty, slightly sweet, and irresistibly stretchy.
Steps:
- Start by rinsing and soaking the Akawi cheese in cold water. Change the water every 1–2 hours until the salt level is to your liking (typically 4–6 hours).
- Grate or crumble the cheese finely, then mix with the mozzarella for that extra melt factor.
- Stir in sugar and semolina if using.
At this point, you should have a smooth, moist cheese mixture. Not too wet, but not crumbly either. If it’s too dry, it won’t spread well; if it’s too runny, it’ll seep out.
Optional: Some people like to microwave or slightly warm the cheese mixture before layering, especially if the cheese is firm. This helps it blend and melt better during baking.
Step 4 – Layering and Baking
Now we assemble! This is the most fun – and satisfying – part of the process.
Steps:
- Preheat your oven to 180°C (350°F).
- In your chosen pan (preferably non-stick or well-greased), spread half of the kataifi dough evenly and press it down with the bottom of a cup or your hands.
- Add the cheese filling and spread it evenly over the dough.
- Cover the cheese layer with the remaining dough, pressing gently to even it out.
You want each layer to be compact so the dessert holds its shape. Don’t press too hard though – we still want that fluffiness in the dough.
Bake Time:
- Bake for 30–40 minutes or until the top is golden brown and crisp.
Some traditional recipes flip the Knafeh halfway through baking for even browning on both sides, but if you’re using a top-heating oven, that’s not necessary.
Once baked, remove it from the oven and immediately pour the cooled syrup evenly over the hot Knafeh. The sizzle you hear? That’s pure satisfaction. It means the syrup is seeping right into those crispy layers.
Step 5 – Final Touches and Serving
Your Knafeh is nearly complete, but let’s add the finishing flair.
Garnish:
- A generous sprinkle of crushed pistachios.
- Optional: A few rose petals or edible flowers for a luxurious look.
Serving:
- Cut into squares or wedges and serve warm.
- Knafeh is best enjoyed fresh – the cheese is gooey, the dough is crisp, and the syrup is perfectly absorbed.
Pair it with Arabic coffee or mint tea for the ultimate Middle Eastern experience. It’s also great with a scoop of clotted cream or a dollop of plain yogurt if you want to balance the sweetness.
Serving Tip: Knafeh makes a dramatic centerpiece, especially if served in the same pan it was baked in. Gather your friends or family and serve it straight to the table with a big smile – you’ve just recreated a Palestinian classic!
Tips for Perfect Knafeh
Common Mistakes to Avoid
Let’s face it – Knafeh can be a little intimidating at first, especially with its delicate balance of textures and flavors. But if you know what pitfalls to dodge, you’re already halfway there.
Don’t Over-Butter: Yes, butter is essential, but drowning your dough will leave you with a greasy mess. Stick to the recommended measurements.
Cheese Too Salty: Not soaking your cheese properly will leave you with a salty surprise. Be patient – that soaking step is critical.
Syrup Too Thin or Too Hot: Make sure your syrup has a slightly thick consistency and is cooled before pouring it onto the hot Knafeh. Hot-on-hot will turn your dessert soggy fast.
Uneven Layers: An uneven cheese or dough layer means parts will cook differently. Take the time to spread everything evenly.
How to Get the Perfect Crunch
That crispy, golden topping is what dreams are made of – here’s how to get it right:
- Use Fresh Dough: If using frozen kataifi, make sure it’s thawed fully and fluffed properly.
- Distribute Butter Evenly: Every strand of kataifi should be coated to brown evenly.
- Bake at the Right Temp: Don’t rush with a high temperature – slow, steady baking gives you a golden crunch without burning.
- Serve Immediately: Like fries, Knafeh is best right out of the oven. The longer it sits, the more it loses that iconic texture.
Variations of Palestinian Knafeh
Knafeh Nabulsi vs. Knafeh Khishneh
There’s more than one way to enjoy Knafeh, and the two main types often spark friendly debates among fans: Knafeh Nabulsi and Knafeh Khishneh.
Knafeh Nabulsi, named after the city of Nablus, is arguably the most iconic. It features a smooth, creamy cheese layer enveloped in fine, buttery kataifi dough. The entire top is often dyed with orange food coloring for that signature glow, and it’s always drenched in sugar syrup and garnished with crushed pistachios.
Knafeh Khishneh (meaning “coarse”) uses shredded dough on both the bottom and the top, resulting in a crunchier texture. It’s the go-to version for people who love a deep contrast between the crispy outside and the soft, gooey inside.
While both are authentic and delicious, the preference often depends on personal taste or family tradition. Some prefer the slightly softer texture of Nabulsi, while others crave the crackle of Khishneh.
You can also find hybrid versions that blend the two textures—coarse on top, fine on the bottom. The sky’s the limit when it comes to customization.
Sweet vs. Savory Knafeh
Did you know that Knafeh doesn’t always have to be sweet?
Savory Knafeh exists and is actually a beloved twist in many parts of the Levant. Instead of sugar syrup, it’s seasoned with herbs, nuts, and even meat or spinach. The cheese used is more robust and not sweetened. Some versions feature minced beef or lamb, pine nuts, and fresh parsley, wrapped in crispy kataifi dough and baked until golden.
It’s a perfect choice for brunch or as a party appetizer—unique, flavorful, and visually stunning.
Meanwhile, the sweet version remains the classic, often enjoyed during festive occasions, holidays, or as an indulgent dessert. It’s hard to beat the combination of molten cheese, syrup-soaked pastry, and the nutty crunch of pistachios.
Whether sweet or savory, Knafeh can be adapted to suit any craving, making it one of the most versatile desserts in Palestinian cuisine.
Storing and Reheating Knafeh
Let’s be honest—Knafeh is best fresh out of the oven. That crisp-on-the-outside, gooey-on-the-inside combo is hard to replicate. But if you happen to have leftovers (lucky you!), here’s how to make the most of them.
To Store:
- Cool it completely before storing.
- Cover tightly with foil or place in an airtight container.
- Store in the refrigerator for up to 3 days.
To Reheat:
- Preheat your oven to 180°C (350°F).
- Place the Knafeh in a baking dish and cover loosely with foil to prevent it from drying out.
- Heat for 10–15 minutes until warmed through.
- Optionally drizzle a bit more syrup over the top before serving.
Microwave Option: If you’re in a rush, microwaving works in a pinch, but the dough will lose its crunch. About 30–60 seconds should do the trick, depending on your portion size.
Tip: If you know ahead of time you’ll have leftovers, try storing the syrup separately and drizzle it over individual portions after reheating. This helps maintain a better texture.
FAQs about Palestinian Knafeh Recipe
Can I make Knafeh ahead of time?
Yes, you can prep the layers and store them in the fridge (unbaked) for up to 24 hours. Just bake and add the syrup when ready to serve.
What cheese is best for Knafeh?
Traditionally, Nabulsi or Akawi cheese is used. If those aren’t available, a mix of low-moisture mozzarella and ricotta can work as a substitute.
Can I use phyllo dough instead of kataifi?
You can, but the texture won’t be the same. Kataifi gives that signature shredded crunch, while phyllo sheets are flakier and more pastry-like.
Is Knafeh gluten-free?
No, traditional Knafeh contains wheat-based kataifi dough. However, gluten-free versions can be made using alternative flours and gluten-free phyllo dough.
How long does Knafeh last in the fridge?
Properly stored, Knafeh can last 2–3 days in the fridge. For best results, reheat in the oven to revive its texture.
Conclusion
Palestinian Knafeh is more than just a dessert—it’s a celebration of tradition, culture, and family. Every bite tells a story of the Levant, of gatherings around warm ovens, of laughter shared over syrupy, cheesy goodness.
Whether you’re making it for a special holiday, a dinner party, or just to treat yourself, Knafeh delivers an experience that’s both comforting and unforgettable. With a little patience and the right ingredients, you can bring a piece of Palestine into your kitchen and share in a culinary tradition that spans centuries.
So, next time you’re craving something truly indulgent, skip the store-bought sweets—roll up your sleeves and make Knafeh from scratch. You’ll be glad you did.


