Italian Cannoli Recipe: Cannoli are one of Italy’s most iconic desserts—crispy, tube-shaped pastry shells stuffed with a sweet and creamy ricotta filling. Originating in Sicily, this delightful dessert was traditionally made during the Carnival season but quickly became a year-round favorite. They represent celebration, indulgence, and rich cultural heritage.
Every Italian bakery has their own variation, but one thing remains constant: cannoli are meant to be savored slowly, enjoyed with a cup of espresso or a sweet liqueur, and shared with loved ones. If you’ve never tried making them at home, you’re in for a real treat—and it’s easier than you might think with the right guidance.
What Makes Cannoli So Irresistible?
So what’s the secret behind their global appeal? It’s all in the contrast. The outer shell is golden, bubbly, and crispy—giving a satisfying crunch with every bite. The inside? Light, creamy, slightly tangy from the ricotta, and often enhanced with notes of citrus, chocolate chips, or even pistachios. It’s a marriage of textures and flavors that just works.
Cannoli also allow for a ton of personalization. Want a boozy touch? Add a splash of Marsala wine. Like them extra sweet? Toss in some powdered sugar or a drizzle of honey. This guide walks you through everything you need to make authentic cannoli that are just as good—if not better—than your favorite Italian bakery.
Essential Ingredients for Traditional Cannoli
Ingredients for the Cannoli Shells
To start, you’ll need the following ingredients to make the crispy shells:
- 2 cups all-purpose flour
- 2 tablespoons sugar
- 1/2 teaspoon salt
- 1 teaspoon cinnamon (optional)
- 3 tablespoons butter or lard, cut into cubes
- 1 egg
- 1/2 cup Marsala wine (or red wine as a substitute)
- 1 tablespoon white vinegar
- Oil for frying (vegetable or canola)
These ingredients come together to form a dough that’s elastic and flavorful, thanks to the wine and vinegar. The Marsala not only adds a touch of sweetness but helps create those signature bubbles on the shell as it fries.
Ingredients for the Creamy Ricotta Filling
The creamy filling is really the soul of the cannoli. Here’s what you need:
- 2 cups whole milk ricotta cheese (drained overnight)
- 1/2 cup powdered sugar (adjust to taste)
- 1/2 teaspoon vanilla extract
- 1/2 teaspoon orange zest or lemon zest (for brightness)
- 1/4 cup mini chocolate chips or chopped candied fruit (optional)
- 2 tablespoons heavy cream (optional, for extra smoothness)
The key here is to drain your ricotta well. This ensures your filling is thick and creamy—not runny. Trust us, this one step makes all the difference between a good cannoli and a perfect one.
Step-by-Step Guide to Making Cannoli
Step 1: Preparing the Cannoli Dough
Start by combining flour, sugar, salt, and cinnamon in a large mixing bowl. Cut in the butter or lard until the mixture resembles coarse crumbs. In a separate bowl, whisk together the egg, Marsala wine, and vinegar. Gradually add the wet ingredients to the dry, kneading the dough until it becomes smooth and elastic—about 10 minutes by hand or 5 minutes using a stand mixer with a dough hook.
Wrap the dough in plastic and let it rest at room temperature for at least 30 minutes. This resting period allows the gluten to relax, making the dough easier to roll out and shape.
Step 2: Shaping and Frying the Shells
Once rested, roll out the dough very thin—ideally to about 1/8 inch. Using a round cutter or a bowl, cut out circles (around 4 inches in diameter). Wrap each circle around a metal cannoli form, sealing the edge with a dab of egg white.
Heat oil in a deep fryer or large pot to 350°F (175°C). Fry the shells a few at a time until golden and bubbly, about 1-2 minutes per shell. Carefully remove them with tongs and let them cool slightly before sliding them off the forms. Drain on paper towels.
Want extra crunch? Let them sit uncovered for a few hours. Just don’t fill them yet—that comes later.
Step 3: Making the Sweet Ricotta Filling
While your shells cool, it’s time to whip up that heavenly filling. In a mixing bowl, combine the drained ricotta, powdered sugar, vanilla, and zest. Mix until smooth. If desired, fold in chocolate chips or candied fruit. For an extra silky texture, add a splash of heavy cream.
You can use a food processor or hand mixer, but don’t over-blend. You want the filling thick and pipeable, not runny. Once ready, transfer it into a piping bag with a large round tip.
Step 4: Assembling Your Cannoli
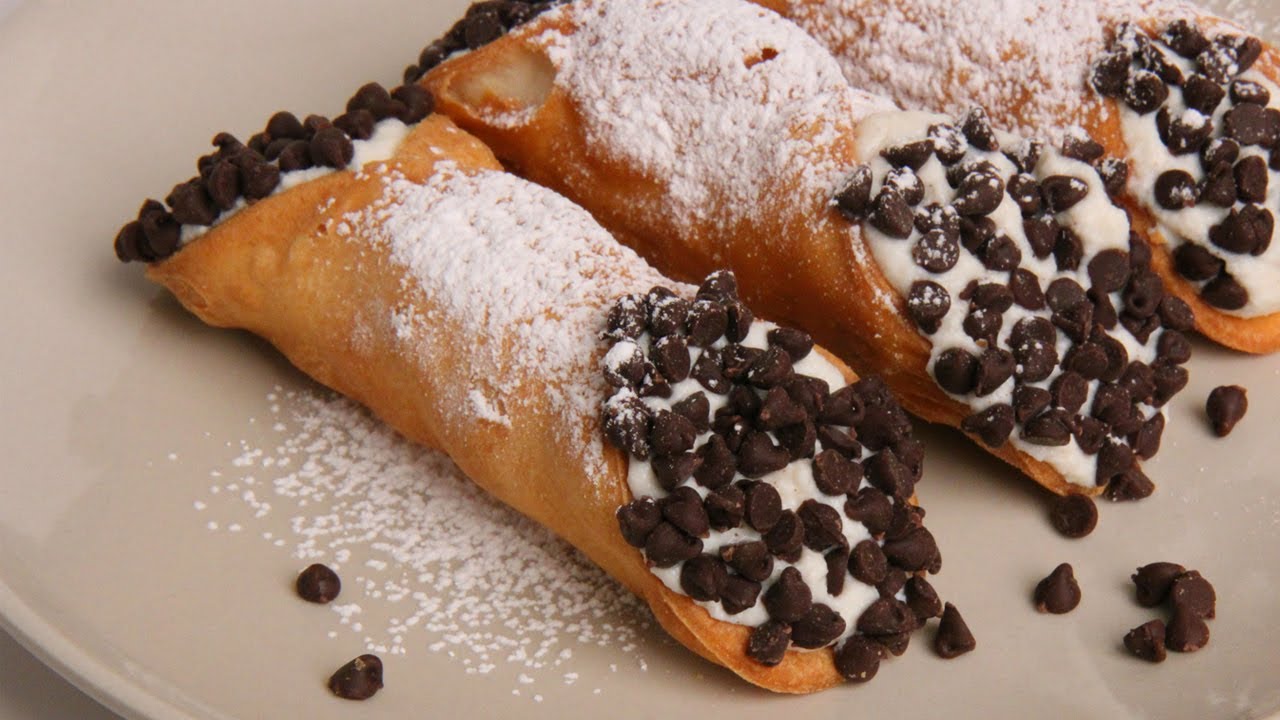
Right before serving, pipe the filling into both ends of each shell until full. For presentation, dip the ends in extra mini chocolate chips, crushed pistachios, or even colorful sprinkles. Finish with a dusting of powdered sugar over the top.
And there you have it—authentic, crispy, creamy cannoli made right in your kitchen.
Pro Tips for Perfect Cannoli
Draining Ricotta for a Firm Filling
One of the most overlooked steps in making cannoli is draining the ricotta. Skipping this can turn your filling into a soupy mess that seeps into your crispy shells. The goal? A thick, luscious, pipeable cream that holds its shape inside the shell.
Here’s how to do it:
- Place your ricotta in a cheesecloth or a fine-mesh sieve.
- Set it over a bowl and let it drain overnight in the fridge.
- If you’re short on time, gently press the ricotta with paper towels to remove excess moisture.
This step alone can elevate your cannoli game. It gives your filling that dense-yet-smooth texture you find in real-deal Italian bakeries. Plus, it helps keep your shells from going soggy.
Flavor Variations You Can Try
Cannoli are incredibly versatile, and once you’ve mastered the classic, you can have some fun experimenting. Here are a few creative flavor twists:
- Chocolate Cannoli: Add cocoa powder to the dough or dip the ends of the shells in melted chocolate.
- Pistachio Ricotta: Mix ground pistachios into the filling and top with crushed nuts for a nutty finish.
- Citrus Zest: Use lemon, orange, or even lime zest in the ricotta for a fresh zing.
- Liqueur Love: A splash of amaretto, limoncello, or rum in the filling adds an adult twist.
- Savory Cannoli: For a bold change, try a ricotta-herb filling for an appetizer-style cannoli.
Don’t be afraid to personalize. Whether you’re catering to a holiday theme or just having fun in the kitchen, the possibilities are endless.
Serving Suggestions and Storage
Best Time to Fill and Serve
Timing is everything when it comes to cannoli. The biggest mistake people make? Filling the shells too early. The moisture from the ricotta can quickly soften your crispy shell, robbing you of that iconic crunch.
Pro tip: Only fill cannoli right before serving—ideally no more than 1–2 hours in advance. If you must prep ahead, store the filling and shells separately and combine at the last minute.
For presentation, arrange them on a decorative tray, dust them generously with powdered sugar, and maybe garnish with maraschino cherries or chocolate shavings. Trust us, it’s a show-stopper.
Storing Cannoli Without Losing Crunch
Cannoli are best fresh, but if you have leftovers, here’s how to store them:
- Unfilled shells: Store in an airtight container at room temperature for up to a week. You can even refresh them in a low oven for a few minutes.
- Filled cannoli: Store in the refrigerator, loosely covered, for up to 24 hours. They’ll soften a bit, but still taste delicious.
- Ricotta filling: Keep in an airtight container in the fridge for up to 3 days.
Avoid freezing filled cannoli—ice crystals can destroy the texture. However, unfilled shells can be frozen and re-crisped when needed.
FAQs about Italian Cannoli Recipe
Can I bake the shells instead of frying them?
Yes, you can bake cannoli shells for a healthier alternative. However, baked shells won’t have the same crispy, bubbly texture as the traditional fried version. For best results, brush them lightly with oil and bake at 400°F until golden.
What can I substitute for ricotta?
If ricotta isn’t available, you can use mascarpone, cream cheese, or a blend of both. Just note that it will change the texture and taste slightly, but still be delicious.
How long will filled cannoli last?
Filled cannoli are best enjoyed within 2 hours of assembling. If refrigerated, they’ll last up to 24 hours, though the shells may lose their crunch.
Can I freeze cannoli shells?
Absolutely! Store unfilled, cooled shells in an airtight container or freezer bag for up to 2 months. Reheat in the oven to restore crispness before filling.
How do I make mini cannoli?
Use smaller round cutters (about 2.5 to 3 inches) and mini cannoli forms. The process is the same, just scaled down. Perfect for parties or bite-sized treats!
Conclusion
Making authentic Italian cannoli at home is a joyful, rewarding experience. From kneading the dough and shaping the shells to whipping up a sweet ricotta filling, each step is a labor of love that pays off in a bite that’s crispy, creamy, and unforgettable.
Cannoli aren’t just a dessert—they’re a celebration. A celebration of flavor, texture, and Italian heritage. Whether you’re sharing them with guests or treating yourself to a quiet indulgence, homemade cannoli always steal the show.
So roll up your sleeves, grab that rolling pin, and bring a taste of Sicily into your kitchen. Your taste buds will thank you.