Homemade Slime Recipe: Slime is a gooey, stretchy, and moldable substance that’s captivated kids and adults alike. It’s a DIY science experiment and sensory toy rolled into one. This popular craft has taken the internet by storm, making its way into schools, homes, and even therapy rooms. But what exactly is slime?
At its core, slime is a non-Newtonian fluid, which means it doesn’t behave like regular liquids or solids. It can ooze through your fingers like a liquid, but also hold its shape like a solid. The secret behind this magical consistency lies in the chemical reaction between glue and an activator (usually borax, contact lens solution, or baking soda). When mixed, they create a stretchy polymer substance that we all love to squish.
Why Make Slime at Home?
Why bother making slime at home when you can buy it in stores? The answer is simple: homemade slime is cheaper, customizable, and way more fun. Not only is it a great way to save money, but it also gives you full control over the ingredients you’re using. You can make it safer for young children by avoiding certain chemicals, and even tailor it to your preferences by adding glitter, scents, colors, or beads.
More than just a messy hobby, making slime is also an educational activity. It’s a fun way for kids to learn about science and chemistry without even realizing it. And let’s not forget the bonding time it offers between parents and children. There’s something incredibly satisfying about creating something from scratch with your own hands. Plus, watching that goo come together is nothing short of magical.
Essential Ingredients for Homemade Slime
Basic Ingredients You Need
The beauty of making slime at home is how simple it is. Most recipes require just a few ingredients that you probably already have in your kitchen or can find easily at a local store. Here’s what you need to get started:
- White School Glue (PVA Glue): This is the base of your slime. It creates the sticky, moldable texture.
- Water: Used to thin out the glue for a better consistency.
- Baking Soda: Helps firm up the slime and controls its thickness.
- Contact Lens Solution: Acts as the activator. Make sure it contains boric acid or sodium borate, which is necessary for the slime to form.
- Food Coloring (optional): For fun, vibrant colors.
These are the basic items for a standard slime recipe. The good news? Most of these are non-toxic and safe for older kids to handle with supervision.
Optional Add-ins for Fun and Texture
Want to take your slime to the next level? Add-ins can transform your simple goo into a masterpiece. Here are some optional extras to consider:
- Glitter: Adds sparkle and flair.
- Foam Beads: For a crunchy texture.
- Shaving Cream: Turns it into fluffy slime.
- Lotion or Baby Oil: For a softer, stretchier feel.
- Scented Oils or Extracts: To make it smell amazing.
- Glow-in-the-Dark Paint: Yes, you can make slime that glows!
These additions are entirely optional but offer a world of creativity. Let your kids (or your inner child) go wild with the combinations. Whether you want sparkly, crunchy, fluffy, or glowing slime, there’s a recipe out there for you.
Safety First – Tips Before You Start
Safety Guidelines for Kids
Before diving into the slime-making process, let’s talk safety. Although homemade slime is relatively safe, especially when made without borax powder, certain precautions are always smart—especially when working with younger children.
- Supervision is Key: Always supervise kids during slime making and playing.
- Avoid Ingestion: Slime is not edible. Make sure younger kids know not to put it in their mouths.
- Wash Hands: After playing with slime, hands should be washed thoroughly.
- Protect Clothing and Surfaces: Slime can stain, so use old clothes and cover your workspace with newspaper or a plastic tablecloth.
These simple steps ensure a safe, mess-free, and fun experience for everyone involved. After all, the goal is creative fun, not a trip to the dry cleaner!
Handling and Storing Slime Properly
Once your slime is made, you’ll want to keep it fresh and clean for as long as possible. Here are some helpful tips:
- Store in an Airtight Container: Plastic containers or zip-lock bags work perfectly.
- Keep in a Cool, Dry Place: Avoid direct sunlight or extreme temperatures.
- Don’t Mix with Dirt or Hair: Always play with slime on a clean surface and keep it away from pets.
Following these tips will help your slime last for weeks without drying out or becoming unusable.
Step-by-Step Guide to Making Basic Slime
Ingredients List for Basic Slime
Let’s get to the fun part: making the slime! Here’s a quick list of what you’ll need:
- 1/2 cup of white school glue
- 1/2 cup of water
- 1/2 teaspoon of baking soda
- 1 tablespoon of contact lens solution
- A few drops of food coloring (optional)
You can double or triple the recipe if you want to make a bigger batch. Just keep the ratios the same for the best results.
Mixing Instructions
- Combine Glue and Water: Pour the glue and water into a mixing bowl and stir until fully combined.
- Add Food Coloring: If using, add a few drops of food coloring and mix well.
- Add Baking Soda: Stir in the baking soda thoroughly.
- Add Contact Lens Solution: Slowly add the contact solution while stirring. The slime will start to form almost immediately.
- Knead the Slime: Once it begins to pull away from the bowl, use your hands to knead the slime. This helps improve its texture and stretchiness.
If the slime is too sticky, add a tiny bit more contact lens solution. If it’s too stiff, add a few drops of water.
Troubleshooting Common Slime Issues
- Too Sticky? Add more contact lens solution gradually.
- Too Runny? Try adding a pinch more baking soda.
- Too Hard? Add some lotion or water and knead again.
- Won’t Form? Double-check your ingredients—especially the contact solution. It must contain boric acid or sodium borate.
Getting the consistency just right might take a little practice, but once you’ve nailed it, you’ll be hooked!
Variations of Slime Recipes
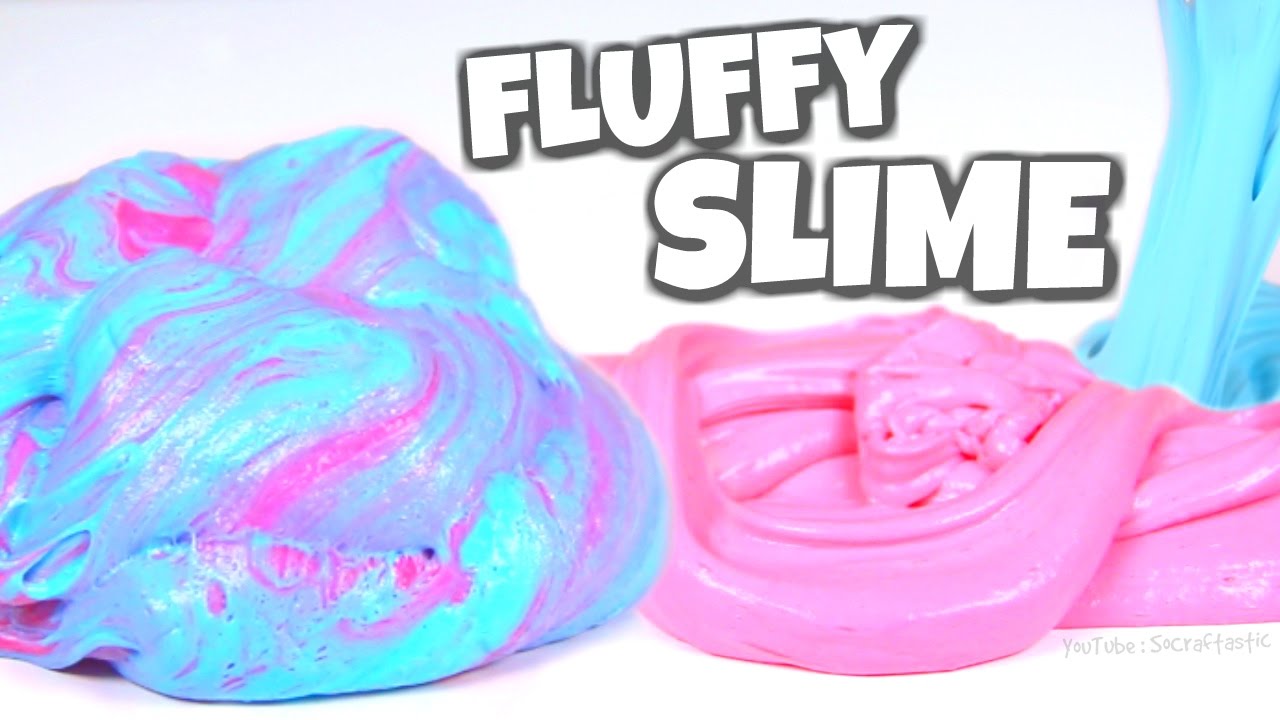
Fluffy Slime
Fluffy slime is a fan favorite thanks to its pillowy texture and satisfying stretch. If you want to give your slime a cloud-like makeover, this variation is for you.
Ingredients Needed:
- 1/2 cup white school glue
- 1/2 cup shaving cream
- 1/2 tsp baking soda
- 1 tbsp contact lens solution
- Food coloring (optional)
How to Make It:
Start by mixing your glue and shaving cream in a bowl. Add in the food coloring to give it a fun tint. Stir in the baking soda next, and finally the contact solution. The more shaving cream you use, the fluffier the slime gets. Once it forms, knead it until it’s smooth and stretchy.
Pro Tips:
- Avoid over-activating—too much contact solution can make it rubbery.
- Use sensitive skin shaving cream if you’re concerned about irritation.
- It will lose fluffiness over time, but can be fluffed again with a little more shaving cream.
Fluffy slime is incredibly soft and fun to squish, making it a great sensory experience for all ages.
Glitter Slime
Want to glam things up? Glitter slime is where it’s at! Perfect for parties or as a sparkly gift, this version adds a little magic to the mix.
Ingredients Needed:
- 1/2 cup clear school glue
- 1/2 tsp baking soda
- 1 tbsp contact lens solution
- Glitter (any color or combo)
Steps to Make It:
Mix the glue and baking soda first. Add your glitter generously—you can never have too much sparkle! Add the contact lens solution and mix until it begins to form. Knead the slime until it stops sticking to your hands.
Custom Ideas:
- Try different glitter types: chunky, fine, holographic, or themed shapes.
- Mix in glow-in-the-dark glitter for extra fun.
- Use colored glitter glue to save time and get even color coverage.
This slime is especially fun for kids who love crafts and sparkle. Plus, it looks great stored in clear containers.
Clear Slime
Clear slime is beautiful and mesmerizing. It has a glass-like appearance and can be used as a base for other variations like jelly cubes or confetti slime.
Ingredients Needed:
- 1/2 cup clear school glue
- 1/2 tsp baking soda
- 1 tbsp contact lens solution
- Water (optional, for consistency)
How to Make It:
Combine the clear glue with baking soda and stir until well mixed. Slowly add contact solution while mixing. You’ll notice the slime forming. Knead gently until smooth.
Extra Tips:
- For a crystal-clear finish, let the slime rest in a sealed container for 1-2 days.
- Keep air bubbles to a minimum by stirring gently.
- Do not add color if you want to maintain the transparency.
Clear slime is perfect for artistic creations. You can embed tiny toys, charms, or beads to create your own slime masterpiece.
Cleaning Up After Slime Time
How to Clean Slime Off Clothes and Surfaces
As much fun as slime is, it can be a bit of a mess-maker. Luckily, cleaning it up doesn’t have to be a nightmare.
Cleaning Off Clothes:
- Scrape off as much slime as possible with a dull knife or spoon.
- Rinse the fabric under cold water.
- Apply white vinegar to the stained area and gently rub with your fingers.
- Let it sit for a few minutes, then wash with laundry detergent.
Cleaning Off Carpets and Furniture:
- Blot the area with vinegar or rubbing alcohol.
- Use a brush or cloth to work the slime out.
- Rinse with warm water and blot dry.
Preventive Tips:
- Always play on a slime-safe surface.
- Use aprons or old clothes.
- Keep slime away from upholstered furniture and carpets.
With these tricks, you’ll be a pro at slime cleanup in no time.
How to Store Slime to Keep It Fresh
Nobody wants to put time and effort into making slime only for it to dry out or go bad. Proper storage is key to keeping it squishy and stretchy for weeks.
Best Storage Practices:
- Store slime in an airtight container—Tupperware or zip-lock bags work great.
- Label each slime batch with a date so you know how old it is.
- Keep it in a cool, dry place—avoid direct sunlight or heat sources.
Reviving Dry Slime:
- Add a few drops of warm water or lotion and knead.
- For fluffy slime, a pump of shaving cream can help revive the fluffiness.
- If it’s too rubbery, a drop of baby oil might bring it back to life.
When to Toss It:
- If it smells bad, changes color oddly, or becomes too sticky or hard, it’s probably time to let it go.
Good storage habits can make your slime last for weeks—or even months—with minimal maintenance.
FAQs about Slime Recipe
Can I make slime without borax?
Yes, you can! Instead of borax powder, you can use contact lens solution that contains boric acid or liquid starch as the activator. These alternatives are just as effective and often safer for young children.
What can I use instead of glue?
If you want a glue-free recipe, try cornstarch and shampoo or psyllium husk and water (microwave method). While these don’t give you the classic slime feel, they are safe and fun alternatives.
Is slime safe for toddlers?
Slime can be safe for toddlers with adult supervision and non-toxic ingredients. Avoid recipes with borax or harsh chemicals. Stick to edible slime versions made with items like marshmallows, cornstarch, or yogurt.
How long does homemade slime last?
Homemade slime can last anywhere from 1 to 4 weeks, depending on the ingredients used and how well it’s stored. Always keep it in an airtight container and check for any signs of mold or smell before each use.
Can slime go bad?
Yes, slime can go bad. If it smells odd, changes color drastically, becomes too sticky, or grows mold, it’s best to throw it out and make a new batch.
Conclusion
The beauty of homemade slime lies in its simplicity and customization. With just a few household ingredients and some optional flair like colors, glitter, or textures, you can create something truly unique. Plus, the step-by-step process offers an engaging mix of fun and education, perfect for kids and adults alike.
Whether you’re making slime for a rainy-day activity, a classroom science experiment, or just a break from screen time, the joy it brings is worth the (sometimes sticky) effort. Just remember the key tips: measure accurately, follow the instructions, and don’t be afraid to get a little messy. The results are always worth it.
So go ahead, gather your ingredients, and dive into the wonderfully weird world of slime. Once you start, you might just find yourself coming back to experiment with new colors, textures, and ideas over and over again. Happy slime-making!


