Homemade Onion Rings Recipe: There’s something undeniably satisfying about biting into a freshly fried onion ring. That crispy crunch followed by the sweet and savory burst of onion flavor is just magical. But store-bought onion rings or fast-food versions rarely hit the spot like a homemade batch can. If you’ve never tried making onion rings from scratch, you’re in for a delicious treat.
Why Make Onion Rings at Home?
First off, making onion rings at home lets you control everything—from the freshness of the onions to the thickness of the batter and the choice of oil. No more guessing what went into your snack. Plus, the satisfaction of cooking your own crispy rings from scratch? Totally worth it.
Most store-bought options are either frozen or overly greasy. At home, you get that golden-brown texture without the soggy mess. And hey, it’s way more fun, especially if you enjoy experimenting in the kitchen.
What Makes Onion Rings So Addictive?
Let’s talk texture and flavor. Onion rings hit you with the ultimate crunch factor, followed by a soft, slightly sweet onion bite. It’s the kind of contrast that keeps your hand going back for more. When done right, the batter is light and crisp—not heavy or doughy—and complements the onion without overpowering it.
Onion rings are also super versatile. Serve them as an appetizer, a side dish, or even as a crunchy burger topping. Whether you’re hosting game night or just treating yourself, onion rings are always a crowd-pleaser.
Ingredients Needed for Homemade Onion Rings
Before diving into the cooking process, let’s get your shopping list ready. Good ingredients make great onion rings.
Fresh and Crispy Essentials
Here’s what you’ll need for a basic, foolproof onion ring recipe:
- Large yellow or white onions (2–3, peeled)
- All-purpose flour (1 cup)
- Cornstarch (½ cup for extra crispiness)
- Baking powder (1 tsp)
- Salt (1 tsp)
- Black pepper (½ tsp)
- Paprika or cayenne (optional, for a little kick)
- Cold sparkling water or club soda (1 cup – this makes the batter airy)
- Breadcrumbs or panko (for extra crunch, optional)
- Oil for frying (canola, peanut, or vegetable oil)
Make sure everything is pre-measured. Trust me—it saves a ton of stress when you’re juggling hot oil and batter.
Recommended Oils and Seasonings
The oil you choose matters. Go for something with a high smoke point like canola, vegetable, or peanut oil. Avoid olive oil, as it can burn easily at frying temperatures.
For seasoning, it’s all about balance. Salt and pepper are musts, but feel free to mix in some garlic powder, paprika, or a touch of cayenne for spice. Want to go bold? Try curry powder or smoked paprika for a flavor twist.
Tools and Equipment You’ll Need
Having the right tools makes everything easier—and safer.
Kitchen Gear Checklist
Here’s what you need to pull off the perfect onion ring batch:
- Sharp knife
- Large mixing bowls
- Whisk or fork (for mixing batter)
- Slotted spoon or tongs (for flipping)
- Deep fryer or heavy-bottomed pot
- Thermometer (optional but super helpful)
- Paper towels or cooling rack (for draining)
- Baking sheet (to keep rings warm in the oven)
A thermometer helps you keep the oil between 350°F to 375°F—key for crispy results. Without one, toss in a bit of batter; if it sizzles and floats, you’re good.
Frying Tips for Perfect Texture
Always fry in small batches to avoid dropping the oil temperature. Overcrowding the pot leads to soggy rings, and nobody wants that. Also, give your rings a few seconds to cool before diving in—they’ll firm up nicely and develop that signature crunch.
Step-by-Step Guide to Making Homemade Onion Rings
Let’s break it down step by step. Don’t worry—this process is easier than you think and totally worth the few extra dishes.
Step 1: Choosing the Right Onion
Go for large yellow or white onions. They’re sweet, flavorful, and perfect for frying. Red onions can work too but have a sharper flavor. Cut off both ends and peel off the skin.
Slice the onions into ½-inch thick rounds, then gently separate them into individual rings. Save the tiny inner rings for stir-fries or salad—they’re tough to batter evenly.
Step 2: Slicing and Separating Rings
Once sliced, gently press each ring to separate them cleanly. Try to keep the rings intact. A little patience here pays off later. If some break, it’s okay—those can be tester pieces for your first fry batch.
Place your separated rings in a bowl of cold water or buttermilk and let them soak for 10–15 minutes. This softens them slightly and cuts the sharpness of the raw onion flavor.
Step 3: Prepping the Batter
This is where the magic begins. The batter is what gives onion rings that irresistible crunch, so let’s do it right.
In a large bowl, mix 1 cup of all-purpose flour, ½ cup of cornstarch, 1 tsp of baking powder, 1 tsp of salt, ½ tsp of black pepper, and a pinch of paprika or cayenne if you like a kick. Slowly whisk in 1 cup of cold sparkling water or club soda. The fizz is key—it creates those light, airy pockets in the batter that make onion rings beautifully crispy.
The texture of the batter should be smooth and slightly thick, but not too gloopy. Think pancake batter consistency. If it’s too thick, add a splash more soda water. If too runny, sprinkle in a bit more flour.
Want a breadcrumb layer? Set aside another bowl with panko breadcrumbs for a double-coat. Dip in batter, then dredge through the breadcrumbs before frying. This step isn’t traditional, but it adds a serious crunch factor.
Step 4: Dredging and Coating
Take each soaked onion ring and pat it dry with a paper towel. This helps the batter stick. First, dredge it lightly in plain flour—just a quick dusting. This step gives the wet batter something to cling to.
Next, dip the ring into your prepared batter. Let any excess drip off. If you’re going for a double layer of crunch, press it gently into the panko breadcrumbs now.
Pro tip: Use one hand for the wet ingredients and the other for dry to avoid turning your fingers into batter-coated claws.
Lay the coated rings on a plate or rack while you prep the rest. Try not to stack them—they’ll stick together.
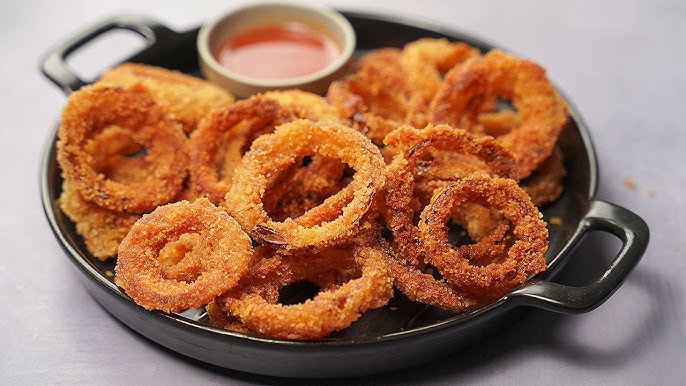
Step 5: Frying to Golden Perfection
Heat your oil to 350°F (175°C). If you don’t have a thermometer, toss a drop of batter in—it should sizzle immediately and float to the top.
Gently lower the onion rings into the oil, one at a time. Don’t overcrowd the pot—fry in small batches of 4–6 rings, depending on the size of your pot. This keeps the oil temperature steady.
Fry each batch for about 2–3 minutes, flipping once halfway through, until golden brown. You’re looking for a deep, even color—not pale or too dark.
Use a slotted spoon or tongs to remove the rings and let them drain on a cooling rack or paper towels. Hit them with a sprinkle of salt while they’re hot. Trust me—this step is key for flavor.
Step 6: Draining and Serving
Once all the onion rings are fried and golden, it’s time to serve. If you’re not eating them immediately (which is impressive self-control), keep them warm in an oven set to 200°F (93°C).
Avoid covering them or sealing them in a container right away—they’ll steam and lose their crispness. Let them breathe a bit on a rack.
Serve them hot with your favorite dipping sauces. They also make killer sides for burgers, sandwiches, or even on their own as a crunchy snack.
Pro Tips to Elevate Your Onion Rings Game
Want to go from good to restaurant-quality? Here’s how:
How to Make Them Extra Crispy
- Use cold batter: Keep the batter chilled until you’re ready to fry.
- Opt for sparkling water or beer in your batter to add extra air and crunch.
- Add a bit of cornstarch to your flour mix—it creates a drier, crispier coating.
- Double dip: First in batter, then in breadcrumbs like panko for that pro-level crunch.
Also, don’t skip the flour dusting step before dipping in batter—it helps the coating stick better and makes a big difference.
Variations and Flavors to Try
- Spicy Rings: Add cayenne or chili powder to your batter.
- Cheesy Crust: Mix grated Parmesan with panko.
- Gluten-Free: Use rice flour or chickpea flour instead of all-purpose.
- Beer Batter: Swap soda water for a light beer—this adds depth and flavor.
Experiment with different coatings and seasonings. Onion rings are a blank canvas waiting for your flavor twist.
Serving Suggestions and Dipping Sauces
While onion rings are fantastic on their own, pairing them with the right dips and dishes can take things to a whole new level. Whether you’re prepping for a game-day snack spread or just upgrading your lunch, here are some tasty pairings.
Classic Combos
The most timeless way to enjoy onion rings? Alongside a juicy cheeseburger and fries. The crispy rings provide that perfect contrast to a soft, savory sandwich. They’re also amazing with hot dogs, grilled sandwiches, or barbecue meats.
Want a fun twist? Use onion rings as a topping for burgers. Slide one or two giant rings right onto your patty for extra crunch and flavor. You can even build a burger tower with rings stacked between every layer—go big or go home, right?
For appetizers, arrange onion rings on a platter with a trio of dipping sauces. They’re the kind of finger food that disappears fast at parties.
Creative Sauce Ideas
Here’s where you can really let your flavor imagination run wild. Onion rings and sauces are best friends. Try these:
- Classic Ranch: Cool and herby, a go-to dip.
- Garlic Aioli: Creamy with a bold garlic punch.
- Spicy Sriracha Mayo: A mix of mayo and sriracha for heat and creaminess.
- Honey Mustard: Sweet, tangy, and addictively good.
- Cheese Sauce: Warm and gooey cheddar pairs perfectly with crispy rings.
- BBQ Sauce: Smoky and sweet for a Southern-style flavor combo.
Want a healthier option? Mix Greek yogurt with lemon, dill, and garlic for a light dip. Or go international with tzatziki or chipotle crema. The possibilities are endless—and delicious.
Storage and Reheating Tips
So, you’ve made a huge batch of onion rings (respect), but you can’t finish them all in one go. Don’t worry—they can be stored and revived pretty well with a few tricks.
How to Keep Them Crispy
To store leftover onion rings, let them cool completely first. Then, layer them in an airtight container with parchment paper between layers to prevent sticking.
Refrigerate for up to 3 days, but the sooner you eat them, the better they’ll taste. Avoid sealing them while still hot or warm—trapped steam will make them soggy.
For longer storage, you can freeze them. Arrange the rings on a baking sheet in a single layer and freeze until solid. Then transfer to a freezer-safe bag or container. They’ll keep well for about a month.
Best Reheating Methods
Microwave? Nope. That’s a recipe for limp, sad rings.
Instead, try one of these:
- Oven Method: Preheat to 375°F (190°C), place rings on a wire rack over a baking sheet, and heat for 10–12 minutes.
- Air Fryer: 375°F for 5–6 minutes works wonders—crispy and fast.
- Skillet Reheat: A quick fry in a nonstick pan with a tiny bit of oil revives the crunch well.
Avoid covering them during reheating—steam is the enemy of crispiness.
FAQs about Onion Rings Recipe
1. Can I make onion rings without deep frying them?
Yes! Try baking them at 425°F with a drizzle of oil or use an air fryer for a healthier, crispy result.
2. What type of onion works best for onion rings?
Yellow or white onions are ideal—they’re sweet, flavorful, and hold up well when fried.
3. Can I make the batter ahead of time?
It’s best used fresh, but you can prep dry ingredients in advance and mix in the wet just before frying.
4. How do I stop the batter from falling off?
Pat the onion rings dry before battering, and dust with flour before dipping in the wet batter. This helps the coating stick.
5. Are onion rings vegan?
They can be! Use plant-based milk or water and ensure your batter and breadcrumbs don’t contain dairy or eggs.
Conclusion
Homemade onion rings aren’t just a snack—they’re a statement. They say, “I know good food, and I can make it myself.” Whether you’re throwing a party, prepping a movie-night treat, or just craving something crispy and golden, this step-by-step guide gives you everything you need.
From choosing the perfect onion and crafting a light, bubbly batter to achieving that ultimate crunch in every bite, you’ve now got all the tools to make onion rings that rival (and probably beat) any restaurant version. Bonus: you can customize them however you want.
So grab those onions, fire up the fryer, and get cooking. Your crispy masterpiece awaits.


