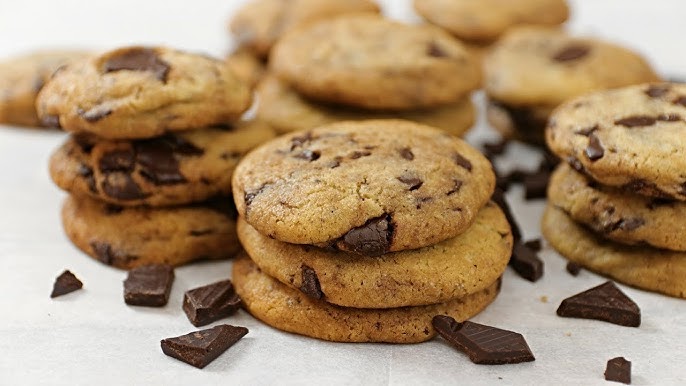
Gluten Free Chocolate Chip Cookie Recipe: More people are switching to a gluten-free lifestyle than ever before—and not just those with celiac disease. For some, it’s about managing gluten sensitivity. For others, it’s a way to reduce inflammation, boost energy levels, or simply explore healthier alternatives. Whatever the reason, gluten-free baking has become a booming trend. But here’s the kicker: going gluten-free doesn’t mean you have to sacrifice flavor, especially when it comes to comfort foods like chocolate chip cookies. With the right ingredients and techniques, your gluten-free cookies can rival—and even surpass—their traditional counterparts.
Common Challenges in Gluten-Free Baking
Gluten-free baking has a bit of a learning curve. Without gluten to bind and give structure, your cookies can end up dry, crumbly, or flat. Texture is usually the first victim—nobody wants a cookie that tastes like sawdust or breaks apart in your hands. And then there’s the flavor. Gluten-free flours can sometimes taste off or feel gritty. But don’t worry—we’ll tackle all these issues head-on in this step-by-step guide.
Essential Ingredients for Gluten-Free Chocolate Chip Cookies
Choosing the Right Gluten-Free Flour
This is arguably the most critical part. Not all gluten-free flours are created equal. Some are made from rice, others from almonds, tapioca, or even chickpeas. The best gluten-free flour blends usually combine several sources and include a binding agent like xanthan gum or guar gum.
For this recipe, we recommend using a 1:1 gluten-free flour blend (sometimes labeled as “measure for measure”), which mimics the behavior of all-purpose flour. Brands like King Arthur, Bob’s Red Mill, or Cup4Cup are great starting points. Just make sure your blend includes xanthan gum—or add about ½ teaspoon per cup if not.
Key Ingredients You’ll Need
Here’s your shopping list for the ultimate gluten-free chocolate chip cookies:
- 1 cup unsalted butter (softened)
- 1 cup packed brown sugar
- ½ cup granulated sugar
- 2 large eggs
- 2 tsp vanilla extract
- 2¾ cups gluten-free all-purpose flour
- 1 tsp baking soda
- ½ tsp baking powder
- ½ tsp salt
- 2 cups semi-sweet chocolate chips (ensure they’re gluten-free)
- Optional: 1 cup chopped nuts (like walnuts or pecans)
Each ingredient plays a role. Brown sugar adds moisture and chewiness. Eggs bind the dough. Baking soda and powder help lift the cookies. And those chocolate chips? Well, they’re the stars of the show.
Tools and Equipment Needed
Must-Have Kitchen Tools
Before you dive into baking, make sure you have the right tools. Here’s what you’ll need:
- Mixing bowls (one large, one medium)
- Electric mixer or stand mixer
- Measuring cups and spoons
- Rubber spatula
- Cookie scoop (for evenly sized cookies)
- Baking sheet(s)
- Parchment paper or silicone baking mat
- Cooling rack
These basic tools will make your baking process smoother and more efficient.
Optional Tools for Better Results
Want to go the extra mile? Here are a few bonus tools that can elevate your cookie game:
- Kitchen scale (for accurate flour measurement)
- Cookie cooling rack
- Silicone mat (helps prevent sticking and promotes even baking)
- Ice cream scoop (makes for perfect cookie dough balls)
Having these extras on hand isn’t mandatory, but they can definitely make your cookies look and taste like they came from a pro bakery.
Step-by-Step Recipe Guide
Step 1: Preheat and Prepare
Start by preheating your oven to 350°F (175°C). This is a crucial step, so don’t skip it. A preheated oven ensures your cookies bake evenly right from the start. Line your baking sheets with parchment paper or silicone baking mats to prevent sticking and burning.
Step 2: Mix the Dry Ingredients
In a medium-sized mixing bowl, whisk together your dry ingredients: gluten-free flour, baking soda, baking powder, and salt. This step is more important than it sounds. Proper mixing of dry ingredients ensures that your leavening agents are evenly distributed, so every cookie rises evenly and tastes consistent.
If your gluten-free flour blend doesn’t contain xanthan gum, now is the time to add it—about ½ teaspoon per cup of flour. This will help mimic the elasticity and chew of regular cookies. Once everything is evenly combined, set the bowl aside. Pro tip: sifting your flour can reduce clumping and improve texture.
Step 3: Cream Butter and Sugar
In a large mixing bowl, cream together the softened butter, brown sugar, and granulated sugar. Use an electric mixer on medium speed for 2-3 minutes, or until the mixture turns fluffy and pale in color. Creaming is more than just mixing—it incorporates air into the batter, which helps your cookies become light and slightly crispy on the outside.
Brown sugar is essential here. It adds a rich, caramel-like flavor and contributes to the chewiness of the cookie. Don’t rush this step—proper creaming makes a noticeable difference in your final result.
Step 4: Add Eggs and Vanilla
Once the butter and sugar mixture is light and creamy, add in the eggs one at a time. Beat well after each addition. This step helps emulsify the mixture, creating a smooth, cohesive dough.
Then add the vanilla extract. Use pure vanilla if possible—it’s a small detail that makes a big flavor difference. The eggs provide structure and moisture, while the vanilla enhances the overall taste. Keep mixing until the mixture is smooth and uniform.
If you’re using any other liquid flavoring (like almond extract or even a dash of espresso), this is the moment to introduce it.
Step 5: Combine Wet and Dry Mixtures
Now it’s time to bring it all together. Gradually add the dry ingredients into the wet mixture. Mix on low speed to avoid flour flying everywhere, and continue until everything is just combined. You don’t want to overmix the dough, as it can lead to dense cookies.
At this point, the dough will be thick and slightly sticky—don’t worry, that’s perfect. If your dough feels too dry or crumbly, add a tablespoon of milk or water. Gluten-free flour can be a bit thirstier than regular flour, so adjustments are sometimes needed.
Step 6: Fold in the Chocolate Chips
Here comes the fun part—adding the chocolate chips! Fold in 2 cups of semi-sweet chocolate chips using a spatula or wooden spoon. Be gentle so you don’t overwork the dough. If you love extra chocolate, go ahead and sprinkle in a few more chips or even chunks.
Make sure your chocolate chips are labeled gluten-free. While many are naturally gluten-free, some brands may be processed in facilities that handle wheat. If you want to switch things up, try white chocolate chips, dark chocolate chunks, or even peanut butter chips.
Step 7: Chill the Dough
This step is often skipped—but don’t! Chilling the dough for at least 30 minutes (or up to 24 hours) is a game-changer. When you let the dough rest in the fridge, a few magical things happen:
- The fat (butter) solidifies, which means the cookies spread less and bake more evenly.
- The flour has more time to absorb the moisture, leading to better texture.
- The flavors deepen and become more pronounced.
Cover your mixing bowl tightly with plastic wrap or transfer the dough into an airtight container. If you’re in a rush, even 20 minutes of chill time is better than none.
Step 8: Scoop and Shape Cookies
Once chilled, it’s time to portion the dough. Use a cookie scoop or tablespoon to form evenly-sized dough balls—about 1.5 to 2 tablespoons each. Roll them gently between your palms if needed to make smooth, round balls.
Place them on your prepared baking sheets, spacing each ball about 2 inches apart. These cookies will spread a bit as they bake, so give them room to breathe. For a bakery-style look, press a few extra chocolate chips into the tops of each ball before baking. It makes a big difference in presentation.
Step 9: Bake to Perfection
Bake the cookies at 350°F (175°C) for 10 to 12 minutes. Watch closely around the 10-minute mark. The edges should look golden brown while the centers might still appear slightly underbaked—that’s exactly what you want. They’ll continue to set as they cool.
If you like your cookies soft and chewy, pull them out right when the edges are set. For a crispier texture, let them bake another minute or two. Every oven is a little different, so don’t be afraid to adjust based on how your cookies are looking and smelling.
Pro Tip: Bake one test cookie first to see how it spreads. If it’s too flat, chill the dough longer. If it doesn’t spread enough, flatten the balls slightly before baking.
Step 10: Cooling and Storing
Once out of the oven, let the cookies cool on the baking sheet for 5 minutes. Then transfer them to a wire rack to cool completely. This helps them firm up without getting soggy on the bottom.
Store cooled cookies in an airtight container at room temperature for up to 5 days. If they start to lose their freshness, pop one in the microwave for 10 seconds—it’ll taste like it just came out of the oven!
Want to make them last longer? Freeze the dough balls on a tray, then transfer to a freezer bag for easy baking anytime. Or freeze the baked cookies in an airtight container with parchment paper between layers.
Tips for Perfect Gluten-Free Cookies Every Time
Avoiding Gritty Texture
The biggest complaint in gluten-free baking? Gritty texture. Here’s how to fix it:
- Let your dough rest. Chilling gives the flour time to absorb liquid and soften up.
- Use a fine-textured flour blend. Blends with rice flour can be gritty unless finely milled.
- Don’t skip xanthan gum—it helps give structure and improves mouthfeel.
Also, avoid overbaking, which can make gluten-free cookies tough and crumbly.
Keeping Cookies Moist and Chewy
Moisture retention is key in gluten-free baking. Here’s how to keep your cookies irresistibly chewy:
- Use brown sugar: its molasses content adds moisture.
- Add an extra egg yolk: the fat from the yolk helps create a soft center.
- Store with a slice of bread: it keeps the cookies from drying out (but change it every few days).
These small tweaks make a big difference in ensuring your cookies stay fresh, soft, and delicious.
Variations and Customizations
Vegan and Dairy-Free Options
Looking to make these cookies vegan or dairy-free? No problem! Gluten-free doesn’t have to mean sacrificing flexibility. Here’s how to adjust the recipe:
- Butter Substitute: Use plant-based butter or coconut oil. Stick butters tend to work better than tubs for texture.
- Egg Substitute: Try flax eggs (1 tbsp ground flaxseed + 3 tbsp water = 1 egg). Let it sit for 10 minutes before adding to your batter.
- Chocolate Chips: Make sure your chocolate chips are dairy-free. Brands like Enjoy Life are top choices for allergen-friendly chocolate.
These swaps will yield slightly different textures but still absolutely delicious results. They’re perfect for accommodating dietary needs without sacrificing that classic cookie taste.
Nut Additions and Flavor Twists
Want to kick things up a notch? Here are some ideas to personalize your gluten-free chocolate chip cookies:
- Nuts: Add chopped walnuts, pecans, or macadamia nuts for crunch.
- Spices: A dash of cinnamon or nutmeg can add warmth.
- Coconut: Shredded coconut brings a tropical twist.
- Dried Fruit: Mix in dried cranberries or cherries for a chewy surprise.
- Double Chocolate: Replace ¼ cup of flour with unsweetened cocoa powder for a double chocolate version.
The beauty of this base recipe is how adaptable it is. Make it your own and have fun experimenting!
FAQs about Gluten Free Chocolate Chip Cookie Recipe
Can I use almond flour instead of gluten-free flour?
Almond flour has a different fat and moisture content, so it can’t be substituted 1:1 for a gluten-free all-purpose blend. If using almond flour, you’ll need to adjust other ingredients, and the cookies may turn out denser and more moist.
How do I store gluten-free cookies?
Store them in an airtight container at room temperature for up to 5 days. For longer storage, freeze in airtight bags with parchment between layers.
Can I freeze the cookie dough?
Absolutely! Scoop and freeze dough balls on a baking sheet, then transfer to a freezer bag. Bake from frozen—just add a minute or two to the baking time.
Are chocolate chips always gluten-free?
Not always. While chocolate itself is gluten-free, some brands may add gluten-containing fillers or be processed in shared facilities. Always check labels for certified gluten-free options.
What makes gluten-free cookies spread too much?
Too much butter or not enough structure (from flour or xanthan gum) can cause spreading. Chilling the dough and using a properly balanced flour blend helps prevent this.
Conclusion
And there you have it—a foolproof, step-by-step guide to making the best gluten-free chocolate chip cookies ever. Whether you’re baking for dietary reasons, experimenting with new ingredients, or simply in the mood for a rich, chewy treat, this recipe has got you covered. The key lies in quality ingredients, a little patience (hello, dough chilling!), and not being afraid to tweak things to your taste.
Baking gluten-free doesn’t mean compromising on flavor or texture. With this guide, you’re now armed with all the tips and tricks to bake cookies that are soft, gooey, golden, and downright crave-worthy. So what are you waiting for? Go preheat that oven and let the magic begin.


