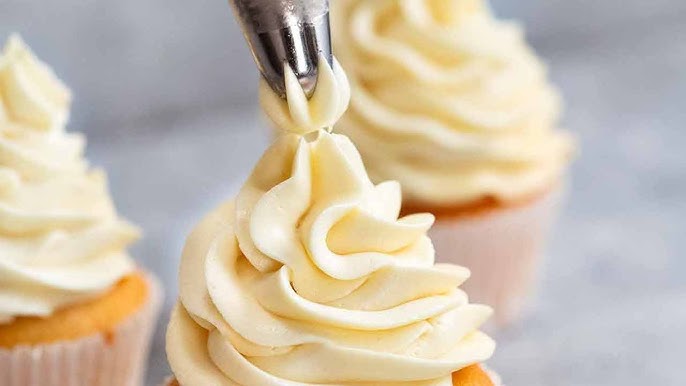
Ermine Frosting Recipe: If you’re a fan of silky-smooth frosting that’s not overly sweet, then you’re in for a treat. Ermine frosting, also known as boiled milk frosting or flour frosting, is a classic, old-fashioned topping that transforms cakes into dreamy delights.
Let’s walk through this luscious, cloud-like frosting recipe step by step. You’ll never look at buttercream the same way again.
Introduction to Ermine Frosting
Ermine frosting isn’t your typical icing. It’s light, buttery, and has a subtly sweet flavor that lets your cake shine without overpowering it. Originally paired with red velvet cake before cream cheese frosting stole the show, this frosting is making a delicious comeback—and for good reason.
Unlike American buttercream, which can be a bit cloying with its high sugar content, ermine frosting is based on a cooked flour and milk mixture. That base is then whipped with butter and sugar to create a mousse-like consistency that’s absolutely irresistible. The result? A pipeable, spreadable frosting that feels as luxurious as whipped cream but with the stability of buttercream.
Ingredients Needed for Ermine Frosting
Before we get into the nitty-gritty steps, let’s start by gathering everything you’ll need. Here’s a quick list of the ingredients to make about 2½ cups of frosting—enough for a standard 2-layer cake.
Core Ingredients:
- 1 cup (240 ml) whole milk
- 3 tablespoons (24 grams) all-purpose flour
- 1 cup (200 grams) granulated sugar
- 1 cup (226 grams) unsalted butter, softened
- 1 teaspoon vanilla extract
- Pinch of salt (optional)
Ingredient Notes:
- Milk: Whole milk yields the creamiest result, but you can use 2% if that’s what you have.
- Butter: Make sure it’s unsalted and fully softened to room temperature for easy whipping.
- Flour: All-purpose flour works best. Avoid using self-rising flour or cake flour.
- Sugar: Some folks use powdered sugar, but traditional recipes stick with granulated sugar. Trust the process—it’ll dissolve beautifully.
If you’re feeling adventurous, you can also infuse the milk with herbs (like lavender) or spices (like cinnamon) for a twist.
Tools You’ll Need
Having the right tools makes this recipe foolproof. Here’s what you’ll want on hand before you begin:
Kitchen Equipment Checklist:
- Medium saucepan
- Whisk
- Fine mesh strainer (optional)
- Stand mixer or hand mixer
- Mixing bowl
- Rubber spatula
- Measuring cups and spoons
Preparation Tips:
- Use a heavy-bottomed saucepan to avoid scorching the milk-flour mixture.
- Let your butter sit out for at least 1 hour to fully soften.
- If you’re in a rush, spread the cooked mixture on a plate and refrigerate to cool it quickly.
Proper tools mean less stress, and less stress means fluffier frosting.
Step-by-Step Instructions to Make Ermine Frosting
This process might seem a little different if you’re used to making buttercream, but follow along carefully—every step is worth it.
Step 1: Preparing the Flour Mixture
Start by whisking together the flour and sugar in your saucepan. This dry blend is the heart of your frosting.
Pro tip: Whisking the flour and sugar first helps prevent lumps once you add the milk.
Now, slowly pour in the milk while whisking constantly. This prevents clumps from forming and creates a smooth slurry.
Step 2: Cooking the Mixture
Place the saucepan over medium heat. Whisk continuously as the mixture begins to thicken. This takes about 5–7 minutes.
You’ll know it’s ready when the texture resembles a thick pudding or pastry cream. It should coat the back of a spoon.
Don’t stop stirring! This part is key to preventing scorching and lumps.
Once thickened, remove from heat. If you want a super smooth frosting, you can press the mixture through a fine mesh strainer.
Step 3: Cooling Down the Base
Pour the mixture into a bowl and cover with plastic wrap, pressing it directly onto the surface to avoid skin formation.
Let it cool to room temperature naturally. You can also speed it up by refrigerating it, but ensure it’s fully cool before the next step. If it’s warm, it will melt the butter and ruin the frosting’s texture.
Step 4: Beating Butter and Combining
In a separate bowl, beat the softened butter for 3–5 minutes until it’s light, pale, and fluffy.
Then, gradually add the cooled milk-flour mixture, one tablespoon at a time, while beating continuously.
Keep whipping for about 5 minutes until the frosting is silky smooth and well combined. Add in your vanilla extract and a pinch of salt (if using) for flavor.
And there it is—beautiful, smooth Ermine frosting ready to spread or pipe!
Pro Tips for Perfect Ermine Frosting
Even though this frosting is pretty straightforward, a few tricks can take it from good to bakery-level greatness.
Texture Troubleshooting:
- Lumpy frosting? You probably didn’t whisk enough while cooking. Strain the cooked base before cooling to fix this.
- Too runny? Your base may have been undercooked, or your butter was too soft. Pop the frosting in the fridge for 10–15 minutes and then re-whip.
- Curdled appearance? Don’t panic. Keep whipping—it usually comes together with more mixing.
Flavor Enhancements:
- Add a bit of almond or coconut extract for a flavor twist.
- Mix in melted (and cooled) white chocolate for a richer texture.
- Fold in lemon zest or espresso powder to suit your cake flavor.
Storage Tips:
Ermine frosting is best used immediately, but you can refrigerate it for up to 5 days. Let it come to room temp and re-whip before using.
You can also freeze it for up to a month. Just thaw in the fridge overnight and whip before spreading.
Creative Uses for Ermine Frosting
Sure, it’s dreamy on cakes, but Ermine frosting has way more uses than you might expect. Once you master the texture and taste, you’ll find yourself reaching for it for more than just traditional bakes.
1. Cake Layering and Decorating
Ermine frosting holds its shape beautifully, making it ideal for both rustic cake spreads and more intricate piping. It’s especially perfect for layer cakes, thanks to its light yet sturdy consistency. Whether you’re stacking a three-tier vanilla cake or something rich like red velvet, this frosting won’t slump or slide.
Try it with:
- Chocolate cake
- Coconut cake
- Lemon chiffon
- Carrot cake
2. Cupcakes and Fillings
This frosting pipes wonderfully onto cupcakes and can be easily colored with food gel. You can also use it as a filling inside cupcakes or even sandwich cookies for a creamy surprise.
Pro tip: Chill it slightly before piping to help hold more elaborate shapes.
3. Cookie Sandwiches and Pastries
Use a small amount between two sugar cookies or piped into puff pastries. The smooth texture mimics whipped cream but stays stable for longer, especially at room temperature.
Ermine Frosting vs. Buttercream: What’s the Difference?
Still wondering why you should go the extra mile for Ermine frosting when American buttercream is quicker? Here’s a side-by-side comparison that clears things up:
| Feature | Ermine Frosting | American Buttercream |
|---|---|---|
| Texture | Silky, mousse-like | Dense, sometimes gritty |
| Sweetness | Mild | Very sweet |
| Stability | Stable but softer than buttercream | Extremely stable |
| Ease of piping | Excellent with some chilling | Very stiff, easy to pipe |
| Base ingredients | Flour, milk, butter, sugar | Butter and powdered sugar |
| Cooking required? | Yes | No |
| Ideal for | Layer cakes, cupcakes, smooth finishes | Piped decorations, firm coverage |
As you can see, each has its own perks—but if you’re after a more balanced, creamy flavor, Ermine takes the cake.
Common Mistakes to Avoid
Even seasoned bakers slip up now and then. Here are some common pitfalls when making Ermine frosting—and how to dodge them.
1. Not Cooling the Roux Enough
This is probably the number one mistake. If your flour-milk base is still warm when added to the butter, the mixture can split or become runny. Always bring it to room temperature first.
2. Using Cold Butter
Cold butter won’t whip up smoothly and won’t incorporate well with the flour base. Make sure it’s softened to room temperature—not melted, just soft enough to leave a finger indent.
3. Overheating the Flour Mixture
If you overcook the base, it may become too thick and gelatinous, leading to a gummy texture in the final frosting. Aim for a thick but pourable pudding consistency.
4. Not Whipping Long Enough
Sometimes the frosting may look curdled or separated at first, especially after adding the milk base. Keep whipping—consistency improves the longer you beat it.
How to Flavor Your Ermine Frosting
Once you’ve nailed the base recipe, feel free to get creative with flavors. This frosting is like a blank canvas.
Flavor Variations:
- Chocolate Ermine Frosting: Add 1/3 cup of unsweetened cocoa powder or 4 oz of melted (and cooled) dark chocolate to the butter before whipping.
- Coffee Infusion: Dissolve 1 teaspoon of instant espresso powder in the milk before cooking.
- Citrus Twist: Add lemon zest or orange extract along with the vanilla.
- Berry Boost: Puree strawberries or raspberries and fold into the final mixture for a fruity touch (strain first to avoid seeds).
Storing and Freezing Tips
Ermine frosting isn’t just tasty—it’s practical too. Here’s how to make it last without sacrificing texture.
Refrigeration:
- Store in an airtight container for up to 5 days.
- Let it sit out for 30 minutes, then re-whip before use.
Freezing:
- Freeze for up to 1 month.
- Thaw overnight in the fridge, then re-whip to restore texture.
Avoid microwaving to soften—it can melt the butter and ruin the texture.
FAQs about Ermine Frosting Recipe
Q1: Can I make Ermine frosting without flour?
A: Not really—flour is essential to creating the thickened base that gives Ermine its signature texture. Without it, you won’t get the same result.
Q2: Is Ermine frosting safe for kids?
A: Absolutely! It uses simple ingredients and no raw eggs, making it kid-friendly and safe for everyone.
Q3: Why does my frosting look curdled?
A: That’s common if the base and butter are at different temperatures. Just keep whipping—it usually comes together with time.
Q4: Can I color Ermine frosting?
A: Yes! Gel food coloring works best. Add it after the final whip for the most accurate color.
Q5: Is this frosting good for hot weather?
A: It’s better than whipped cream but not as heat-stable as American buttercream. Keep it chilled if you’re serving outdoors.
Conclusion
There you have it—a complete guide to making, using, and perfecting Ermine frosting. It might take a couple of extra steps, but the end result is so worth it. Its silky, not-too-sweet, luxurious texture is perfect for cakes, cupcakes, and everything in between.
So next time you’re baking something special, ditch the store-bought buttercream and give this vintage gem a try. You’ll be hooked from the first bite.


