Energy Bites Recipe: Energy bites, also known as energy balls or protein balls, are small, nutrient-dense snacks designed to provide a quick boost of energy. Packed with wholesome ingredients like oats, nut butters, honey, seeds, and dried fruits, they are the perfect alternative to store-bought granola bars or sugary snacks. These no-bake snacks are incredibly versatile—you can make them sweet, savory, chewy, or crunchy based on your preference. Their popularity has soared due to how easy they are to make, how little mess they create, and the fact that they’re portable and perfect for a busy lifestyle.
You don’t need to be a chef to whip up a batch of energy bites. Most recipes require no oven, just one mixing bowl, and about 10 to 15 minutes of your time. They’re ideal for meal prepping, as you can make a large batch at once and enjoy them throughout the week. Plus, they’re kid-approved, making them a great addition to school lunches or after-school snacks.
Why Energy Bites Are the Perfect Snack
If you’re constantly on the go and find yourself reaching for less-than-ideal snack options, energy bites can be a game changer. Unlike many packaged snacks loaded with preservatives and refined sugars, energy bites are usually made from all-natural ingredients that offer real nutritional value. They provide a healthy mix of protein, fiber, and healthy fats that help stabilize blood sugar levels and keep you feeling full longer.
Whether you need a pre-workout boost, a mid-morning pick-me-up, or a sweet treat that doesn’t derail your health goals, energy bites fit the bill. They’re also an excellent option for people with dietary restrictions. You can easily make them vegan, gluten-free, paleo, or keto with a few simple swaps. They’re not just snacks—they’re fuel for your day.
Health Benefits of Energy Bites
Nutrient-Rich Ingredients
What makes energy bites truly special is the powerful punch of nutrients they deliver in such a small package. Oats, one of the most common base ingredients, are a great source of slow-digesting carbohydrates and fiber, which promote satiety and digestive health. Nut butters like almond, peanut, or cashew provide healthy fats and protein, essential for muscle repair and energy production.
Seeds such as chia, flax, and hemp are often added for an extra boost. These little superfoods are rich in omega-3 fatty acids, antioxidants, and plant-based protein. Dried fruits like cranberries, raisins, or dates not only add natural sweetness but also come packed with vitamins, minerals, and additional fiber. With such a blend of whole food ingredients, energy bites support heart health, improve metabolism, and help with blood sugar regulation.
Perfect for Pre- and Post-Workout
For anyone who exercises regularly, energy bites are a must-have. Eating a couple of these before a workout provides the body with quick-burning carbohydrates to fuel your session. The protein content helps preserve muscle mass during training. After a workout, energy bites support recovery by replenishing glycogen stores and aiding muscle repair, thanks to the mix of carbs and protein.
Unlike store-bought energy bars that can be full of unpronounceable additives, homemade energy bites let you control every ingredient. You get to decide how much sugar to use, what kind of protein to add, and whether to include extra fiber or fat. This makes them not only healthier but also tailor-made for your specific dietary goals.
Essential Ingredients for Energy Bites
Base Ingredients You’ll Need
Every great energy bite recipe starts with a solid foundation. These base ingredients are typically pantry staples, and you might already have them at home:
- Rolled oats: Provide texture and slow-digesting carbs.
- Nut butter: Acts as a binder while adding healthy fats and protein.
- Honey or maple syrup: Adds sweetness and helps hold everything together.
- Chia seeds or flaxseeds: Boost fiber and omega-3s.
- Vanilla extract: Enhances overall flavor.
These ingredients create the bulk of your mixture and give it the consistency needed to form into balls. While they might look humble, they’re a powerhouse of energy and nutrition.
Optional Add-ins for Flavor and Texture
Want to take your energy bites to the next level? Here’s where the fun begins. Customize your bites with different add-ins to suit your taste or nutritional needs:
- Dried fruits (e.g., cranberries, raisins, dates, apricots)
- Chocolate chips (dark or semi-sweet for a touch of indulgence)
- Shredded coconut (for tropical flair)
- Protein powder (to increase protein content)
- Spices like cinnamon or nutmeg
- Crushed nuts (for added crunch and healthy fats)
You can get creative and mix and match based on what you love or what you have on hand. It’s hard to go wrong!
Step-by-Step Guide to Making Energy Bites
Step 1: Gather All Your Ingredients
Before you dive into mixing, take a moment to assemble everything you’ll need. Having your ingredients measured and ready to go makes the process smoother and faster. Here’s a simple base recipe:
Ingredients:
- 1 cup rolled oats
- 1/2 cup peanut butter (or any nut butter)
- 1/3 cup honey or maple syrup
- 1/4 cup mini chocolate chips
- 1/4 cup ground flaxseed or chia seeds
- 1 tsp vanilla extract
Optional:
- 1 scoop of protein powder
- 1/4 cup dried fruit
Place everything on your countertop within arm’s reach. You’ll also need a large mixing bowl, a spoon or spatula, and a tray or plate for shaping the balls.
Step 2: Mix Ingredients Thoroughly
Now that you have everything ready, it’s time to mix. In a large mixing bowl, combine your dry ingredients first—oats, flaxseeds (or chia), protein powder if using, and any spices like cinnamon. Give these a quick toss to evenly distribute.
Next, add your wet ingredients—nut butter, honey or maple syrup, and vanilla extract. The key here is to mix until everything is well incorporated. You want the oats and seeds to be fully coated, and the texture should be slightly sticky but firm enough to hold its shape. If it feels too dry, add a bit more honey or nut butter. If it’s too wet, sprinkle in some extra oats or flaxseed.
Don’t be afraid to get your hands a little dirty. Sometimes, the best way to mix thoroughly is with clean hands. This ensures that all the ingredients are combined evenly and helps you feel the consistency as you go.
This step is crucial because it determines how well the bites will hold together. A well-mixed batch means your bites won’t crumble apart or stick annoyingly to your fingers when rolling.
Step 3: Chill the Mixture
Once everything is mixed, cover the bowl with plastic wrap or transfer the mixture into a container with a lid. Pop it into the fridge for at least 20–30 minutes. This chilling period allows the ingredients to firm up, making it easier to roll them into perfect bite-sized balls.
Chilling isn’t just for convenience; it helps the oats absorb moisture and the nut butter to solidify slightly. The mixture will hold its shape much better when cold, and the flavors will have a chance to meld together beautifully.
If you’re short on time, you can put the bowl in the freezer for about 10–15 minutes instead. Just don’t let it freeze completely—you want it firm, not rock solid.
During this time, you can clean up your prep area or get your storage containers ready. It’s all about efficiency!
Step 4: Roll Into Bite-Sized Balls
Once the mixture is nicely chilled, take it out and get ready to roll. Using a spoon or a small cookie scoop, grab a portion of the mixture and roll it between your palms into a ball. Aim for about 1 to 1.5-inch diameter—bite-sized but satisfying.
This step is pretty straightforward, but it can get a bit sticky. If you find the mixture sticking to your hands, lightly wetting them with water or spraying them with a bit of cooking spray can help. Some people even keep a small bowl of water nearby just for this purpose.
Place the rolled bites onto a tray or plate lined with parchment paper. You can enjoy them right away or chill them again for another 10 minutes to set fully. If you made a big batch, this is the point where you can separate the bites into portions for the week.
Kids love helping with this part—it’s a great way to get them involved in healthy eating. Let them roll their own energy bites and pick their favorite mix-ins for the next batch.
Step 5: Store Properly for Maximum Freshness
Congratulations! You’ve just made a delicious, healthy batch of energy bites. Now it’s time to store them correctly so they stay fresh and tasty.
The best way to store energy bites is in an airtight container. Place them in a single layer or separate layers with parchment paper to prevent sticking. Store the container in the fridge for up to 7 days. They’ll remain firm and chewy and won’t lose their texture.
If you want to make a larger batch to last longer, energy bites freeze beautifully. Lay them out on a tray, freeze them for an hour, then transfer them to a freezer-safe bag or container. This prevents them from sticking together in a giant clump. When you’re ready to eat, just take a few out and let them thaw at room temperature for 10–15 minutes.
Proper storage is key to maintaining both flavor and nutritional value. It also helps avoid food waste. With just a little care, your energy bites will be ready whenever hunger strikes—whether it’s before a workout, after school, or on your lunch break.
Tips and Tricks for the Best Energy Bites
Choosing the Right Sweeteners
Not all sweeteners are created equal. If you’re looking for the healthiest option, go for natural sweeteners like raw honey, maple syrup, or date paste. They offer sweetness without causing the blood sugar spikes that refined sugar can trigger. Plus, they add subtle flavor notes—honey adds floral hints, while maple syrup brings a caramel-like depth.
Want to make your bites lower in sugar? You can reduce the sweetener by half and use mashed banana or unsweetened applesauce to help bind the ingredients. These swaps also provide extra nutrients and moisture.
Just remember, the goal isn’t to create a dessert—it’s to craft a nutritious snack. Sweeteners should be there to enhance, not overpower, the other ingredients.
Making it Vegan or Gluten-Free
Making energy bites vegan or gluten-free is super simple. For vegan versions, replace honey with maple syrup or agave nectar, and be sure to use dairy-free chocolate chips. Always double-check labels on your oats and protein powders, as some can contain hidden animal products or gluten.
If you’re avoiding gluten, opt for certified gluten-free oats. Most oats are naturally gluten-free, but cross-contamination can happen during processing, so it’s worth buying ones labeled safe for celiacs.
Want to boost the protein without using whey? Use plant-based protein powders like pea, hemp, or brown rice protein. They’re easy to digest and just as effective for muscle recovery.
The beauty of energy bites lies in their adaptability. You can cater them to nearly any diet without sacrificing flavor or texture.
Popular Variations of Energy Bites
Chocolate Peanut Butter Energy Bites
This classic combo never fails. Chocolate and peanut butter are a match made in snack heaven, and when combined in an energy bite, the result is pure deliciousness. For this variation, use your standard base of oats and peanut butter, then mix in cocoa powder and mini dark chocolate chips. Add a scoop of chocolate or vanilla protein powder if you want a muscle-friendly boost.
What makes these so irresistible is their rich, fudgy texture. The cocoa adds depth while the chocolate chips provide little bursts of sweetness. You can even add a pinch of sea salt to enhance the chocolate flavor even more. Want more crunch? Toss in some chopped peanuts or crispy rice cereal.
They taste like dessert but are packed with healthy fats, fiber, and protein. Kids love them, adults crave them, and they’re a favorite for pre- or post-workout snacks. Keep a stash in the fridge and they’ll disappear fast.
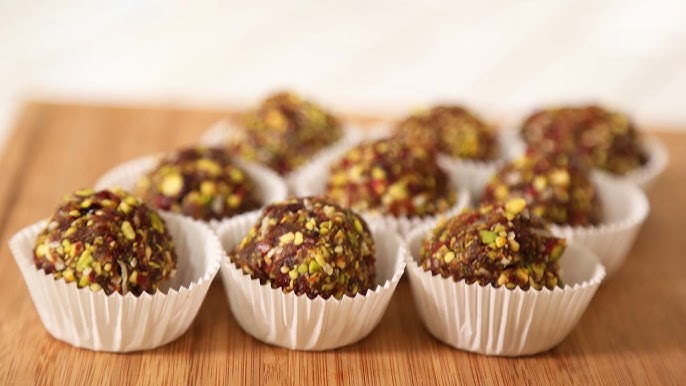
Coconut Almond Energy Bites
If you love the tropical flavor of coconut, this variation is a must-try. Start with almond butter and rolled oats as your base. Add unsweetened shredded coconut, a bit of maple syrup, and a dash of almond extract for extra flavor. Chia seeds, flaxseeds, or hemp seeds can be thrown in for texture and nutrition.
These bites are naturally sweet and incredibly satisfying. They’re especially good for those avoiding chocolate or looking for a lighter flavor profile. You can even roll the finished balls in extra coconut flakes for an Instagram-worthy finish.
The coconut almond combo isn’t just delicious—it’s full of heart-healthy fats, antioxidants, and fiber. These are perfect as a midday energy boost or a quick breakfast option with your morning coffee.
Matcha Green Tea Energy Bites
Looking for something a little different? Try adding matcha powder to your energy bites. Matcha is powdered green tea packed with antioxidants and a gentle caffeine kick. It pairs beautifully with cashew butter and vanilla protein powder.
For these bites, mix oats, cashew butter, honey or maple syrup, vanilla, and a teaspoon of matcha. Add in coconut flakes or white chocolate chips for a sweet contrast. The matcha gives them a slightly earthy flavor and a gorgeous green hue.
They’re great for when you need a focused burst of energy, like during long work sessions or study marathons. Plus, they look elegant and taste refreshing—perfect for impressing friends or clients with a healthy snack that’s also gourmet.
Serving Suggestions and Storage
How to Serve Energy Bites
Energy bites are incredibly versatile when it comes to serving. Here are a few fun and functional ways to enjoy them:
- On-the-go snack: Pack a few in a small container or zip-lock bag and keep them in your gym bag or purse.
- Part of a breakfast bowl: Serve with yogurt, granola, and fresh berries for a complete meal.
- Afternoon pick-me-up: Pair with a cup of coffee or tea to fight that 3 p.m. slump.
- Healthy dessert: Roll them in cacao powder or crushed nuts and serve after dinner.
You can also get creative with how you shape them—flatten them into bars, press them into molds for themed shapes, or roll them in toppings like cocoa powder, sesame seeds, or coconut.
The key is to enjoy them in a way that fits your lifestyle. Whether you’re chasing kids around the house or prepping for a hike, energy bites are always the right choice.
Best Ways to Store for Freshness
Proper storage ensures that your energy bites stay fresh, tasty, and safe to eat. Here’s a quick guide:
- Short-term: Store in an airtight container in the fridge for up to 7 days.
- Freezer: For longer storage, freeze them for up to 3 months. Just lay them on a baking sheet to flash freeze first, then store in a zip-lock or freezer-safe container.
- Room temperature: If you’re eating them within a day or two and it’s not too warm, they can be kept at room temp in a sealed container.
Avoid leaving them exposed to air, as they can dry out or absorb unwanted odors from your fridge. Also, if using ingredients like banana or dairy, opt for refrigeration to prevent spoilage.
To make life easier, you can portion them into daily servings using snack bags or small containers. This way, you always have the right amount ready to go without over-snacking.
FAQs about Energy Bites Recipe
Can I freeze energy bites?
Yes! Energy bites freeze extremely well. Just flash freeze them on a tray for 1 hour, then transfer to a freezer-safe bag or container. They’ll last up to 3 months.
Are energy bites kid-friendly?
Absolutely. They’re soft, sweet, and fun to eat—perfect for school lunches or after-school snacks. Plus, you can sneak in healthy ingredients like chia seeds or flax without them even noticing.
What can I use instead of nut butter?
If you have allergies or want a change, try sunflower seed butter, tahini, or soy nut butter. Each provides a similar texture and healthy fats without nuts.
How long do energy bites last?
Stored in the fridge, they’re good for about 7 days. In the freezer, they last up to 3 months. Keep them in an airtight container for best results.
Can I make energy bites without a food processor?
Yes! Most recipes don’t need a food processor. Just mix everything in a bowl with a spoon or your hands. A food processor can help with smoother textures but isn’t necessary.
Conclusion
By using simple ingredients like oats, nut butters, seeds, and natural sweeteners, you create something that not only tastes amazing but also fuels your body the right way. Plus, the endless variations mean you’ll never get bored. From chocolatey indulgence to tropical freshness, there’s a bite for every mood and moment.
So, next time you find yourself reaching for a snack, skip the vending machine. Whip up a batch of homemade energy bites and keep your snack game strong, healthy, and delicious.