Egg Tart Recipe: Egg tarts are one of those bakery delights that bridge cultures. Originally inspired by the English custard tart, they found their true identity in Chinese bakeries and later became a staple in dim sum menus around the world. From Macau to Hong Kong, each region adds a twist, making them richer, silkier, or more caramelized depending on the local preference. While the original versions date back centuries, modern egg tarts have been fine-tuned into the golden, creamy pastries we crave today.
Why You’ll Love This Recipe
Let’s face it—there’s something magical about biting into a warm egg tart. The contrast between the flaky pastry and the silky-smooth custard is what makes this treat irresistible. This recipe is perfect for beginners and seasoned bakers alike. It uses simple, pantry-friendly ingredients and guarantees that bakery-quality finish right in your home oven. Whether you’re baking for a family brunch, a tea party, or just because you’re craving a treat, these egg tarts will never disappoint.
Ingredients Needed for Egg Tarts
For the Tart Shell
Creating the perfect tart starts with the right base. Here’s what you’ll need:
- 1 1/2 cups all-purpose flour
- 1/2 cup unsalted butter (cold and cubed)
- 1/4 cup powdered sugar
- 1 egg yolk
- 2 tablespoons cold water
- A pinch of salt
This combination gives you a buttery, melt-in-your-mouth shell that complements the custard perfectly.
For the Egg Custard Filling
Next comes the creamy filling—the heart of any egg tart. Gather these:
- 1/2 cup granulated sugar
- 1 cup hot water
- 5 large eggs
- 1/2 cup evaporated milk
- 1/2 teaspoon vanilla extract
This blend creates a light yet creamy texture with just the right amount of sweetness.
Tools and Equipment You’ll Need
Essential Kitchen Tools
To make things go smoothly, you’ll need a few basics:
- Mixing bowls
- A whisk
- Measuring cups and spoons
- Muffin tin or tart molds
- Fine mesh strainer
- Rolling pin
Each tool has a role—especially the strainer, which helps keep your custard smooth and lump-free.
Optional Tools for Better Results
Want to up your game? These extras can help:
- Pastry cutter (for butter)
- Stand mixer (for dough)
- Baking weights (to prevent bubbling)
- Cooling rack
Using these tools ensures uniform baking and makes cleanup a breeze.
How to Make Egg Tart Dough
Step-by-Step Dough Preparation
Let’s dive into making the tart shell:
- Mix Dry Ingredients: In a large bowl, combine flour, powdered sugar, and salt.
- Add Butter: Toss in the cold butter and use your fingers or a pastry cutter to work it into the flour until the mixture resembles coarse crumbs.
- Add Wet Ingredients: Whisk the egg yolk with cold water, then slowly drizzle into the flour-butter mixture. Mix until a dough forms.
- Rest the Dough: Form it into a disc, wrap in plastic wrap, and refrigerate for 30 minutes.
- Roll and Shape: Roll out the dough on a floured surface, then cut circles to fit your tart molds. Press into the tins and prick the bottoms with a fork.
Resting and chilling the dough are key here—they prevent shrinking and make the crust super flaky.
Tips for a Flaky and Buttery Shell
- Use cold butter and cold water—warm ingredients make the dough greasy.
- Don’t overwork the dough; handle it just enough to come together.
- Let the dough rest. This relaxes the gluten and gives a better texture.
A good tart shell should hold its shape without being too hard or chewy, and following these steps will ensure perfection.
How to Make the Egg Custard Filling
Mixing the Custard Smoothly
- Dissolve Sugar in Water: Combine sugar and hot water, stirring until fully dissolved. Let cool.
- Beat the Eggs: In a separate bowl, beat the eggs gently. You want to avoid froth—keep it smooth.
- Combine Ingredients: Add the evaporated milk and vanilla to the eggs. Slowly pour in the cooled sugar water.
- Strain the Mixture: Use a fine mesh strainer to remove any clumps or bubbles.
This method gives you that silky, glassy custard top with zero curdling or lumps.
Avoiding Common Mistakes
- Don’t use hot sugar water: This can cook the eggs and ruin the texture.
- Don’t overbeat the eggs: You’ll get bubbles that ruin the finish.
- Always strain: This step is non-negotiable if you want smooth custard.
A few simple habits can make all the difference between bakery-style egg tarts and disappointing ones.
Assembling the Egg Tarts
Filling the Tart Shells
Now that both your tart shells and custard are ready, it’s time to bring everything together:
- Preheat Your Oven: Set it to 350°F (175°C) so it’s hot and ready by the time your tarts are assembled.
- Arrange the Tart Shells: Place your prepared tart shells (in the molds) onto a baking tray for easier handling.
- Fill the Shells with Custard: Carefully pour the strained custard into each shell. Fill them up to about 80-90% full to avoid overflow during baking.
Using a small ladle or spoon helps control the pour and keeps things tidy. You want to avoid spilling custard over the edge of the pastry, which can cause uneven baking or sticking.
Getting That Perfect Surface
To get that glossy, bakery-style custard top:
- Let the custard sit for a minute or two before placing in the oven to allow bubbles to rise.
- Use a toothpick to pop any surface bubbles before baking.
- If needed, tilt the tart slightly to even out the custard.
This attention to detail gives your tarts that pro finish.
Baking the Egg Tarts
Ideal Temperature and Time
Place the tray in the center of your preheated oven and bake for:
- 10 minutes at 375°F (190°C)
- Then reduce to 350°F (175°C) and bake for another 15-20 minutes
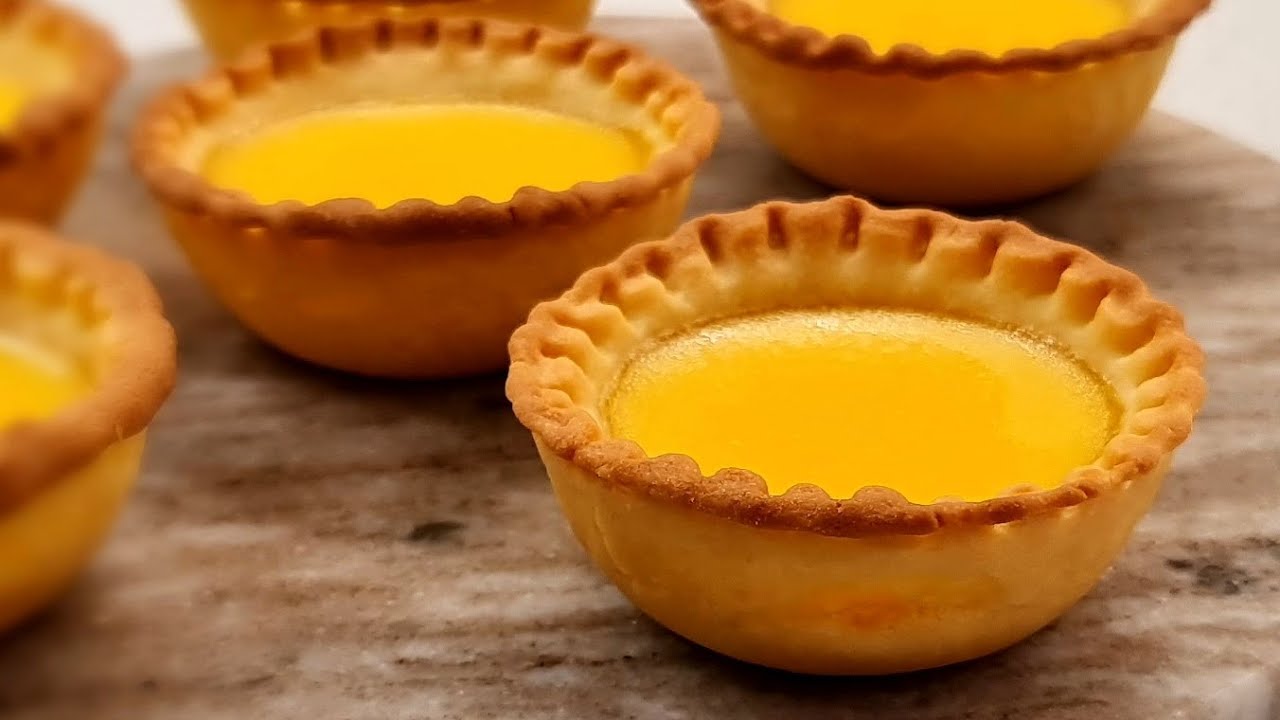
Watch for the edges of the crust to turn a golden brown and the center custard to set but still jiggle slightly. That gentle wobble means it’s perfectly cooked—not overbaked.
How to Tell When They’re Done
- The custard should be set around the edges and slightly wobbly in the center.
- Gently insert a toothpick—it should stand upright and come out clean.
- Avoid overbaking; otherwise, the custard can crack or bubble too much.
Let them cool in the molds for about 5 minutes, then transfer to a wire rack. They’ll firm up as they cool, making them easier to remove from the molds.
Cooling and Serving
Why Cooling Is Important
You might be tempted to dig in right away (they smell amazing, after all), but letting the tarts cool is crucial:
- It helps the custard finish setting without overcooking.
- It prevents the shells from crumbling when removed.
- It improves the texture—warm tarts have a silkier feel than hot ones.
Leave them on a cooling rack for at least 20–30 minutes before serving.
Serving Suggestions
Egg tarts are versatile. Serve them:
- Warm for a silky custard texture
- Chilled for a firmer bite
- With tea or coffee as a perfect afternoon treat
- Lightly dusted with powdered sugar or cinnamon for a twist
They’re perfect on their own, but you can also add a dollop of whipped cream or a side of fresh fruit for a little something extra.
Storing and Reheating Egg Tarts
How to Store Them Properly
To keep your egg tarts fresh:
- Store leftovers in an airtight container in the fridge for up to 3 days.
- Avoid stacking them; use parchment paper between layers if necessary.
- Do not freeze egg tarts, as freezing can alter the texture of the custard.
The crust can absorb moisture in the fridge, so proper storage is key to maintaining that flaky texture.
Best Way to Reheat
When you’re ready to enjoy them again:
- Reheat in an oven at 300°F (150°C) for 5-8 minutes to revive the crispiness.
- Avoid microwaving—they’ll become rubbery.
- Let them sit at room temperature for a few minutes before reheating for even results.
This simple reheating trick can make day-old tarts taste fresh out of the oven.
Variations of Egg Tarts
Hong Kong-Style vs. Portuguese Egg Tarts
While both are delicious, these two styles have distinct differences:
Hong Kong-Style Egg Tarts:
- Made with a smooth, pale-yellow custard
- Uses shortcrust or puff pastry
- Custard is light, eggy, and not overly sweet
- Typically baked until just set without browning
Portuguese Egg Tarts (Pastéis de Nata):
- Originated in Lisbon and became popular in Macau
- Made with a richer custard, often with caramelized tops
- Uses flaky puff pastry
- Often features a touch of cinnamon or lemon zest
If you’re adventurous, try making both and see which one your taste buds prefer. Both offer an exquisite blend of textures and flavors.
Creative Flavor Twists
Once you’ve mastered the basics, have fun with these flavorful variations:
- Matcha Egg Tarts: Add 1 tsp of matcha powder to the custard mix
- Chocolate Egg Tarts: Add 1-2 tbsp of cocoa powder or swirl in melted chocolate
- Coconut Egg Tarts: Use coconut milk instead of evaporated milk
- Fruit-Infused Tarts: Add a thin slice of strawberry or mango on top before baking
These creative tweaks can make your egg tarts stand out at parties or family gatherings.
Common Mistakes and How to Avoid Them
Overbaking or Undercooking
This is the most common issue with egg tarts:
- Overbaking: Causes cracks, bubbling, and a dry custard
- Undercooking: Leads to a runny, unset filling
Always look for the signature jiggle in the center and golden edges. Use the oven timer and check around the 20-minute mark.
Custard Not Smooth or Silky
If your custard turns out lumpy or curdled, here’s why:
- You poured hot sugar water directly into the eggs
- You didn’t strain the custard before filling
- You overmixed, creating air bubbles
Stick to gentle mixing, let ingredients cool before combining, and always strain.
Tips for Perfect Egg Tarts Every Time
Pro Techniques for Flawless Results
Here are a few top tips to make your egg tarts look and taste bakery-quality:
- Use room temperature eggs to help custard mix more evenly
- Don’t skip chilling the dough—it really helps with shaping and flakiness
- Rotate the tray halfway through baking for even heat exposure
- Let the custard rest before baking to reduce bubbles
These subtle tweaks can turn good tarts into incredible ones.
Making in Advance for Events
Planning a party or celebration?
- Make the dough up to 2 days ahead and store it chilled
- Bake tarts one day in advance, and reheat before serving
- Store in airtight containers to maintain freshness
- Garnish just before serving for that wow factor
With this strategy, you’ll enjoy the event instead of stressing in the kitchen.
FAQs about Egg Tart Recipe
1. Can I use store-bought pastry instead of making my own?
Yes! Puff pastry or shortcrust pastry from the store works great if you’re short on time. Just make sure it’s thawed before shaping.
2. Why does my custard crack on top?
Cracks usually mean you overbaked the tarts. Keep an eye on them and remove as soon as the center is set but still wobbly.
3. Can I freeze egg tarts for later?
Not recommended. Freezing can cause the custard texture to change and the crust to become soggy.
4. What’s the difference between evaporated milk and regular milk?
Evaporated milk is thicker and creamier, giving the custard a richer taste and smoother texture than regular milk.
5. How do I make the tarts more or less sweet?
Adjust the sugar in the custard mixture by 1–2 tablespoons depending on your taste. Just be sure it still balances well with the pastry.
Conclusion
Egg tarts might look fancy, but they’re surprisingly simple to make once you break the process down. From mixing the buttery dough to preparing that silky custard and baking everything to golden perfection—each step adds up to something truly magical. Whether you go with the classic Hong Kong-style or the rich Portuguese version, these pastries will always be crowd-pleasers.
Bake a batch and watch how quickly they disappear. Trust me, they’re that good.


