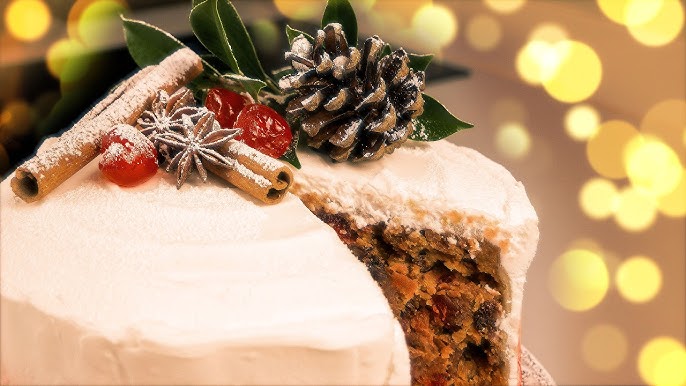
Christmas Cake Recipe: Ah, Christmas cake—the heart of holiday traditions, wrapped in rich flavors, nostalgia, and a whole lot of love. It’s not just a dessert; it’s a celebration on a plate. This dense, fruit-laden, spiced cake has been gracing holiday tables for generations, and every bite brings with it the warmth of the season. Unlike other cakes, a Christmas cake is usually soaked in alcohol like rum or brandy, giving it that deep, mature taste that only improves with time. And let’s not forget the elaborate decorations—snow-like icing, colorful fruits, and sometimes even mini figurines that bring a festive charm.
Whether you love the boozy kick or just enjoy the comforting spice and sweet fruitiness, there’s something uniquely satisfying about baking your own Christmas cake. It’s more than just baking; it’s a cherished ritual, filled with anticipation and a whole lot of fun.
History of the Traditional Christmas Cake
The story of the Christmas cake is rooted in old English traditions. It evolved from plum porridge, a dish enjoyed in the 16th century. People would fast in preparation for Christmas and break their fast on Christmas Eve with a rich porridge. Over time, ingredients like butter, flour, and eggs were added, transforming the porridge into a pudding and eventually into a cake.
By the Victorian era, the Christmas cake became a staple of holiday celebrations. With the availability of ovens in homes, families began baking fruit cakes and covering them with marzipan and royal icing. These cakes were often made weeks in advance and ‘fed’ with alcohol to improve flavor and shelf life. Today, the tradition continues, passed down through generations, and adapted to suit modern tastes—sometimes alcohol-free, nut-free, or even gluten-free.
Ingredients You’ll Need
Dried Fruits and Nuts
Here’s where the magic begins. A classic Christmas cake is nothing without a generous mix of dried fruits. Think raisins, sultanas, currants, chopped dates, dried apricots, cranberries, and glace cherries. You can also add chopped nuts like almonds, pecans, or walnuts for that extra crunch and flavor. This fruit and nut mixture forms the rich core of your cake.
- 500g raisins
- 250g sultanas
- 200g chopped dates
- 100g glace cherries (halved)
- 100g dried apricots (chopped)
- 100g chopped walnuts or almonds
Feel free to mix and match based on your preference or availability. Just ensure the total fruit content is around 1kg for a traditional dense cake.
Wet Ingredients and Spices
Next up are the wet ingredients and the magical blend of spices that give the cake its iconic flavor. You’ll need:
- 250g unsalted butter (room temperature)
- 250g brown sugar (light or dark)
- 5 large eggs
- Zest of 1 orange and 1 lemon
- 2 tsp vanilla extract
- 1 tbsp molasses or golden syrup (optional)
As for spices, go generous:
- 2 tsp cinnamon
- 1 tsp ground nutmeg
- 1 tsp ground allspice
- ½ tsp ground cloves
- ½ tsp ground ginger
These spices create the warm, festive aroma that hits you the moment you slice the cake.
Optional Ingredients for Extra Flavor
Want to add a personal twist? Here are a few optional ingredients:
- 100ml brandy or rum (for soaking and feeding)
- 100g candied peel
- 50g cocoa powder (for a deeper flavor)
- 1 tsp almond extract (for a nutty touch)
You can skip the alcohol or use fruit juice instead for a non-alcoholic version. Either way, these additions take your cake to the next level.
Preparing the Fruit Mixture
Soaking the Fruits
Soaking the fruits is a crucial step. It infuses them with flavor and ensures they remain moist during baking. Start by placing all the dried fruits in a large bowl. Pour over your choice of liquid—brandy, rum, or fruit juice. Mix well, cover with cling film, and let it soak.
Use about 100–150ml of liquid per 1kg of dried fruit. Stir the mixture once a day to keep everything evenly soaked.
Ideal Duration for Soaking
The longer, the better! Ideally, soak the fruits for at least 3 days. For the best results, start soaking them 1–2 weeks in advance. This allows the fruits to plump up beautifully and absorb all the flavor, giving your cake that rich, indulgent taste we all love. If you’re short on time, a 24-hour soak can still do the job—just warm the liquid before pouring it over the fruits to help them absorb faster.
Making the Cake Batter
Mixing the Wet and Dry Ingredients
Now for the fun part—putting it all together. Start by creaming the butter and sugar until light and fluffy. This step is vital for a moist, airy texture. Add the eggs one at a time, beating well after each addition. If the mixture curdles, add a spoonful of flour to bring it back together.
In a separate bowl, sift the flour with the spices. Gradually fold the dry ingredients into the wet mixture. Add the citrus zest, vanilla extract, molasses (if using), and any optional flavorings.
Folding in the Soaked Fruits
Drain any excess liquid from the soaked fruit (you can reserve it for feeding the cake later). Gently fold the fruit and nuts into the batter using a spatula. Be careful not to overmix—just enough to evenly distribute everything. The final batter will be thick and richly speckled with fruits and nuts.
Baking the Cake
Ideal Oven Temperature and Time
Baking a Christmas cake is not a rushed affair—it’s a slow and steady process. You’ll need to preheat your oven to 140°C (285°F) for a conventional oven or 130°C (265°F) for a fan-assisted one. This low temperature ensures the dense batter bakes evenly without burning the exterior.
Grease and line a deep 8-inch round or 7-inch square cake tin with baking parchment. For extra protection, wrap the outside of the tin with a double layer of brown paper or newspaper tied with string. This prevents the sides from overcooking before the center is done.
Spoon the batter into the tin, level the top, and gently tap it on the counter to release air bubbles. Cover the top loosely with a piece of parchment paper or foil to prevent over-browning.
Bake for 4 to 4.5 hours, but start checking after 3.5 hours. Insert a skewer into the center—if it comes out clean or with only a few moist crumbs, your cake is ready.
How to Know When It’s Done
Knowing when your cake is perfectly baked can be a little tricky, but here are a few reliable signs:
- Skewer Test: As mentioned, a clean skewer is the most trusted indicator.
- Firm to Touch: The cake should feel firm and springy when gently pressed.
- Even Color: The top should be a rich golden-brown without dark spots or burns.
Once baked, remove from the oven and allow it to cool in the tin for about 30 minutes. Then carefully turn it out onto a wire rack to cool completely.
Cooling and Storing the Cake
Proper Cooling Techniques
Proper cooling is critical to ensure the cake’s texture sets well and doesn’t become soggy. Leave the cake in the tin for at least 30 minutes after removing it from the oven. Then transfer it to a wire rack and let it cool completely—this might take several hours.
Avoid wrapping or decorating the cake while it’s still warm. Trapped moisture can make it spoil faster or ruin your decorations.
Storing for Long-Lasting Freshness
One of the best things about a traditional Christmas cake is how long it lasts. If stored properly, it can keep for several months!
Here’s how to store it:
- Wrap in Parchment: Once completely cool, wrap the cake tightly in baking parchment.
- Double Wrap with Foil: Then wrap it again in aluminum foil (avoid plastic wrap as it traps moisture).
- Store in Airtight Container: Place the wrapped cake in a cake tin or airtight container.
- Cool, Dark Place: Keep it in a cupboard or pantry—away from direct sunlight and humidity.
If you’re making the cake well in advance, don’t forget to “feed” it every week. Simply poke holes in the top with a skewer and drizzle 1–2 tablespoons of brandy or rum over the cake. This keeps it moist and intensifies the flavor.
Decorating Your Christmas Cake
Using Marzipan and Icing
Now comes the festive fun—decorating! The classic Christmas cake is covered in a layer of marzipan and royal or fondant icing. Here’s how to do it:
- Apricot Glaze: Warm 2–3 tablespoons of apricot jam and brush it over the cake. This helps the marzipan stick.
- Marzipan Layer: Roll out marzipan and cover the cake. Trim the edges and smooth it down.
- Drying Time: Let the marzipan dry for 1–2 days before adding the icing.
- Royal or Fondant Icing: Apply a generous layer, smooth it out, and shape it as desired.
Creative Decoration Ideas
Let your creativity shine! Here are some popular decoration ideas:
- Snow Scene: Use white icing for a snowy effect, and add small plastic trees or Santa figurines.
- Icing Stars and Snowflakes: Use cookie cutters to make festive shapes.
- Ribbon and Holly: Wrap a colorful ribbon around the base and add sugar holly leaves and berries.
- Gold Dust or Edible Glitter: For a shimmering, elegant finish.
You can go minimalist with just a sprinkle of icing sugar or go full-on festive with intricate designs—the choice is yours!
Tips for the Perfect Christmas Cake
Avoiding Common Mistakes
Even seasoned bakers can slip up. Here are some pitfalls to watch out for:
- Overbaking: Always monitor closely in the last hour. Overbaked cake becomes dry.
- Skipping Soaking: Don’t rush the soaking step. It’s key to getting that moist, rich texture.
- Not Feeding the Cake: This step deepens flavor over time. Don’t skip it if you want a traditional taste.
- Wrong Tin Size: Using a pan that’s too small can cause overflow, and one that’s too big can result in a flat, dry cake.
Enhancing Flavor and Texture
Want to level up your cake?
- Use fresh citrus zest and quality spices.
- Mix different types of alcohol (rum and brandy blend beautifully).
- Toast the nuts before adding them to the batter for extra crunch and aroma.
- Add a splash of espresso or cold brew coffee to enhance the richness.
FAQs about Christmas Cake Recipe
How early should I make a Christmas cake?
It’s best to bake it 4–6 weeks before Christmas to allow time for maturing and feeding with alcohol.
Can I make a nut-free version?
Absolutely! Just skip the nuts or substitute with extra dried fruit or seeds.
What’s the best way to moisten the cake?
Feed it weekly with 1–2 tablespoons of alcohol like brandy or rum. For non-alcoholic versions, use orange or apple juice.
Can I freeze Christmas cake?
Yes! Wrap it tightly in parchment and foil, and freeze for up to 6 months. Thaw overnight before serving.
Is alcohol necessary for the recipe?
Nope. You can use fruit juice instead for soaking and feeding. The flavor will be slightly different but still delicious.
Conclusion
Baking a Christmas cake isn’t just about the end result—it’s a joyful tradition, a celebration of flavor, and a way to bring loved ones together. From soaking the fruits to the final sprinkle of icing sugar, every step adds to the magic. Whether you follow the classic method or add your own twist, a homemade Christmas cake will always be the heart of the holiday table. So roll up your sleeves, fire up the oven, and let the festive baking begin!