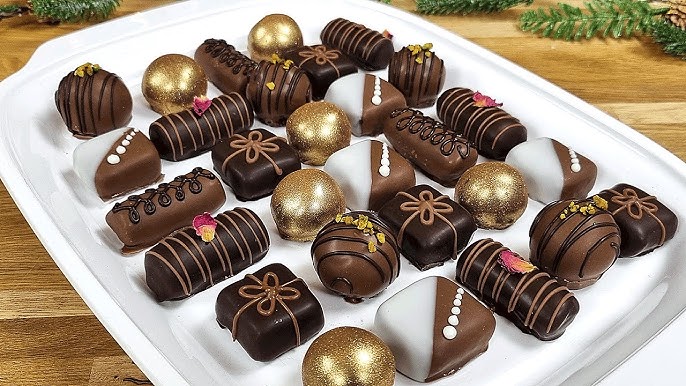
Chocolate Truffles Recipe: Chocolate truffles are the epitome of indulgence—bite-sized balls of rich, velvety chocolate that literally melt in your mouth. Made primarily from a ganache center (a silky blend of chocolate and cream), these luscious treats are often rolled in cocoa powder, nuts, or dipped in chocolate coatings. Named after the luxurious mushroom-like fungus because of their visual similarity, chocolate truffles have become a staple in the world of gourmet confections.
What makes chocolate truffles so irresistible? It’s their balance of texture and taste—smooth and creamy on the inside, sometimes with a little crunch or powdery finish on the outside. They’re not just candies; they’re tiny pieces of edible art that can be simple or sophisticated depending on how you craft them.
History and Origin of Chocolate Truffles
Chocolate truffles originated in France during the late 19th to early 20th century. The story goes that a French chef accidentally poured hot cream into a bowl of chopped chocolate instead of sugar and eggs. The mixture hardened into a rich paste that could be rolled into balls—thus, the first chocolate truffle was born. These early truffles were typically hand-rolled and coated in cocoa powder, mimicking the look of the rare and expensive truffle fungus.
Over time, different countries and chocolatiers added their unique twists—Swiss truffles with butter and cream, Belgian truffles filled with nut pastes or liquors, and American versions coated in chocolate shells. Today, truffles can range from simple ganache balls to elaborately decorated gourmet delights.
Why Make Homemade Truffles?
Why go through the effort of making truffles at home when you can buy them? The answer is simple—homemade truffles taste better, are more cost-effective, and you have full control over the ingredients. Want to avoid preservatives or dairy? No problem. Looking for a sugar-free version? Easy. Plus, the creative possibilities are endless—you can flavor them with your favorite liqueur, roll them in different coatings, or even shape them into hearts for a romantic gift.
Homemade truffles are also the perfect DIY gift. They’re easy to personalize and package beautifully, making them ideal for holidays, birthdays, or even wedding favors. And let’s not forget the sheer joy of biting into a truffle you crafted with your own hands—it’s incredibly satisfying.
Ingredients Needed
Basic Ingredients for Classic Chocolate Truffles
Before diving into the kitchen, let’s gather the essentials. The classic chocolate truffle requires only a handful of simple ingredients:
- High-quality dark or semi-sweet chocolate (200g or 7 oz) – The better the chocolate, the better your truffles will taste.
- Heavy cream (100ml or 3.5 oz) – Full-fat cream is key to creating that smooth, melt-in-your-mouth ganache.
- Unsalted butter (2 tbsp) – Optional, but adds richness and shine to your ganache.
- Cocoa powder or melted chocolate for coating
That’s it for the base! With these ingredients, you can whip up a batch of classic chocolate truffles in no time.
Optional Flavor Enhancers
Want to level up your truffles? Here are some optional add-ins:
- Liqueurs (e.g., Baileys, Grand Marnier, Amaretto)
- Spices (e.g., cinnamon, chili, cardamom)
- Extracts (e.g., vanilla, peppermint, almond)
- Zest (e.g., orange or lemon for a citrusy kick)
- Sea salt (a pinch on top for balance and flavor contrast)
Just remember, a little goes a long way. You don’t want to overpower the chocolate.
Tools and Equipment Required
Having the right tools makes the process smoother. Here’s what you’ll need:
- Heatproof bowl
- Saucepan
- Rubber spatula or whisk
- Baking sheet or tray
- Parchment paper
- Small cookie scoop or spoon
- Gloves (optional, for cleaner rolling)
Once you’ve got your ingredients and tools ready, it’s time to move on to the fun part—making the truffles!
Step-by-Step Guide to Making Chocolate Truffles
Step 1: Choosing the Right Chocolate
Not all chocolate is created equal. For the best truffles, use high-quality chocolate bars (not chips, which contain stabilizers). Aim for chocolate with at least 60-70% cocoa content for a rich, decadent flavor. Brands like Valrhona, Lindt, or Ghirardelli are excellent choices. If you’re using milk chocolate, remember it will be sweeter and less intense, so adjust your other ingredients accordingly.
The chocolate should be finely chopped so it melts evenly when combined with the hot cream. This step is crucial—uneven chunks can result in a lumpy ganache.
Step 2: Making the Ganache
This is where the magic begins. Ganache is the luscious, velvety center of your chocolate truffles. Start by heating your heavy cream in a small saucepan over medium heat. Don’t let it boil—once you see bubbles forming around the edges, it’s ready.
Next, pour the hot cream over your chopped chocolate in a heatproof bowl. Let it sit for about 1–2 minutes so the chocolate begins to melt. Then, stir gently with a spatula or whisk, working from the center outward, until the mixture is silky smooth. If you’re adding butter for extra richness, stir it in now while the mixture is still warm.
Want to infuse flavors? Add a splash of liqueur, a pinch of spice, or some citrus zest at this stage. The warmth of the ganache will help disperse the flavors evenly. Once it’s all melted and combined, you’ve got your ganache base ready.
Step 3: Cooling and Setting the Ganache
Now that your ganache is smooth and dreamy, it needs time to set. Cover the bowl with plastic wrap (pressed directly onto the surface to prevent a skin from forming) and refrigerate it for about 1–2 hours. You’re looking for a firm but scoopable consistency.
If you’re short on time, you can speed up the process by placing the bowl in the freezer for 30–45 minutes. Just be careful not to freeze it solid, or it’ll be impossible to shape.
You’ll know it’s ready when you can press a spoon into it and it holds its shape without being too hard or sticky.
Step 4: Shaping the Truffles
This step is where things get a little messy—but also super fun! Line a baking sheet with parchment paper. Use a small cookie scoop, melon baller, or even a spoon to portion out the ganache. Aim for 1-inch balls.
Roll each portion between your palms to form smooth, round truffles. If your hands are too warm, the ganache may start melting—wearing gloves or chilling your hands with cold water can help. Don’t worry if they’re not perfect spheres. The rustic look adds to their charm.
Once rolled, place the truffles back onto the tray and chill them again for about 15–30 minutes to firm them up before coating.
Step 5: Coating and Finishing Touches
Here’s where you get to be creative. The classic coating is unsweetened cocoa powder—it gives a nice contrast to the rich ganache. But don’t stop there. Try these options too:
- Finely chopped nuts (e.g., pistachios, almonds, hazelnuts)
- Shredded coconut
- Powdered sugar
- Melted chocolate (dip for a shiny, hard shell)
- Sprinkles, edible glitter, or crushed candy canes
To coat, simply roll each truffle in your chosen topping or dip into melted chocolate using a fork. Place coated truffles back on parchment and chill for another 15–30 minutes until set.
Now you have beautiful, gourmet-style chocolate truffles, made entirely by you.
Variations and Flavor Ideas
Alcohol-Infused Truffles
Adding a splash of alcohol gives truffles a luxurious adult twist. Popular choices include:
- Baileys Irish Cream
- Rum or spiced rum
- Brandy or cognac
- Amaretto or Frangelico
Limit it to about 1–2 tablespoons per batch of ganache to avoid compromising texture. The alcohol not only adds flavor but also acts as a natural preservative.
Nutty and Fruity Variations
Incorporate finely chopped nuts or dried fruits into the ganache for added texture:
- Crushed hazelnuts with dark chocolate
- Chopped dried cherries or cranberries with a touch of orange zest
- Peanut butter and milk chocolate combo
- Toasted coconut and white chocolate
You can also press a whole roasted almond or cherry into the center of each truffle for a delightful surprise bite.
Vegan and Dairy-Free Options
Want to go vegan? No problem. Swap the heavy cream for full-fat coconut cream or any plant-based milk (cashew and oat milk work best for creaminess). Use vegan dark chocolate that’s free of dairy and you’re all set.
Add in a teaspoon of coconut oil or vegan butter for that extra smooth texture. These truffles are just as indulgent—perfect for anyone avoiding animal products.
Tips for Perfect Truffles Every Time
Common Mistakes to Avoid
- Using low-quality chocolate: This will directly affect the taste and texture.
- Overheating the cream: Boiling can separate fats and ruin ganache.
- Adding too much liquid: Liqueurs and extracts should be minimal to maintain consistency.
- Skipping the chill time: Truffles need time to set properly; rushing leads to sticky messes.
- Over-handling the ganache: Your body heat can melt it quickly; work fast and chill hands if needed.
Storage and Shelf Life
Homemade chocolate truffles are best kept in the fridge in an airtight container. They’ll stay fresh for about 1–2 weeks. For longer storage, freeze them for up to 2 months—just thaw in the fridge before serving.
Avoid storing them at room temperature for long periods, especially in warmer climates, as they can soften or melt.
Gifting and Presentation Ideas
Truffles make the perfect DIY gift. Place them in mini cupcake liners inside a small gift box or mason jar. Tie with a ribbon and add a personalized tag for a thoughtful touch.
You can also theme your truffles by occasion:
- Valentine’s Day: Heart-shaped truffles, pink sprinkles
- Christmas: Peppermint coating or eggnog-flavored ganache
- Birthdays: Colorful coatings, edible glitter
FAQs about Chocolate Truffles Recipe
Can I make truffles ahead of time?
Absolutely! You can make them up to a week in advance and store them in the fridge.
Why is my ganache too soft to roll?
It may need more time to chill. If it’s still too soft, try freezing it for 15–20 minutes.
Can I use chocolate chips instead of bars?
You can, but chips have stabilizers that may affect texture. Use high-quality chips if bars aren’t available.
How do I make truffles less sweet?
Use high-percentage dark chocolate (70% or more) and avoid sweet coatings like powdered sugar.
Are truffles gluten-free?
Yes, classic truffles are naturally gluten-free. Just double-check the chocolate and any add-ins to be sure.
Conclusion
Chocolate truffles may seem fancy, but they’re surprisingly easy to make at home. With just a few basic ingredients and a little patience, you can create rich, indulgent treats that rival any store-bought confection. Whether you’re making them for yourself, gifting to a friend, or serving at a party, these truffles are guaranteed to impress.
The best part? You can endlessly customize them to suit your taste. Add nuts, fruit, liqueurs, spices—whatever your heart (and sweet tooth) desires. Once you get the hang of it, you’ll never look at store-bought truffles the same way again.
So grab some chocolate and cream, and let’s get rolling!


