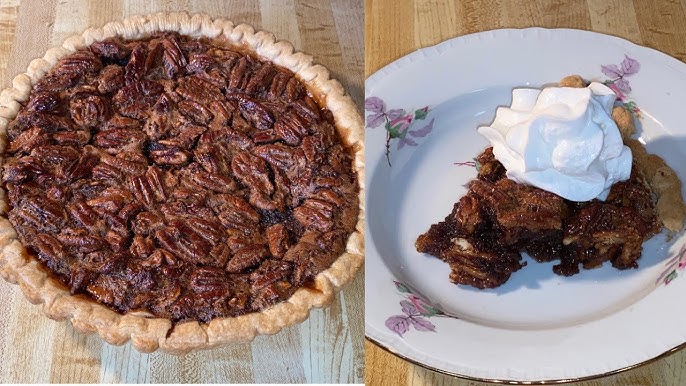
Chocolate Pecan Pie Recipe: Chocolate Pecan Pie is a luxurious twist on the classic Southern pecan pie, enriched with the indulgent depth of chocolate. It’s more than just a dessert—it’s a show-stopper for holidays, dinner parties, or anytime you crave something extra special. The magical combination of nutty pecans and gooey chocolate creates a flavor profile that’s rich, sweet, and slightly crunchy. It’s a pie that speaks of comfort, celebration, and homemade warmth all in one bite.
What sets it apart is the way the melted chocolate merges with the brown sugar, butter, and eggs to create a silky, fudge-like filling. The toasted pecans on top add that perfect nutty crunch that contrasts beautifully with the smoothness underneath. Whether it’s your first time making it or your fiftieth, this pie never fails to impress. And yes, it’s as heavenly as it sounds!
Why You’ll Love This Recipe
You’re going to love this recipe for so many reasons. First off, it’s incredibly easy to follow—even if you’re not a baking expert. We’ve broken down the steps so you can whip it up without stress or confusion. Second, the ingredients are straightforward and most are likely already in your pantry.
What truly makes this recipe shine is its perfect balance. It’s sweet but not cloying, rich without being too heavy. The chocolate doesn’t overpower the pecans, and the pecans don’t overwhelm the chocolate. It’s that harmony of flavors that makes each slice irresistible. This recipe is also flexible—add a dash of bourbon for depth, or go semi-sweet or dark chocolate based on your preference.
And if you’re someone who enjoys baking to impress—this pie’s glossy finish and rustic look give off serious “wow” vibes. It’s a total crowd-pleaser, both in taste and appearance.
Ingredients You’ll Need
For the Pie Crust
Let’s start with the base—your pie crust. You can absolutely go for a pre-made crust if you’re in a rush, but if you’ve got a bit of time, a homemade crust takes this pie to the next level. Here’s what you’ll need for a basic buttery pie crust:
- 1 ¼ cups all-purpose flour
- ½ tsp salt
- 1 tbsp granulated sugar
- ½ cup (1 stick) unsalted butter, cold and cubed
- 3-4 tbsp ice water
This yields a flaky, buttery crust that perfectly complements the rich filling. The cold butter creates steam pockets as it bakes, giving you that dreamy, golden texture.
For the Chocolate Pecan Filling
This is where the magic happens. The filling is a rich blend of chocolate, pecans, and sweet, gooey goodness. You’ll need:
- 1 cup light corn syrup
- 1 cup granulated sugar
- 3 large eggs
- ¼ cup unsalted butter, melted
- 1 ½ tsp vanilla extract
- ¼ tsp salt
- 1 ½ cups chopped pecans
- ¾ cup semi-sweet chocolate chips or chunks
You can swap in dark chocolate for a more intense flavor or even use chocolate bars chopped into chunks for a more rustic, gourmet touch. Want to add a splash of something special? Try a tablespoon of bourbon or espresso for extra depth.
Tools and Equipment Required
Baking Essentials
You won’t need a kitchen full of gadgets to make this pie, but there are a few key tools that will make the process smooth and enjoyable. Here’s your must-have list:
- 9-inch pie dish (glass or ceramic preferred)
- Mixing bowls (at least two)
- Whisk and silicone spatula
- Rolling pin (if making homemade crust)
- Pastry cutter (optional but helpful for crust)
- Measuring cups and spoons
- Aluminum foil or pie shield (to protect crust edges)
Having quality bakeware ensures even cooking and helps your pie come out perfect every time.
Optional Tools That Make Life Easier
If you’re a frequent baker or just love gadgets, a few extras can be nice to have:
- Food processor (for making crust)
- Kitchen scale (for precise ingredient measurements)
- Cooling rack (for better air circulation after baking)
These tools aren’t necessary, but they do make the job quicker and more precise.
Preparing the Pie Crust
Homemade vs. Store-Bought Crust
Let’s be real—not everyone has time to make pie dough from scratch. Store-bought crusts are perfectly fine and can save you a good 20-30 minutes. But if you’re up for it, making your own crust delivers a texture and flavor that’s hard to beat. A homemade crust is flakier, more buttery, and just more…personal.
If you’re using store-bought, follow the package instructions for blind baking. If you’re making it from scratch, combine the dry ingredients, cut in the cold butter until the texture is sandy with pea-sized bits, then add ice water until it forms a dough. Roll it out and fit it into your pie dish.
How to Blind Bake the Crust
Blind baking means partially baking the crust before you add the filling. This helps avoid a soggy bottom—no one likes that! Here’s how to do it:
- Preheat your oven to 375°F (190°C).
- Roll out your dough and fit it into the pie dish.
- Prick the bottom with a fork to prevent puffing.
- Line the crust with parchment paper and fill with pie weights or dried beans.
- Bake for 15 minutes, then remove the weights and bake another 5-7 minutes until lightly golden.
Let it cool while you make your filling.
Making the Chocolate Pecan Filling
Melting the Chocolate Perfectly
Getting that silky chocolate texture is all about technique. You want the chocolate melted evenly—no burning, no seizing. Here’s how to do it right:
Use a double boiler if you have one. Place a heatproof bowl over a saucepan of simmering water (not boiling). Add your chocolate chips or chopped chocolate into the bowl and stir gently as it melts. The indirect heat prevents scorching and gives you that glossy finish.
Don’t have a double boiler? No problem. You can microwave it, but be cautious. Use a microwave-safe bowl and heat the chocolate in 20-30 second bursts, stirring after each round until smooth. Once melted, set it aside to cool slightly so it doesn’t scramble your eggs when mixed in.
Remember, the quality of your chocolate really makes a difference here. Choose a brand you love eating straight up—because that’s the flavor you’re baking into your pie.
Mixing the Filling Ingredients
Now it’s time to build that luscious filling. Start with the wet ingredients: whisk together the eggs, corn syrup, granulated sugar, melted butter, vanilla extract, and salt until everything’s fully combined. It should be glossy and smooth.
Next, stir in the cooled melted chocolate. Once that’s incorporated, fold in the chopped pecans. Make sure they’re evenly distributed throughout the mixture. You want pecans in every single bite, not just floating on top.
Some bakers like to add whole pecans on top for presentation—totally optional, but it does give the pie a polished look. You can also experiment by tossing in a bit of cinnamon or espresso powder to add an extra layer of flavor.
Assembling the Pie
Combining the Filling with the Crust
With your crust cooled and ready, pour the chocolate pecan mixture right into it. Use a silicone spatula to scrape down the bowl—you don’t want to waste a drop of that decadent filling.
Give the pie dish a little shimmy on the counter to help the filling settle evenly. This helps eliminate any air bubbles and spreads the pecans nicely.
If you’re topping with whole pecans, now’s the time. Gently arrange them in concentric circles or a freeform pattern across the top of the filling. It adds crunch and gives your pie a “made-by-a-pro” look.
Tips for an Even Spread
Here are a few pro tips to make sure your pie bakes evenly and looks great:
- Don’t overfill the crust. Leave a little space near the rim to avoid spillover.
- Tap the pie dish gently on the counter to level the filling.
- If your pecans are clumping together, use a fork to gently separate them and spread them out.
- Let the assembled pie sit for about 10 minutes before baking—this helps the filling settle and improves texture.
Baking Instructions
Oven Temperature and Time
Preheat your oven to 350°F (175°C). Place your assembled pie on the center rack. It’s a good idea to put a baking sheet underneath just in case the filling bubbles over.
Bake for 50 to 60 minutes. Halfway through, you might want to cover the edges of the crust with foil or use a pie shield to prevent over-browning.
Keep a close eye in the last 10 minutes. The top should be slightly puffed and the center should jiggle just a little—it will firm up as it cools.
How to Know When It’s Done
You’ll know your pie is ready when the edges are set and the center has a slight wobble. Don’t go for a completely firm center—it’s not a cheesecake! That jiggle means it’s still moist and gooey inside.
Insert a knife about 2 inches from the center; it should come out mostly clean. The filling continues to set as it cools, so don’t worry if it seems a bit soft.
If your crust edges are getting too brown before the filling is set, tent them with foil to protect them without interfering with the baking process.
Cooling and Serving
Letting the Pie Set Properly
Once your pie is out of the oven, don’t rush it. This is where the real transformation happens. Let it cool completely at room temperature for at least 2–3 hours. This is crucial because the filling needs time to firm up and reach that gooey-yet-sliceable texture. If you try cutting into it too soon, you’ll end up with a runny mess—even if it looked perfect coming out of the oven.
Place the pie on a wire rack and allow air to circulate underneath. Resist the urge to chill it in the fridge right away, as that can cause condensation, which leads to a soggy crust.
After cooling, you can store it in the fridge for a firmer texture, especially if you’re planning to serve it the next day. Just be sure to cover it loosely with foil or plastic wrap to avoid absorbing any fridge odors.
Best Ways to Serve Chocolate Pecan Pie
Now comes the fun part—eating it! This pie is delicious warm, at room temperature, or even chilled. If you prefer it slightly warm (and who doesn’t love melted chocolate?), reheat individual slices in the microwave for 10-15 seconds.
Want to elevate it even more? Here are a few delicious serving suggestions:
- With whipped cream – A dollop of fresh whipped cream adds a light, airy contrast.
- With ice cream – Vanilla ice cream is the classic pick, but butter pecan or chocolate chip also work beautifully.
- With a drizzle of caramel or chocolate sauce – Go all-in on indulgence.
- With fresh berries – Adds a nice tart balance to the richness.
This pie is a great standalone dessert, but it’s also amazing paired with a warm beverage. Coffee, tea, or even a spiced hot cocoa make perfect companions.
Storage and Reheating Tips
Refrigeration vs. Freezing
Chocolate pecan pie stores surprisingly well, which makes it a great make-ahead dessert for holidays or parties. After it cools completely, wrap it in plastic wrap or aluminum foil and store it in the refrigerator for up to 4 days.
Want to save it for longer? It freezes like a champ. Wrap the whole pie or individual slices tightly in plastic wrap, then place in a freezer-safe bag or airtight container. It’ll stay good for up to 2 months.
To thaw, transfer it to the refrigerator overnight. If you’re thawing a slice, a few hours at room temp should do the trick.
How to Reheat Without Drying It Out
When it comes time to reheat, don’t just toss it in the microwave for 5 minutes and hope for the best. Here’s how to keep that gooey goodness intact:
For the whole pie:
- Preheat oven to 300°F (150°C).
- Loosely cover the pie with foil to prevent over-browning.
- Bake for 15–20 minutes or until warmed through.
For slices:
- Microwave on a microwave-safe plate in 15-second bursts until warm.
- Or reheat in the oven at 300°F for 5–8 minutes.
Avoid overheating, or the filling can get grainy and lose its silky texture. If you’re feeling extra, serve reheated slices with a scoop of ice cream—it softens just enough to make each bite pure magic.
Common Mistakes to Avoid
Burnt Crusts and Runny Fillings
Even seasoned bakers can run into trouble with pie, but most issues are easy to avoid if you know what to watch for. Here are some of the biggest pitfalls and how to steer clear of them:
Burnt crust edges: This usually happens when the crust is exposed to high heat for too long. Use a pie shield or make your own with strips of foil to cover the edges halfway through baking.
Runny filling: This can be caused by underbaking or not letting the pie cool long enough. Make sure to bake until the edges are firm and the center is just set. Then give it a good 2-3 hours to cool and firm up.
Overmixed filling: Whisk gently to combine ingredients. Overmixing can cause too much air, leading to a cracked or uneven surface.
Using hot chocolate in the egg mixture: Always cool your melted chocolate slightly before mixing it with eggs to avoid scrambling them.
Fixing Overbaked or Undercooked Pie
Overbaked pie often means a dry filling or a tough crust. If your filling looks cracked or dry, serve it with whipped cream or sauce to add moisture.
For underbaked pie (runny center), you can put it back in the oven for another 10-15 minutes. If the top is already browning too much, tent it with foil to prevent burning while the inside cooks through.
The bottom line? Watch it closely, follow the baking time, and trust the jiggle test more than the clock.
Nutritional Information
Calorie Count per Slice
Chocolate pecan pie is undeniably rich—and yes, that richness comes with a calorie tag. On average, one slice (1/8 of a 9-inch pie) packs about 450 to 600 calories, depending on the ingredients used. Most of these calories come from sugars, fats (butter, chocolate, and nuts), and carbohydrates.
Here’s a general breakdown for one slice:
| Nutrient | Amount |
|---|---|
| Calories | 550 kcal |
| Total Fat | 30g |
| Saturated Fat | 10g |
| Cholesterol | 70mg |
| Sodium | 180mg |
| Total Carbohydrates | 65g |
| Sugars | 45g |
| Protein | 5g |
It’s a dessert meant for indulgence, not daily consumption—but when enjoyed in moderation, it’s well worth the treat.
Healthier Alternatives and Tips
If you’re looking to lighten things up without sacrificing flavor, here are some easy substitutions:
- Use dark chocolate (70% cacao or higher): Less sugar, more antioxidants.
- Replace corn syrup with maple syrup or honey: These natural sweeteners add complexity and are slightly better for blood sugar control.
- Try a whole wheat or almond flour crust: This adds fiber and reduces refined carbs.
- Cut down sugar: Reduce the sugar by 25%—the chocolate and pecans will still bring a lot of sweetness.
- Use coconut oil instead of butter for a dairy-free option with a hint of tropical flavor.
Remember, it’s still a treat, but you can definitely tweak it to better suit your dietary goals.
Pairing Suggestions
Drinks That Complement Chocolate Pecan Pie
Pairing the right drink with your dessert can take the experience from great to unforgettable. Because this pie is both sweet and rich, you’ll want something that complements its bold flavors.
Here are some fantastic pairings:
- Coffee or Espresso – The bitterness of coffee beautifully balances the sweetness of the pie.
- Bourbon or Whiskey – If you’re serving this pie at a grown-up gathering, a glass of smooth bourbon ties in wonderfully with the caramel and nutty notes.
- Red Wine – A bold red like Zinfandel or a light Pinot Noir adds complexity.
- Milk or Almond Milk – For a classic, comforting combo that never fails.
Side Desserts to Serve With It
Want to create a full dessert spread? Chocolate pecan pie plays well with others. Consider these sidekick treats:
- Mini fruit tarts – Add a fresh, tangy contrast.
- Lemon bars – Their citrusy bite cuts through the richness.
- Vanilla or pumpkin cupcakes – For seasonal variety.
- Biscotti or shortbread cookies – Light, crunchy, and perfect with coffee.
Keep in mind that the pie is the star, so any side desserts should be smaller and simpler to avoid overwhelming your guests.
Variations of Chocolate Pecan Pie
Bourbon Chocolate Pecan Pie
Want to add a grown-up twist to your classic pie? A splash of bourbon adds warmth and depth that blends beautifully with both the chocolate and pecans. Just add 1–2 tablespoons of bourbon to your filling mixture before baking.
The alcohol bakes off, but it leaves behind a hint of smokiness and sophistication. Pair it with whipped cream or serve it as-is for a cozy, slightly boozy dessert.
Gluten-Free or Vegan Adaptations
Looking to make your pie gluten-free or vegan-friendly? It’s easier than you think.
For gluten-free:
- Use a store-bought gluten-free pie crust or make one with almond flour or a gluten-free flour blend.
- Ensure all other ingredients (like chocolate and corn syrup) are certified gluten-free.
For vegan:
- Use a plant-based butter alternative.
- Swap eggs with a flax egg (1 tbsp ground flaxseed + 2.5 tbsp water = 1 egg).
- Use dairy-free chocolate.
- Replace honey (if used) with maple syrup.
The texture might be slightly different, but you’ll still get that rich, nutty, chocolatey goodness in every bite.
FAQs about Chocolate Pecan Pie Recipe
1. Can I make chocolate pecan pie ahead of time?
Yes! It actually tastes even better the next day. Just bake it, let it cool, and store it in the fridge. Reheat slices as needed.
2. Do I need to toast the pecans beforehand?
Not necessary, but it enhances the nutty flavor. Just toast them in a dry skillet for 2-3 minutes before adding them to your filling.
3. What’s the best type of chocolate to use?
Semi-sweet or dark chocolate is ideal. You can use chips or chop up a high-quality bar for extra richness.
4. Can I freeze chocolate pecan pie?
Absolutely! Wrap it tightly and freeze for up to 2 months. Thaw in the fridge overnight before serving.
5. Why is my pie filling runny even after baking?
It might be underbaked or didn’t cool long enough. Make sure the center has a slight jiggle when you remove it and let it cool completely to set.
Conclusion
There you have it—your complete guide to baking the perfect chocolate pecan pie from scratch. Whether you’re whipping it up for the holidays, a dinner party, or just to treat yourself, this pie brings the “wow” factor every single time.
From the buttery, flaky crust to the gooey, chocolate-laced filling packed with toasted pecans, it’s a dessert that delivers comfort, indulgence, and a whole lot of smiles. With the right ingredients, a little patience, and these step-by-step instructions, you’re now fully equipped to bake like a pro.
Don’t forget to make it your own. Add a splash of bourbon, try dark chocolate, or experiment with different nuts. That’s the beauty of homemade baking—it’s all about making it delicious for you and the people you share it with.