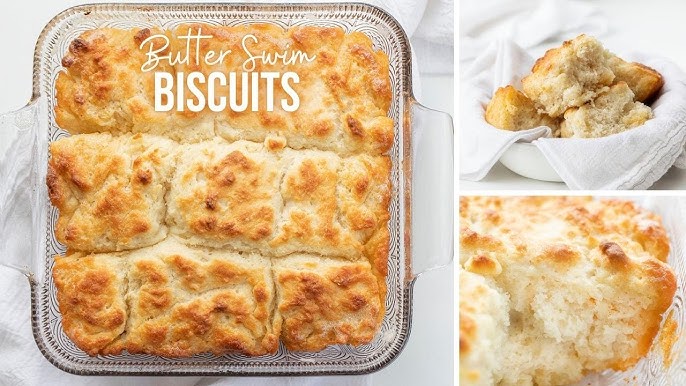
Butter Swim Biscuits Recipe: Butter swim biscuits—just hearing the name makes your mouth water, right? These Southern-style biscuits are the very definition of comfort food. Instead of the usual dry-on-the-outside biscuit texture, butter swim biscuits are tender, moist, and dripping with melted butter in every bite. They’re the kind of biscuits that make you want to grab a second (or third) before anyone else at the table notices.
Unlike traditional biscuits, where butter is cut into the dough, butter swim biscuits are quite literally baked in a pool of melted butter. This gives them a crispy, golden crust on the outside while keeping the inside soft and flaky. It’s a no-fuss, foolproof recipe that’s perfect for beginners and busy folks alike. Whether you’re making them for a lazy Sunday brunch, a holiday meal, or just because you need a carb-filled hug, these biscuits won’t disappoint.
Let’s dive into how to make these buttery marvels at home with just a few basic ingredients and an oven. You don’t need any fancy skills—just a love for old-fashioned comfort food and a good appetite.
Ingredients You’ll Need
To make butter swim biscuits, you’ll only need a handful of ingredients that are probably already in your kitchen. That’s part of the charm—simple ingredients, spectacular results.
Here’s your grocery list:
- 2 1/2 cups all-purpose flour
- 1 tablespoon granulated sugar
- 1 tablespoon baking powder
- 1 1/2 teaspoons salt
- 1 3/4 cups buttermilk (cold)
- 1/2 cup (1 stick) unsalted butter
Optional Add-ins:
- 1/2 cup shredded cheddar cheese (for a cheesy twist)
- 1 teaspoon garlic powder (for a savory kick)
- Fresh herbs like rosemary or chives
The magic here is how the ingredients come together. The buttermilk gives these biscuits that signature tangy flavor and a beautifully soft crumb, while the butter… well, it turns them into little golden pillows of heaven. You can adjust the sugar if you want a slightly sweeter biscuit, or even substitute with honey if you’re feeling adventurous.
You can even go plant-based by swapping the buttermilk with a mixture of almond milk and lemon juice, and using vegan butter instead. The result? Still absolutely irresistible.
Kitchen Tools and Equipment
Before we jump into the actual cooking, let’s make sure you’ve got the right tools on hand. You don’t need a commercial kitchen, but a few basics will make the process smooth and easy.
Must-have tools:
- Mixing bowl – One large bowl is enough for mixing the dry and wet ingredients.
- Whisk or fork – To blend the dry ingredients evenly.
- Measuring cups and spoons – Accuracy matters when baking.
- 9×9-inch baking dish – Glass or ceramic is ideal for even heat distribution.
- Microwave-safe bowl – For melting the butter.
That’s it—no biscuit cutters, rolling pins, or any extra effort required. One of the reasons butter swim biscuits are so popular is because you can mix them up in under 10 minutes and let your oven do the rest.
Pro tip: A metal baking pan will work too, but it might brown the bottom of the biscuits more quickly. Keep an eye on it the first time you bake.
Step-by-Step Instructions
Alright, it’s time to get those hands flour-dusted and start baking! Follow these easy steps for guaranteed golden, buttery perfection.
Step 1 – Preheat the Oven and Prepare the Pan
First things first—set your oven to 450°F (232°C). That high heat is what helps create the crisp, golden exterior while keeping the insides tender.
While the oven is heating up, melt the butter in a microwave-safe bowl. Pour the melted butter into your 9×9-inch baking dish. Swirl it around or tilt the dish to coat all sides evenly. This buttery base is what gives these biscuits their “swimming” feature.
It’s important to have the butter fully melted and sitting hot in the dish before adding the dough—this is what sears the bottom of the biscuits and locks in flavor.
Step 2 – Mix the Dry Ingredients
In your large mixing bowl, whisk together:
- 2 1/2 cups all-purpose flour
- 1 tablespoon sugar
- 1 tablespoon baking powder
- 1 1/2 teaspoons salt
Make sure everything is thoroughly combined. This step is key to ensuring that your biscuits rise evenly and have a balanced flavor. If you’re adding herbs or spices, mix them in now so they’re evenly distributed throughout the dough.
Step 3 – Add the Buttermilk
Slowly pour 1 3/4 cups cold buttermilk into your dry ingredients. Stir gently using a fork or spatula until just combined. The dough will be sticky and thick—that’s exactly what you want.
Avoid overmixing, which can make your biscuits tough. Just stir enough so that no dry pockets of flour remain.
Now that your dough is ready, it’s time for the buttery finale!
Step 4 – Melt the Butter
Although you’ve likely already melted the butter and poured it into the pan, let’s break this step down a bit more. You’ll need 1 stick (1/2 cup) of unsalted butter, and the goal is to get it completely liquified, not just softened.
Use a microwave-safe bowl and heat the butter in 15-second intervals, stirring in between to avoid any splattering. Once it’s fully melted, pour it evenly into the bottom of your 9×9-inch baking dish. The entire surface should be glossy with butter.
This buttery base will sizzle once the dough touches it—creating that irresistible crispy crust and rich, buttery flavor that defines butter swim biscuits. It’s like frying and baking at the same time, and it’s absolutely genius.
Step 5 – Pour and Spread the Dough
Now comes the fun part: transferring the biscuit dough into the butter-filled pan. Scoop the dough out of the mixing bowl and drop it right into the center of your buttery dish.
Don’t worry if it looks messy—it’s supposed to be rustic and freeform. Using a spatula or your hands (lightly greased or floured), spread the dough gently to the edges of the pan. It won’t be perfect, and that’s okay. The butter will start to seep over the edges and around the dough, creating that signature “swim” effect.
Here’s the secret to perfectly portioned biscuits: Use a knife to score the dough into nine equal squares (3×3 pattern). You don’t need to cut all the way through—just a shallow score on the surface. This not only helps the biscuits bake evenly but also makes them easier to separate once done.
Step 6 – Bake to Golden Perfection
Slide your pan into the preheated oven (450°F) and bake for 22 to 25 minutes. The exact time can vary depending on your oven and pan, so keep a close eye after the 20-minute mark.
You’re looking for a beautiful golden-brown top, crispy edges, and a fluffy, moist center. The butter should be bubbling around the sides, giving the biscuits a slightly fried edge that’s crisp yet melt-in-your-mouth tender.
Once they’re done, pull the dish out and let it cool for about 5 minutes. Don’t skip this resting time—it allows the butter to settle, the biscuits to firm up slightly, and makes them easier to lift from the pan without crumbling.
Tips for Perfect Butter Swim Biscuits
Let’s face it, even simple recipes can go sideways without a few pro tips. Here’s how to get buttery biscuit bliss every time:
- Use cold buttermilk. Cold liquid helps keep the dough dense and moist, which is perfect for this style of biscuit.
- Don’t overmix. A light hand is your best friend here. Mix until just combined and no more.
- Score the dough. Not only does this help with portioning, but it also gives the biscuits a better rise and texture.
- Keep an eye on the butter. If you notice the butter browning too quickly in the oven, lightly tent the pan with foil for the last 5 minutes of baking.
- Use a glass or ceramic baking dish. Metal pans conduct heat more quickly, which can cause the biscuits to brown unevenly or too fast on the bottom.
Common mistakes include overmixing, using old baking powder, or not measuring the flour correctly (always spoon and level, don’t scoop!). Follow the recipe and tips closely, and you’re guaranteed to impress.
Serving Suggestions
So you’ve baked your butter swim biscuits—now what? Serve them warm, straight from the oven, and you’ve got a crowd-pleaser on your hands. But if you want to take things to the next level, here are some serving ideas:
- Classic Comfort: Slather with honey or jam for a sweet breakfast treat.
- Savory Vibes: Serve alongside fried chicken, sausage gravy, or scrambled eggs.
- Southern Style: Pair with collard greens, mac and cheese, or BBQ.
- Fancy Brunch: Top with poached eggs and hollandaise sauce for a Southern twist on Eggs Benedict.
These biscuits are the perfect vehicle for all things delicious—whether you’re dipping them in gravy or making a breakfast sandwich. They’re versatile, indulgent, and honestly addictive.
Storage and Reheating Tips
So you’ve made a big batch of butter swim biscuits—now what? If you’ve got leftovers (and that’s a big if), you’ll want to store and reheat them properly to keep that same rich, buttery texture.
Storing Butter Swim Biscuits
- At Room Temperature: If you plan to eat them within 1-2 days, store the biscuits in an airtight container on your counter. Make sure they’re completely cool before sealing them to avoid trapping moisture that can make them soggy.
- In the Fridge: To keep them fresh for up to a week, pop them in the fridge. Wrap the biscuits in foil or plastic wrap, or place them in a zip-top bag. This helps prevent them from drying out.
- Freezing for Later: Want to save some for a rainy day? Freeze the biscuits individually wrapped in plastic wrap, then place them in a freezer bag. They’ll stay good for up to 3 months.
Reheating Butter Swim Biscuits
The key to reheating these beauties is to avoid drying them out while still reviving that crispy exterior. Here’s how:
- Oven (Best Method): Preheat your oven to 350°F (177°C). Wrap the biscuits loosely in foil and heat for 10–12 minutes. For a crispier crust, open the foil in the last 2 minutes.
- Microwave (Quick Fix): Wrap a biscuit in a damp paper towel and microwave on medium for 20–30 seconds. This keeps the inside soft but won’t give you that oven-crisp finish.
- Toaster Oven: Great for small batches. Just place the biscuit on the rack and heat at 325°F (163°C) for about 8–10 minutes.
Adding a pat of butter on top before reheating is a smart move—it keeps the biscuit moist and enhances that rich flavor.
FAQs about Butter Swim Biscuits Recipe
1. Can I use a different type of flour?
Yes! All-purpose flour is best for texture, but you can substitute with whole wheat (for a heartier biscuit) or even gluten-free blends. Just keep in mind, the texture might change slightly.
2. How do I make these biscuits dairy-free?
You can replace the buttermilk with a non-dairy milk mixed with 1 tablespoon of lemon juice or vinegar. Use plant-based butter instead of regular butter, and you’re good to go!
3. Can I make these ahead of time?
Absolutely. Prepare the dough and spread it in the pan, then cover and refrigerate overnight. Add 2-3 minutes to your bake time if baking from cold.
4. Why are my biscuits not fluffy?
Overmixing or using expired baking powder are the two biggest culprits. Also, make sure your buttermilk is cold, which helps create steam for fluffiness.
5. What does “swim” in butter really mean?
It means the biscuits are literally baked in melted butter. Instead of butter being mixed into the dough, it’s poured into the pan and surrounds the dough during baking, resulting in that signature crust and flavor.
Conclusion
Butter swim biscuits are proof that you don’t need a long list of ingredients or complicated steps to make something downright magical. With just a few pantry staples, some melted butter, and a baking dish, you can whip up a batch of golden, crispy, melt-in-your-mouth biscuits that rival anything from a bakery or Southern diner.
Whether you’re a seasoned home cook or just starting your baking journey, this recipe is approachable, adaptable, and incredibly satisfying. Plus, once you’ve tasted that buttery crust and fluffy center, you’ll never go back to dry, bland biscuits again.
So go ahead—grab that bowl, melt some butter, and give these a try. One bite, and you’ll understand why these biscuits have become a viral sensation and a new family favorite in kitchens across the country.