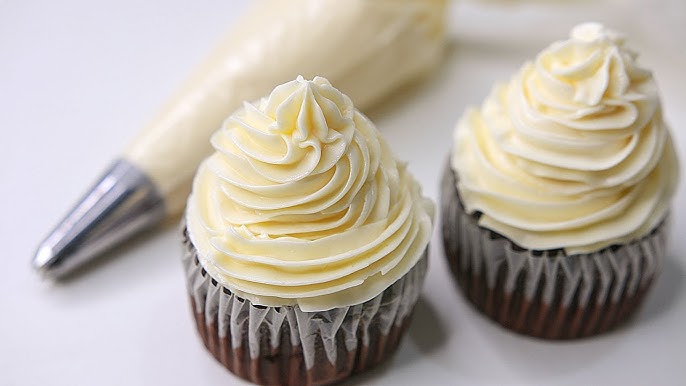
Butter Frosting Recipe: Butter frosting, also known as buttercream, is one of the most beloved and versatile frostings in the baking world. It’s smooth, creamy, and melts in your mouth with every bite. At its core, butter frosting is made from butter and powdered sugar, whipped together until light and fluffy. It’s a staple in home bakeries and professional kitchens alike, known for its ease of preparation and customizable nature.
Whether you’re decorating cupcakes, icing a birthday cake, or spreading a thick layer on cookies, butter frosting offers the perfect balance of sweetness and richness. The texture can range from silky smooth to firm enough for piping roses and borders, depending on how it’s made and the proportions used.
Why Butter Frosting is a Classic Favorite
There’s a reason butter frosting has stood the test of time. First off, it’s incredibly easy to make with just a few pantry staples—no complicated steps, no hard-to-find ingredients. It’s also incredibly forgiving. Messed up the sugar ratio? A splash of milk or extra sugar can fix that. Need it dairy-free? Use vegan butter. Want it to taste like strawberries or coffee? Add a flavor extract or a few teaspoons of espresso.
Its adaptability makes it a favorite among bakers of all levels. Plus, its texture is just divine. Soft enough to glide on a cake, yet sturdy enough to hold its shape when piped. And the flavor? Buttery, creamy, slightly sweet—like a hug for your taste buds.
Butter frosting is not just about taste, though. It’s also about presentation. This frosting can be colored, piped, swirled, or smoothed into a glossy finish. It’s perfect for birthday parties, weddings, bake sales, or just a Tuesday evening dessert.
Essential Ingredients for Butter Frosting
Main Ingredients and Substitutes
You only need a few ingredients to whip up classic butter frosting, but quality matters. Here’s what you’ll typically use:
- Butter (1 cup, unsalted) – The backbone of the frosting. Room temperature is key for the perfect whip.
- Powdered Sugar (4 cups) – Also known as confectioners’ sugar; it provides sweetness and structure.
- Milk or Cream (2–4 tablespoons) – Helps achieve the desired consistency.
- Vanilla Extract (1–2 teaspoons) – Adds depth of flavor and enhances sweetness.
- Salt (a pinch) – Balances the sweetness and enhances flavor.
Substitutes:
If you’re dairy-free or vegan, swap the butter with plant-based margarine or vegan butter. Almond or oat milk can replace dairy cream, though it may slightly alter the flavor and consistency.
For a less sweet version, reduce the sugar and add a tablespoon of cornstarch to maintain structure. You can also use flavored extracts like almond, lemon, or coconut for a unique twist.
Choosing the Right Butter
Your frosting is only as good as the butter you use. Always go for unsalted butter—this gives you control over the final saltiness. Choose a high-fat content butter (preferably European-style) for the richest flavor and smoothest texture.
Using room temperature butter is non-negotiable. Cold butter won’t blend properly and melted butter will make your frosting runny. Room temp butter should be soft enough to press with a finger but not melting.
Pro tip: Want your frosting whiter? Some bakers opt for whipped shortening or a butter-shortening combo for ultra-white results. It may lose some buttery flavor, but it’s great for weddings and professional cake decorating.
Tools You’ll Need
Kitchen Equipment Checklist
Making butter frosting doesn’t require a fancy setup, but having the right tools makes the process smoother and more enjoyable. Here’s what you’ll need:
- Electric Mixer (Stand or Handheld) – Absolutely essential for creaming the butter and achieving the fluffy texture.
- Mixing Bowl (preferably metal or glass) – Deep enough to prevent sugar clouds from flying everywhere.
- Measuring Cups and Spoons – Precision matters here.
- Rubber Spatula – For scraping down the sides and ensuring everything’s mixed thoroughly.
- Sifter (optional) – To prevent lumps in your powdered sugar.
- Offset Spatula or Knife – For spreading the frosting smoothly on cakes or cupcakes.
- Piping Bags and Tips (optional) – For decorating and piping designs.
If you’re planning to tint your frosting, food-safe gel colors and a toothpick for adding small amounts at a time will come in handy.
Preparing Your Ingredients
Room Temperature Matters
One of the most overlooked yet crucial steps in making butter frosting is ensuring your ingredients are at the right temperature—specifically, room temperature. This means your butter should sit out for about 30 minutes to an hour before you begin. It should be soft but not melting.
Why does this matter? Cold butter won’t whip properly, and you’ll end up with a chunky mess. Overly soft or melted butter will result in a greasy, runny frosting. Room temperature butter ensures a creamy, fluffy, stable texture.
If you forget to take out your butter in time, here’s a trick: Cut it into small cubes and let it sit out for 15–20 minutes. Or microwave it in 5-second bursts, rotating often.
Powdered sugar also mixes best at room temperature. If it’s been stored in a cold pantry or fridge, let it sit out for a bit or sift it to reduce clumping.
Measuring Precisely
Butter frosting is all about balance. Too much sugar and it’s overly sweet; too little and the texture falls flat. Always measure ingredients carefully. Use the spoon-and-level method for powdered sugar—don’t pack it into the cup.
For butter, one stick is ½ cup or 113g. A typical recipe uses two sticks (1 cup). Use a digital scale for the most accurate measurements, especially if scaling up for large cakes.
Milk or cream should be added a tablespoon at a time. It’s easier to thin out thick frosting than to thicken runny frosting without compromising taste.
Step-by-Step Instructions for Making Butter Frosting
Step 1: Creaming the Butter
This is where the magic starts. Place your room temperature butter into a mixing bowl and beat it on medium-high speed for at least 5 minutes. It should turn pale, fluffy, and almost double in volume.
This step is crucial for incorporating air, which makes the frosting light and spreadable. Don’t rush this part. Under-whipped butter results in dense frosting.
Use a spatula to scrape down the sides of the bowl halfway through mixing. This ensures everything is evenly whipped.
Step 2: Adding Sugar Gradually
Once your butter is light and fluffy, it’s time to bring in the sweetness. Add powdered sugar one cup at a time, beating thoroughly after each addition. If you dump it all in at once, you’ll likely end up with a kitchen dusted in sugar and a clumpy mess.
Start your mixer on low speed to incorporate the sugar, then increase to medium-high to beat it in fully. You’ll notice the frosting thickening as you go. Don’t forget to scrape down the sides of the bowl between additions so everything is well blended.
Depending on the humidity in your kitchen and the fat content of your butter, you may need slightly more or less sugar than the recipe calls for. If it gets too thick, don’t panic—that’s where milk or cream comes in.
At this stage, taste your frosting. Too sweet? Add a pinch of salt. Not sweet enough? Sprinkle in a bit more sugar. This is your chance to tailor the flavor to your liking.
Step 3: Flavoring and Adjusting Consistency
Now that the base is ready, it’s time to make it delicious. Add 1–2 teaspoons of vanilla extract—or any extract of your choice—and mix until fully incorporated. Want to get fancy? Try almond, lemon, orange, or even maple extract for a unique twist.
Next, adjust the consistency. If the frosting is too thick, add milk or cream, one tablespoon at a time, beating after each addition. For a thinner, glossier frosting perfect for glazing, go for more liquid. If it’s too soft for piping, add a bit more powdered sugar.
This step is where you make the frosting yours. If you’re coloring the frosting, add a small amount of gel food coloring and mix thoroughly until the color is even. Use a toothpick to add tiny amounts—you can always add more, but you can’t take it out.
Texture-wise, you’re looking for smooth, fluffy, and pipeable. It should hold peaks but spread easily with a spatula.
Flavor Variations
Chocolate Butter Frosting
To turn your butter frosting into a rich chocolate dream, simply add unsweetened cocoa powder or melted chocolate. Start with ¾ cup of cocoa powder sifted into the powdered sugar. Or, if using melted chocolate, cool it slightly before adding to the creamed butter to prevent curdling.
You might need to add a touch more milk or cream since cocoa can dry out the frosting a bit. Add a pinch of salt and a splash of vanilla or coffee extract to enhance the chocolate flavor.
This version pairs beautifully with chocolate, vanilla, or red velvet cakes and makes any cupcake instantly more indulgent.
Vanilla Bean, Citrus, and Other Twists
For something more elegant, try using real vanilla bean paste instead of extract. It adds visible vanilla specks and a deeper flavor.
Want something refreshing? Add the zest of one lemon, lime, or orange along with a teaspoon of juice. Citrus butter frosting is perfect for summer cakes or cupcakes with fruit fillings.
Feeling bold? Experiment with:
- Espresso powder for mocha buttercream
- Maple syrup for fall-inspired bakes
- Crushed freeze-dried strawberries for fruity flair
Frosting Tips and Tricks
Avoiding Common Mistakes
Even a simple recipe like butter frosting can go wrong if you skip the basics. Here are some pitfalls to avoid:
- Using cold butter: This leads to lumpy frosting that’s impossible to fix.
- Overbeating: While creaming is good, overmixing after the sugar is added can cause the frosting to separate.
- Skipping the sifting: Lumpy sugar equals lumpy frosting. Always sift your powdered sugar.
- Too much liquid: Adding too much milk too fast can break the emulsion, leading to soupy frosting.
Always take your time and make adjustments slowly. Don’t try to rush the mixing process, and always taste as you go.
Achieving the Perfect Texture
The gold standard is a frosting that’s fluffy but firm enough to pipe. Think of whipped butter—it should be soft yet structured.
If you’re decorating cupcakes, go a bit stiffer so the swirls hold up. For layered cakes, a smoother, spreadable consistency is best.
Temperature also plays a role. If it’s too warm, pop the frosting in the fridge for 10–15 minutes before using. Too cold? Let it sit out and give it another whip.
How to Store and Preserve Butter Frosting
Refrigeration vs Freezing
Once you’ve made your perfect batch of butter frosting, the next question is: how do you store it without it losing its texture or flavor?
Refrigeration is ideal for short-term storage. Place the frosting in an airtight container and keep it in the fridge for up to 1 week. When you’re ready to use it, bring it to room temperature, then re-whip it for a minute or two to restore its fluffiness.
Freezing works great if you want to store it longer. Spoon the frosting into a freezer-safe container, smoothing out the top. Seal it tightly to prevent freezer burn and label it with the date. Butter frosting can be frozen for up to 3 months.
To thaw, move the container to the refrigerator overnight. Once thawed, let it come to room temperature, then beat it again to restore its smooth, creamy texture. If it feels a bit too thick after defrosting, add a splash of milk and whip again.
Pro tip: Store unused frosting in small batches if you plan on using different colors or flavors later. This makes it easier to work with and prevents waste.
Best Cakes and Cupcakes to Pair With
Matching Flavors for Maximum Delight
Butter frosting is a match made in dessert heaven with a wide range of baked goods. It complements and enhances flavors, adding richness and sweetness to every bite.
Here are some classic pairings:
- Vanilla Cake: A timeless match. Add vanilla frosting on vanilla cake for a double dose of comfort.
- Chocolate Cake: The creamy texture of butter frosting contrasts beautifully with rich, dense chocolate cake.
- Red Velvet Cake: Cream cheese butter frosting is a twist that works wonders here.
- Carrot Cake: Add a pinch of cinnamon or nutmeg to your butter frosting for a cozy, spiced combo.
- Lemon or Citrus Cakes: Pair with a light, lemon-zested butter frosting for a refreshing taste.
- Cupcakes: Whether vanilla, funfetti, or chocolate, butter frosting is the go-to choice for topping cupcakes with swirls, roses, or simple smooth domes.
Want to level up? Use different piping tips to create patterns, flowers, or borders that match the theme of your event. Butter frosting holds shape well and gives you the flexibility to experiment.
Decorating with Butter Frosting
Simple Piping Techniques
You don’t have to be a professional cake artist to create beautiful designs. A few basic tools and techniques can take your decorating game from basic to bakery-worthy.
Here are some beginner-friendly piping tips:
- Round Tip (#1A): Great for smooth domes and writing.
- Star Tip (#1M or #2D): Ideal for swirls, rosettes, and textured edges.
- Leaf Tip (#352): Create leaves, petals, or textured ridges.
Fill your piping bag about two-thirds full to maintain control. Twist the end to prevent frosting from spilling out and apply steady pressure while guiding the tip with your hand.
Start with simple borders and swirls before moving on to flowers and complex designs. Practice on parchment paper until you feel confident.
Using Food Coloring
Butter frosting is an excellent canvas for color. Use gel food coloring for vibrant hues without thinning the frosting. Liquid colors can change the texture if overused.
Use a toothpick to add color a little at a time and blend thoroughly. Need multiple shades? Divide the frosting into separate bowls and mix in colors individually.
For ombre effects, start with a light shade and gradually add more coloring to each batch. Want a marble effect? Slightly swirl two colors together in the piping bag.
Butter frosting also works well with natural colorants like:
- Beet powder (pink/red)
- Matcha (green)
- Turmeric (yellow)
- Cocoa powder (brown)
Nutritional Information
Calories, Sugar, and Fat Content
Let’s face it—no one eats butter frosting thinking it’s health food. But if you’re curious or need to manage your intake, here’s the breakdown for a basic batch (yields enough to frost 12 cupcakes):
| Nutrient | Per Serving (2 Tbsp) |
|---|---|
| Calories | ~150 kcal |
| Total Fat | 8–10 g |
| Saturated Fat | 5–6 g |
| Cholesterol | 25–30 mg |
| Sodium | 20–30 mg |
| Total Carbohydrates | 20–25 g |
| Sugar | 18–22 g |
| Protein | <1 g |
These numbers vary based on ingredients, especially if you’re using heavy cream or added flavorings. Vegan versions may have slightly different macros.
If you’re looking to lighten it up:
- Use less sugar and add cornstarch for structure.
- Replace half the butter with Greek yogurt or avocado (for a different taste and texture).
- Try whipped cream-based frostings for a lower fat option.
FAQs about Butter Frosting Recipe
What’s the best way to make it less sweet?
Add a pinch of salt or a splash of lemon juice to cut the sweetness without altering texture too much.
Can I make butter frosting ahead of time?
Absolutely! Store it in an airtight container in the fridge for up to a week, or freeze it for up to three months.
Why is my frosting too runny?
It’s likely due to too much liquid or warm butter. Chill it briefly and beat again. If needed, add more powdered sugar.
Can I color butter frosting?
Yes! Gel colors work best. Always start with a little and add more as needed to avoid oversaturating.
Is butter frosting gluten-free?
Yes, if all your ingredients are certified gluten-free. Always double-check labels.
Conclusion
Butter frosting is the ultimate go-to in the world of desserts. Whether you’re icing a simple vanilla cake or dressing up cupcakes for a birthday bash, this frosting never disappoints. It’s creamy, rich, sweet—but not too sweet—and incredibly versatile.
From classic vanilla to deep chocolate, citrus-infused to espresso-kissed, butter frosting allows you to get creative in your kitchen without a ton of effort. With just a handful of ingredients, the right technique, and a few tips from this guide, you can master the art of making perfect butter frosting every time.
So the next time you’re baking, whip up a batch, pipe it high, and let the compliments roll in.