Breadstick Recipe: Let’s be honest—there’s nothing quite like the warm, soft, buttery goodness of freshly baked breadsticks straight from the oven. Store-bought versions might be convenient, but homemade breadsticks take flavor and freshness to a whole new level. Making them yourself also means you can customize the flavors, textures, and sizes to suit your taste buds. Whether you’re hosting a dinner party, craving a snack, or want to impress your guests with something special, homemade breadsticks can be your go-to option.
Plus, it’s fun! Making breadsticks from scratch gives you full control over every ingredient—meaning you can avoid preservatives and artificial additives. And if you’ve never tried baking bread before, breadsticks are a perfect entry point. They’re simple, quick, and forgiving—even if your dough isn’t perfect, it’ll still taste delicious once baked and slathered in butter or garlic.
Breadsticks also pair beautifully with countless meals: pasta, soups, salads, and even as appetizers. Their versatility makes them a must-know recipe in any home cook’s repertoire.
Tools and Equipment You’ll Need
Before diving into the ingredients and method, let’s make sure your kitchen is ready. You don’t need any fancy gadgets, but a few basic tools can make your breadstick journey smoother:
- Mixing Bowl: A large bowl to combine and knead your dough.
- Measuring Cups and Spoons: Precision matters in baking!
- Wooden Spoon or Dough Hook: For mixing the ingredients. If you have a stand mixer, even better.
- Clean Surface or Board: You’ll need a space to knead and roll out your dough.
- Baking Sheet: Preferably non-stick or lined with parchment paper.
- Kitchen Towel or Plastic Wrap: To cover the dough while it rises.
- Pastry Brush: For applying butter, olive oil, or seasonings on top of your breadsticks before baking.
Having these tools on hand makes the process smoother, and your breadsticks will come out looking like they belong in a bakery.
Ingredients Needed for Perfect Breadsticks
Basic Ingredients Breakdown
Now let’s get down to the heart of the recipe—the ingredients. Breadsticks don’t require much, and you likely already have most of these in your pantry:
- All-purpose flour (2 ¼ cups): The foundation of your dough. It provides structure and chew.
- Warm water (¾ cup): Activates the yeast and helps the dough come together.
- Active dry yeast (2 ¼ teaspoons): This helps your dough rise and gives it that airy, light texture.
- Sugar (1 tablespoon): A little sweetness to feed the yeast.
- Salt (1 teaspoon): Enhances flavor and balances the taste.
- Olive oil or melted butter (2 tablespoons): Adds richness and moisture to the dough.
- Optional: Garlic powder, Italian seasoning, parmesan cheese: For that flavor punch.
These simple ingredients, when combined with love and a bit of patience, transform into golden breadsticks that smell and taste irresistible.
Optional Add-Ons and Variations
Want to spice things up a bit? Breadsticks are super customizable. Here are a few ideas to add flair to your basic dough:
- Garlic and Herb: Mix garlic powder and Italian herbs into the dough or brush on top before baking.
- Cheesy Breadsticks: Sprinkle shredded mozzarella or parmesan before baking.
- Whole Wheat: Substitute half of the all-purpose flour with whole wheat for a healthier twist.
- Stuffed Breadsticks: Wrap dough around cheese sticks or pepperoni for a fun surprise inside.
Feel free to experiment. Once you get the hang of the basic recipe, these little tweaks can turn your breadsticks into your signature dish.
Step-by-Step Breadstick Dough Preparation
Mixing the Dough
Here’s where the magic begins. Start by activating the yeast: in a large bowl, combine warm water and sugar, then sprinkle the yeast on top. Let it sit for about 5-10 minutes until it gets frothy. This means the yeast is alive and ready to do its job.
Once the yeast mixture is ready, add olive oil, salt, and gradually stir in the flour. Start with 2 cups and add more if needed. Mix with a wooden spoon or dough hook until everything is combined into a sticky dough.
If you’re using your hands, expect to get a little messy—flour your hands lightly to keep the dough from sticking too much. You’re aiming for a soft, slightly sticky consistency, but it shouldn’t be too wet.
Kneading Techniques for Best Texture
Once your dough comes together, it’s time to knead. Kneading helps develop gluten, which gives bread its chew and structure. Place the dough on a lightly floured surface and use the heel of your hand to push it forward, then fold it over and repeat. Do this for about 8-10 minutes.
If you’re using a stand mixer, let the dough hook do the work for about 5 minutes on medium speed.
You’ll know your dough is ready when it becomes smooth and elastic. Press it gently with your finger—if it springs back slightly, you’ve nailed it.
This step is crucial. Don’t rush it. Good kneading means your breadsticks will rise well and have that perfect texture when baked.
Letting the Dough Rise
Importance of Dough Proofing
Now, let your dough rest and rise—this step is called proofing. Place the kneaded dough back into the mixing bowl and cover it with a clean towel or plastic wrap. Set it in a warm, draft-free spot for about 1 to 1.5 hours, or until it doubles in size.
This rising time allows the yeast to create tiny air pockets, giving your breadsticks a fluffy interior. Skipping or rushing this process can lead to dense, hard breadsticks. Patience is key.
If you’re in a colder climate, preheat your oven to the lowest setting for a minute or two, then turn it off and place your dough inside (covered, of course). This creates the perfect warm environment for proofing.
Ideal Conditions for Rising
Ideal proofing happens at around 75°F to 80°F (24°C to 27°C). Too hot, and you risk killing the yeast. Too cold, and the dough will take forever to rise. If your kitchen is chilly, use that slightly-warmed oven trick or place the bowl near a warm window or even on top of the fridge.
Once the dough has doubled in size, punch it down gently to release excess gas. It’s now ready to be shaped into your delicious breadsticks.
Shaping and Prepping the Breadsticks
Rolling Out the Dough
Alright, now that your dough has risen and is all puffed up with potential, it’s time to get your hands dirty again—this time with shaping. Start by lightly flouring your work surface. Gently turn out the dough and use your hands or a rolling pin to flatten it into a rectangle. Aim for a thickness of about ½ inch. You don’t want it too thin or your breadsticks will be crispy instead of soft and chewy.
Keep the edges even if you want that uniform bakery-style look, but honestly, rustic breadsticks are charming in their own right. Don’t stress if some are a little lopsided—it adds character. Make sure the dough isn’t sticking to your surface. If it is, sprinkle a bit more flour underneath.
Here’s a little trick: If your dough keeps springing back while rolling, let it rest for 5 minutes. This relaxes the gluten and makes shaping way easier.
Cutting and Forming Breadstick Shapes
With your dough rolled out to the desired thickness, it’s time to cut! Use a sharp knife, a pizza cutter, or even a bench scraper. Cut the dough into strips about 1/2 to 3/4 inch wide and 5-6 inches long. The size is flexible—short and thick breadsticks are perfect for dipping, while longer, thinner ones are more elegant for serving with soup or pasta.
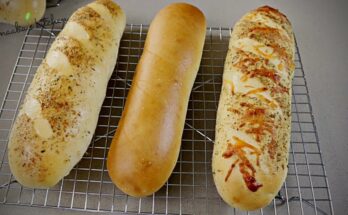
Once cut, you can keep them straight or give them a little twist for a fun spiral look. For twisted breadsticks, just grab each end of a strip and twist in opposite directions a few times. Place them on your prepared baking sheet, leaving a little space between each one since they will puff up during baking.
Before baking, brush them generously with melted butter or olive oil. This not only helps them brown but also adds flavor. Want extra pizzazz? Sprinkle them with garlic powder, herbs, or grated parmesan for that irresistible Italian flair.
Baking the Breadsticks to Perfection
Ideal Baking Temperature and Time
Preheat your oven to 400°F (200°C). A hot oven ensures your breadsticks rise quickly and get that nice golden crust without drying out.
Slide your tray of ready-to-bake breadsticks into the oven and let them bake for about 12 to 15 minutes. Keep a close eye on them during the last few minutes—you’re looking for a light golden brown color. If you like a crispier edge, you can leave them in for an extra 2-3 minutes.
Every oven is a bit different, so your first batch might be a little bit of trial and error. Once done, they should be soft in the middle with a slight crunch on the outside.
Final Touches After Baking
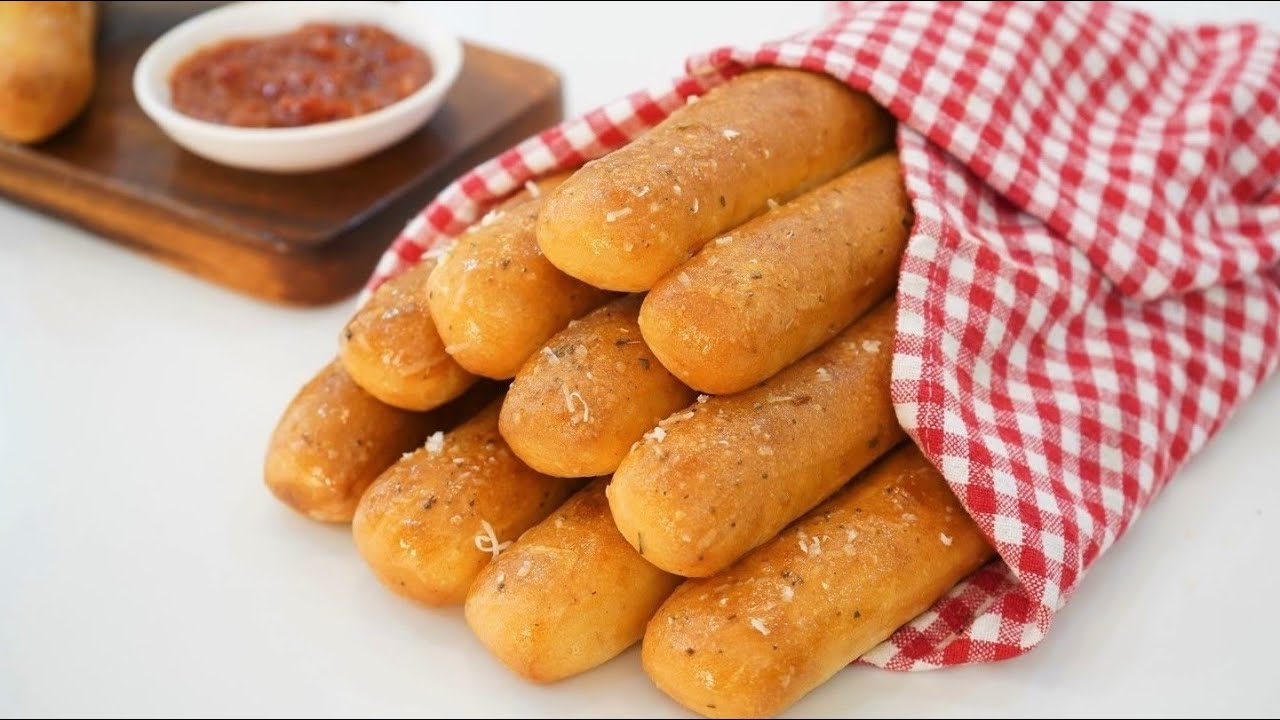
When your breadsticks are out of the oven and still piping hot, this is the perfect moment to elevate their flavor. Brush them one more time with melted butter or garlic butter. This last buttery layer soaks into the warm crust, giving it a luscious finish.
You can also sprinkle on more parmesan, sea salt, or even a dash of red pepper flakes if you want a spicy kick. Let them cool slightly on a wire rack before serving, or serve them warm right out of the pan—nobody will complain!
Store any leftovers in an airtight container for up to 3 days. You can reheat them in the oven at 350°F (175°C) for about 5 minutes to bring back that fresh-baked magic.
Serving Suggestions and Dips
Best Dishes to Pair With Breadsticks
Breadsticks are surprisingly versatile. Whether you’re serving a five-star Italian dinner or just want something warm to munch on during movie night, they fit right in. Here are a few ideas:
- Pasta Dishes: Spaghetti, fettuccine Alfredo, lasagna—breadsticks are their best friends.
- Soups: Tomato basil, minestrone, or creamy mushroom soup paired with a warm breadstick? Divine.
- Salads: Caesar salad or a hearty garden mix tastes even better with a side of soft breadsticks.
- Appetizers: Add them to a cheese board or antipasto platter for a rustic touch.
Breadsticks are also a hit at parties. Serve them in a tall glass or basket lined with parchment—easy to grab and even easier to love.
Easy Dipping Sauce Ideas
Breadsticks and dips are a match made in carb-lover heaven. Try these easy and tasty dipping options:
- Marinara Sauce – Classic, tomato-based, and perfectly tangy.
- Garlic Butter Sauce – Melt butter with minced garlic and herbs.
- Cheese Sauce – Warm and gooey; ideal for kids and adults alike.
- Ranch Dressing – Cool and creamy; especially great with herbed breadsticks.
- Pesto – A rich basil-based dip for a fresh, garlicky punch.
You can also get creative with flavored oils—infused with chili, rosemary, or roasted garlic. A simple olive oil and balsamic vinegar combo also does the trick.
Storing and Reheating Breadsticks
Best Practices for Keeping Breadsticks Fresh
Breadsticks are best when enjoyed fresh, warm, and straight from the oven—but let’s be real, we all love leftovers. If you’ve baked a big batch or just want to prep ahead, storing them correctly is crucial to maintain that soft, chewy goodness.
Once your breadsticks have completely cooled, transfer them to an airtight container or resealable plastic bag. If you’re storing multiple layers, use parchment paper between them to prevent sticking. This keeps them from drying out and helps them stay soft for up to 3 days at room temperature.
Avoid storing breadsticks in the refrigerator—it actually makes them go stale faster. The cool environment causes the starch molecules to recrystallize, drying out the bread. Instead, if you want to keep them for longer, consider freezing.
To freeze, wrap each breadstick in aluminum foil or plastic wrap, then place them all in a freezer-safe ziplock bag. They’ll stay good for up to 2 months. When you’re ready to enjoy them, there’s no need to thaw—just pop them in the oven directly.
How to Reheat Without Losing Texture
When it’s time to reheat, skip the microwave. While it’s quick, the microwave tends to make bread soggy and rubbery. Instead, use the oven or toaster oven for the best results.
Preheat your oven to 350°F (175°C), wrap the breadsticks in foil to retain moisture, and heat for about 5–8 minutes. If you want a crispier exterior, unwrap them for the last 2 minutes. They’ll come out warm, soft, and just as delightful as when you first made them.
For frozen breadsticks, bake at the same temperature for 10–15 minutes. You can even brush them with fresh garlic butter or olive oil before reheating to give them a little boost of flavor.
Tips and Tricks for Perfect Breadsticks Every Time
Common Mistakes to Avoid
Even though breadsticks are beginner-friendly, a few common pitfalls can lead to less-than-perfect results. Let’s dodge those:
- Using water that’s too hot or cold: Yeast is picky. Water that’s too hot will kill it; too cold and it won’t activate. Aim for water around 110°F (43°C).
- Over-kneading or under-kneading: You want to develop gluten but not overdo it. Under-kneaded dough won’t rise well, and over-kneaded dough becomes tough.
- Skipping the rise time: Don’t rush the proofing process. Skipping it results in dense, flat breadsticks.
- Crowding the baking sheet: Leave enough space between breadsticks so they don’t stick or bake unevenly.
- Overbaking: Breadsticks bake fast. Going even 2 minutes too long can turn them dry and hard. Keep an eye out.
Expert Tips for Beginners
Here’s how to make sure every batch is a winner:
- Use bread flour instead of all-purpose if you want a chewier texture.
- Add a pinch of sugar or honey to give the breadsticks a slight sweetness.
- Try different toppings: Sesame seeds, everything bagel seasoning, or crushed red pepper can add variety.
- Brush with flavored oils or butter twice—once before baking for browning and once after for that final shine.
- Make mini breadsticks for snacking or kids’ lunches—same great taste, bite-sized fun.
Practice makes perfect, and every batch you bake will teach you something new. Once you get comfortable, you’ll never want to go back to store-bought!
Healthier Alternatives and Dietary Options
Gluten-Free Breadstick Version
For those avoiding gluten, don’t worry—you can still enjoy breadsticks with a few smart substitutions. Use a quality gluten-free flour blend designed for baking. Look for one with xanthan gum already included, as this helps mimic the elasticity of gluten.
Replace the regular flour with a 1:1 gluten-free mix and follow the recipe as usual. You might need to adjust the water slightly, as some gluten-free flours absorb more liquid. Gluten-free doughs are typically stickier and less elastic, but that’s okay. Just shape your breadsticks gently and use parchment paper for easy handling.
Bake at the same temperature, but keep a close eye as baking times can vary slightly. The result? Soft, golden breadsticks that taste just as satisfying.
Vegan and Low-Carb Options
- Vegan Breadsticks: Use plant-based milk or water, and swap out butter for vegan margarine or olive oil. The rest of the process stays exactly the same.
- Low-Carb/Keto Breadsticks: For a keto-friendly twist, make breadsticks with almond flour, mozzarella cheese, and egg. This version doesn’t require yeast or rising time—just mix, shape, and bake. They’re chewy, cheesy, and perfect for those watching their carb intake.
With a little creativity, you can adapt this recipe to fit almost any dietary need, making homemade breadsticks a truly universal comfort food.
FAQs about Breadstick Recipe
1. Can I make the dough ahead of time?
Yes! You can prepare the dough a day in advance. After kneading, cover and refrigerate it. Let it come to room temperature before shaping and baking.
2. Why didn’t my breadsticks rise properly?
Likely reasons include expired yeast, water that’s too hot or cold, or not allowing enough rise time. Make sure your yeast is active and the dough proofs in a warm environment.
3. How do I make my breadsticks extra soft?
Brush them with melted butter before and after baking. You can also tent them with foil during baking to keep the moisture in.
4. Can I freeze unbaked breadstick dough?
Absolutely. Shape the breadsticks, freeze them on a tray, then transfer to a bag. Bake from frozen—just add 5–7 minutes to the baking time.
5. What’s the best way to reheat leftover breadsticks?
Reheat in a 350°F oven for 5–8 minutes wrapped in foil. For frozen ones, bake for 10–15 minutes.
Conclusion
Making breadsticks at home is easier than it sounds—and way more rewarding. From the joy of watching your dough rise to pulling that golden tray of breadsticks out of the oven, it’s a satisfying experience from start to finish. Plus, you get to enjoy them fresh and hot, tailored to your exact flavor preferences.
Whether you like them buttery, cheesy, garlicky, or even twisted and fancy, homemade breadsticks are the perfect sidekick to almost any dish. They’re simple enough for beginners but delicious enough to wow your family and guests. And once you taste the homemade difference, you might never look at a store-bought breadstick the same way again.