Sourdough Loaf Recipe: There’s something magical about baking your own bread. The smell that fills your kitchen, the satisfying crackle of the crust, and the chewy, tangy bite of the crumb—it’s like giving your taste buds a hug.
If you’ve ever dreamed of making artisan-style bread at home, this sourdough loaf recipe will walk you through every step of the way.
Whether you’re a newbie or someone who’s dabbled in bread baking, this guide will teach you how to make a sourdough loaf that’s crisp on the outside, soft on the inside, and packed with flavor.
What is Sourdough Bread?
Sourdough bread isn’t your average loaf. It’s made using natural fermentation from a living culture of flour and water known as a starter. Unlike breads that use commercial yeast, sourdough rises thanks to wild yeast and lactic acid bacteria. This unique fermentation process not only gives it a distinctive tangy flavor but also makes it easier to digest. Plus, sourdough tends to have a longer shelf life because of its acidic nature, which resists mold.
The history of sourdough goes back thousands of years. Long before commercial yeast was a thing, this was how all bread was made. Bakers would keep a portion of fermented dough to leaven the next batch. In fact, sourdough is considered the oldest form of leavened bread. It’s a timeless process, a beautiful dance between science and art.
Why Make Sourdough at Home?
Sure, you could buy sourdough at a fancy bakery, but nothing beats the homemade version. Making sourdough at home lets you control every ingredient. No preservatives, no weird additives—just flour, water, and salt. It’s healthier, more flavorful, and incredibly satisfying to make. Plus, once you get the hang of it, it’s surprisingly therapeutic. There’s a rhythm to sourdough baking that becomes a lifestyle. It teaches patience, timing, and intuition.
And don’t worry—it’s not as complicated as it sounds. With a bit of practice and the right guide (that’s where I come in), anyone can master sourdough.
Ingredients You’ll Need
The Starter – The Heart of Sourdough
Before you do anything, you need a starter. This bubbly mixture of flour and water is what gives sourdough its lift and tang. If you don’t have one yet, don’t fret—it’s easy to make from scratch with just two ingredients. Mix equal parts flour and water, let it sit at room temperature, and feed it daily for about 5 to 7 days. You’ll start to see bubbles, and it will develop a slightly sour aroma. That’s when you know it’s alive and kicking.
Alternatively, you can ask a friend for some or buy one online. Once you have your starter, you’ll need to keep it happy by feeding it regularly. Think of it as a pet—feed it and it will reward you with delicious bread.
Other Essential Ingredients
Besides your starter, you only need a few simple ingredients:
- Flour: Use high-quality bread flour for the best results. It has more protein, which helps develop gluten and gives your bread structure. Whole wheat flour can add flavor and nutrients.
- Water: Use filtered or bottled water if your tap water is chlorinated. Chlorine can inhibit the growth of the starter.
- Salt: Essential for flavor and controlling the fermentation process.
Optional additions include seeds, herbs, olives, or even cheese for a fun twist. But for this recipe, we’re keeping it classic.
Tools You’ll Need for Sourdough Baking
Kitchen Tools and Equipment Checklist
You don’t need a bakery-level kitchen, but a few tools can make the process smoother:
- Digital Scale: Precision matters in baking. Measuring by weight is more accurate than by volume.
- Mixing Bowls: At least two large bowls for mixing and resting the dough.
- Bench Scraper: Useful for handling sticky dough and shaping it cleanly.
- Dutch Oven or Cast Iron Pot: Crucial for creating steam, which gives your bread that perfect crust.
- Lame or Sharp Razor Blade: For scoring the dough before baking.
- Tea Towels or Banneton Basket: Used during the proofing stage to hold and shape the dough.
- Thermometer (Optional): Helps ensure your dough and water are at the right temperature.
These tools help you stay consistent and improve your results, especially as you bake more often.
Step-by-Step Guide to Making Sourdough Bread
Step 1: Feed Your Starter
First things first—your starter needs to be active and bubbly before you begin mixing dough. Feed it about 4 to 6 hours before you plan to start your bread. Combine equal weights of starter, flour, and water. For example, 50g of each will do. Leave it in a warm spot and wait for it to double in size and show bubbles on the surface. You can test its readiness by dropping a spoonful into water—if it floats, it’s ready to use.
This step is vital. An underfed or sluggish starter won’t give your dough the rise it needs. It’s like building a house on a shaky foundation. Make sure your starter is strong, and you’ll have a much better loaf.
Step 2: Mix the Dough
Now the fun begins! In a large bowl, mix the following:
- 500g bread flour
- 350g water (room temperature)
- 100g active sourdough starter
- 10g salt
Start by mixing the flour and water only—this is the beginning of a process called autolyse, which we’ll cover in the next step. Mix until you have a shaggy dough. It’ll be sticky and rough, but that’s okay. Let it rest for 30 to 45 minutes. Then add the starter and mix it in thoroughly. Finally, add the salt and mix again.
This mixing process is more about combining ingredients than kneading. We’ll build strength through stretching and folding later. Keep the dough in the same bowl and cover it with a damp towel or plastic wrap.
Step 3: Autolyse Process
Autolyse might sound fancy, but it’s simply letting your flour and water sit together before adding the starter and salt. This resting period helps the flour absorb the water, which kickstarts gluten development naturally. You’ll notice that after the autolyse, the dough is smoother and more elastic even before any kneading.
Why is this step important? Because it makes your dough easier to work with and gives your bread better texture. Skipping autolyse often results in a denser loaf with less oven spring. It’s a small step that makes a big difference.
Once your autolyse is complete (30–45 minutes), you’re ready to incorporate the starter and salt and begin bulk fermentation.
Step 4: Bulk Fermentation
Bulk fermentation is where the real magic happens. After you’ve added your starter and salt, cover your bowl and let the dough rest at room temperature for 4 to 5 hours. During this time, the wild yeast and bacteria are busy fermenting the dough, creating gases and flavor.
But you’re not just letting it sit there. Every 30 to 45 minutes, you’ll do a stretch and fold. Reach under the dough, pull it up, and fold it over itself. Turn the bowl and repeat on all sides. Do this 3–4 times during the bulk fermentation phase. You’ll notice the dough becoming stronger, puffier, and more elastic.
The goal is to develop enough strength in the dough while keeping the crumb open and airy. Keep an eye on the temperature too—around 75–78°F (24–26°C) is ideal. Too cold, and the dough will ferment slowly; too hot, and it might overproof.
Step 5: Stretch and Fold Technique
Stretching and folding might seem like a simple task, but it plays a key role in gluten development. Rather than kneading traditionally, which can deflate your dough or overwork it, this technique builds strength gently.
To do it, wet your hands slightly to prevent sticking. Grab one edge of the dough, pull it up, and fold it over the center. Rotate the bowl 90 degrees and repeat until you’ve folded all four sides. You’ll do this a few times during bulk fermentation, spaced about 30 to 45 minutes apart.
Each time you stretch and fold, your dough gets tighter and more structured. By the end of the bulk ferment, it should be domed, jiggly, and full of life. This means you’re ready to shape your loaf.
Step 6: Shaping the Dough
After the bulk fermentation is complete, it’s time to shape your dough. This is where you take all that bubbly, fermented goodness and give it structure. First, gently turn the dough out onto a lightly floured surface. Be careful not to knock out too much of the gas—it’s what gives your loaf those beautiful air pockets.
Start by gently flattening the dough into a rough rectangle. Then, fold the bottom third up, the top third down, and finally fold it in half from side to side. Use a bench scraper to help if the dough is sticky. Now, cup your hands around the dough and rotate it to create surface tension—this helps the loaf keep its shape while baking.
Transfer the shaped dough into a well-floured banneton or a bowl lined with a floured towel. Seam-side up is standard, as you’ll flip it out before baking. Cover it and let it rest for the final rise.
Step 7: Final Proofing
The final proof is your dough’s last nap before hitting the oven. This step allows the gluten to relax and the dough to rise a bit more. You have two options here: room temperature proofing or cold retardation.
- Room Temperature Proofing: Let the dough rise at room temp for 1 to 2 hours until it looks puffy and springs back slowly when poked.
- Cold Retardation: Place the covered dough in the fridge overnight (8–12 hours). This method enhances the sour flavor and makes the dough easier to handle and score.
Cold proofing is highly recommended for beginners. It gives you flexibility on baking time and improves both flavor and crust. When you’re ready to bake, preheat your oven with the Dutch oven inside for at least 30 minutes at 475°F (245°C).
Step 8: Scoring and Baking
Now comes the dramatic part—baking! Carefully remove the hot Dutch oven and flip your dough onto a piece of parchment paper. This is when you score the dough using a lame or sharp blade. A deep slash along the top helps control how the bread expands in the oven. Get creative with patterns if you like—it’s your bread, after all.
Transfer the dough (with parchment) into the Dutch oven. Cover it with the lid and bake for 20 minutes. Then, remove the lid and bake for another 20–25 minutes, or until the crust is deep golden brown and the loaf sounds hollow when tapped.
The steam trapped in the Dutch oven during the first part of baking is key to a crisp, shiny crust. Don’t skip this!
Step 9: Cooling and Slicing
As tempting as it is to dive in right away, wait! Cooling is just as important as baking. Remove the loaf from the Dutch oven and place it on a wire rack. Let it cool for at least one hour before slicing. This resting period allows the crumb to set and the moisture to redistribute evenly.
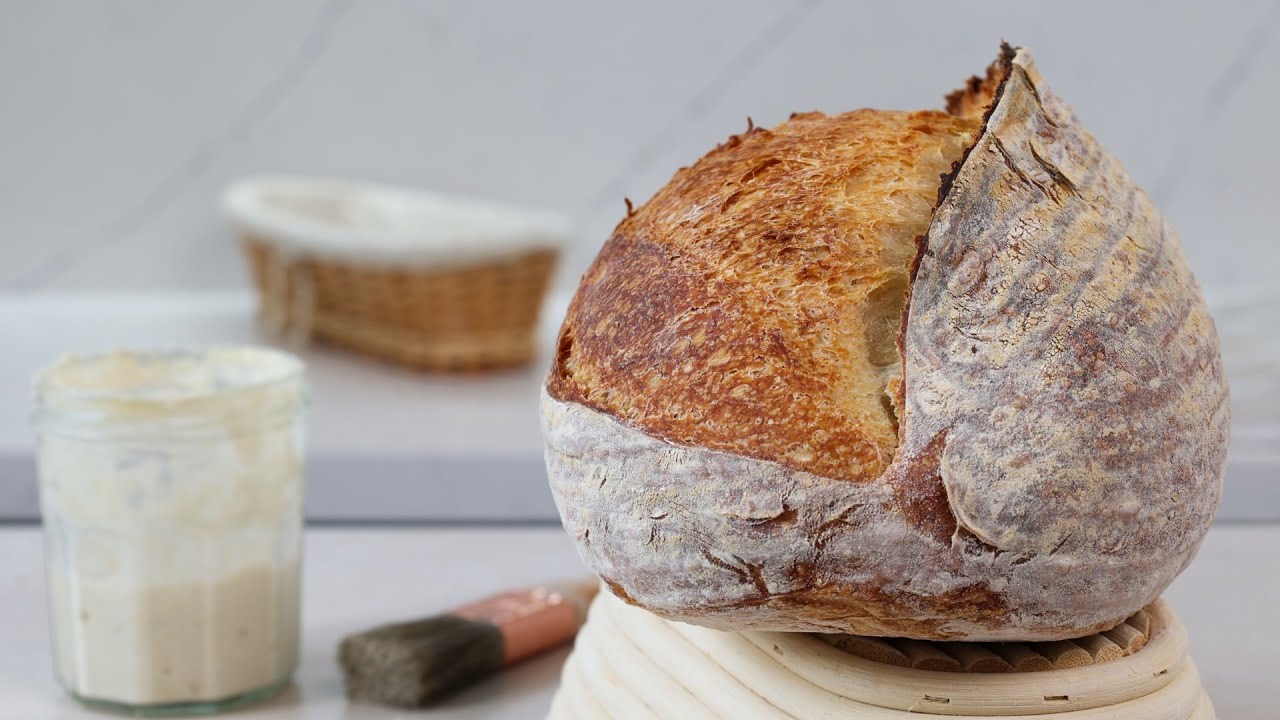
Cutting too early can result in a gummy texture and ruin that lovely open crumb you worked so hard for. Once it’s cool, slice it with a serrated knife and take in that amazing aroma. Crisp crust, chewy crumb, tangy flavor—perfection.
Tips for Perfecting Your Sourdough Loaf
- Hydration Levels: If you’re new to sourdough, start with 70–75% hydration. Higher hydration gives a more open crumb but is harder to handle.
- Keep a Baking Journal: Record times, temperatures, and results. It helps you tweak your process.
- Be Patient: Don’t rush the fermentation. Good bread takes time.
- Temperature Control: Use a thermometer to keep dough and room temps consistent.
- Practice Makes Progress: Each loaf teaches you something new. Don’t worry about perfection—just keep baking.
Common Mistakes to Avoid
Even the best bakers make mistakes, especially when it comes to sourdough. But learning from them is part of the journey. Here are some of the most common pitfalls and how to avoid them:
- Using an Inactive Starter: If your starter isn’t bubbly and active, your dough won’t rise properly. Always test it with the float test before using.
- Under or Over Fermenting: Under-fermented dough will be dense, while over-fermented dough can collapse. Watch for signs like increased volume, bubbles on the surface, and a slight jiggle when you shake the bowl.
- Too Much Flour During Shaping: Using excessive flour when shaping can prevent the dough from sticking to itself, weakening its structure. Use just enough to keep things manageable.
- Not Preheating the Oven or Dutch Oven: Heat is crucial for oven spring. Always preheat thoroughly.
- Cutting Too Soon: Let your bread cool for at least an hour to allow the crumb to set. Cutting early leads to gummy texture.
Avoiding these mistakes will significantly increase your chances of baking a beautiful loaf.
Storage and Shelf Life
Once you’ve baked the perfect sourdough loaf, you’ll want to keep it fresh. Here’s how:
- Room Temperature: Store in a bread box or wrapped in a clean kitchen towel for up to 3–4 days. Avoid plastic bags, which can soften the crust.
- Freezing: Slice the loaf, place the slices in a freezer bag, and freeze. When you want a slice, pop it in the toaster straight from the freezer.
- Reheating: Revive a day-old loaf by sprinkling it with water and warming it in a 350°F oven for 10–15 minutes.
Sourdough naturally resists mold thanks to its acidity, but always check before eating leftovers. The flavor also continues to develop after baking, making day-two sourdough surprisingly delicious.
FAQs about Sourdough Loaf Recipe
How long does it take to make sourdough bread?
From start to finish, making a sourdough loaf can take anywhere from 12 to 24 hours, depending on your fermentation and proofing schedule. Most of that time is hands-off.
Can I use all-purpose flour instead of bread flour?
Yes, you can, but bread flour yields better structure and chew. If using all-purpose, reduce the hydration slightly to prevent the dough from becoming too slack.
How do I know if my starter is ready?
Your starter is ready when it doubles in size within 4–6 hours of feeding, smells pleasantly tangy, and passes the float test (a spoonful floats in water).
Can I freeze sourdough bread?
Absolutely. Slice it first, then freeze. You can toast individual slices directly from the freezer or reheat the entire loaf in the oven.
Why is my sourdough too dense?
Common reasons include an underactive starter, underproofing, too much flour, or insufficient gluten development. Make sure your starter is lively and your fermentation process is properly timed.
Conclusion
There you have it—a complete, step-by-step guide to baking your own sourdough loaf at home. It might seem a little overwhelming at first, but remember: every great baker started with a sticky mess and a bubbly jar of starter. With practice, patience, and a little flour on your hands, you’ll be turning out loaves that look and taste like they came from a professional bakery.
So feed that starter, warm up that oven, and get ready to experience the joy of real bread. Your kitchen is about to smell amazing.


