Snickerdoodles Cookie Recipe: Snickerdoodles are the cozy, cinnamon-coated cookies that remind many of childhood kitchens and holiday cheer. These delightful treats stand out from other cookies thanks to their soft, chewy texture and slightly tangy flavor. At their core, they’re sugar cookies rolled in a mixture of cinnamon and sugar—but there’s a twist. That hint of tang? It comes from a unique ingredient we’ll dive into shortly.
What really sets snickerdoodles apart is their simplicity and flavor punch. You don’t need chocolate chips, nuts, or any fancy fillings. The cinnamon sugar crust adds a delicious crunch on the outside, while the inside stays soft and buttery. Whether you’re baking them for a holiday tray, school event, or just because, snickerdoodles are guaranteed crowd-pleasers.
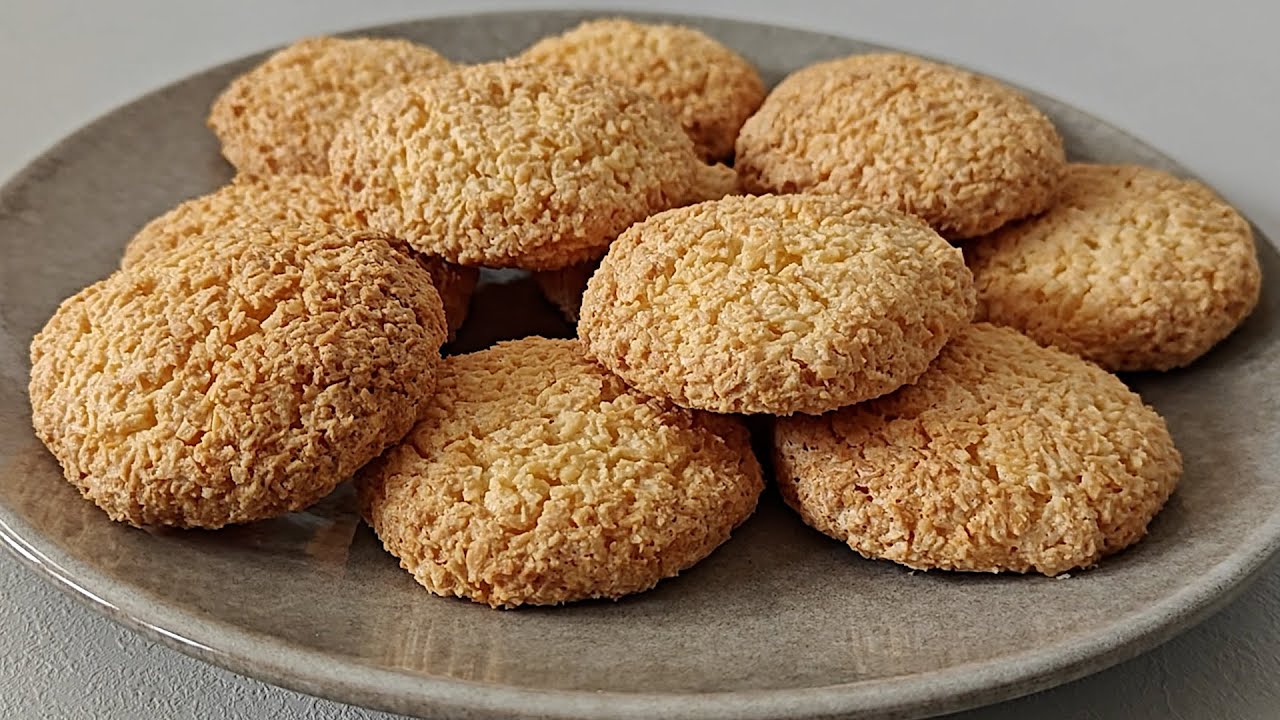
These cookies are also known for their charming crackled tops, which are a result of their chemical leavening and baking method. This makes them not only tasty but visually inviting. And while they’re classic in flavor, snickerdoodles are anything but boring—they’re warm, comforting, and timeless.
A Brief History Behind the Cookie
Snickerdoodles have a quirky name and an even more fascinating history. Their exact origin is debated, but many food historians trace them back to German or Dutch immigrants who brought the recipe to America. The name “snickerdoodle” may come from the German word “Schneckennudeln,” a type of cinnamon roll, or it might simply be a whimsical invention from 19th-century New England.
No matter where they started, snickerdoodles became popular in American cookbooks in the early 1900s. They rose to fame for their simple ingredients and their cozy, nostalgic flavor. Over the decades, they’ve become a staple in cookie exchanges and holiday baking.
What’s beautiful about snickerdoodles is how they’ve stood the test of time. Their recipe has remained mostly unchanged, which is a testament to how perfect it already was. Today, you can find modern spins—stuffed, frosted, or turned into ice cream sandwiches—but the classic version remains beloved.
Essential Ingredients for Snickerdoodles
Core Ingredients You’ll Need
If you’re planning to make snickerdoodles, chances are you already have most of the ingredients in your pantry. That’s one of the many reasons people love them. Here’s what you’ll need for the base recipe:
- All-purpose flour – The structure of the cookie.
- Granulated sugar – Sweetness and that signature crispy edge.
- Unsalted butter – Rich flavor and soft texture.
- Eggs – Binding the dough and adding moisture.
- Baking soda – Leavening for a light, airy result.
- Cream of tartar – That secret tangy touch.
- Salt – To balance out the sweetness.
- Ground cinnamon & extra sugar – For that essential cinnamon-sugar coating.
Every ingredient here plays a vital role. The flour holds it together, the butter gives richness, and the sugar sweetens the deal. When combined just right, they form a magical dough ready to be transformed into cookies.
Make sure your butter is at room temperature—this helps it cream more smoothly with the sugar and yields fluffier cookies. Using high-quality cinnamon also elevates the flavor, making that sugar crust extra irresistible.
Importance of Cream of Tartar
This is where snickerdoodles really stand out. Cream of tartar isn’t commonly used in every cookie, but in this recipe, it’s essential. It adds a subtle tanginess and helps create the cookie’s signature chewiness.
Cream of tartar also reacts with the baking soda to create carbon dioxide, which makes the cookies puff up and crackle as they bake. Without it, your cookies would still be tasty—but they wouldn’t have that iconic snickerdoodle flavor or texture.
Some recipes suggest lemon juice or vinegar as substitutes if you don’t have cream of tartar on hand, but the result won’t be quite the same. If you’re aiming for that classic, slightly tangy snickerdoodle, cream of tartar is a must.
Tools and Equipment Needed
Kitchen Tools Checklist
You don’t need a professional kitchen setup to make amazing snickerdoodles. Here’s a quick checklist of the tools you’ll need:
- Mixing bowls – One for dry ingredients, one for wet.
- Electric hand mixer or stand mixer – For creaming butter and sugar.
- Measuring cups and spoons – Accuracy is key.
- Whisk or spatula – For mixing and scraping down sides.
- Cookie scoop or tablespoon – To portion dough evenly.
- Baking sheets – Light-colored pans work best to avoid overbrowning.
- Parchment paper or silicone baking mat – Prevent sticking and make cleanup easy.
- Wire rack – To cool cookies evenly.
Using the right tools makes the baking process smoother and more enjoyable. A cookie scoop ensures uniform size, which means even baking. And parchment paper? It’s your best friend for mess-free, perfect bottoms on every cookie.
Step-by-Step Snickerdoodle Recipe
Step 1: Prepping Your Ingredients
Before you even turn on the oven, it’s time to prep. This step sets the foundation for success. Start by letting your butter sit at room temperature—this helps it cream better. Measure your ingredients carefully and sift the dry ones to prevent lumps.
Preheat your oven to 375°F (190°C). Prepare your baking sheets with parchment paper. In one bowl, whisk together the flour, cream of tartar, baking soda, and salt. In another, beat the butter and sugar until it’s fluffy and light—this usually takes about 2–3 minutes.
Crack in the eggs one at a time, beating well after each. This helps incorporate air and ensures a smooth dough. Gradually mix in the dry ingredients until everything’s fully combined. The dough should be soft but not sticky.
Meanwhile, in a shallow dish, mix up the cinnamon and sugar coating. This will give your snickerdoodles that unforgettable flavor and crunch.
Step 2: Mixing the Dough
Now that your ingredients are prepped and your oven is warming up, it’s time to mix the dough. This part is where all the magic starts to come together. You’ve already creamed your butter and sugar, and now it’s time to add the eggs and dry ingredients.
Once your butter and sugar are fluffy, beat in the eggs one at a time. Don’t rush this—let each egg mix in fully before adding the next. It’s this step that gives your cookies a rich, moist crumb. Then, slowly add the dry ingredient mixture to the wet mixture, a little at a time. You want the dough to come together smoothly without overmixing.
Mixing too much can activate the gluten in the flour, making your cookies tough instead of soft and chewy. Stir just until everything is combined. You should end up with a soft, pliable dough that doesn’t stick to your hands too much. If it feels too sticky, a tablespoon or two of extra flour can help.
Once the dough is ready, you can chill it for about 20–30 minutes. While not required, chilling helps prevent the cookies from spreading too much in the oven, leading to thicker, softer results.
Step 3: Rolling in Cinnamon Sugar
This is the part where snickerdoodles start to become their true selves. In a small bowl, mix about 1/4 cup sugar with 1.5 tablespoons of ground cinnamon. This is your cookie coating—sweet, spicy, and absolutely irresistible.
Scoop the dough into balls, about 1 to 1.5 tablespoons each. Roll each ball between your hands to smooth it out, then roll it generously in the cinnamon-sugar mixture until it’s fully coated.
This coating is more than just a flavor boost—it adds a delightful crunch to the outside of the cookies and helps them develop those signature crackled tops. Don’t be shy here; you want a nice thick layer of cinnamon sugar clinging to every bit of dough.
Place the coated dough balls onto your baking sheets, leaving about 2 inches of space between each. These cookies will spread slightly, so make sure they’re not too close together.
Step 4: Baking to Perfection
Slide your tray into the preheated oven and bake at 375°F (190°C) for 8 to 10 minutes. Timing is everything here. You’re aiming for cookies that are puffed up, slightly golden around the edges, and still a bit soft in the center.
If you want them soft and chewy (which is the snickerdoodle sweet spot), take them out when they look just barely done. They’ll continue to cook slightly as they cool on the tray. If you leave them in until they’re fully browned, they’ll turn crispy—and while still delicious, they won’t have that classic texture.
Once out of the oven, let the cookies rest on the tray for about 2 minutes before transferring them to a wire rack. This helps them firm up a bit without drying out. The result? A perfectly chewy center with crisp edges, and a sugary-cinnamon coating that crackles with each bite.
And that’s it—you’ve just baked a batch of traditional, absolutely heavenly snickerdoodles!
Tips for Perfect Snickerdoodles
Avoiding Common Mistakes
Even though snickerdoodles are simple, there are a few pitfalls that can lead to disappointing results. Let’s walk through how to avoid the most common baking blunders.
1. Don’t skip the cream of tartar. Without it, the cookies lose their signature tang and texture. While you can technically substitute it, the flavor won’t be the same.
2. Overmixing the dough is a no-no. Stirring too long once the flour goes in can lead to tough cookies. Mix just until combined for the best texture.
3. Don’t overbake. Snickerdoodles should be pulled from the oven when they still look slightly underdone. They’ll set up as they cool, giving you that soft, chewy center.
4. Chill the dough if it’s too soft. Warm or overly soft dough will spread too much and lose its shape. A short chill in the fridge makes it easier to roll and gives thicker cookies.
5. Use fresh ingredients. Especially your baking soda and cream of tartar. Old leaveners won’t do their job properly, leading to flat or dense cookies.
Getting familiar with your oven can also help a lot. If it runs hot or cold, you might need to adjust the bake time slightly. And don’t forget to rotate your baking trays halfway through for even baking.
How to Make Them Extra Soft and Chewy
If soft, chewy cookies are your goal, these extra tips will get you there every time.
- Use room temperature butter – Not melted, not cold. Softened butter creams better with sugar and helps with texture.
- Add an extra egg yolk – This little tweak can increase chewiness without changing the flavor.
- Use a higher ratio of brown sugar – Swapping out some of the white sugar for light brown sugar introduces moisture and makes cookies more tender.
- Underbake slightly – As mentioned before, take them out just before they look fully done. They’ll finish baking on the sheet.
Some bakers also swear by adding a teaspoon of cornstarch to the dry ingredients for extra tenderness. It’s a small change that can make a noticeable difference.
Variations and Creative Twists
Chocolate Chip Snickerdoodles
Want to take your snickerdoodles to the next level? Add chocolate chips. This twist blends the warm, spicy charm of cinnamon with the melty goodness of chocolate. It’s a game changer.
To make chocolate chip snickerdoodles, simply fold in 1 to 1½ cups of semi-sweet or milk chocolate chips into the finished dough before rolling the balls in cinnamon sugar. You can also experiment with white chocolate chips for a sweeter, creamier contrast, or even mix in chunks of dark chocolate if you like a richer bite.
The process stays exactly the same—scoop, roll in cinnamon sugar, and bake. What you’ll get is a cookie with that traditional snickerdoodle texture, but with gooey chocolate pockets in every bite. It’s the perfect fusion of two beloved cookie flavors, and a guaranteed hit for anyone who can’t resist a chocolate twist.
These cookies are especially fun to serve at parties or as part of a holiday cookie platter. They’re unexpected, indulgent, and completely addictive.
Vegan and Gluten-Free Options
Craving snickerdoodles but following a specific diet? No worries. You can make these cookies vegan and gluten-free without losing their signature taste and texture.
For Vegan Snickerdoodles:
- Replace butter with a plant-based butter or coconut oil.
- Use a flax egg (1 tbsp ground flax + 2.5 tbsp water) as a substitute for each egg.
- Ensure your sugar is vegan (some white sugars are processed with bone char).
For Gluten-Free Snickerdoodles:
- Use a gluten-free all-purpose flour blend that includes xanthan gum.
- Double-check that your baking soda and cream of tartar are gluten-free (most are, but always good to confirm).
The rest of the steps are the same. Vegan and gluten-free versions might be slightly more delicate, so chilling the dough is even more helpful to prevent too much spreading.
The result? Still soft, still chewy, still absolutely delicious. Plus, everyone at your table can enjoy them without worrying about dietary restrictions.
Storing and Freezing Tips
How to Keep Them Fresh
One of the best parts of snickerdoodles—besides the flavor—is that they store beautifully. You can bake a big batch and enjoy them over days (or weeks) with a few simple tricks.
To store:
- Let the cookies cool completely before storing.
- Place them in an airtight container with a slice of bread to keep them soft.
- Keep at room temperature for up to 5–7 days.
To freeze baked cookies:
- Place cooled cookies in a single layer on a baking sheet to flash-freeze.
- Once solid, transfer to a freezer-safe bag or container.
- Store for up to 2 months.
- When ready to eat, let them thaw at room temperature or warm them briefly in the microwave.
To freeze unbaked dough:
- Scoop and roll dough balls in cinnamon sugar as usual.
- Freeze them on a tray until firm, then move to a freezer bag.
- Bake from frozen—just add a couple of extra minutes to the baking time.
Whether you’re meal prepping for the holidays or just love having cookies on hand, freezing is your best friend. The flavor holds up, and the texture stays dreamy.
FAQs about Snickerdoodles Cookie Recipe
Can I Make Snickerdoodles Without Cream of Tartar?
Yes, you can substitute cream of tartar with lemon juice or white vinegar (about 2 teaspoons for every teaspoon of cream of tartar), but the flavor and texture won’t be quite the same.
How Do I Know When They’re Done?
Snickerdoodles should look set around the edges but still soft in the middle. They’ll continue baking on the tray after being removed from the oven, so don’t wait for them to turn golden brown.
Can I Freeze the Dough?
Absolutely. Roll the dough into balls, coat them in cinnamon sugar, and freeze. Bake straight from the freezer—just add a couple of extra minutes to the baking time.
Are Snickerdoodles Supposed to Be Soft or Crispy?
Traditionally, snickerdoodles are soft and chewy inside with slightly crisp edges. However, baking them a bit longer will give you a crunchier version if that’s what you prefer.
What’s the Best Way to Serve Snickerdoodles?
They’re perfect with a glass of milk, a cup of coffee, or alongside vanilla ice cream. Serve warm for the ultimate experience!
Conclusion
Snickerdoodles aren’t just cookies—they’re memories wrapped in cinnamon and sugar. They’re simple to make, packed with flavor, and endlessly adaptable. Whether you’re a first-time baker or a seasoned pro, this recipe brings comfort and joy in every bite.
From understanding the magic of cream of tartar to mastering the perfect chewy texture, we’ve walked through each step to make sure your snickerdoodles are everything they should be. And with tips for variations and storage, you’ve got all the tools to bake like a pro.
So grab your mixing bowl, preheat the oven, and fill your kitchen with the irresistible scent of homemade snickerdoodles. One bite, and you’ll understand why this classic cookie has stood the test of time.