Rice Balls Recipe: Rice balls are a beloved comfort food found in many cultures, particularly in Asian cuisines. At their core, they are simply balls of sticky rice, sometimes filled with savory ingredients or seasoned for extra flavor.
These handheld delights are easy to make, portable, and incredibly versatile. Whether you’re packing lunch, prepping snacks, or craving something filling and flavorful, rice balls fit the bill.
Origin and Cultural Significance
Rice balls date back centuries and are deeply rooted in various culinary traditions. In Japan, they are called onigiri and are typically shaped into triangles or ovals. Korean jumeokbap are usually round and often mixed with vegetables and sesame oil. Italians, on the other hand, introduced arancini, a deep-fried version made with risotto. Each version speaks to the creativity of using simple ingredients to create something comforting and satisfying.
Ingredients You’ll Need
Main Ingredients
To make basic rice balls, you’ll need:
- 2 cups short-grain white rice (sticky rice is best)
- 2 ½ cups water
- Salt (to taste)
These are the essentials. The short-grain rice holds together well due to its higher starch content, making it perfect for shaping.
Optional Fillings and Toppings
Here’s where the magic happens. You can customize rice balls with any of the following fillings:
- Cooked tuna with mayonnaise
- Pickled plum (umeboshi)
- Grilled salmon flakes
- Kimchi
- Cheese cubes
- Leftover stir-fried vegetables
For toppings and finishing touches:
- Toasted sesame seeds
- Seaweed (nori)
- Furikake seasoning
- Soy sauce glaze
- Katsuobushi (bonito flakes)
These options allow you to get creative and tailor each rice ball to your taste.
Tools and Equipment Required
Kitchen Tools for Easy Preparation
You don’t need fancy gadgets, but having the right tools helps:
- A rice cooker or pot with a lid
- Mixing bowls
- A rice paddle or wooden spoon
- Plastic wrap (to shape without sticking)
- A small bowl of water (to moisten hands and prevent rice from sticking)
- A knife and cutting board (if using fillings)
Having these basics ready streamlines the entire process.
Step-by-Step Instructions
Step 1 – Cooking the Rice
Start by rinsing your short-grain rice under cold water until the water runs clear. This step removes excess starch and prevents the rice from becoming gummy. Add the rice and water to your rice cooker or pot. If using a pot, bring it to a boil, then reduce to a simmer, cover, and cook for about 18-20 minutes.
Once the rice is cooked, let it sit covered for another 10 minutes. Fluff it gently with a rice paddle. Your rice should be sticky but not mushy—perfect for forming into balls.
Step 2 – Preparing the Fillings
While the rice is cooling slightly, prepare your fillings. This could be as simple as mixing canned tuna with a bit of mayo or flaking some grilled salmon. Keep your fillings bite-sized so they tuck neatly inside the rice ball. If using ingredients like kimchi, chop them finely and squeeze out any excess moisture.
Step 3 – Shaping the Rice Balls
Now comes the fun part—shaping the rice! First, prepare a small bowl of water with a pinch of salt. Wet your hands lightly before handling the rice to prevent it from sticking. Scoop about ½ cup of warm (but not hot) rice into your palm.
If you’re adding a filling, flatten the rice slightly in your hand and place a small spoonful of the filling in the center. Then gently close the rice around the filling and form it into a ball, oval, or triangle shape, depending on your preference. Don’t worry if it’s not perfect—practice makes perfect, and the important part is that it holds together.
If you’re making plain rice balls, simply form the rice into your desired shape without a filling. This method is great for kids or when you’re serving rice balls with dipping sauces.
Step 4 – Adding Fillings and Sealing
For filled rice balls, make sure the filling is fully enclosed within the rice to prevent it from spilling out. Press the rice firmly but gently as you shape it, being careful not to squish it too tightly. The idea is to create a firm outer shell while keeping the rice fluffy inside.
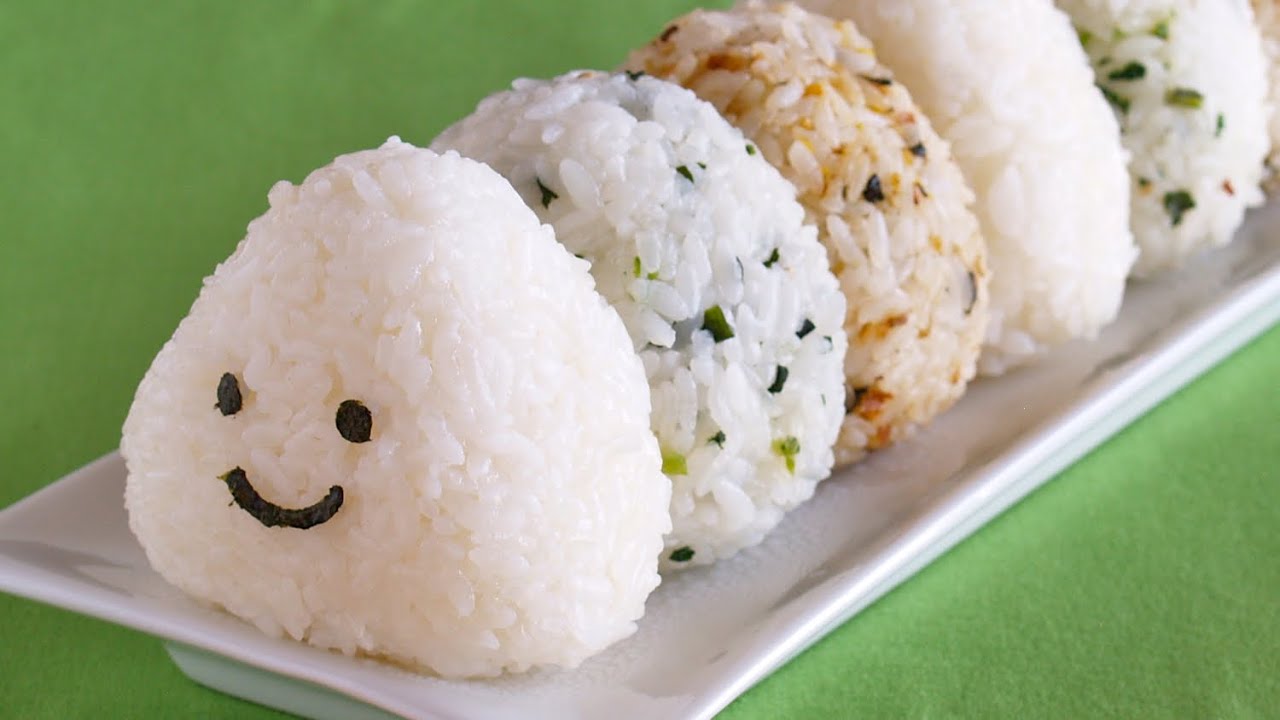
Wrap the rice ball in a strip of seaweed if you like that traditional Japanese touch. The nori also makes them easier to hold without getting your fingers sticky. You can also sprinkle sesame seeds or furikake on the outside for a pop of flavor and texture.
To seal the rice balls, especially if you’re packing them for lunch or storing them, wrap each one tightly in plastic wrap once cooled. This helps keep them moist and fresh.
Step 5 – Final Touches and Serving
Presentation goes a long way, especially if you’re serving these to guests or packing them in bento boxes. Lay them out on a plate lined with greens or serve them in decorative paper cups. If you made different varieties, label them with little flags or stickers to show the fillings.
Serve your rice balls with dipping sauces like soy sauce, spicy mayo, or even a sweet chili glaze for added flavor. If you’re going the fusion route, serve them with miso soup or kimchi on the side.
Rice balls can be enjoyed warm, at room temperature, or even chilled. They’re incredibly portable, making them the perfect snack or lunch for school, work, or picnics.
Tips for Perfect Rice Balls
Sticking and Shaping Hacks
Making rice balls can get messy, but there are a few tricks to make it easier:
- Always use slightly wet or oiled hands.
- Don’t use overcooked or mushy rice—it won’t hold shape well.
- Use plastic wrap to shape the rice if you’re making multiple at once or want perfect shapes.
- Chill the rice for a few minutes if it’s too hot to handle.
If you’re making them with kids, using molds or plastic presses can help create fun shapes and reduce the mess.
Storage and Meal Prep Tips
Rice balls are fantastic for meal prep. You can make a big batch and store them:
- In the fridge: Wrap each rice ball individually and store for up to 2 days. Warm them in the microwave with the plastic wrap still on to retain moisture.
- In the freezer: Rice balls freeze well if you’re using simple fillings. Wrap them tightly and thaw overnight in the fridge or microwave from frozen.
Pro tip: Don’t freeze rice balls with mayonnaise or raw vegetables—they don’t thaw well.
They’re a lifesaver on busy days and perfect for quick lunches or after-school snacks.
Variations of Rice Balls Around the World
Japanese Onigiri
These are the most iconic version, often seen in anime or Japanese lunch boxes. Traditional fillings include pickled plum (umeboshi), salted salmon, and kombu (kelp). They’re usually triangle-shaped and wrapped in a crisp sheet of nori. Some are even grilled with soy sauce (yaki onigiri) for extra umami flavor.
Japanese onigiri have become so popular that convenience stores across Japan stock dozens of varieties. And now, they’re making waves globally!
Korean Jumeokbap
Korean-style rice balls are round and typically mixed with ingredients like minced vegetables, kimchi, seaweed flakes, and sesame oil. They’re bold in flavor, often spicy, and can be made in minutes. You’ll find them in dosirak (lunchboxes) or served as a snack alongside fried chicken.
These rice balls don’t usually have a filling but are packed with flavor throughout. They’re perfect for using up leftovers and are a common part of Korean home cooking.
Italian Arancini
Taking a detour to Europe, arancini are Sicilian rice balls made with creamy risotto, stuffed with cheese, meat, or peas, then breaded and deep-fried until golden. Unlike the Asian versions, these are indulgent and hearty. They’re often served with marinara sauce or as a part of a festive Italian meal.
Although they’re from different culinary worlds, all these rice ball versions share one thing: delicious simplicity.
FAQs about Rice Balls Recipe
Can I use jasmine or basmati rice for rice balls?
It’s best to use short-grain rice because it’s sticky and holds its shape. Long-grain varieties like jasmine or basmati don’t stick well enough.
How long can rice balls sit out?
At room temperature, rice balls are safe for about 4–6 hours. If it’s hot out, it’s best to refrigerate them sooner.
Are rice balls healthy?
Yes! They’re a balanced snack, especially when filled with protein or veggies. Just watch your portion size if you’re adding mayo or fried fillings.
Can I make rice balls without fillings?
Absolutely. Plain rice balls seasoned with salt or sprinkled with sesame seeds are just as tasty.
Why do my rice balls fall apart?
It could be due to using the wrong type of rice, not pressing firmly enough, or handling them while they’re too hot. Let the rice cool slightly before shaping.
Conclusion
Rice balls may seem simple, but they carry a lot of heart and heritage. From Japanese convenience stores to Italian family dinners, they show up in various forms, proving that good food doesn’t have to be complicated. With just a few ingredients and a little practice, you can whip up a batch of these delightful bites that satisfy hunger and warm the soul.
Whether you’re a newbie cook or a seasoned foodie, rice balls are the kind of comfort food that never disappoints. So grab some rice, roll up your sleeves, and get rolling—literally!


