Raspberry Pie Recipe: There’s something irresistibly nostalgic about a homemade raspberry pie. With its golden, buttery crust and sweet-tart filling that bursts with flavor, it’s a dessert that can turn any day into a celebration. Whether you’re baking it for a summer picnic, holiday feast, or just a quiet family dinner, this guide will walk you through every step to create the perfect raspberry pie—one that’s both beautiful and delicious.
What is Raspberry Pie?
Raspberry pie is a classic dessert made from a flaky pie crust and a filling of fresh or frozen raspberries, sugar, and thickener, often enhanced with lemon juice and a touch of spice. It’s popular across many cultures and especially loved during summer when raspberries are in season. Unlike some overly sweet desserts, raspberry pie offers a delightful balance between tart and sweet, giving your taste buds a rollercoaster of flavor in every bite.
Why You’ll Love This Recipe
Why choose raspberry pie over other fruit pies? It’s all about that punchy flavor and the natural beauty raspberries bring. The vibrant red color, the subtle seeds that give texture, and that signature zing set it apart. Plus, this recipe is both foolproof and flexible. Whether you’re a first-time pie baker or a seasoned pro, you’ll appreciate how approachable and rewarding it is. You’ll also learn techniques that can be applied to other pies—double win!
Ingredients You’ll Need
Fresh Ingredients
Here’s your raspberry pie grocery checklist:
- Raspberries (4–5 cups): Fresh is ideal for flavor and texture, but high-quality frozen berries work in a pinch.
- Lemon Juice (1 tablespoon): Brightens the flavors and balances the sweetness.
- Butter (2 tablespoons): Dotted on the filling before baking for richness.
- Egg (1): Beaten for the egg wash to give the crust a golden shine.
Pantry Staples
Don’t overlook these kitchen essentials:
- Sugar (3/4–1 cup): Adjust based on how sweet your berries are.
- Cornstarch or Tapioca Starch (3 tablespoons): Helps thicken the filling.
- All-Purpose Flour (2 1/2 cups if making crust): Key for that flaky base.
- Salt (1/2 teaspoon): Enhances all the other flavors.
- Cold Water (6–8 tablespoons): Essential for binding pie dough without making it sticky.
Having everything pre-measured and ready (mise en place style) will make the process smooth and enjoyable.
Kitchen Tools Required
Essential Baking Equipment
You don’t need fancy gadgets to bake a stellar raspberry pie, but a few reliable tools are essential:
- 9-inch Pie Dish: Glass or ceramic gives the best results.
- Rolling Pin: To roll out your dough evenly.
- Mixing Bowls: At least two—one for the crust, one for the filling.
- Pastry Cutter or Fork: If making homemade crust.
- Measuring Cups & Spoons: Accuracy is everything in baking.
- Pie Shield or Foil: Prevents crust edges from burning.
- Baking Sheet: Catches drips and keeps your oven clean.
Helpful Extras
Optional, but helpful additions include:
- Pastry Brush: For that glossy egg wash finish.
- Cooling Rack: Helps set the pie without making the bottom soggy.
- Food Processor: Speeds up crust-making, but isn’t mandatory.
Get these ready before you begin, and you’ll save yourself the mid-bake scramble.
Preparing the Pie Crust
Homemade vs Store-Bought
You’ve got options here. Store-bought pie crusts are fine if you’re in a time crunch, but there’s something magical about making your own. A homemade crust is flakier, more flavorful, and adds a touch of pride to your baking. Plus, once you get the hang of it, you’ll wonder why you ever bought one.
Step-by-Step for Flaky Crust
Here’s how to make a simple yet heavenly crust from scratch:
- Combine Dry Ingredients: In a large bowl, whisk together 2 1/2 cups of flour and 1/2 teaspoon salt.
- Cut in Butter: Add 1 cup (2 sticks) of cold, cubed unsalted butter. Use a pastry cutter or fork to blend until mixture looks like coarse crumbs.
- Add Cold Water: Drizzle in ice water, 1 tablespoon at a time, mixing just until the dough comes together. Avoid overworking it—this keeps it tender.
- Divide & Chill: Split the dough into two discs, wrap in plastic wrap, and chill for at least 1 hour. This helps relax the gluten and solidify the fat, which is key to a flaky texture.
- Roll & Line the Dish: On a floured surface, roll out one disc to fit your 9-inch pie plate. Carefully place it in the dish and trim any excess.
- Pre-Bake (Optional): If you like a crisper bottom, blind bake the crust for 10 minutes with pie weights before adding the filling.
This crust will be your golden canvas for the vibrant raspberry masterpiece.
Making the Raspberry Filling
Fresh vs Frozen Raspberries
Both can work wonders. Fresh raspberries bring brightness and texture, while frozen ones are convenient and usually picked at peak ripeness. If using frozen, don’t thaw them—they’ll release too much juice and turn your pie into soup. Just mix them with the sugar and starch and use them straight from the freezer.
Creating the Perfect Sweet-Tart Balance
The filling is the soul of this pie. Here’s how to make it sing:
- Combine Ingredients: In a bowl, gently mix 4–5 cups of raspberries with 3/4 cup sugar (use up to 1 cup for extra tart berries), 3 tablespoons cornstarch, 1 tablespoon lemon juice, and a pinch of salt.
- Let It Sit: Let the mixture rest for 10 minutes. This helps the starch start absorbing the berry juices, which prevents a soggy crust.
- Adjust to Taste: Taste and tweak the sugar or lemon as needed. Some like it sweeter; others prefer a tangy kick.
- Fill the Crust: Pour the filling into your prepared pie crust and dot with small pieces of butter to enhance richness.
You’re nearly ready to bake, and your kitchen should already be smelling amazing.
Assembling the Pie
Lattice or Full Top Crust?
Now comes the fun part—topping your pie. You’ve got a couple of options here:
- Lattice Crust: This traditional method adds a rustic look. Cut your second disc of dough into strips (about 1 inch wide) and weave them over the filling.
- Full Top Crust: Roll out the second dough disc and place it over the filling. Make sure to cut several slits in the top for steam to escape.
Each method has its own charm. A lattice crust shows off the vibrant raspberry filling underneath, while a full top crust gives you that classic golden pie look.
Sealing the Pie
Whichever top you choose, make sure you seal the edges well:
- Trim Excess Dough: Leave about 1/2 inch overhang around the edges.
- Crimp the Edges: Fold the edge under itself and crimp with your fingers or a fork.
- Apply Egg Wash: Beat one egg with a tablespoon of water and brush over the top crust. This gives your pie that shiny, golden finish once baked.
- Optional Topping: Sprinkle some coarse sugar on top for added sparkle and a slight crunch.
Now your pie is ready to hit the oven. The hard part is not sneaking a bite of that raw crust!
Baking the Raspberry Pie
Preheat and Bake Time
Set your oven to 375°F (190°C) and let it fully preheat. Place the pie on a baking sheet to catch any bubbling juices (no one wants to clean burnt sugar off the oven floor).
- Bake for 45–55 minutes.
- Check the pie at the 30-minute mark. If the crust edges are browning too quickly, cover them with a pie shield or strips of aluminum foil.
- The filling should be bubbling through the vents or lattice, and the crust a deep golden brown.
The Cooling Game
As tempting as it is to dive right in, letting your pie cool is crucial:
- Cool at room temperature for at least 3–4 hours before slicing.
- This helps the filling set properly, so it doesn’t run all over your plate.
Tip: Set the pie on a wire rack to help air circulate evenly underneath and prevent a soggy bottom.
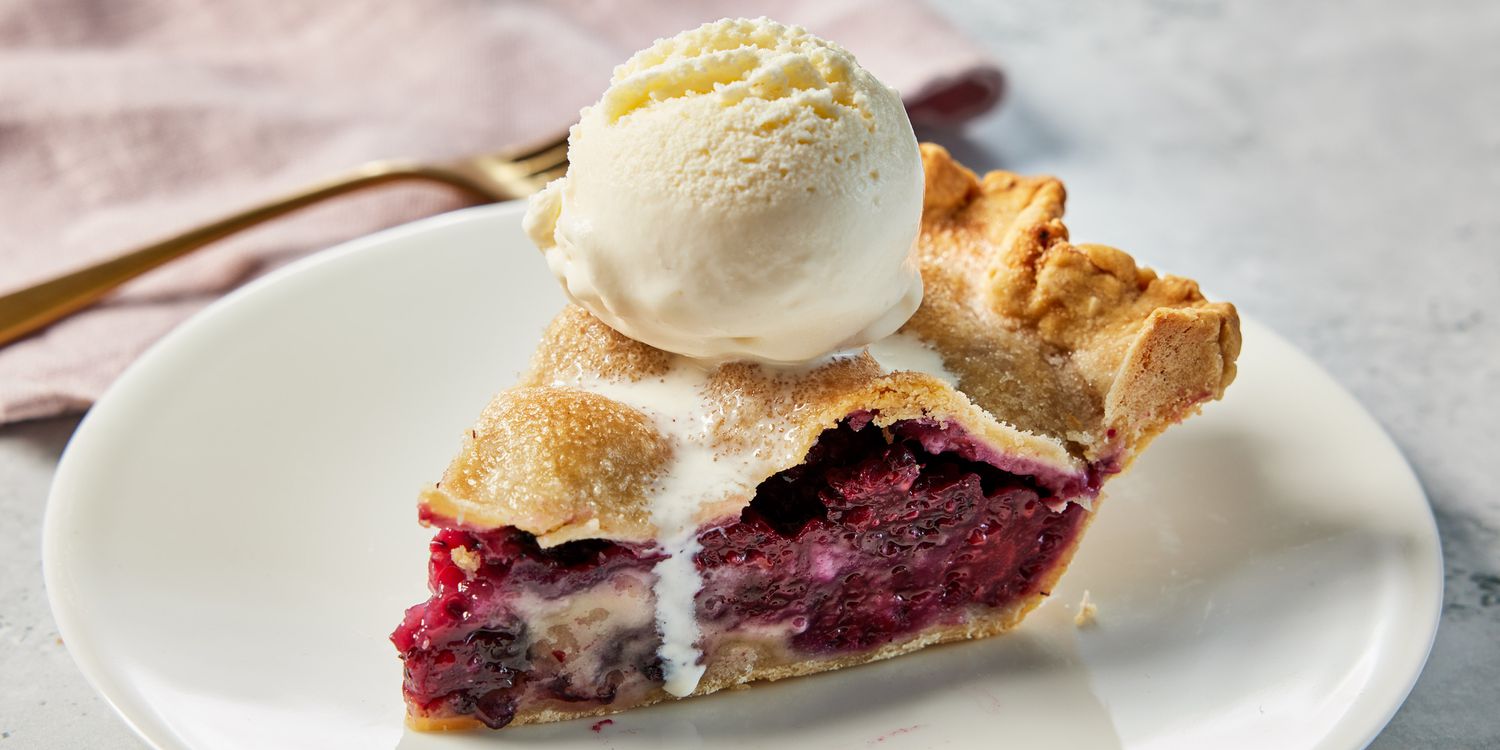
Serving Suggestions
Classic Pairings
A warm slice of raspberry pie is pure bliss—but add one of these, and you’ve got magic:
- Vanilla Ice Cream: The cold creaminess contrasts perfectly with the warm, fruity filling.
- Whipped Cream: Light, airy, and a touch sweet—ideal if you don’t want to overshadow the raspberry flavor.
- Custard or Cream Sauce: For a more indulgent dessert.
Garnish Ideas
Want to impress your guests? Add:
- Fresh raspberries on top.
- A mint sprig for color.
- A light dusting of powdered sugar.
Not only does it look fancy, but it also makes the flavor pop visually and on the palate.
Storage and Make-Ahead Tips
Storing Your Raspberry Pie
If you’re lucky enough to have leftovers:
- At Room Temperature: Good for up to 2 days, covered loosely with foil or plastic wrap.
- Refrigerator: Keeps well for up to 5 days. Just reheat slices in the oven at 325°F for 10–15 minutes for that freshly-baked vibe.
Freezing Tips
Yes, you can freeze raspberry pie!
- Baked Pie: Let it cool completely, wrap tightly in foil, and freeze for up to 3 months. Reheat from frozen at 375°F for 25–30 minutes.
- Unbaked Pie: Assemble and freeze unbaked. Bake directly from frozen, adding 10–15 minutes to the bake time.
Having one in the freezer means homemade dessert is always just a moment away.
Troubleshooting Common Issues
Runny Filling
Uh-oh, your pie looks more like soup? Common causes:
- Not enough thickener.
- Cutting it too soon—give it proper cooling time!
- Overripe berries with too much juice.
Next time, increase the cornstarch by a tablespoon or use tapioca starch for better thickening.
Burnt Crust
If your crust burns while the filling’s underdone:
- Cover edges early on.
- Lower your oven rack so heat hits the bottom better.
- Consider baking at a slightly lower temperature for longer next time.
Variations of Raspberry Pie
Mixed Berry Twist
Want to take your raspberry pie up a notch? Try mixing in:
- Blueberries
- Blackberries
- Strawberries (sliced)
This combo creates a medley of flavors and adds complexity to the filling. Keep the sugar and thickener ratios the same, but feel free to adjust the mix based on what’s in season or available.
Chocolate Raspberry Pie
For a decadent spin, layer some chocolate chips or ganache at the bottom of the crust before adding the raspberry filling. The chocolate melts slightly during baking, giving you a gooey surprise in every bite.
Crumb Topping Alternative
Instead of a top crust, top your pie with a buttery crumb made from flour, sugar, and cold butter. It adds a delightful crunch and cuts some of the tartness from the raspberries.
Experimenting with these variations can help you discover your perfect pie style.
Healthier Raspberry Pie Alternatives
Cutting Down the Sugar
If you’re watching your sugar intake:
- Use a sugar substitute like Stevia, Monk Fruit, or Erythritol. Just be sure to adjust the quantities as these sweeteners can be much sweeter than sugar.
- Increase the lemon juice slightly to maintain the balance of tartness.
Whole Wheat Crust
Swap some or all of the all-purpose flour for whole wheat flour. It’ll add a nutty flavor and more fiber. Expect a slightly denser crust but still tasty!
Vegan Raspberry Pie
To make your pie plant-based:
- Use vegan butter or coconut oil in the crust.
- Skip the egg wash or brush the crust with almond milk for a golden hue.
- Make sure your sugar is vegan-friendly (some are processed with bone char).
Delicious pies shouldn’t be limited by dietary restrictions—and this one definitely delivers.
Tips from Experienced Bakers
Chill Everything
From the butter to the water, and even the flour if you want—keep ingredients cold when making pie dough. This is the secret to that irresistible flaky crust.
Don’t Overmix
Once your dough starts coming together, stop mixing. Overworking the dough develops gluten, which makes your crust tough instead of tender.
Watch the Weather
On humid days, your dough might need less water. On dry days, it might need a touch more. Trust your eyes and hands more than the exact measurements.
These little tweaks and tips often separate a good pie from a showstopper.
Fun Raspberry Pie Facts
- Raspberries belong to the rose family—which might explain their fragrant aroma.
- In folklore, raspberries were used as a symbol of kindness and healing.
- National Raspberry Cream Pie Day is celebrated on August 1st in the United States!
So the next time you bite into a slice, remember—you’re enjoying a bit of history, culture, and nature in one.
FAQs about Raspberry Pie Recipe
1. Can I use frozen raspberries for this pie?
Yes, frozen raspberries work well. Just use them straight from the freezer without thawing to prevent excess moisture.
2. How do I prevent a soggy bottom crust?
Blind bake the crust for 10 minutes, or sprinkle a thin layer of breadcrumbs or crushed graham crackers before adding the filling.
3. What’s the best thickener for raspberry pie?
Cornstarch works great, but for a clearer filling, try tapioca starch or arrowroot powder.
4. How long should I let the pie cool before cutting?
At least 3–4 hours at room temperature. This gives the filling time to set properly.
5. Can I make this pie in advance?
Absolutely! You can bake the whole pie a day ahead and store it at room temperature or freeze an unbaked pie for later.
Conclusion
There you have it—the ultimate guide to baking a delicious, show-stopping raspberry pie from scratch. From choosing the freshest berries to crafting the perfect crust and balancing flavors just right, this guide was designed to take you step by step through the process, even if you’re a baking beginner. Whether you stick to the classic recipe or venture into creative variations, one thing’s certain: you’re about to make a pie that people will remember.
Baking is more than just combining ingredients—it’s an act of love, patience, and creativity. So the next time you’re in the kitchen, rolling out dough and smelling the sweet raspberry aroma wafting through the air, smile a little. You’re not just baking a pie—you’re making a memory.


