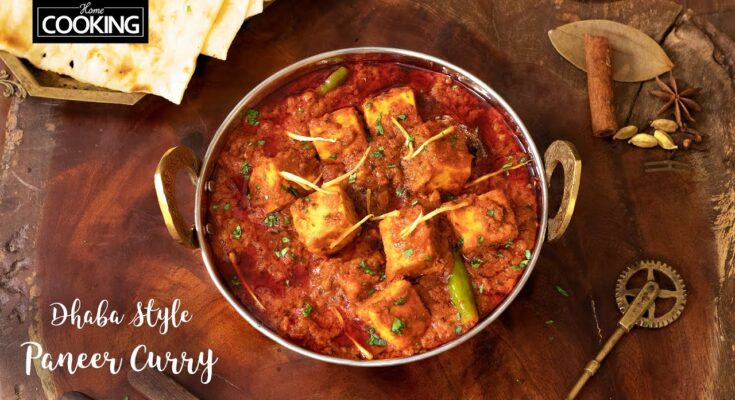
Paneer Recipe: Paneer, a staple in Indian kitchens, is a fresh, non-aged cheese made by curdling milk with a food acid like lemon juice or vinegar. Unlike other cheeses, paneer doesn’t melt, which makes it perfect for cooking in various dishes—from dry starters to creamy curries. It’s known for its soft, crumbly texture and mild taste that easily absorbs the flavors of spices and gravies it’s cooked in. While store-bought paneer is easily available, homemade paneer is a whole different experience—fresher, softer, and free of preservatives.
So, why make paneer at home? First, it’s incredibly easy. You only need two ingredients—milk and a coagulant. Second, it’s cheaper and more customizable. You can control the texture, moisture, and even flavor by adding herbs or spices. Homemade paneer also gives a sense of satisfaction, knowing you created something pure and delicious right in your kitchen.
Let’s dive into this step-by-step guide that breaks down the paneer-making process like a breeze.
Ingredients Required
To make fresh paneer, you don’t need a long grocery list. In fact, most of the items are already in your kitchen.
Basic Ingredients
- Full-Fat Milk (1 liter): Whole milk is ideal because it contains the right amount of fat to give you rich and soft paneer.
- Coagulant: Choose between lemon juice (2 tbsp), white vinegar (2 tbsp), or yogurt (1/2 cup).
Optional Flavor Enhancers
- Salt: A pinch if you want to season the paneer slightly.
- Herbs & Spices: Add crushed pepper, chili flakes, or fresh herbs like coriander for a gourmet twist.
Remember, the quality of milk greatly affects the final product. Always opt for full-fat, fresh milk. Avoid using UHT or tetra pack milk as they don’t curdle well and may lead to poor yield.
Tools and Equipment Needed
Making paneer doesn’t require any fancy gadgets, but having the right tools makes the process easier and cleaner.
Must-Have Kitchen Tools
- Heavy-bottomed Pan: Prevents the milk from burning at the bottom.
- Wooden Spoon or Ladle: For stirring the milk gently.
- Muslin Cloth or Cheesecloth: For straining the curds.
- Colander or Sieve: To hold the cloth and let the whey drain out.
- Heavy Object: To press the paneer—like a mortar, a pot filled with water, or a heavy book wrapped in foil.
Tips for Better Preparation
- Always sterilize your utensils before starting. Clean tools ensure that your paneer remains fresh for longer.
- If using lemon juice or vinegar, dilute it slightly with water to avoid making the paneer too tangy.
Step-by-Step Guide to Make Paneer
Let’s now get into the real action—making paneer at home. Follow these steps carefully for soft, delicious paneer every time.
Step 1: Boil the Milk
Start by pouring 1 liter of full-fat milk into a heavy-bottomed pan. Heat the milk over medium flame, stirring occasionally to prevent it from sticking to the base. Let it come to a gentle boil.
Pro Tip: Don’t walk away while boiling milk—it can overflow in seconds once it starts boiling.
Step 2: Add the Coagulant
Once the milk starts boiling, reduce the heat to low. Add your coagulant slowly—either lemon juice or vinegar, one tablespoon at a time. Stir gently after each addition. You’ll soon see the milk begin to curdle, forming white curds and greenish whey.
Important: Don’t add all the acid at once. Adding it gradually gives you better control over the curdling process.
Step 3: Curdling the Milk
Continue stirring until the whey separates completely. Once you see clear greenish liquid and curds have fully formed, turn off the heat immediately.
Let it sit for 2-3 minutes to ensure complete curdling.
Step 4: Straining the Curdled Milk
Place a colander over a large bowl and line it with muslin cloth. Pour the curdled milk carefully into the cloth to strain the whey.
Rinse the curds under cold running water for a few seconds. This stops the cooking process and also removes the acidic taste from lemon or vinegar.
Gather the ends of the cloth and squeeze out the excess liquid.
Step 5: Pressing and Setting the Paneer
Tie the muslin cloth and place it under a heavy object to press it. Leave it for 30-60 minutes, depending on how firm you want your paneer to be.
After pressing, unwrap the cloth. You’ll have a beautiful block of homemade paneer ready to be cut into cubes or crumbled for your favorite dish.
Storing Paneer Properly
So you’ve made a perfect block of homemade paneer—now what? Whether you plan to use it immediately or later, storing it the right way ensures it remains fresh and tasty.
Refrigeration Tips
If you’re planning to use the paneer within 2-3 days, refrigerate it properly:
- Wrap the paneer in a clean, damp cloth to keep it moist.
- Place it inside an airtight container to prevent it from drying out or absorbing odors.
- Store it in the refrigerator at around 4°C (39°F).
Before using refrigerated paneer, soak it in warm water for 10 minutes to restore its softness. This step is especially helpful if it’s turned a little firm or dry.
Freezing Tips
Want to store it for longer? Paneer freezes well, but there are some pointers:
- Cut it into cubes before freezing. That way, you can defrost only what you need.
- Wrap the cubes in cling wrap or aluminum foil and place them in a zip-lock bag or freezer-safe container.
- Use frozen paneer within 1 to 2 months for best texture and taste.
To thaw, simply transfer the frozen paneer to the fridge overnight, or soak it in warm water until it softens.
Cooking Ideas Using Fresh Paneer
Paneer is a culinary chameleon. It can go from spicy to savory to sweet without breaking a sweat. Here are a few classic and delicious ideas to make the most of your homemade paneer:
Paneer Butter Masala
This rich, creamy dish is a restaurant favorite. It combines paneer cubes with a velvety tomato-based gravy spiced with garam masala, chili powder, and kasuri methi. It’s best enjoyed with naan or jeera rice.
Quick Recipe Tip: Sauté paneer cubes lightly before adding them to the gravy to enhance their texture and flavor.
Palak Paneer
A nutritious combination of pureed spinach and paneer. It’s flavored with garlic, cumin, and green chilies. It’s a popular North Indian dish that’s both healthy and filling.
Pro Tip: Blanch and puree the spinach for a vibrant green color, and add cream for extra richness.
Paneer Tikka
Marinated paneer cubes grilled to perfection—this dish is a party showstopper. Mix yogurt with spices, marinate the paneer, and grill or bake until charred. Serve with mint chutney for a flavor explosion.
Serving Idea: Turn it into a wrap or roll with some onions and sauces in a paratha.
Common Mistakes to Avoid
Even though making paneer is simple, a few missteps can ruin the batch. Let’s look at some of the most common mistakes people make and how to avoid them.
Overboiling the Milk
This is a big no-no. Boiling milk too long changes its composition and may affect how well it curdles. It can also lead to a rubbery texture in your paneer.
Fix: Heat until it just comes to a boil—look for those rising bubbles and switch to low flame immediately.
Not Using Enough Acid
Not adding enough lemon juice or vinegar can prevent the milk from curdling completely, leaving you with a poor yield or half-formed curds.
Fix: Start with two tablespoons and increase gradually until you see a clear separation of whey and curds.
Skipping the Rinse
Not rinsing the curds can leave your paneer with an unpleasant acidic taste.
Fix: Always rinse under cold water immediately after straining to neutralize any leftover acid.
Tips for Perfect Paneer Every Time
Want to impress friends or simply enjoy the perfect bite? These pro tips will help you get paneer that’s soft, tasty, and just right every single time.
Texture Perfection
- Use whole milk for creamy paneer.
- Don’t over-press it. Pressing for too long makes it dry.
- For a softer version, press for just 20-30 minutes.
Taste Tips
- Want to flavor your paneer? Add herbs like oregano, thyme, or green chilies to the milk just before adding the coagulant.
- Adding a pinch of salt before setting can make your paneer more flavorful from the inside out.
Serving Suggestions
- For appetizers: Cube it and sauté with spices for quick paneer bites.
- For salads: Crumble it and toss with veggies and lemon.
- For curries: Always soak in warm water before adding to the gravy to keep it moist.
Health Benefits of Paneer
Paneer isn’t just a tasty treat; it’s packed with nutrients that offer a host of health benefits. It’s especially useful for vegetarians who may lack sufficient protein in their diet.
Rich in Protein
Paneer is an excellent source of protein, making it great for muscle repair, tissue building, and overall body strength. Just 100 grams of paneer can provide around 18 grams of protein.
Great for Bone Health
It’s loaded with calcium and phosphorus—two nutrients essential for strong bones and teeth. This makes it particularly beneficial for children, pregnant women, and older adults.
Weight Management
Despite being rich, paneer is low in carbs and has healthy fats that can make you feel full longer. It helps reduce binge eating and supports weight loss goals when consumed in moderation.
Supports Digestive Health
The presence of good fats and proteins aids digestion and boosts metabolism. Plus, it’s easier to digest than some other dairy products.
FAQs about Homemade Paneer
Even after following the steps, you might still have questions. Let’s clear up some common doubts about making and using homemade paneer.
1. Can I use low-fat milk to make paneer?
Technically, yes—but don’t expect the same results. Paneer made from low-fat or skim milk turns out dry and crumbly. If you’re after rich, soft, and moist paneer, always go for full-fat or whole milk.
2. Why is my paneer too hard or rubbery?
There are a couple of reasons. Overboiling the milk or pressing the paneer for too long can squeeze out too much moisture, making it hard. Stick to the timing guidelines and avoid using too much weight while pressing.
3. How long does homemade paneer last?
When stored properly in the fridge, homemade paneer stays good for up to 3 days. If frozen, it can last 1 to 2 months, but it’s best consumed fresh for optimal taste and texture.
4. What can I do with the leftover whey?
Don’t toss it! Whey is loaded with nutrients. You can use it to knead dough for rotis, add it to soups, or even use it as a base for curries. It’s a great way to boost protein intake naturally.
5. Can I flavor the paneer while making it?
Absolutely. Add herbs, crushed pepper, or even sautéed garlic to the curds before pressing for flavored paneer. It gives a gourmet twist to your homemade cheese and works especially well in sandwiches and salads.
Conclusion
Making paneer at home isn’t just about saving money or eating fresh—it’s about rediscovering the joy of cooking something from scratch. With just two simple ingredients and a little time, you can create a versatile, healthy, and delicious dairy product that works for countless Indian dishes and global cuisines. From curries and snacks to salads and wraps, paneer is your blank culinary canvas.
And the best part? Once you make paneer at home, you’ll never want to go back to the store-bought version. It’s fresher, tastier, and absolutely rewarding.


