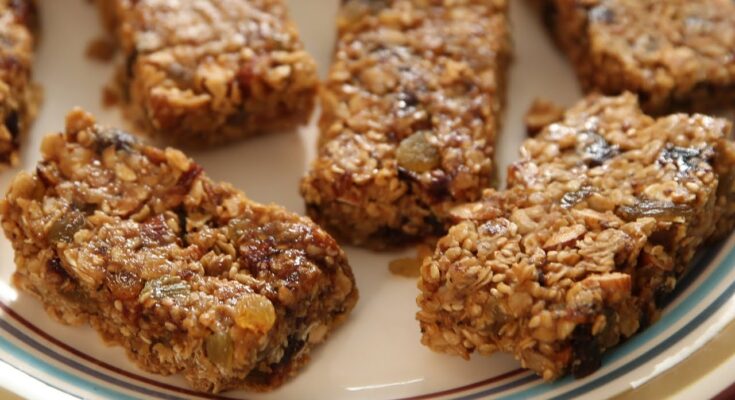
Granola Bars Recipe: Granola bars are more than just a snack—they’re the ultimate blend of convenience and nutrition. Whether you’re hiking, rushing to work, or just need a healthy pick-me-up between meals, granola bars deliver on all fronts. But here’s the thing—store-bought bars often come loaded with sugar, preservatives, and a list of ingredients you can’t pronounce. That’s why making your own at home is not only cost-effective but also better for your health.
When you make granola bars from scratch, you control what goes in. Want to add dried cranberries and pumpkin seeds? Go for it. Need to avoid nuts? No problem. You can even adjust the sweetness or texture to your liking. Think of it like building your own personal energy booster, tailored just for your taste buds and lifestyle.
Ingredients You’ll Need
Before diving into the process, let’s talk ingredients. A good granola bar starts with a simple base and offers plenty of room for creativity. Here’s what you’ll typically need:
Basic Ingredients:
- Rolled oats (2 cups): The heart of every granola bar.
- Nut butter (1/2 cup): Acts as a binder and adds creaminess—think peanut, almond, or cashew butter.
- Honey or maple syrup (1/2 cup): Natural sweeteners that help hold everything together.
- Chopped nuts (1/2 cup): Almonds, walnuts, pecans—pick your favorite.
- Dried fruits (1/3 cup): Raisins, cranberries, chopped apricots, or dates for natural sweetness.
Optional Add-ins for Customization:
- Chocolate chips or cacao nibs
- Shredded coconut
- Flax seeds, chia seeds, or hemp hearts
- Cinnamon or vanilla extract for flavor
All these elements can be mixed and matched based on your dietary needs or flavor preferences. The key is to keep the dry-to-wet ratio balanced to avoid a crumbly mess or overly sticky bars.
Essential Equipment
Making granola bars doesn’t require a fancy kitchen setup. But a few essentials will make your life easier and your bars perfect every time.
Tools You’ll Need:
- A large mixing bowl
- A small saucepan (for heating wet ingredients)
- A rubber spatula or wooden spoon
- A 9×9-inch baking dish or tray
- Parchment paper (for easy removal)
- A sharp knife (for clean cutting)
Prep Tips Before You Start:
- Line your baking dish with parchment paper with extra overhang—this makes removing the bars a breeze.
- Lightly grease the parchment with oil or non-stick spray to prevent sticking.
- Measure out all your ingredients in advance. Once the syrup is heated, things can move fast!
Step-by-Step Granola Bars Recipe
Let’s get down to business—the step-by-step process to make delicious, chewy, or crunchy granola bars at home. You can opt for a baked or no-bake version depending on your preference.
Step 1: Prepping the Ingredients
Start by pre-measuring and organizing your ingredients. Toast your oats and nuts in a dry pan or oven for about 8-10 minutes at 350°F for a deeper flavor. This step isn’t mandatory but adds a nice crunch and nuttiness.
Step 2: Mixing the Dry Ingredients
In a large bowl, combine:
- Rolled oats
- Toasted nuts
- Dried fruit
- Seeds or spices (if using)
Give everything a good mix so the flavors are evenly distributed. This also helps when it’s time to combine with the wet ingredients—less mixing means less breakage later.
Step 3: Preparing the Wet Mixture
In a small saucepan, add:
- Nut butter
- Honey or maple syrup
Heat over low-medium heat, stirring constantly, until everything is smooth and slightly bubbly. Add a splash of vanilla extract at this point if you like.
This mixture is what binds everything together, so make sure it’s not too runny or too thick. Think of it as a thick syrup—spreadable, but not watery.
Step 4: Combining Everything Together
Pour the hot syrup mixture over your dry ingredients. Use a spatula to mix until all the dry ingredients are coated evenly. This step can be a bit messy, but that’s part of the fun. If it seems too dry, add a little more syrup; too wet, toss in a few extra oats.
Once everything is combined, transfer the mixture to your prepared baking dish.
Step 5: Pressing into a Pan and Baking (or No-Bake Option)
Use the back of a spoon or a flat-bottomed glass to press the mixture firmly into the pan. Pressing hard is crucial—it helps the bars hold their shape.
For Baked Bars: Bake at 325°F (160°C) for 20-25 minutes until edges turn golden brown.
For No-Bake Bars: Skip the oven and chill the mixture in the fridge for at least 2 hours until firm.
Cooling, Cutting, and Storage Tips
Once your granola bars are baked or chilled, the next crucial steps are cooling, cutting, and storing them properly to maintain their texture and freshness.
Cooling:
- For Baked Bars: Allow the bars to cool in the pan for about 10-15 minutes. This initial cooling helps them set slightly, making them easier to handle.
- For No-Bake Bars: After chilling in the refrigerator for at least 2 hours, ensure the bars are firm to the touch before proceeding.
Cutting:
- Use the Right Tools: A sharp, serrated knife works best for cutting granola bars without crumbling.
- Cutting Technique: Remove the bars from the pan using the parchment paper overhang. Place them on a cutting board and slice into desired sizes. For uniformity, consider cutting into 12 equal bars or 16 smaller squares.
Storage:
- Room Temperature: Store the bars in an airtight container at room temperature for up to a week. Place parchment paper between layers to prevent sticking.
- Refrigeration: For longer freshness, refrigerate the bars in an airtight container for up to two weeks.
- Freezing: Granola bars freeze well. Wrap individual bars in parchment paper and place them in a freezer-safe bag or container. They can be frozen for up to 3 months. To eat, thaw at room temperature for about 20 minutes.
Proper cooling, cutting, and storage ensure your homemade granola bars remain delicious and ready to enjoy whenever you need a quick snack.
Tips to Customize Your Granola Bars
One of the joys of making granola bars at home is the ability to customize them to your taste preferences and dietary needs. Here are some ideas to inspire your creativity:
Flavor Variations:
- Chocolate Lovers: Add mini chocolate chips or drizzle melted dark chocolate over the cooled bars.
- Fruity Delight: Incorporate dried fruits like cranberries, raisins, chopped apricots, or dried blueberries for a sweet and tangy flavor.
- Nutty Crunch: Mix in chopped nuts such as almonds, walnuts, pecans, or cashews for added crunch and protein.
- Spice It Up: Add spices like cinnamon, nutmeg, or pumpkin spice to enhance the flavor profile.
Dietary Modifications:
- Vegan: Replace honey with maple syrup or agave nectar. Ensure that any chocolate used is dairy-free.
- Gluten-Free: Use certified gluten-free oats and ensure all other ingredients are gluten-free.
- Nut-Free: Substitute nut butter with seed butter like sunflower seed butter and omit any nuts, replacing them with seeds like pumpkin or sunflower seeds.
Texture Adjustments:
- Chewy Bars: Use more wet ingredients like nut butter and sweeteners to achieve a softer texture.
- Crunchy Bars: Bake the bars longer or add crispy elements like puffed rice cereal for added crunch.EatingWell
Add-Ins:
- Seeds: Incorporate chia seeds, flaxseeds, or hemp seeds for added nutrition.
- Coconut: Add shredded coconut for a tropical twist.
- Protein Boost: Mix in protein powder to increase the protein content, making the bars more filling.
Experimenting with different combinations allows you to create granola bars that are uniquely yours, catering to your taste and nutritional preferences.
Common Mistakes and How to Avoid Them
Even with a straightforward recipe, certain pitfalls can affect the outcome of your granola bars. Here’s how to avoid common mistakes:
Crumbly Texture:
- Insufficient Binding Agents: Ensure you’re using enough wet ingredients like honey or nut butter to bind the dry ingredients together.Love and Lemons
- Improper Pressing: Firmly press the mixture into the pan to compact it, which helps the bars hold their shape.
- Cutting Too Soon: Allow the bars to cool completely before cutting to prevent them from falling apart.
Too Sweet or Not Sweet Enough:
- Adjust Sweeteners: Taste the mixture before setting it to adjust the sweetness level. Remember that dried fruits add natural sweetness.
Sticky or Hard Texture:
- Overheating Syrup: Avoid boiling the honey or syrup mixture for too long, as it can harden upon cooling, making the bars too hard.
- Underheating Syrup: Ensure the syrup mixture is heated enough to blend smoothly with the dry ingredients, aiding in proper binding.
Uneven Cooking:
- Uniform Thickness: Spread the mixture evenly in the pan to ensure consistent cooking and texture throughout.
By being mindful of these common issues and their solutions, you can perfect your granola bar-making skills and enjoy consistently delicious results.
FAQs about Granola Bars Recipe
1. Are homemade granola bars healthier than store-bought ones?
Yes, homemade granola bars are often healthier because you control the ingredients. You can avoid excess sugar, preservatives, and artificial flavors commonly found in store-bought versions.
2. How do I make granola bars stick together?
The key is using a binding agent like honey, maple syrup, or nut butter. Pressing the mixture firmly into the pan and chilling it also helps the bars hold their shape.
3. Can I make granola bars without baking?
Absolutely! No-bake granola bars are easy to make. Just mix the ingredients, press into a pan, and refrigerate until set.
4. How long do homemade granola bars last?
Stored in an airtight container, they last up to 1 week at room temperature or 2–3 weeks in the refrigerator.
5. Can I freeze granola bars?
Yes, granola bars freeze well. Wrap them individually and store them in a freezer-safe container for up to 3 months.
6. What ingredients can I add to customize my granola bars?
You can mix in nuts, seeds, dried fruits, chocolate chips, coconut flakes, or spices like cinnamon for variety and flavor.
7. Are granola bars good for weight loss?
They can be, especially when made with wholesome ingredients and eaten in moderation. Opt for low-sugar, high-fiber recipes.
8. Can I make granola bars gluten-free or vegan?
Yes! Use gluten-free oats for gluten-free bars and replace honey with maple syrup or agave nectar for a vegan version.
9. Why are my granola bars falling apart?
This could be due to not using enough binding agent or not pressing the mixture firmly enough. Try increasing the sticky ingredients slightly.
10. Can kids eat homemade granola bars?
Definitely! Just be cautious with allergens like nuts and ensure the bars are soft enough for younger children to chew safely.
Conclusion
Don’t be afraid to experiment. Try seasonal flavors, add superfoods, or play with different sweeteners and textures. The control is all yours. Homemade granola bars aren’t just healthier than store-bought options—they’re also more rewarding. There’s nothing like the pride of enjoying a delicious snack you made from scratch.
So grab your oats, nut butter, and favorite mix-ins and get started. Trust me, once you taste your own homemade granola bars, you won’t go back to the store-bought kind.


