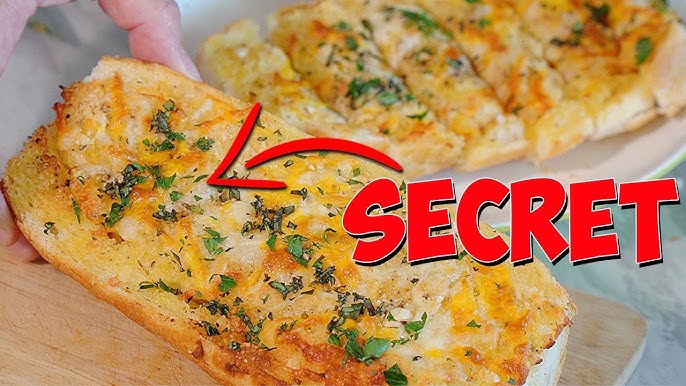
Cheesy Garlic Bread Recipe: Cheesy garlic bread isn’t just food—it’s comfort on a plate. Imagine biting into golden, crusty bread slathered with garlic butter and melted cheese. That savory, buttery, garlicky goodness hits you in all the right places. It’s the kind of snack or side that turns any meal into something special. From kids to adults, no one can resist that perfect crunch on the outside and gooey, cheesy middle. Whether it’s served with pasta, soup, or just on its own, it always disappears from the table first.
The magic lies in its simplicity. It’s not fancy, but it’s deeply satisfying. What makes it even better? You can whip it up in no time with ingredients you probably already have at home. It’s budget-friendly, easy to customize, and basically impossible to mess up.
The Perfect Side Dish or Appetizer
What’s a bowl of spaghetti without garlic bread? Or a hearty soup without something to dip? Cheesy garlic bread is that versatile companion that fits just about any main dish. It’s also a crowd-pleaser at parties, family dinners, or lazy weekends. Slice it into thick wedges for dinner, or cut it into bite-sized cubes for appetizers. You can serve it alongside meat, pasta, salad, or just enjoy it as a snack.
One of the best things? It transitions effortlessly from casual family meal to dinner party side dish. Add a little parsley or a drizzle of olive oil, and suddenly it looks gourmet. Plus, it’s the kind of food that brings people together, sparks conversations, and keeps everyone coming back for more.
Essential Ingredients for Cheesy Garlic Bread
Bread Selection – What Works Best?
Your choice of bread can make or break your garlic bread. While you can technically use any type of bread, some options truly elevate the experience. French baguette, Italian loaf, or ciabatta are top contenders. Why? They offer that crispy crust with a soft interior—ideal for soaking up all that garlic butter and supporting gooey cheese without getting soggy.
If you’re after a thick, hearty bite, go for a rustic sourdough or a thick-sliced Italian loaf. Want individual servings or sliders? Dinner rolls or mini buns work great. Just make sure whatever bread you choose has a decent crust and isn’t too soft—otherwise, it’ll turn mushy when you add the toppings.
Fresh bread is best, but if you’re using day-old bread, that’s okay too. In fact, slightly stale bread holds up better when buttered and baked, making it perfect for this recipe.
Types of Cheese for Maximum Flavor
Here’s where the magic really happens. The cheese you use will define your garlic bread. Mozzarella is the most popular choice—it’s stretchy, mild, and melts beautifully. But don’t stop there. Mixing in sharp cheddar, provolone, or parmesan adds depth and a little edge to the flavor profile.
Want a punch of flavor? Use aged cheeses like gouda or a sprinkle of blue cheese for a more gourmet twist. You can also use a blend of Italian cheeses like fontina, asiago, and Romano for that classic pizzeria taste.
Shred your cheese fresh if you can. Pre-shredded cheese often comes with anti-caking agents that affect melting and texture. The fresher, the better.
Garlic – Fresh vs. Powder
Garlic is non-negotiable in garlic bread (obviously). But should you use fresh garlic or garlic powder? The answer depends on what you’re after.
Fresh garlic gives you a bold, pungent flavor. Sautéed lightly in butter, it releases a rich aroma that’s hard to beat. Just mince it fine to spread evenly across the bread.
Garlic powder, on the other hand, is more subtle and easier to mix into spreads. It’s great if you’re in a hurry or want a smoother, more uniform flavor.
For best results? Use both. Start with fresh garlic for aroma and taste, and sprinkle in a dash of garlic powder to reinforce the flavor. It’s a double whammy your taste buds will thank you for.
Kitchen Tools You’ll Need
Basics That Make the Job Easier
Making cheesy garlic bread doesn’t require fancy gadgets, but a few basic kitchen tools can make the process smoother and more efficient.
Here’s what you’ll need:
- Baking sheet or tray: A sturdy, flat surface for baking.
- Mixing bowl: To mix the butter, garlic, and herbs.
- Spatula or butter knife: For spreading the garlic mixture.
- Grater: If you’re using block cheese.
- Foil or parchment paper: To line your baking tray and reduce mess.
- Oven or toaster oven: Essential for melting the cheese and crisping the bread.
Optional but helpful:
- Pastry brush: To evenly apply the garlic butter.
- Broiler setting: For an extra golden, bubbly cheese finish.
- Having these on hand keeps things quick and stress-free. Plus, clean-up becomes a breeze.
Step-by-Step Guide to Making Cheesy Garlic Bread
Step 1: Preparing the Garlic Butter Spread
This is where the flavor begins. Your garlic butter spread is the base that gives cheesy garlic bread its signature punch. Start by softening half a cup of unsalted butter—let it sit at room temperature for about 30 minutes. You want it spreadable, not melted.
Next, mince 3–4 cloves of fresh garlic. You can use more if you’re a garlic lover. Toss it into a bowl with the softened butter. Add a teaspoon of garlic powder for extra kick, a pinch of salt, and two tablespoons of freshly chopped parsley or dried Italian herbs. Want to get fancy? Add a dash of crushed red pepper flakes for a spicy twist or a squeeze of lemon for a zesty bite.
Mix everything together until it’s smooth and evenly combined. The key here is balance—you want every bite of bread to have a little bit of garlic, herbs, and buttery goodness. Set the mixture aside and resist the urge to eat it with a spoon (it’s tempting, trust me).
Step 2: Prepping the Bread
Now, grab your loaf of choice. Slice it in half lengthwise if it’s a baguette or Italian loaf. If you’re using rolls or smaller loaves, simply cut them open like you would a sandwich. Don’t slice all the way through if you want pull-apart style bread—just create deep pockets for the butter and cheese to snuggle into.
Place the bread cut-side up on a foil-lined baking tray. This not only keeps cleanup easy but also prevents any butter or cheese from dripping onto your oven floor and causing smoke. Give the bread a quick toast under the broiler for 1-2 minutes if you want extra crunch, but this is optional.
You’re now ready for the magic to happen.
Step 3: Assembling the Ingredients
Time to bring everything together. Using a butter knife or spatula, generously spread the garlic butter mixture over each slice of bread. Make sure it gets into all the nooks and crannies—that’s where the flavor hides.
Next comes the cheese. Sprinkle your chosen blend evenly over the buttered bread. Don’t be shy—load it up. The more cheese, the better. A mix of mozzarella for meltiness, cheddar for sharpness, and a sprinkle of parmesan for a salty finish works wonders.
Want to go gourmet? Add extras like crumbled bacon, sun-dried tomatoes, caramelized onions, or even jalapeños for heat. This is your bread, your rules.
Step 4: Baking to Perfection
Preheat your oven to 375°F (190°C). Slide the tray in and bake for about 10–15 minutes, or until the cheese is melted, bubbly, and starting to brown at the edges.
For that irresistible golden top, switch to broil for the last 1–2 minutes. Keep a close eye on it—cheese can go from perfectly golden to burnt in seconds.
Once it’s done, remove the tray and let the bread rest for a couple of minutes. This helps the cheese set slightly so it doesn’t slide right off when you cut it.
Step 5: Final Touches and Serving
Almost there! Before serving, sprinkle the bread with a little fresh parsley or basil for a pop of color and freshness. A drizzle of olive oil or a dash of chili flakes adds another flavor layer.
Slice the bread into thick strips or bite-sized chunks, depending on your occasion. Serve it hot, preferably straight from the oven. If you’re pairing it with a meal, consider pasta, soups, or grilled meats.
Cheesy garlic bread is best enjoyed fresh, but leftovers (if any) can be reheated in the oven for a few minutes to restore their crispy-cheesy glory.
Tips and Tricks for the Best Cheesy Garlic Bread
Avoiding Soggy Bread
Nobody likes soggy garlic bread. The trick to avoiding it is all in the prep. Toasting the bread lightly before adding the toppings can help create a barrier that keeps the inside fluffy and the outside crispy.
Use real butter—not margarine—and make sure your cheese isn’t too oily. Also, avoid overloading the bread with toppings that release too much moisture during baking.
Line your tray with foil or parchment and elevate the bread on a wire rack if possible. This allows airflow and helps everything crisp up evenly.
Enhancing Flavor Profiles
Want to level up your garlic bread? It’s all about layering flavors. Use roasted garlic for a sweeter, more complex flavor, or add a bit of lemon zest to your butter for freshness. A touch of smoked paprika can give it a warm, smoky edge.
Try flavored butters—like truffle, herb-infused, or even spicy sriracha butter. Add toppings like sautéed mushrooms, pepperoni slices, or roasted veggies for a loaded bread experience.
You can also experiment with dipping sauces: marinara, ranch, or garlic aioli all pair wonderfully.
FAQs about Cheesy Garlic Bread Recipe
1. What kind of cheese is best for garlic bread?
Mozzarella is the go-to cheese for that classic stretchy, melty goodness. You can also mix in parmesan for a sharp, salty bite or cheddar for bold flavor.
2. Can I use store-bought garlic butter?
Yes, absolutely! But making your own garlic butter with fresh garlic, parsley, and butter gives you better flavor and control over saltiness.
3. Can I make cheesy garlic bread ahead of time?
Definitely. Assemble the bread, wrap it tightly in foil, and refrigerate. When you’re ready, just pop it in the oven. It’s perfect for prepping before guests arrive!
4. Can I freeze cheesy garlic bread?
Yep! After assembling, wrap tightly in plastic wrap and foil. Freeze for up to 2 months. To bake, cook straight from frozen at 180°C (350°F) for 20–25 minutes.
5. What bread is best for cheesy garlic bread?
A crusty loaf like French bread or Italian ciabatta works best. You want something sturdy enough to hold all that cheese and garlic butter without going soggy.
6. How do I reheat cheesy garlic bread?
Wrap in foil and warm it in the oven at 160°C (320°F) for about 10 minutes. Skip the microwave—it’ll make it chewy, not crispy.
7. Can I make it without an oven?
Yes! You can use a stovetop skillet on low heat with a lid or even air-fry slices for a few minutes until the cheese melts and the edges crisp up.
Conclusion
There you have it—a step-by-step guide to making cheesy garlic bread that’s crispy, gooey, garlicky, and downright irresistible. Whether you’re whipping it up for a casual family dinner, serving it as an appetizer at your next get-together, or simply treating yourself on a cozy night in, this recipe never disappoints. It’s easy enough for beginners but flavorful enough to impress seasoned foodies.
The beauty of cheesy garlic bread lies in its adaptability. You can make it spicy, herby, meaty, or even vegan with just a few swaps. Plus, it’s one of those dishes that requires minimal effort but delivers maximum satisfaction. The crunchy crust, the warm, buttery inside, and that cheese pull—oh, that glorious cheese pull—make it a favorite in households everywhere.
So next time you’re wondering what to serve with your pasta or what quick snack to make that everyone will love, remember this recipe. It’s more than just bread. It’s a warm hug in food form.


